All,
It's 0645 on 1 Feb 1990, and CLA SOF's B Squadron has regrouped after its successful mission to destroy a radar site on the western end of the island, and enplaned in three CLA UH-60 Blackhawks, en route to seize a building in southern Havana, home of "Radio Cuba." B Sqdn will seize the radio station and begin broadcasting a pre-recorded message from the Cuban government in exile on a loop, to make the local population aware of this morning's momentous happenings.
Garrisoning the area are troops of the regime's 2nd Airborne Company, 1st Airborne Battalion, "Castro's Bodyguard." They are elite paratroopers and extremely loyal to the Castro brothers. Equally nefariously, nearby is a contingent of Iranian Revolutionary Guards (IRGC); the Castro regime is not doing well economically, particularly as the Soviet Union has begun drawing down support as it nears its own collapse, and so Cuba sought friends wherever it could find them. As avowed enemies of the United States, it was seemingly natural that Cuba and Iran become allies. This involvement by the IRGC in the CLA's fight for liberation would set the stage for decades of enmity between the new Cuba and Iran.
Back in the here and now, there is a big problem: A Squadron was not successful in knocking out a nearby regime SAM site, and as the three-ship formation nears Havana, a missile rises from the jungle below and destroys one of the CLA helicopters!
So far we've had:
1) B Squadron SOF destroyed a radar site in support of amphibious landings at Playa Colorada (5). B Sqdn then egressed and linked up with CLA rotary wing assets for their follow-on mission in Havana (6).
2) C Squadron SOF destroyed a the Cuban military's communications center.
3) 1st Para Battalion dropped in and seized a bridge to screen the landings at Playa Colorada (5).
4) 2nd Para battalion dropped in and eliminated a Castro-regime garrison to screen the landings at the Bay of Pigs (just west of (4).
5) 1st Marine Company, 3rd Infantry Battalion, made an amphibious assault at Playa Colorada.
6) A Squadron SOF attacked a Castro-regime SAM site near Havana, which failed to clear the way for B Squadron's helo assault into Havana.
7) 2nd Marine Company, 6th Infantry Battalion, landed at the Bay of Pigs then turned east and ran into a strong enemy force, which it handily defeated.
8) B Company of the UWG pursued and destroyed an enemy garrison in the Escambray Mountains.
9) B Squadron SOF conducted an aerial insertion into Havana to seize a radio station and broadcast news of the invasion.
The opposing forces, with Castro-loyalists on the left and CLA SOF on the right. The CLA forces are outnumbered due to losing a number of their men to the SAM battery A Squadron failed to knock out.
 Commander, B Squadron: Captain Villanueva
The CLA force, with a Command Stand, five Special Operations rifle teams, an LMG team, a SMAW team, and a single leader figure representing...
 CLA Special Operations, Commanding Officer: Colonel Donalo Quilveras
The CLA force is split into two groups ("sticks"), one for each of the remaining helicopters.The enemy force: the enemy has two Command Stands, eight rifle teams, and an 82mm mortar team. Four rifle teams and the mortar are Castro's Bodyguards, while the other four rifle teams are IRGC.
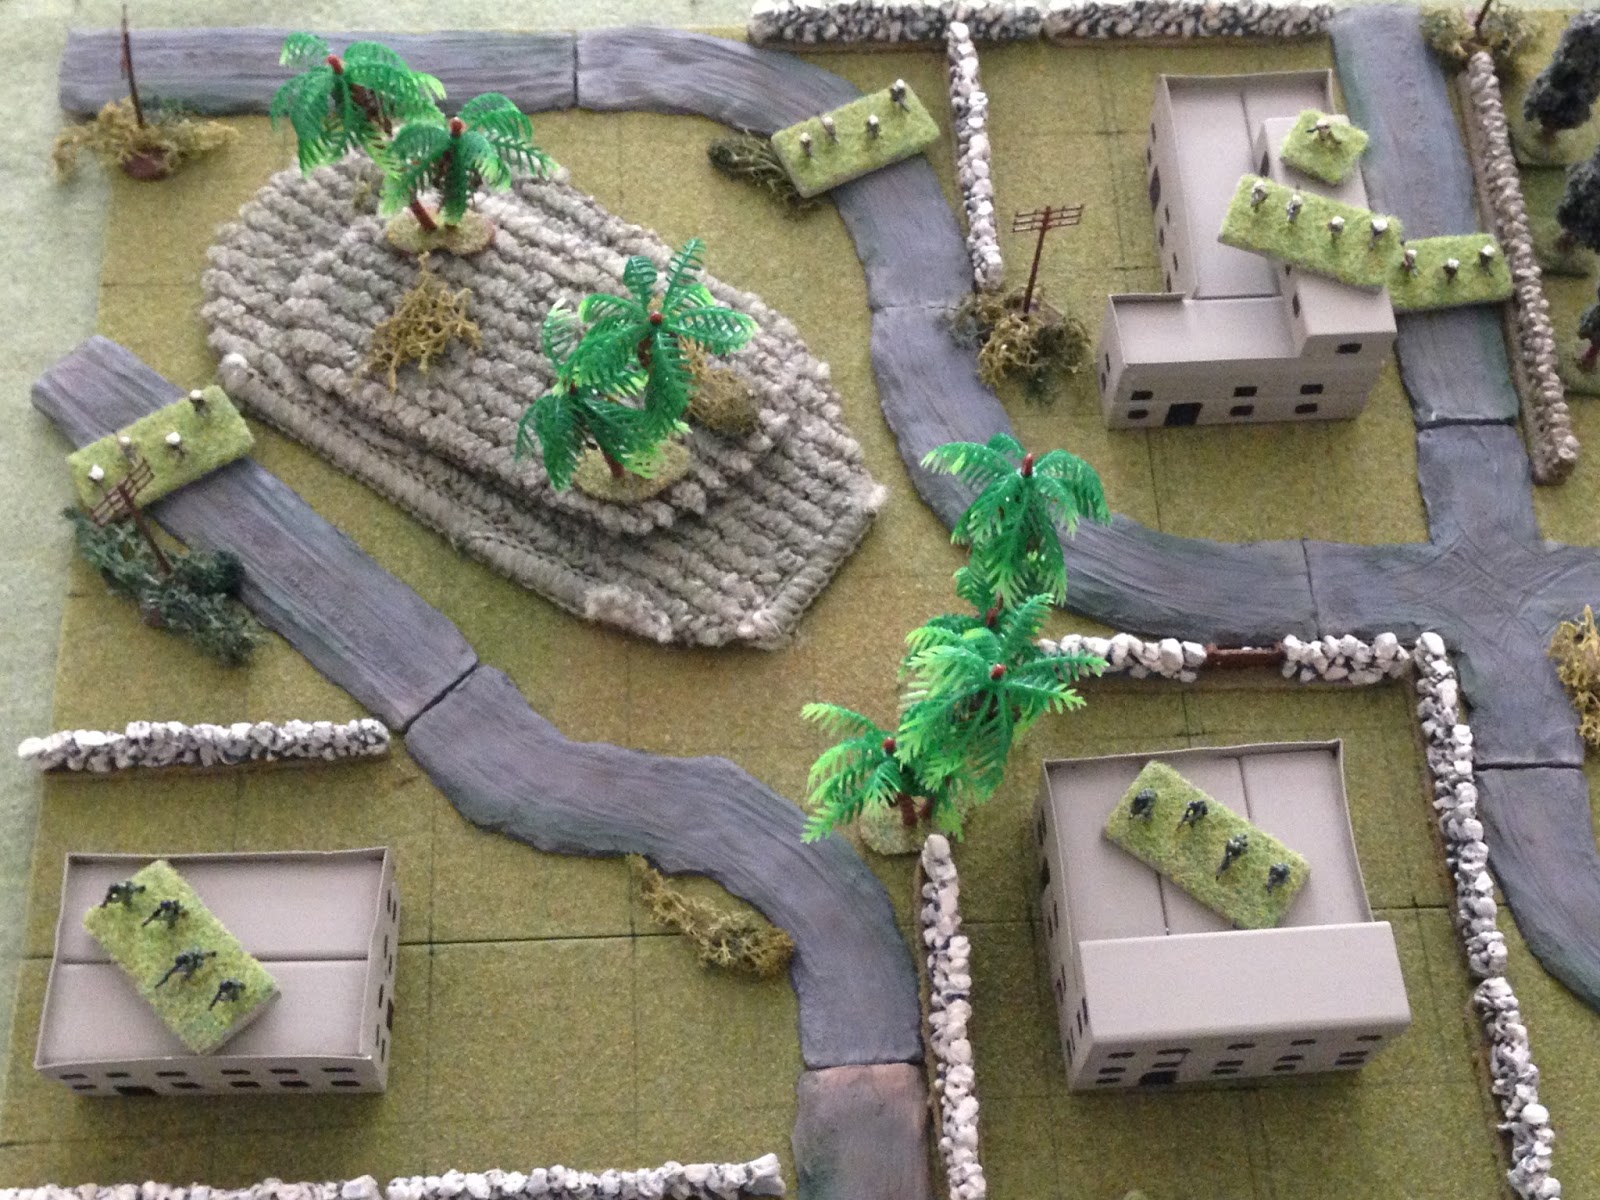
Overview of the map, north is up. The target building is at far right. The CLA forces are not on the board as they will enter via helo, what you see are regime paratroopers and IRGC teams spread out.
The northwest: those are IRGC along the top edge, with Castro's paratroopers on the bottom edge.
Northeast: you can see IRGC at top left, Castro troops along the bottom. There is a park at top right, and the target building at bottom right. The enemy has a Command Stand and their mortar at the target building.
The southeast: target building at top right.
Southwest, showing three enemy paratrooper teams.
The CLA helos enter, heading east, one behind the other, having just lost Helo 3...
When another surface to air missile rises from the SAM battery!
Helo 2 is struck, and crash lands in the park, right between the IRGC (left) and target building (bottom right).
"Holy Crap, they got Helo 2! Man, they're swarming below us!" It seems the enemy Airborne troops at the SAM battery were able to warn their compatriots in Havana.
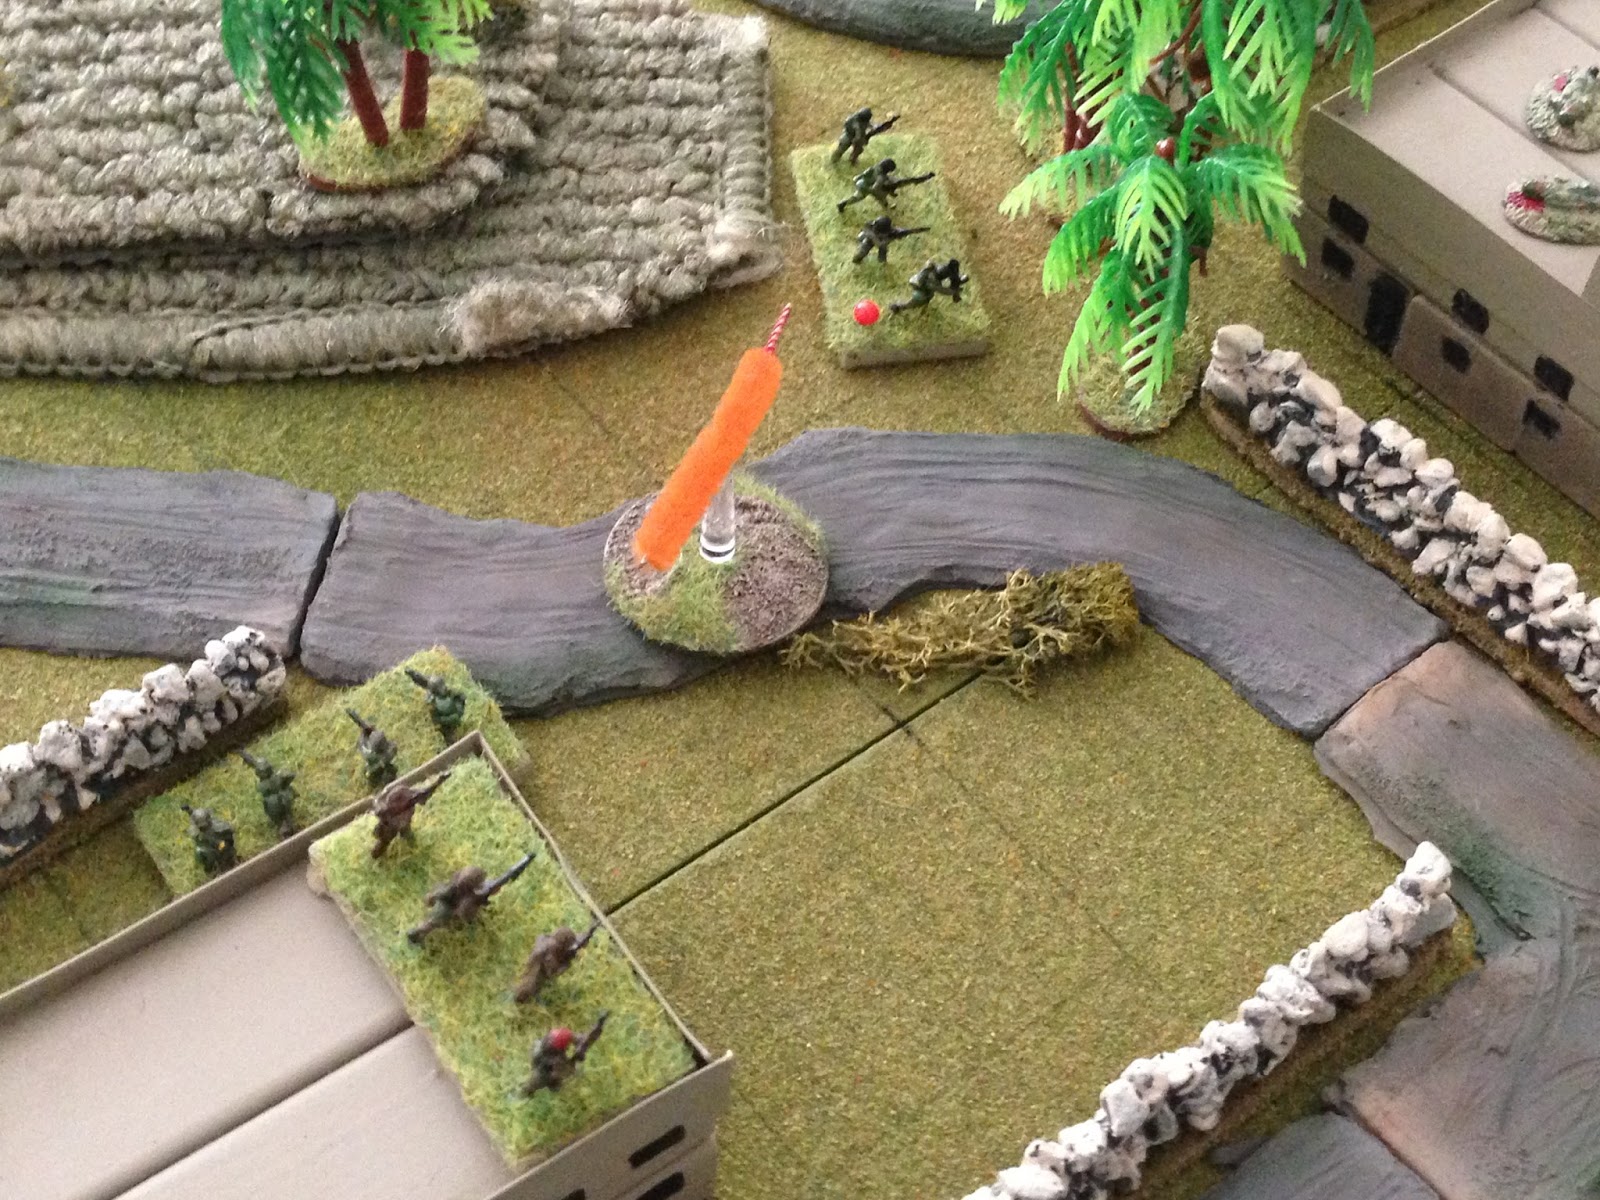
Helo 1 diverts slightly south and flares into a hover...
Stick 1, consisting of Captain Stelosavo and teams 1, 2, and 3, debark.
Helo 1 departs (CLA SOF at bottom right).
In the park, Stick 2 pulls itself out of Helo 2. Stick 2 is Colonel Quilveras, teams 4 and 5, the LMG team, and the SMAW team. The target building is at bottom right.
While the enemy was alerted to trouble, they weren't expecting this. In the south, Stick 1 (bottom center to right) spreads out towards the target building (top right), while enemy forces react by taking up positions (top center to top left).
Stick 2 (top right) moves south, getting the SMAW into the street and Tm 5 into the compund (center, just right of the wall), while the Colonel leads Tm 4 and the LMG team into the target building (far right). The enemy CO falls back with a rifle team and the mortar (bottom right). The IRGC troops consolidate at top left, and move a team into the park (top right).
Close up of the target building, with the Colonel, LMG team, and Tm 4 in the building, the SMAW above in the street, Tm 5 to the left, and the enemy CO, mortar, and rifle team at bottom right.
The LMG team fires ineffectually at the IRGC in the park.
Who then knocks out the SMAW team. That really sucks, as the SMAW would be very useful with all these heavy buildings around...
Tm 5, just outside the target building, fires on some advancing IRGC, getting 'men down.' Their CO comes down to them and tries to rally them, but they stay 'men down.'
The enemy Abn CO leads a team back into the radio station (target building), but Tm 4 snap fires...
Knocking the enemy rifle team out, and their CO falls back to the mortar team. Should be ripe for the plucking.
The enemy in the central building (the post office) fire on Tm 2...
Tm 2 is eliminated (center, with CO and Tm 1 at top right); Tm 3 (bottom right) returns fire to no effect.
Captain Stelosavo and Tm 1 charge the enemy Airborne Co and mortar team (just below the radio station)...
Knocking them both out easily.
The CO then leads Tm 1 (center) south towards the post office (bottom left). That's Tm 5 at top center. Things are looking good.
Tm 5 (bottom center right) wants to close assault the 'men down' IRGC team at far left, but is worried about react fire from the IRGC team in the building at top left, so the LMG team (far right, on radio station) opens up on them...
Forcing them back (far left). We are sooooo money.
Tm 5 rushes out, charging into close combat with the IRGC rifle team and their CO. Tm 5 easily puts them out of the fight, and now sets its sights on the hunkering IRGC team (off camera to top left) that just got knocked off the building by the LMG team...
Tm 5 (center, with IRGC rifle and CO casualties just to the right on the road, hunkered IRGC team they're targeting at top center, with red bead), but another IRGC team (bottom center) guard fires and pins them there in the road.
DAMMMMMMMIIIIIIITTTTT!!!!!
Then the IRGC team in the park fires an RPG at the radio station...
Which puts heavy casualties on Tm 4 (top left), and forces the LMG team to fall back and hunker (bottom right).
DAAAAMMMMIIIIITTT again!!!! Things were looking up, now I've got no effectives in the radio station, Tm5 is pinned in the middle of the street just north of the Post Office, and Stick 1 has lost a team in the south.
The IRGC team (bottom center) that halted Tm 5 (center) with react fire opens up again, getting heavy casualties on them. Uh-oh, they are dead meat for a close assault...
An enemy airborne team moves up (bottom left) and fires on Tm 3 (far right, in a real estate office)...
Forcing them to fall back and hunker (enemy team that shot at top left, Tm3 at bottom center, having ran out of the real estate office). Things are falling apart here...
Enemy in the post office fire on Tm 1 and the CO, missing.
So Tm 1 returns fire, but misses too...
The Colonel tries to rally Tm 4, but they've taken too many casualties and he orders them to get their wounded below.
The Colonel then rallies the LMG (far right), and they get the gun going on the Post Office (bottom left), but hit not a damn thing...
Tm 1 fires on the Post Office, pinning a team there. Now I just need to get close assault them...
Tm 3, recently of the real estate office (bottom left), tries to rally and fails, falling back even further (bottom right). Perfect...
Tm 5 manages to rally and fire on the IRGC team that's been sticking it to them...
And the Iranians are forced to fall back (bottom left, from white puff at bottom right).
The enemy team at bottom left wants to cross the street, but they're worried about guard fire from Tm 1 (top center), so they lay smoke (random event)...
Then dash across the street and fire on Tm 1, but miss.
In the Post Office (far left), an enemy team moves over and rallies the pinned team, then fires on Tm 1, getting heavy casualties (center, radio station at far right). The LMG team (in Radio Station) returns fire, hits nothing (again)... Captain Stelosavo tries to rally Tm 1, but they remain 'men down.'
The LMG team (far right, in Radio Station) throws in a new belt, then really lets the Post Office (far left) have it...
Getting 'men down' on one team, and forcing the other team to fall back and hunker (far left). They are both easy pickins', as are two IRGC teams that are hunkering, but I can't seem to get my men moving to clean them up!
Tm 5 moves south into the Post Office, charging the beat up enemy team there. If everything goes my way, Tm 5 will win this, then move to the enemy team at bottom left, whoop them, then move to an IRGC team off camera to left, and whoop them, which will pretty much seal the deal for this mission...
Tm 5 wins in the Post Office, then moves down to the hunkering enemy Airborne team...
Who promptly fight Tm 5 to a draw, forcing them to fall back into the Post Office, pinned. Fighting to a draw also auto-rallied the enemy team.
SHOOT ME!!!
Tm 3 rallies itself (bottom center, with Co and Tm 1 at top center) and begins moving back towards the Real Estate Office.
Captain Stelosavo tries to rally Tm 1 (bottom center), but they've taken too many casualties and he orders them to get their casualties to the Radio Station, they're done (that's twice I tried to rally 'men down' and lost a team!). The Captain then moved into the Post Office with Tm 5 (top left).
The enemy Paratroopers, "Castro's Bodyguard," are, admittedly, fanatical, but the one at far left is pure crazy! They decide they want to charge Tm 5 and the CO in the Post Office (top center), but they're worried about Guard Fire from Tm 3 (far right), so they pop smoke (center, another random event) to cover their charge...
And sprint into the Post Office. Tm 5 can't snap fire because they're pinned. It's to bayonets, pistols, grenades, and fisticuffs...
Tm 5 and Captain Stelosavo's command team are knocked out!
YOU GOTTA BE @#$% KIDDING ME!!!
The enemy team near the Real Estate Office moves into the building and fires on Tm 3, which should be dead meat...
But not only does Tm 3 (far right) shake off the small arms fire, they return fire and force the enemy paratroopers to fall back and hunker. Now I just need to get to them; how many times have I said that?
Then fate smiles on the CLA. Everyone's face turns skyward at the sound of helicopter rotor blades beating the air...
It's Helo 1, returned with reinforcements! Helo 1 returned to the site of Helo 3's crash, and was able to locate two teams worth of survivors (this was a 'Reinforcements' random event, of course). The helo flares...
And two teams, R1 and R2, fast rope down on the far eastern side of the board. That's an IRGC team hunkering at top center.
R2 opens fire on the IRGC team, missing...
And R1 (bottom left) fires on the enemy paratrooper team in the Post Office (top right, the one that just smoked Tm 5 and Captain Stelosavo), and misses...
Tm 3 (bottom right, near the Real Estate Office) fires on the Post Office (top left)...
Forcing the enemy to fall back (top left, red bead).
The LMG team (top right, in Radio Station) fires on the recently hunkered team (bottom left), but can't get a good shot.
The regime forces catch a break and begin rallying their men, successful with two teams (far left and bottom right)...
the IRGC team in the west only gets up to pinned (R1 and 2 at bottom center)...
And the hunkering IRGC team at top left fails and runs off the map. He;s been there all game, unable to rally. It really hurt the enemy, and was a huge stroke of luck for me, that I was able to overrun both their Command Stands very early in the fight.
The IRGC still has a team (bottom right) in the park, very near the Radio Station (off camera at bottom).
R2 opens up on the IRGC team in the west the one that just rallied up to pin...
And puts them out of the fight.
The LMG team (far right, at Radio Station) opens up on the enemy team behind the Post Office (far left)...
The ferocious machine gun fire forces the enemy team to fall back (red bead at top right, that's the Post Office at top right, with the LMG/Radio Station off camera to right). The enemy falls back, right into the guns of R1 and 2 (bottom left)...
And they are gunned down.
Things are now firmly going our way, and there's no stopping the momentum: R1 (top left) then fires on the enemy paratrooper team that just rallied behind the Real Estate Office (bottom right, in the south)...
The intense fire forces them to flee to the east side of the Real Estate Office, right into the hands of Tm 3. The enemy is down to one team.
R1 and R2 sprint east towards the Radio Station (Post Office at bottom center)...
R1 and 2 enter the park (top center and top right), while the Colonel gets the LMG team re-positioned (top left, in Radio Station). The Revolutionary Guards surrender...
R1 and 2, with the Colonel and the LMG team, consolidate their position at the Radio Station, which is also serving as their casualty clearing station. Colonel Quilveras personally begins the taped transmission, Mission Success!
I'm exhausted, that fight took it out of me! What a mess, with ridiculous swings of fortune and pure luck. What a game! ;) It was really nuts, and there were so many missed opportunities. But with that, it was pure luck that I bagged both enemy COs right off the bat, and if they'd had those guys they'd have been able to rally all those 'men down/hunkered' teams and surely kicked me ass. But they didn't, so I was whoopin'em, but then they went on a ridiculous streak with the firing dice, putting guys out left and right (and then me failing 'men down' rallies), but then I got the reinforcements random event. I was hoping to get two more games in, but this one went on for so long I just go the one in, but it was definitely worth it.
The real worry is that this is a Pyrrhic victory; B Squadron was bled dry, to include losing their Commanding Officer, Captain Stelosavo. So unless they receive reinforcements immediately, there's no way they'll stand up to the inevitable counterattacks.
Captain Stelosavo was decorated for bravery, and was wounded and out for the remainder of the Liberation campaign. Sergeant Estevez is now leading B Squadron.
Sgt Perez, Team 5's Sergeant, was decorated for bravery posthumously with the Estrella de Bronce and Corazon Purpura.


That's all of the batreps so far, let's see what I can get done this coming weekend.
V/R,
Jack


Surprised no-one commented about this. The game certainly was a wild swing of dice on both sides, I am sure this would have been a second loss for the CLA, until you "rolled" a random reinforcement event. Very bloody and a great read. I really think the Cuban defence force deserved to win this one, but the dice swung so wildly, I am OK they did not (not that you may care or not whether I am OK with the win or loss!).
ReplyDeleteYeah man, I don't know if it came through in the reading, but from my standpoint it was a damn barn-burner! Constant swings back and forth, couldn't tell what the hell was going to happen. And for the record, the regime forces never deserve to win ;)
DeleteV/R,
Jack