All,
It's 1230 on 1 Feb 1990, and Golf Company, 2nd Airborne Infantry Battalion is manning a roadblock (14) to prevent the enemy garrison at Cienfuegos from attacking the Bay of Pigs landing site (4). 2nd Airborne Battalion had jumped in earlier this morning and defeated an enemy outpost (4), but now armored elements of the Castro-regime's 6th Armored Battalion have mobilized and departed Cienfuegos for the Bay of Pigs. The Cuban Army under Castro has experienced serious cutbacks to the military in recent years, and the 6th Armored Battalion is understrength and fielding WWII-era T-34 tanks.
So far we've had:
1) B Squadron SOF destroyed a radar site in support of amphibious landings at Playa Colorada (5). B Sqdn then egressed and linked up with CLA rotary wing assets for their follow-on mission in Havana (6).
2) C Squadron SOF destroyed a the Cuban military's communications center.
3) 1st Para Battalion dropped in and seized a bridge to screen the landings at Playa Colorada (5).
4) 2nd Para battalion dropped in and eliminated a Castro-regime garrison to screen the landings at the Bay of Pigs (just west of (4).
5) 1st Marine Company, 3rd Infantry Battalion, made an amphibious assault at Playa Colorada.
6) A Squadron SOF attacked a Castro-regime SAM site near Havana, which failed to clear the way for B Squadron's helo assault into Havana.
7) 2nd Marine Company, 6th Infantry Battalion, landed at the Bay of Pigs then turned east and ran into a strong enemy force, which it handily defeated.
8) B Company of the UWG pursued and destroyed an enemy garrison in the Escambray Mountains.
9) B Squadron SOF conducted an aerial insertion into Havana to seize a radio station and broadcast news of the invasion.
10) 10th Popular Force Battalion seized and destroyed the Pedroso bridge to protect the Bay of Pigs landing site from the Matanzas garrison.
11) 1st Airborne Infantry Battalion successfully fought off a regime counterattack near the bridge at Sandino, protecting the western (Playa Colorada) landing site from the Pinar del Rio garrison.
12) 6th Infantry Battalion fought through an enemy ambush while pushing inland from the Bay of Pigs landing site.
13) 8th Popular Force Battalion ambushed a mechanized column of the enemy 2nd Armored Battalion, just west of Havana.
14) 2nd Airborne Battalion engaged enemy armored forces of the 6th Armored Battalion in the village of El Rincon, en route to the Bay of Pigs landing site.
The opposing forces, with regime troops on the left and CLA troops on the right. The CLA force is made up of Pendraken Brits from the Falklands range, while the Castro-force is made up of Minifigs Warsaw Pact and Arab modern troops, and plastic Takara T-34s.
 Leading the fight for the CLA: Commander, G Co, 2nd AB Inf Bn: Captain Cuervesco. He would have a helluva day.
The CLA force has a Command Stand, seven parachute rifle teams, two MILAN ATGM teams, and a single leader figure (though he's not in the photo of above for some reason) representing...
 2nd Airborne Infantry Battalion, Commanding Officer: Colonel Salvino Carreno. Col Carreno was wounded in the earlier battle for El Rincon immediately following the drop, but he's still in the fight.
The regime force has a Command Stand, seven rifle teams, and two aging, but deadly, T-34 tanks. Well, deadly until they run across modern ATGMs, anyway...
Ivan, if you're watching, these are the troops I painted up in the olive and yellow camo, a la the original Red Dawn ;)
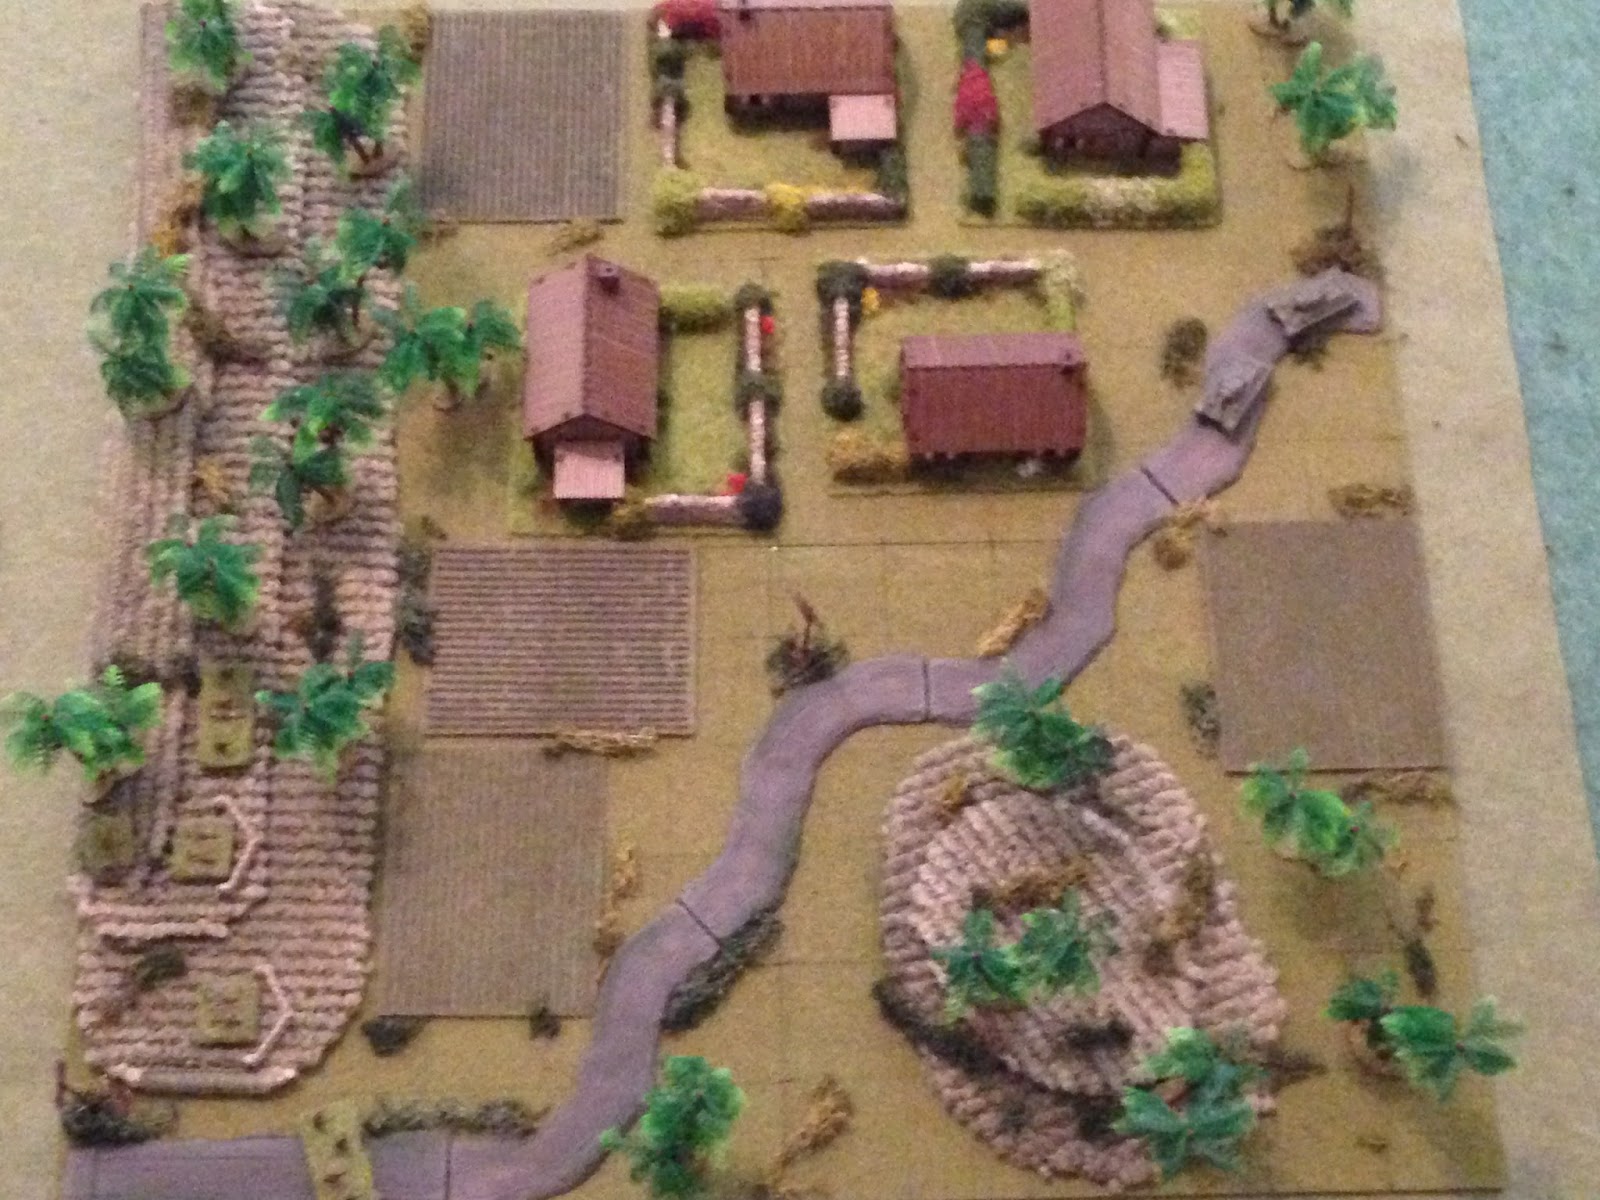
Overview of the map, north is up. The CLA force is dug in at far left, primarily in the bottom left corner, where Colonel Carreno, two rifle teams, and both MILANs are dug in to take on enemy armor. The regime forces are entering via the road at top right. At bottom center right is Hill 29, while at top center is the village of El Rincon.
The CLA blocking force in the southwest. You can see the MILANs dug in, ready to receive the enemy.
The Company Commander, Captain Cuervesco, is with Colonel Carreno, watching the enemy tanks approach, when they halt. "What the hell?" A local villager slowly approaches the enemy armored column.
The villager steals closer to the tank, and the tank commander pops out of the turret. "Hey, he's pointing at us!" The villager points at the CLA roadblock, and the tank commander's eyes follow the villagers outstretched arm. He promptly shouts orders into his radio...
Then ducks back into his vehicle as the villager runs back to his home.
The enemy infantry de-buss (from trucks just off table): two rifle teams dart south towards Hill 29...
While the enemy CO leads five more teams into the village.
Colonel Carreno and Captain Cuervesco simultaneously realize what's happening, and they know what must be done. Colonel Carreno yells, "You go, I'll stay here to hold the road. Hurry!" And with that, Captain Cuervesco grabs the local reserve, five rifle teams, and begins leading them into the village to counter the enemy's approach there.
With a simple, opposed die roll, the game begins, and the regime forces are up first. Let's get it on!
An enemy tank moves forward, and a MILAN team on the west ridge looses a missile to the practically prehistoric armored vehicle...
The missile strikes, immobilizing the vehicle, and the crew abandons ship.
The remaining T-34 fires at the dug-in paras, to no effect.
And the other MILAN crew returns fire...
Blowing the enemy tank straight to hell!
Well, that made unexpectedly quick work of the enemy armor. The dice are with me so far (both missile shots were 'Guard Fire,' so not as many dice as normal)!
The enemy CO leads a rifle team forward (bottom right), and they open up on Team 2 in the village (top left)...
Tm 2 takes casualties (white bead at top right), while Tm3 (red bead, top left) falls back and cowers).
Team 1 moves up (top right), Team 4 moves up (bottom right), Team 5 moves to Team 2 (top left, white bead), but can't help them rally. Captain Cuervesco falls back (far left) and rallies Team 3, who moves up (center).
The enemy responds aggressively in the north, flooding troops into the village.
In the south, the MILANs stay in place (bottom left), while Team 6 moves to the south side of the village (top center) and Colonel Carreno leads Team 7 towards Hill 29 (center right).
An enemy team moves further up Hill 29 (top left), while the dismounted tank crew moves off board (far right).
Back in the ville, an enemy team moves up and fires on Team 1...
Team 1 is put out of the fight, while Team 4 (bottom left, yellow bead) is pinned. This is not good; a team is down and another is very vulnerable to enemy close assault.
The enemy team that hit Team 1 moves into their house. The enemy commander gets a bit conservative; he wants to get into close combat with Team 4 (center left, yellow bead), but he wants to try to eliminate the CLA's ability to Guard Fire and halt the team from closing with Team 4. So the enemy CO has a rifle team move up (far right) and fire on Team 3 (far left), pinning them. So it worked there (pinned teams can't react fire).
The way is pretty much clear, but the enemy CO is still feeling a bit timid. He could fire on Team 5 (off camera to left), hoping to take away their ability to react fire, but he doesn't really want to get into close combat, so decides to have a team fire on Team 4, hoping to knock them out at close range instead of having to lay it on the line in close combat, but there's no effect (a second pin).
The enemy CO begrudgingly leads his rifle team into close assault with Team 4...
But Team 5 (top left) react fire...
And the enemy CO's worst fear occurs: the rifle team he was leading forward takes heavy casualties and is halted in the open!
I'd say the dice are with me, but you ain't seen nothin' yet!
Off camera to left, Team 2 finally rallies, then Team 5 (top left) opens up...
The enemy team is knocked out, and Team 5 rushes into the house (far left, now with two casualty figures in there, one for the team Tm 5 just hit, and one for the CLA Tm 1), while another enemy team is forced to fall back (top right, red bead). The enemy CO is at bottom center with the 'men down' team, and another rifle team just to his rear (right).
Team 2 (top left) moves up and draws enemy Guard fire...
Which misses, allowing Team 2 to get to cover at the edge of the village (top left), where they return fire, causing heavy casualties (far right, white bead). The enemy now has two rifle teams very vulnerable due to heavy casualties, and another at the edge of the village hunkering.
At far left, Captain Cuervesco is able to come down the ridge and rally Team 3, and it's all over but the cryin'... You will likely not believe the extraordinary luck that follows, but Captain Cuervesco is about to win his nation's highest award for valor.
At left, Captain Cuervesco leads Team 3 into close combat. The enemy CO has a decision to make: stay and throw in with the stricken team in an attempt to try to halt the CLA paratroopers' momentum, or fall back to save his own skin; he chooses the latter (far right).
Captain Cuervesco and Team 3 put the enemy out of their misery (casualty figure at bottom left), then charge the next enemy team (center). Again the enemy CO has the exact same choice to make, and again he decides to fall back (top right).
Captain Cuervesco and Team 3 put another team out of the fight (bottom left, casualty figure), then charge ahead to the next enemy rife team. The enemy CO ONCE AGAIN decides to fall back (top center)...
Captain Cuervesco and Team 3 put a third enemy rifle team out of the fight in close combat, then, with blood in their eyes, charge the last enemy rifle team in the north. With nowhere left to run, the enemy CO shrilly screams, "fire, fire you imbeciles, halt these devils!" The last enemy rifle team Snap Fires...
And HOLY @#$%, Team 3 takes heavy casualties!!!
Please note that Captain Cuervesco's charge so far has not been all that amazing; that is, he charged three enemy rifle teams and won, but because they were all in bad morale states (two were 'men down' and one was 'hunkered'), none could react fire, and the bad morale state made the close combat almost a foregone conclusion in favor of the good Captain.
But then the CO runs into an enemy unit in good shape, and they Snap Fire, rolling one D6, and put heavy casualties on Team 3, who is now extremely vulnerable to the enemy coming out and doing to them what they did to the three previous enemy teams...
But the enemy starts his turn in the south, with a rifle team atop Hill 29 (top right) firing on Team 6 (far left), at the southern edge of the village...
Team 6 is forced to fall back and hunker (far left, red bead, from white puff at right).
But then we're right back in the thick of it in the north, where the enemy Commanding Officer leads his last rifle team (in the north) forward into close combat with Team 3, who is unable to react fire and is at severe disadvantage due to dealing with heavy casualties (white bead).
Unlike his counterpart, Captain Cuervesco knows exactly what he must do, and so he hops into the middle of this very precarious situation, almost certain to lead to his own demise...
But there we go: red is for Commies, so you can see which way the fight went. Unbelievable!
The victorious Captain Cuervesco and Team 3, in the wake of knocking out the enemy's Command Section and four rifle teams in close combat.
Please forgive the photo, I'm not sure why the flash came on, but it makes this look like a damned night fight and someone popped a flare... In any case, what you'r looking at is Colonel Carreno and Team 7 capturing the two enemy rifle teams at Hill 29, who had no fight left in them after watching what Captain Cuervesco did to their comrades in the village.
Well, sure it ended up being a push over, but still, what a damned fight! Captain Cuervesco will forever after be known as "El Diablo de El Rincon." Or something like that, I don't speak Spanish ;)
Captain Cuervesco, Commanding Officer of G Company, 2nd Airborne Battalion, is awarded the "Medall de Honor," the CLA's highest award for valor. Sergeant Trojas, Team 3, G Company, 2nd Airborne Battalion, is awarded the "Cruz Servicio Distinguido," the second highest award for gallantry.
Casualties:
CLA: ~10 KIA/WIA
Regime: ~35 KIA/WIA, two knocked out tanks (T-34s), and ~10 POWs
Well, once again a fight goes nothing like I expected, but I still had a good time, and it's another game down in the overall campaign, of which we are now 14 fights into. Not bad, if I do say so myself. And quite your whining, Rod ;)
There are a total of 18 fights scheduled just for the first day of the invasion, but things will seriously slow down down after that, which is to say there will be much fewer fights per day. I have not decided on how many days this will go on for, nor how many fights the overall campaign will be. I imagine it will go on for as many fights as I can keep it fresh for, as many days as I can maintain interest for before some other project captures my imagination.
In the immediate future, I can see having only a couple fights on D+1 as the lines start to stabilize with the regime regaining its balance and the CLA consolidating. After that we should see two or three fights per day, with CLA units 'blending' together, i.e., a fight in Havana with parts of 1st Airborne Bn, 8th Popular Force Bn, and 5th Armored Bn all in the same fight, for example.
I will say that I've got four F-4s and four MiG-21s ready to go for some air combat in support of this campaign, and I've begun painting Napoleonics for Command and Colors. Stay tuned.
V/R,
Jack


Awesome Batrep Jac,. Where do those lovely houses come from?
ReplyDeleteBTW, I wanted to ask you about what rules you're using for barbwire in company command since I saw them in past reports.
Cheers,
Javier,
DeleteSorry, I just saw this, and I also answered on TMP. The houses are laser cut MDF, maybe from 4Ground, but I'm not sure because I bought them off Ebay.
Regarding the barbed wire, it stops infantry, then in the next turn they can move through it. I think it does a good job in terms of holding troops up for a turn out in the open.
V/R,
Jack
So barbwire would be as a any linear obstacle.
DeleteThanks man, and keep posting these fantastic BATREPs, they keep my hobby juices flowing.
Javier,
DeleteYes, barbed wire is treated as a linear obstacle in the rules, but I don't really treat most other terrain as obstacles. I like to keep the game moving, and to do that I keep the table pretty open (in terms of terrain that affects movement).
I just saw your two batreps, I'll comment on your blog.
V/R,
Jack
Blimey!
ReplyDeleteThings are really hotting up in Cuba!
Love the terrain, figures and report....good stuff!
Jim,
DeleteThanks man, I appreciate it, and it's certainly been a good time. I'm looking forward to things heating up on a certain African golf course ;)
V/R,
Jack
..and I have caught up.
ReplyDeleteI have enjoyed all of them so far, even if your dice rolls seem to sometimes pull a rabbit out of the hat for the CLA! I do love how urban battles have lots of close combat, you were sweating on some dice rolls there.
Using T34s in a modern setting does not really count as using armour, as you showed :-)
Holy Cow, good work buddy! Now I'll try to get 10 more posted while you're out on holiday ;)
DeleteI'm glad you're enjoying them, and I've been having a great time. I agree that luck has been on my side, but I'll say this: this weekend I played four fights, and the luck seems to have turned (like I knew it would, it couldn't last forever), and a tank is a tank, especially when you don't have one.
Regarding close combat, you know I'm a sucker for the Hollywood 'up and at'em with the grenade and bayonet.'
V/R,
Jack