All,
AKA, Unit 101's 6th Fight of Operation Payback
It's 0325 on 11 Jul 1990, and Unit 101 is in Lebanon, closing in on The Mayor in the village of Jezabyl. The village is very small, and inhabited only by people that are well armed and loyal to The Mayor, and the tactical problem is that the platoon needs to take The Mayor alive. Team 1 has busted down the door, and now it's time for Team 2 to rush in and grab the target. The sniper and MG teams are to the southwest, in position to isolate the enemy compound (keep reinforcements from getting in) and prevent escape (keep the target from getting out).

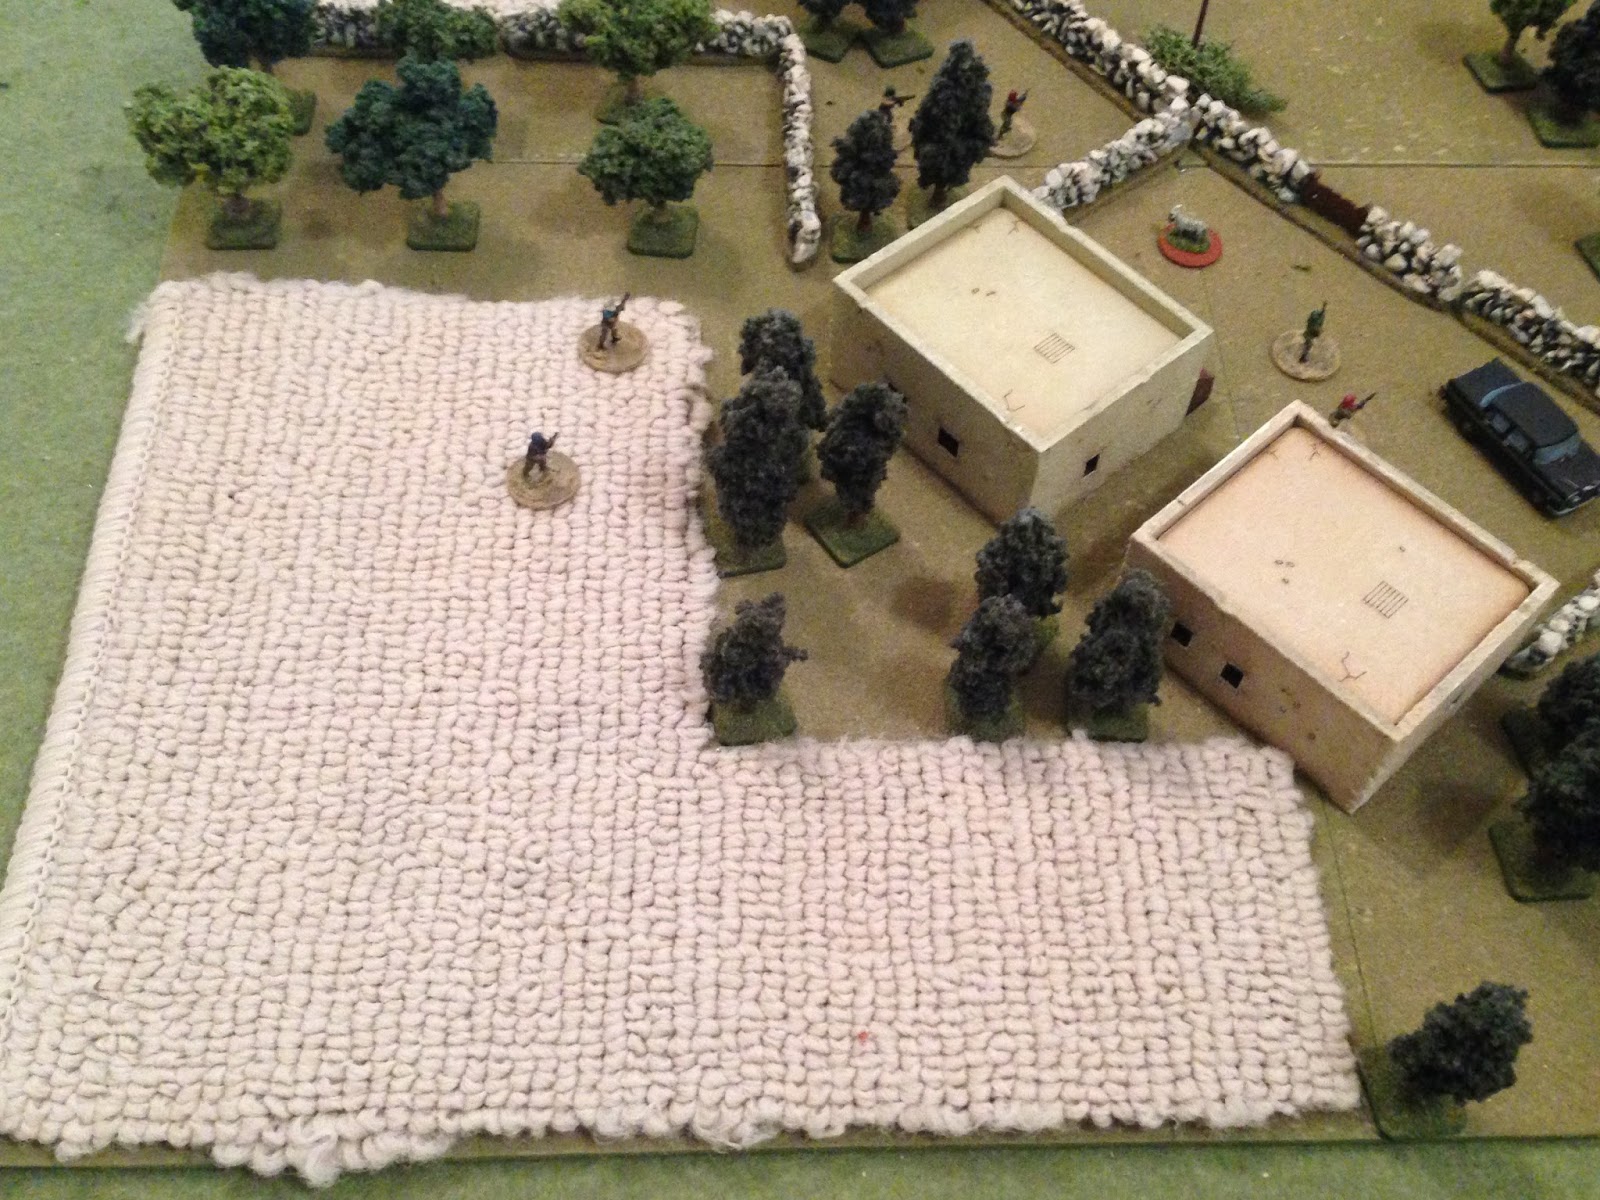
Overview, north is up. The Cubans will enter the table from the east, via the lane between the crop field at top right and the wall/buildings below it. The rest of the village, with the creek, is off camera to top right; that was the ingress where Team 1 fought the previous battle, and Team 2 has passed through them and is moving into The Mayor's compound. They don't know which building The Mayor is in; the enemy has two squad leaders. Once the fight begins, one of the squad leaders will move to The Mayor and attempt to evacuate him, while the other squad leader organizes a delaying action. When it's time have a bad guy squad leader move to the mayor, I'll roll a dice to see which building he's in, and the squad leader will have to move there, grab him, then lead The Mayor off the map. The Cubans, of course, are trying to catch The Mayor alive.
I'm playing this solo, using Ben Lacy's skirmish rules "Final Combat." These are super detailed, and you know I'm simple, so I'm using the activation system as written, and I'm using the movement, spotting, morale, casualty determination, and firing pretty much as written, though simplified just a hair. This game was fun, and didn't take as long as I thought it would, but was still longer than I generally am looking for. I really like the activation system, so I'll probably work to make shooting, spotting, morale, and casualty determination. Oh, and I didn't really mess with postures too much, everyone just kept moving forward. Part of that was I don't have figures to reflect the different postures (standing, kneeling, and prone) and I didn't really want to use more markers for it, though I'm considering getting some more Peter Pig US Marines so I can do this. The only problem is, I can't find suitable bad guys where I can do the same thing (no one makes modern prone bad guys!).

The opposing forces, with good guys on the right and bad guys on the left. The Cubans have five men, the bad guys fourteen, not including The Mayor. I'm going to give Ben's activation system a good workout.
The Cubans are Khurasan's PMCs, while the bad guys are Rebel Minis' insurgents.
The Final Combat/SOF Warrior activation system is built around better troops activating more frequently, so I should be able to pit a small force of highly trained, highly experienced dudes against some local riff-raff, no problem.
The Cuban entry team, from left: Trinity (TQ 4), Ratchet (TQ 3), Mouse (TQ 4), Link (TQ 4), and the boss, Major Villanueva (TQ 5).
The bad guys guarding the gates, fourteen men in total. Two are squad leaders (top), with TQ 3, the rest are straight rabble, TQ 2 (though there are actually TQ 1 guys in the rules). Not pictured is The Mayor; he'll hopefully make an appearance, if only when we grab him and throw his ass on a helicopter ;)
Overview of the table, north is up, this time with troops. The five Cubans are between the field and buildings at top right center, bad guys are spread across the rest of the map.
The Cubans, from bottom left: Link is on Point, Trinity (with MG) is slack, the Major is third, followed by Ratchet, and Mouse bringing up the rear (top right).
In the top left (northwest) corner of the board, there are two guys. The bad guys have heard all the gunfire from the fight between Team 1 and their buddies, so they're all roused, out of bed, and ready for a fight, more or less moving towards the previous fight location (in the northeast, off camera to top right). The only guy still in a building is The Mayor himself.
The bottom left (southwest) corner. No one really here, but plenty of folks moving to the center. Two guys at top center, two guys at right, and a Squad Leader and a rifleman at left.
Looking at the center: all the bad guys except the one at far right are in the previous photo, and the Cubans are at top right.
The bottom right (southeast) corner of the map. The guys at left and the left-hand guy at top center are all from the previous photo. The enemy's 2nd Squad leader is at bottom center right.
It is time to fight! I'm using poker chips for activation: five TQ5 chips, four TQ4 chips, etc... I'm not using separate good guy and bad guy chits; the only overlap is TQ3, where I've got one good guy (Ratchet) and two bad guys (the squad leaders). I just roll one white dice and two black, then activate them in order from highest to lowest (re-roll ties).
The Cubans are moving quickly, shuffling down the alley. Link moves up first (top center).
Where he (bottom left) spots two bad guys (top left, next to their goat), but not the one at top right.
But Trinity moves up (bottom right) next to him, and spots the two guys at top left. There are two bad guys off camera to top right no one is aware of.
As Mouse moves up, something catches his (bottom left). He halts right behind the Major, next to Ratchet, and looks left, where he spots a bad guy moving up (top left). Link and Trinity are at far right.
But the enemy has been alerted, and is moving men forward to challenge the Special Operations commandos.
In the northwest (this is looking west to east), two bad guys move up (bottom left), spotting Link and Trinity (top right). The lead bad guy shouts "Infidels!!!" and fires several shots into the air.
With the bad guys from the last photo at top left, four more insurgents move up (bottom right and center), where they also spot the lead Cubans (top center).
With the goat bleating in a very ornery fashion, two bad guys move up to the wall in the center, spotting Link (top center).
It might seem odd to you that I keep talking about spotting, but each element has to spot its own targets, even if other guys on their side have spotted the enemy, unless they're able to communicate it.
The bad guy (bottom right) Mouse (top right) had spotted halts his trot to the left, also having noticed movement. He spots Mouse and Ratchet as his buddy keeps moving left.
With the guy that just spotted Mouse and Ratchet (top center) at center, a bad guy moves up to the wall (bottom right) and another climbs up on the roof (far right). Neither can see anything yet.
But then another bad guys joins the one that spotted Mouse and Ratchet (bottom left), while a terrorist enters the building at top left via a window.
Back with the point element, Link (center left) calls out 'contact, engaging' and opens fire.
One Tango (center bottom) is hit in the side, killing him, while Link fires again (right). The terrorist is hit in the arm; he can stay in the fight, but he's broken and must crawl to cover then try to rally back into the fight.
Right after Link (bottom left) cuts loose, Trinity (bottom right) opens fire with his Mk48 machine gun.
The bad guy is hit in the left shoulder (bottom left), but is still in the fight, just pinned for now. Trinity fires again, this time at the wounded man's buddy (bottom center). A round skips off the wall and hits the terrorist in the abdomen. He's hit bad and begins crawling away, trying to escape the firefight.
Mouse (bottom left, next to the boss) calls out 'contact left' and fires. The rounds hit the enemy soldier in the chest; he's hurt, and immediately drops his weapon and raises his hands in surrender!
Ratchet moves up (bottom left) next to Mouse and Major Villanueva, and spots the bad guy (top center, in front of the red truck) next to the guy that wants to surrender.
With the guys Link and Trinity engaged at center, a bad guy climbs on the roof in the center, while the enemy 1st Squad Leader starts moving (bottom center) to collect The Mayor. I rolled a dice, and lucky for the Squad Leader, he's in the building at bottom right. I was hoping for one of the buildings at top left...
The enemy 2nd Squad Leader hops the wall (bottom center), hoping to shoot his subordinate (left, with red and white beads) that's trying to surrender to Mouse (top center). The Squad Leader screams "Fire!!!!" The guy just above the red pickup...
Puts his AK on rock'n roll and cuts loose on the Major, Mouse, and Ratchet (top center). No one is hit, but it's enough to make Ratchet flinch.
While the bad guy on the roof (bottom right) fires blindly at Link (top left), spraying and praying at the sound of Cuban gunfire. Coming pretty damn close to one of his comrades (far left). Link isn't affected at all.
Back on the left (in the northwest), two bad guys move up (top center left; no Cubans have spotted these guys yet), while the wounded bad guy atop the building at center left hops down, seeking cover, and his buddy (bottom right) drags his wounded ass towards safety (both guys that Trinity shot, though the one at left can stay in the fight if he's able to rally himself. He really could use a squad leader, but there aren't any close by).
The buys in the northwest (bottom left) lock in on Link and Trinity (top right), who've been firing to bottom right, and open fire. The first rounds go Link's way...
While the 2nd Tango (bottom left) fires on Trinity (top center). Neither Cuban is hit, but the rounds are close enough to make each flinch (hesitate for one phase).
The bad guy on the roof in the center (bottom right) moves up to where he can see, and gets a good look at what all the commotion is about. The bad guy at center top right...
Dashes forward, practically running into Link!!! I roll to see if the bad guy sees him and opens fire, or if he doesn't and they crash into each other and go straight into melee...
Of course, the bad guy makes some incredible rolls and stops and fires, hitting Link in the left thigh and knocking him out of the fight!
I could have marked him with a purple bead, meaning he's wounded and will use each phase to crawl off the map, but I was lazy and just swapped him out with a casualty figure. Unfortunately, I had to do it again later...
With the Tango/Link kerfuffle happening at top left, a bad guy wounded by Link drags himself towards safety (bottom right).
While the bad guy Mouse shot hops the wall, hoping to surrender (red and white beads at center).
The bad guy in the building right next to him moves up to get a look out the window.
While the bad guy at the red pickup reloads and opens fire again on the Major, Ratchet, and Mouse.
Ratchet had turned to his left, and an AK round struck him in the side, between his SAPI plates, severely wounding him. Mouse shouts "Dammit!!!" while the Major replies "Win the firefight!!!"
The bad guy on the roof at far right jumps down next to the red pickup. The enemy 2nd Squad Leader is at bottom center.
Meanwhile, Mouse (top left) raises up and returns fire.
The bad guy that shot Ratchet is hit in the head and killed instantly, while the 2nd Squad Leader (bottom right) is hit in the head too, but is only wounded and begins dragging himself off the battlefield.
For a long, awkward moment, Trinity and a terrorist stare at each other over Link's bleeding body.
That was Trinity having to hesitate a phase due to enemy fire.
Major Villanueva (bottom center, with Ratchet down next to him and Mouse to his left, Link down and Trinity off camera to right) spots the bad guy that just jumped down off the roof in the southeast (top center) and fires, hitting the Tango in the left arm and mangling it bad enough the bad guy is thinking only of escaping the battlefield. Major V doesn't spot the bad guy in the building at top left...
And so he (bottom center) turns his attention to the center (his right), quickly acquiring another target and firing at one of the Tangos in the northwest. But the Major's round go wide and the bad guy is unfazed.
I actually rolled up a hit, but then the hit location was the left calf, which, due to the wall, was impossible, so I made it a miss, then I made the bad guy take his morale roll and he passed like a champion. I think I played that right, right?
While the Major is blazing away (far left), Trinity (bottom center) comes to his senses and opens fire, blowing big holes in the terrorist that shot Link. But the bad guy is tough as nails and begins dragging himself to safety.
Trinity (top right) then spots the bad guy on the roof in the center (bottom left) and opens fire. Machine gun rounds tear into the building's walls, and a bullet enters the bad guy's left shoulder, but he's not hit that bad and stares right back at Trinity (passed morale like Audie Murphy!).
Just below the bad guy on the roof is a wounded terrorist crawling to escape, and the bad guy Major Villanueva shot at and missed is at top left.
Back on the right, Mouse hops the wall, oblivious to the fact there's a bad guy in the building at right.
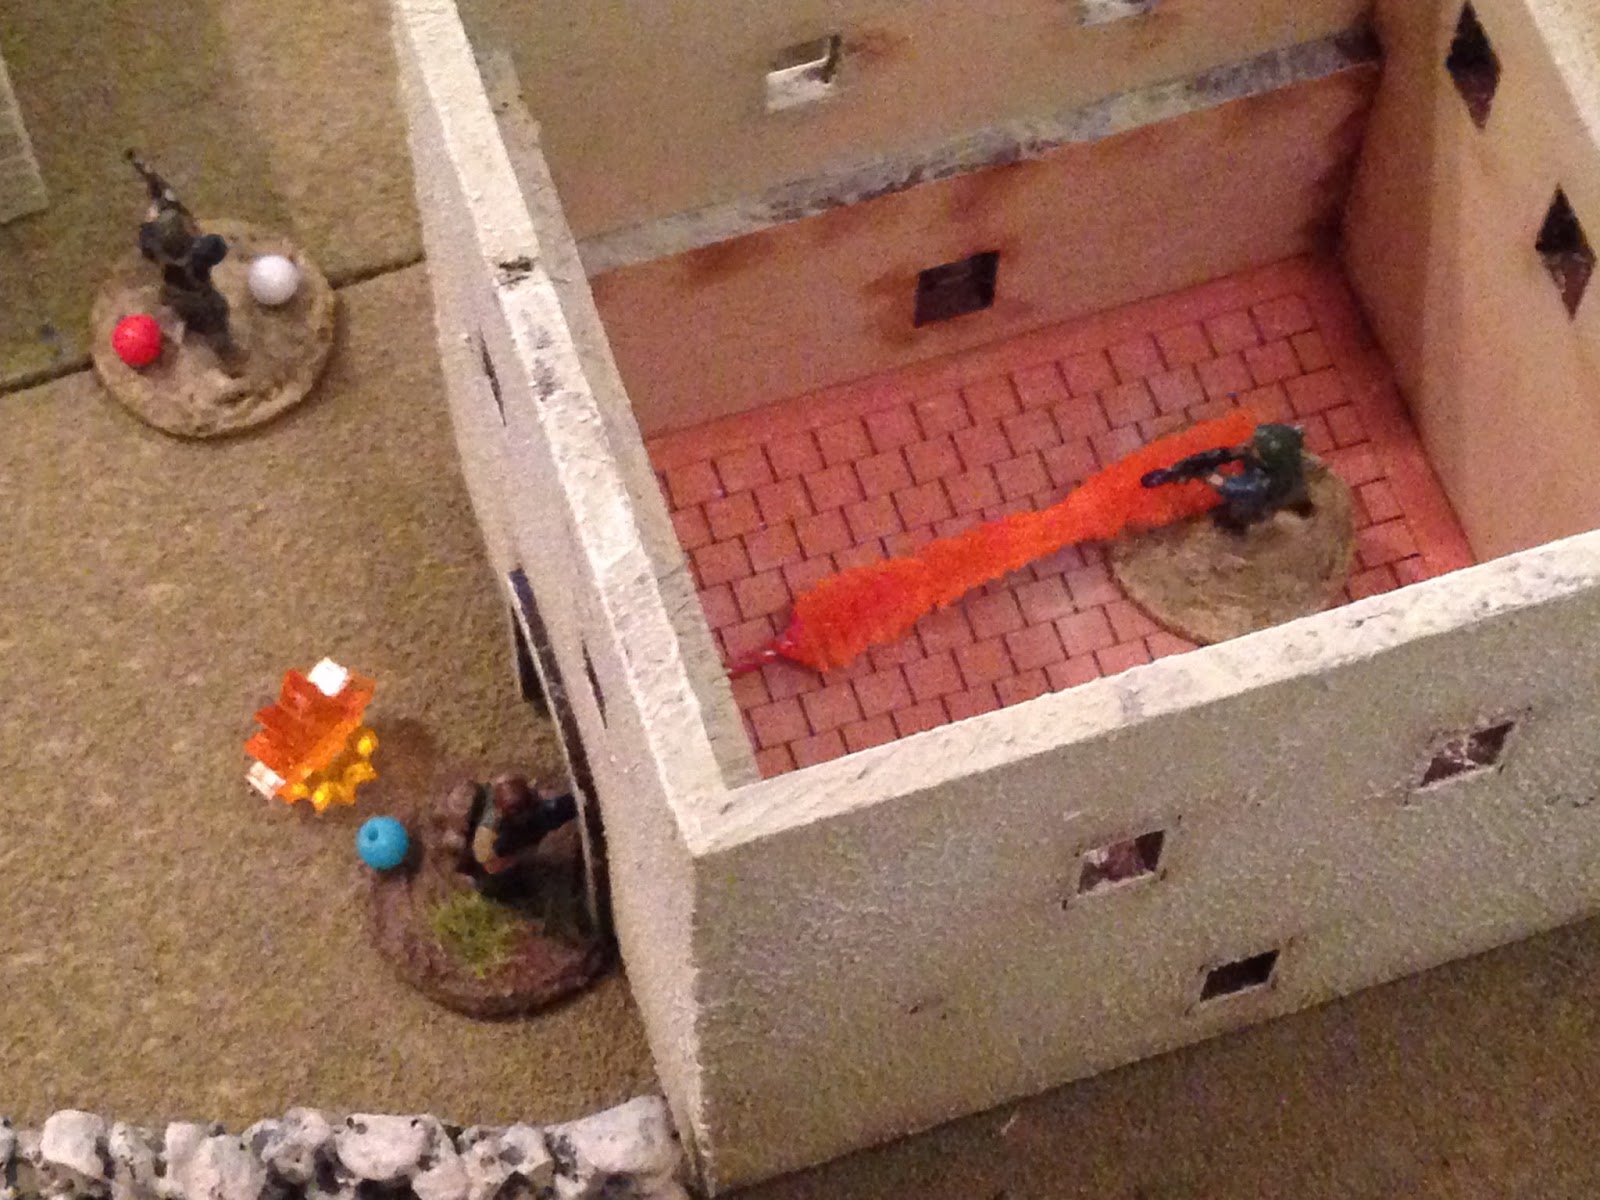
In the center, the bad guy 1st Squad Leader darts into the building The Mayor is sheltering in, while a wounded comrade crawls down the alley.
1st Squad Leader is with The Mayor at bottom center left, while the badly wounded 2nd Squad Leader (purple bead at right) is stumbling, shot in the head, trying to get to safety.
With Mouse over the wall at bottom left, the boss moves up next to Trinity (center) and fires again to the northwest (top right), hitting a Tango in the jaw, killing him.
Trinity (bottom right) turns his machine gun on the incredibly brave terrorist he just shot in the shoulder (top center) and fires again, pinning him.
With Ratchet bleeding at bottom center, Mouse begins moving up (center), eyes on the bad guy that apparently wants to surrender (top center). But movement in the window to his left catches his eye; there's @#$%ing Tango in there!!!
I can't believe he spotted that, there was about a 15% chance!
Major V continues pushing forward (center) like s madman. Having just dropped one bad guy in the northwest (casualty figure at top left), he sights in on the other and fires. The rounds miss, but cause the terrorist to flinch (hesitate one phase, which is pretty much a death sentence for a TW2 guy with no squad leader around).
Especially when I've got a TQ5 superhero that just keeps going: Major V keeps shuffling forward, firing again, hitting the Tango in the neck and putting him out of the fight.
In the center (Major V is off camera to top left), the enemy 1st Squad Leader gets The Mayor to the doorway (bottom center left), while the 2nd Squad Leader continues to move towards the exit (top right).
And all that signals but the end of Turn 1!
Back on the left (Major V is on the right, Trinity is in the center), a wounded bad guy stumbles forward, trying to surrender (red and white beads). Mouse gives him a once over, then motions to him to keep moving to the east (top), before moving to the door of the building housing the Tango he spotted in the window.
Trinity (bottom right) has fired twice at the bad guy on the roof in the center (top center left, with Major Villanueva at center right), hitting him in the shoulder then pinning him. Trinity levels his weapon and cuts loose with another burst of 7.62mm rounds...
The terrorist (bottom left) stands up and throws down his weapon, raising his arms. Trinity signals him to come down, then moves up (top right).
Is it weird, having hardcore terrorists surrender? Twice now this game. Feels a little strange to me; not saying none surrender, but these guys don't seem particularly committed ;)
As Trinity moves up (bottom center), Major V moves right (far right).
Back on the left, Mouse pulls the pin on a frag (blue bead).
While Trinity moves up in the center, near the gate to the goat pen (Mouse is the blue bead at bottom right, Major Villanueva is at top left).
While only three good guys are left in the fight, the momentum is clearly on their side, and they're pushing hard to get forward and keep The Mayor from escaping. I don't know how many bad guys were left still in action at this point (I think it was just the bad guy in the building at bottom right, the 1st Squad Leader escorting The Mayor, and a wounded guy that's pinned but hasn't been able to rally on the other side of the building Major V is up against), but we're winning. However, with only three guys, all it takes is one unfortunate event to change the complexion of the fight. And The Mayor could actually get into the crop fields and give us the slip...

Speak of the devil, the pinned and wounded Tango (bottom left) on the other side of the building from Major V (center) tries to rally but stays pinned (broken, actually). I'm torn between spending time to have Major V move up, spot this guy, then whack him, or go straight after The Mayor (off camera to bottom right). I'm scared The Mayor is going to get away, but I'm also scared of this bad guy creeping up behind the Major...
The bad guy in the center that wants to surrender (center left) to Trinity (top left) hops down off the roof, while two of his badly wounded comrades continue dragging themselves away (bottom left and bottom right, with 1st Squad Leader and The Mayor in the building at bottom right).
Mouse (blue bead) has his frag ready as a wounded bad guy crawls (bottom right) and a surrendering dude walks to the east (top left), but the bad guy in the building at top center...
Knows there is an infidel out there, and so he opens fire on full auto, shooting through the door at Mouse!
Mouse just snickers to himself; "yeah, I kinda saw that coming, @#$%er."
Meanwhile, the enemy's 2nd Squad Leader, shot in the head by the Major, continues stumbling to safety (bottom right, with Mouse at top left), stopping at a dumpster to rest.
While the enemy's 1st Squad Leader gets The Mayor out into the alley, looking to make a run for it to the southwest (bottom center).
Back on the right, the Major hoists himself up on the roof, while a bad guy (whom he is unaware of) cowers on the backside.
Mouse waits until the bad guy has to reload then tosses his frag into the room. "Frag out!!!"
Back in the center, Trinity (bottom left) moves up: "Boss, I got something. I think I've got The Mayor, in the center, coming out of Bravo 7."
In real life, when you hit a village like this, you build an overlay in the mission prep and apply an identifier to every structure in the area of operations, so that you can quickly reference it and everyone knows exactly what you're talking about. Works a lot better than "the third building on the left, the one with the red door and the blue roof." "On the left? Is that north or south from my pos?" "No, it's west of your pos, the one with the blue roof." "Is that coming north up the street or south?" "I dunno, it's on the left! The one with the blue roof!" "Look, @#%hole, I'm looking north and have three buildings with blue roofs, got four more blue roofs to the south." "I said to your west..."
Having heard Trinity (right) call out the target (bottom center), Major Villanueva hops down and begins moving this way (top left).
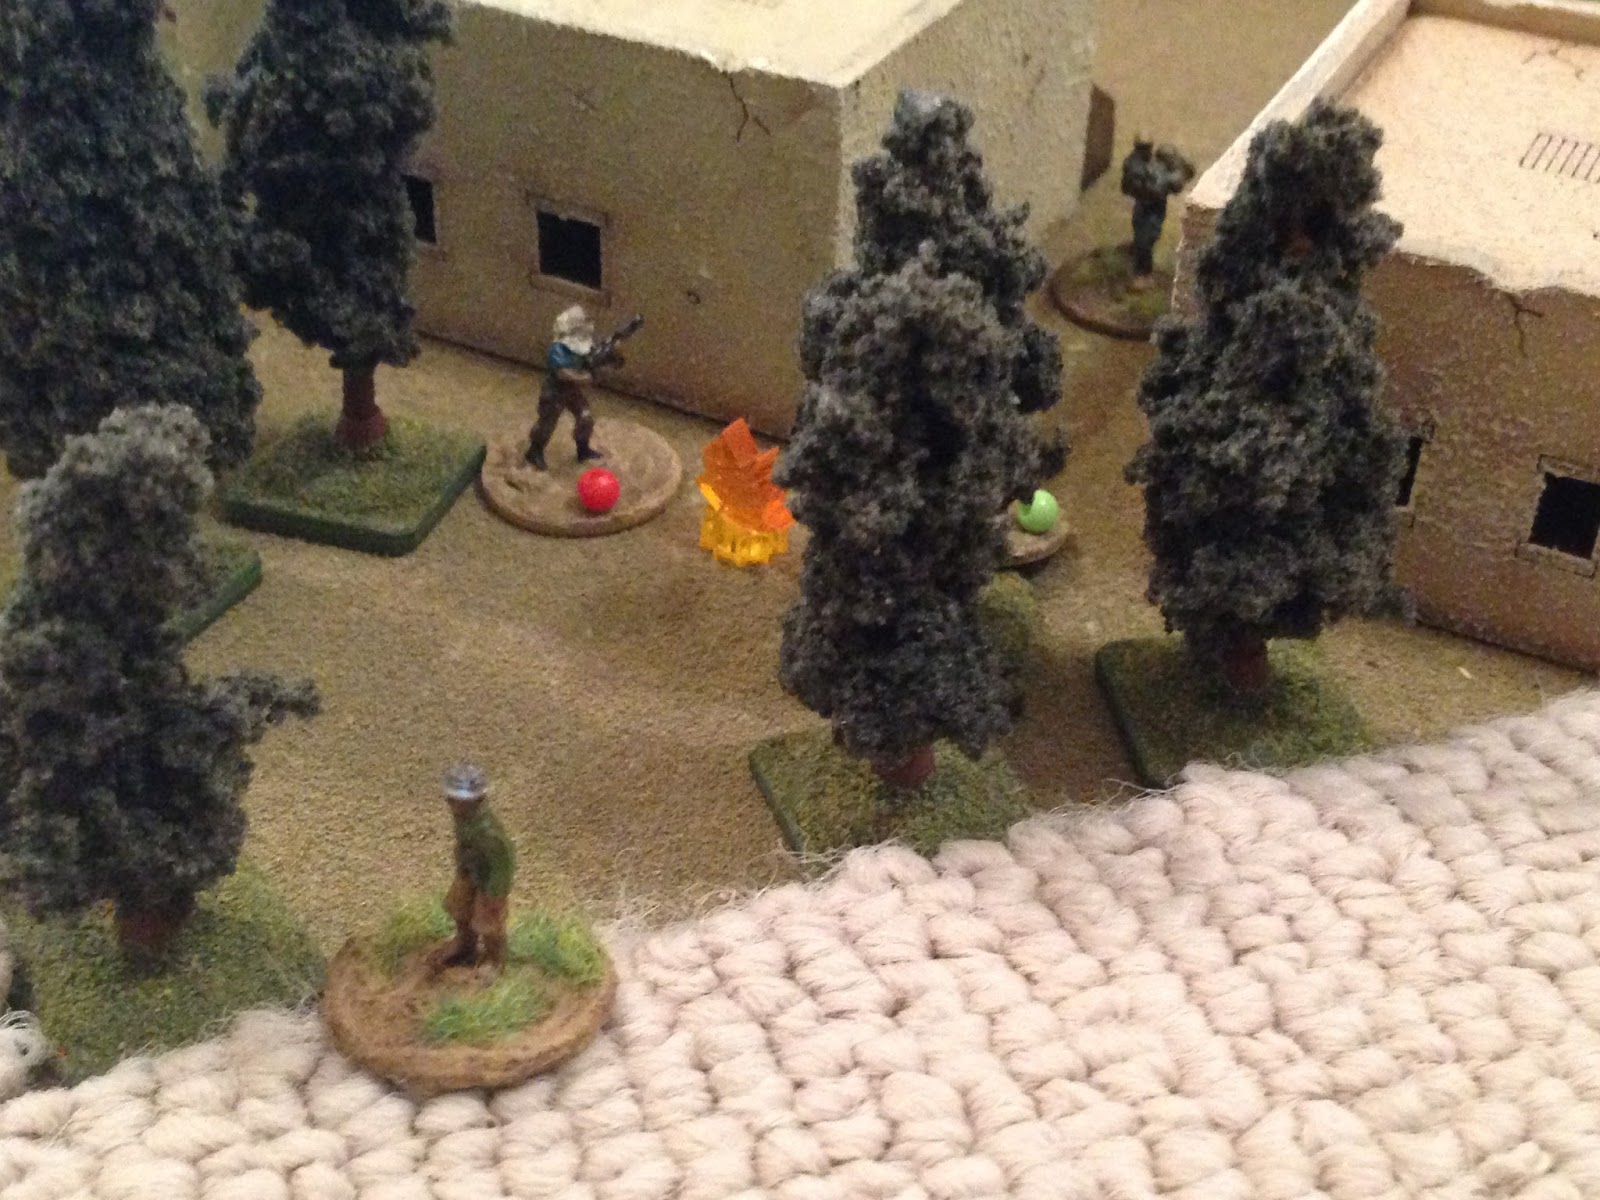
Yep, that leaves a pinned bad guy behind me (behind the trees at top left), but now the enemy squad leader has The Mayor out of the building and they're on the run, I've got to move quick lest they get away.
And, as luck would have it, the pinned, wounded bad guy (left) behind the Major (right) activates again. Once again he tries to rally, but just can't get back in the fight. He's really pulling an Upham.
All over the map, the two bad guys that want to surrender keep walking, and the bad guy wounded keep crawling/stumbling to get off the map.
On the left, the bad guy in the building spots Mouse's grenade. he quickly pounces on it, picking it up to toss it back.
While in the center, the enemy 1st Squad Leader (bottom center) spots Trinity (top center) and fires, while The Mayor continues south (bottom center left). Trinity drops prone, pinned by the AK rounds slapping the wall just below his face.
And the bad guy in the building isn't quite fast enough: the frag detonates in his hands, putting him out of the fight! Mouse gives a quick peek through the door; "yeah, he's out of the fight."
With Trinity pinned at left, Mouse hops the wall (right).
I wasn't going to tell you that Trinity failed his rally roll and stayed pinned, didn't want to embarrass him...
With Trinity pinned at top right, Major Villanueva (center) moves towards The Mayor (off camera to bottom right). The bad guy at far left is the pinned/wounded guy that can't seem to rally, while all the other guys in the photo are either trying to surrender or wounded and trying to escape.
The enemy Squad Leader is quite pleased with himself; he spotted Trinity (top center, with Mouse at top right and Major V behind the trees at top left), fired and pinned him, and now he and The Mayor are moving (bottom center left) towards the safety of the crop fields. "Hurry, Sir, the infidels will never find us once we get into the fields!"
Mouse moves over to Trinity and helps his brother get back in the fight.
Thus ends Turn 2. This is nerve-wracking: I've only got three guys left, but we're right on the cusp of getting The Mayor. But The Mayor is right on the cusp of getting into the crop fields and escaping...
But the Cubans are spurred to action: Trinity and Mouse hop the wall...
And Mouse (bottom center) takes a shot at the fleeing enemy squad leader...
Mouse's rounds tear into the back of the enemy squad leader's right knee (red bead), knocking him down (he's on hesitate for one phase), while Trinity (top right) dashes forward, closing the distance to The Mayor (bottom left).
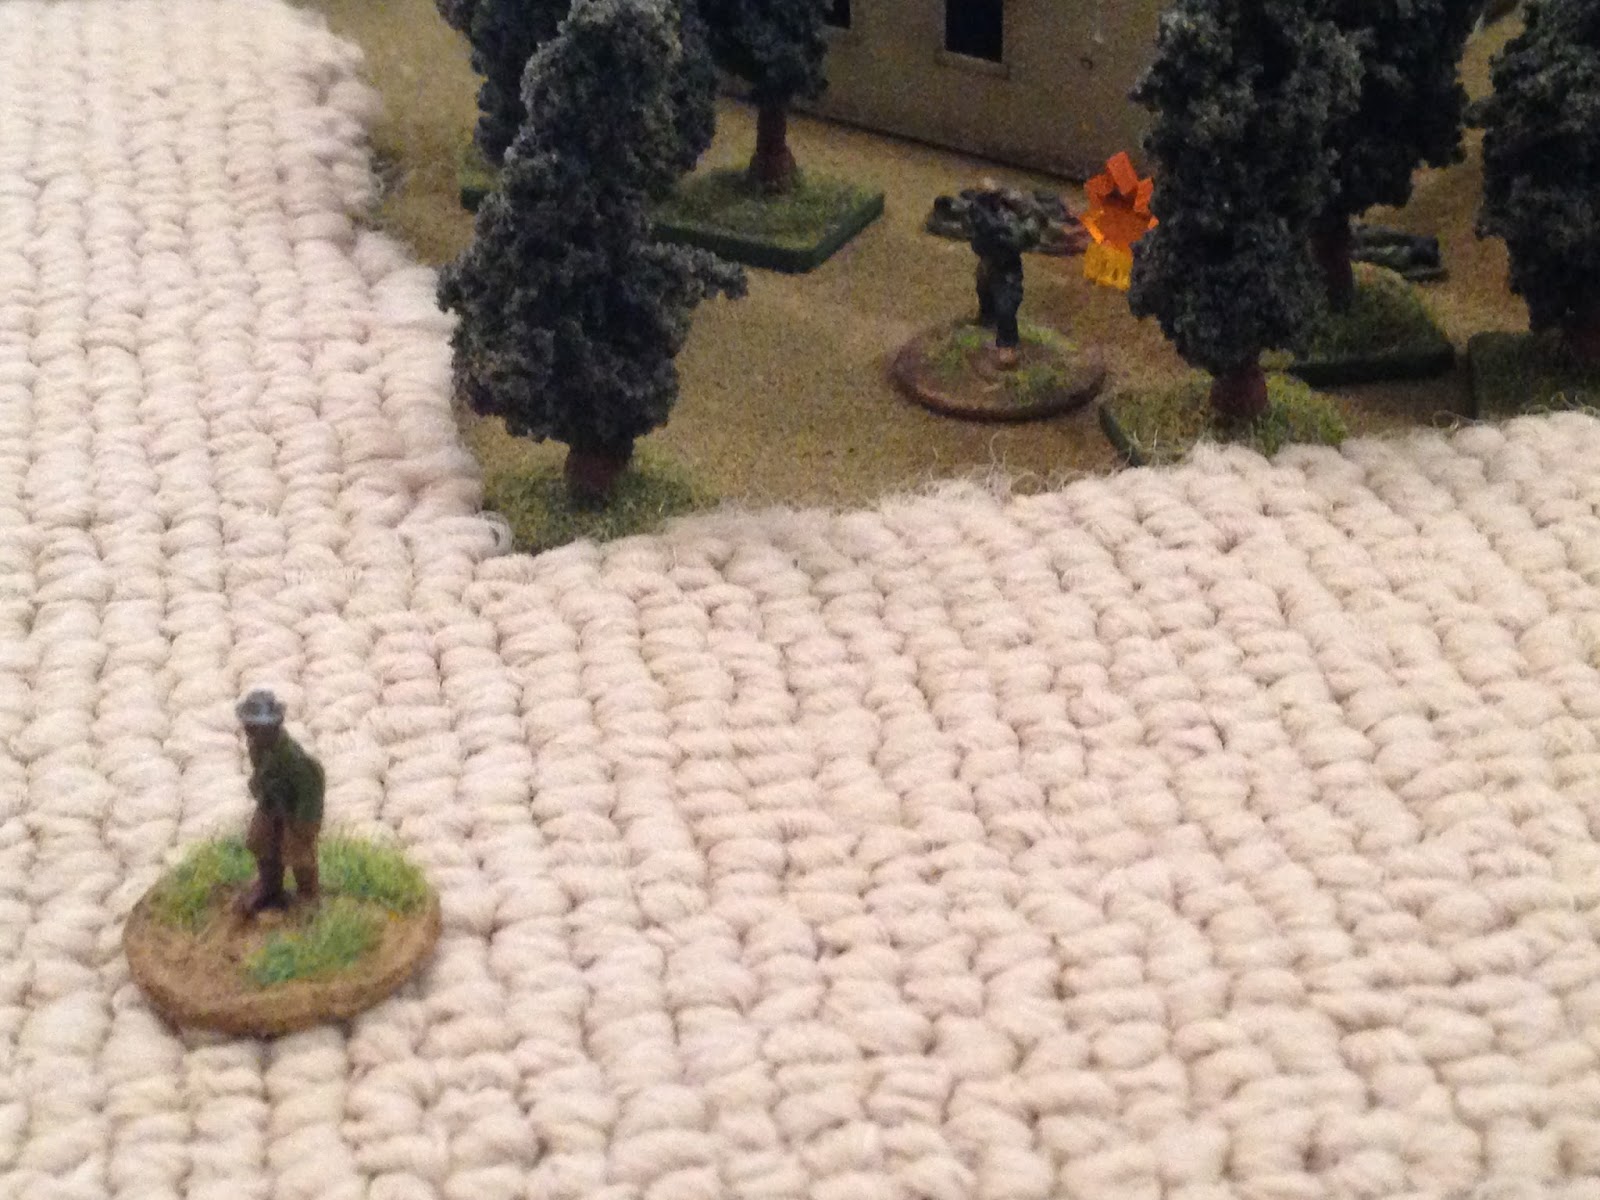
The enemy squad leader turns (red bead at center left) as The Mayor continues running, reaching the edge of the fields (bottom left)!
Mouse dashes up to a building (bottom center). He knows the target is trying to escape into some tall crops, and he's hoping to get onto the roof of the building and maybe spot The Mayor from above, as it will be nearly impossible for anyone at ground level to do so.
Trinity moves up and finishes off the enemy squad leader and one of his minions.
While Mouse hauls himself up on top of the building.
Trinity dashes forward, almost within arm's reach of The Mayor.
But The Mayor manages to duck him and head deeper into the crop field.
Major Villanueva moves up (far left).
But then Trinity shoots ahead and grabs the bastard!
Holy cow, that should have never been that close, but the damn TQ3 tokens kept coming out!!! The Mayor got pretty deep into the crops, so I gave Trinity only about a 20% chance of finding him, and he passed! That may sound low, you may be thinking it's easy to follow the trail of someone in a crop field. Well, that's not my experience, and don't forget, it's 0330 in the morning, pretty damn dark, plus Trinity is pretty much at an all-out sprint to catch up.
It all worked out, but I was really thinking I was going to have to play another game to try and capture The Mayor. I was also second guessing myself, thinking I should have just had Trinity shoot him; better to whack him then let him get away ;)
The Major catches up as Trinity hogties The Mayor. Major Villanueva immediately gets on the radio, passing the pro-word for everyone to consolidate. The rest of Unit 101 picks up and begins moving to catch up.
The Platoon Sergeant, Rake, leads Team 1 forward, gathering up the wounded, (center right), while Team 2 holds security to the north and east (top center and top right) and the sniper and MG teams come in to take security to the west and south (top left and bottom left).
Major Villanueva and rake (center right) discuss the situation and get comms with the extract bird, which is inbound. Unit 101 has three casualties (one from the last fight, two from this one) and three EPWs (The Mayor and two soldiers that were wounded and surrendered).
The Chinook dips in and flares, then makes a quick pickup.
The fight was fun, and tense, though it's still taking me a long time, about two and a half hours. But I'm pretty comfortable with the flow now, though I've gotten away from looking up the firing and spotting modifiers each time and just kind of laying odds (percentages) and rolling 2D10 to see if i worked or not. It doesn't really matter for the game I guess, but it's kind of fun knowing where rounds hit a guy. Actually, it does matter when the target is obscured by cover that can stop a round, I believe. But I believe I'm going to handle wounded in the future the way I did the Cubans here, which is just throw down casualty figures rather than track a bunch of wounded guys crawling to get off the map. And don't misunderstand, that's only for the guys wounded so bad they can't continue the fight; there will still be guys that get hit but remain in the fight. It's pretty cool having a few guys take on so many bad guys and 1) having a tense game, 2) a chance to win, 3) without it just seeming like a die-rolling exercise. I did use the term 'TQ5 superhero' in my writeup, but I just meant that in terms of Major V being an incredibly highly trained and highly experienced operator, not that the rules made him untouchable. Though you do need to make sure you don't have too many TQ5s, unless you have two guys and a hundred bad guys. Like "Strike Back" ;)
Regarding the fight, the Cubans suffered two more wounded, Link and Ratchet, and they were both hit pretty bad. The good news is that both will be able to return to the Unit, but both are going to be out awhile. This fight occurred on 11 July 1990, and Link is out until 1 Sep 1990, and Ratchet is out until 25 Sep 1990. Team 2 is now down three man, though Slate will be coming back on 16 Jul 1990. The bad guys suffered: eight KIA, four WIA that escaped and live to fight another day, and three captured (The Mayor and two wounded soldiers).
For those wondering how the Cubans got a Chinook into Lebanon, where it came from, and where they were going, there are rumors the Cubans have military ties to the Israeli Defense Force, who have their own interest in speaking with The Mayor. Due to these military ties, the flight is safe (owing to fighter escort, two F-15s) and quick (not having to go very far). The Unit sees to its wounded, inventories, surveys, and cleans gear, checks comms, grabs a quick bite, then beds down.
They sleep fitfully, and when they rise they find the intel guys have done their job: a new target has been provided by The Mayor. The Mayor stated the prime facilitator in the double-cross that went down, the man who knows exactly who ordered the ambush and exactly who carried it out, is known simply as "The Persian." The Mayor didn't know anything else about The Persian but that he resides off the grid in Malaysia. Israeli military intelligence was able to provide some details: The Persian is a Shiite Muslim born of Iranian parents in Lebanon in the mid-1960s, true name Ali bin-Schwammy-Roksamshammy (we'll stick with "The Persian"), and he lives in Langkawi, Malaysia. The Israelis were very helpful in assisting with logistics for the Unit to get to Langkawi.
Which is the next set of fights.
V/R,
Jack