All,
It's 1830 on 18 April 1990, and Task Force Trojas is a flurry of activity. Turk and Panda of Team 6-2 were captured approximately two and a half hours ago, and Lt Mikey Trojas, the Task Force commander, has been working non-stop to retrieve his men. First and foremost is the issue of location; where would Demjanovic's Tigers, the Serbian commandos that captured the Cuban Special Forces men, decide to take Mikey's men?
Mikey immediately met with the Cronistrian Democract President, Andraz Gregor, and the head of his military, General Miroslav Denis, both of whom pledged their support. Mikey impressed upon them the urgency; Mikey figures the Serbs' most likely course of action is either to interrogate then execute Turk and Panda, or whisk them out of Cronistria and back to Serbia as soon as possible. In either case, time is of the essence. Mikey informed the President and the General that his Task Force is acting to find Turk and Panda: Team 6-1 is on the street pressing its HUMINT sources for any word of their location, and 626-Forward's SIGINT element has discovery of Turk and Panda's location as its top priority. Gregor and Denis agree to immediately press their informants, moles in the Yugoslavian Army, Cronistrian National Card, and Cronistrian People's Army, and to use Cronistrian Democratic Militia to aggressively scout for the location of Turk and Panda.
Within 45 minutes a TF Trojas source pointed to the area southeast of the capital city of Miran. 626-Forward's SIGINT element did some pattern analysis and laid good odds that the missing CLEF members were being held at the FRY (Yugoslav Army) base near the village of Petroika, five miles southeast of Miran. And then General Gregor's men came through: a mole in the FRY, stationed at Petroika, walked off base, found a payphone, and breathlessly reported to his handler that '...two of our friends were just brought to the base by the Serb scum, and one is hurt pretty bad.' CDM scouts were able to confirm on VHF that there was increased activity at Petroika, and the Serbs were present there as well. Shortly thereafter SIGINT traffic showed a Serb Lieutenant at Petroika contact Major Demjanovic in Miran, and then Demjanovic immediately radioed Belgrade.
Mikey: "Get your stuff together, I think this is it."And with that, a detachment of CDM troops and the remnants of TF Rojas loaded into trucks for movement to Petroika. Once there, Mikey met with President Gregor's nephew, who had just debriefed the CDM mole in the FRY's Petroika garrison. Gregor's nephew pointed out the building Turk and Panda were being held in, and informed Mikey a Serb interrogation team had just arrived and begun working them over. Mikey then convened a meeting of the small unit leaders, in which he literally drew his plan in the dirt. His initial inclination was to leave Rock and Bolt, the two remaining members of Team 6-3, back at base camp, but they pleaded to be a part of the mission and so he gave them the thumbs up. So the mission would go down in three phases:
1. The initial breach: Tico and Bear of Team 6-2 would lead one squad of CDM troops to force a hole in the FRY's base perimeter. Team 6-4, along with attachments from 6-3 (Rock and Bolt) would infiltrate through the penetration towards the target building. Team 6-2/CDM 1st Squad would continue to demonstrate in order to draw enemy attention.
2. Team 6-4 (plus attachments) make the direct action assault on the target building to secure Turk and Panda.
3. Team 6-4+ departs objective area for rally point. All teams rendezvous at rally point, return to base, with Team 6-1 covering withdrawal.
-CDM 2nd and 3rd Squads take up blocking positions along fast routes into Petroika in order to keep enemy QRF from Miran from reinforcing.
-Team 6-1 takes up position near initial breach and is assault force reserve.
**Game note: 1, 2, and 3 above are played out as three separate games. This batrep is for #1 above.
The opposing forces: at bottom center is CDM 1st Squad and the remnants of Team 6-2 (Tico and Blue), responsible for the breach and further demonstration. At top right is the enemy force, a squad of FRY troops manning the outer perimeter. At top left is Team 6-4 plus Rock and Bolt from 6-3.
The bad guys, seven FRY troopers manning the perimeter at their Petroika base.
Team 6-4+: top left is Bolt, top right is Blade, center left is Goss, center right is the team leader, Rooey, bottom left is Rock, and bottom right is Redrum.
Team 6-2 plus CDM 1st Squad: at far right is the team leader, Tico, and his man Blue, and eight Cronistrian Democratic Militia members.
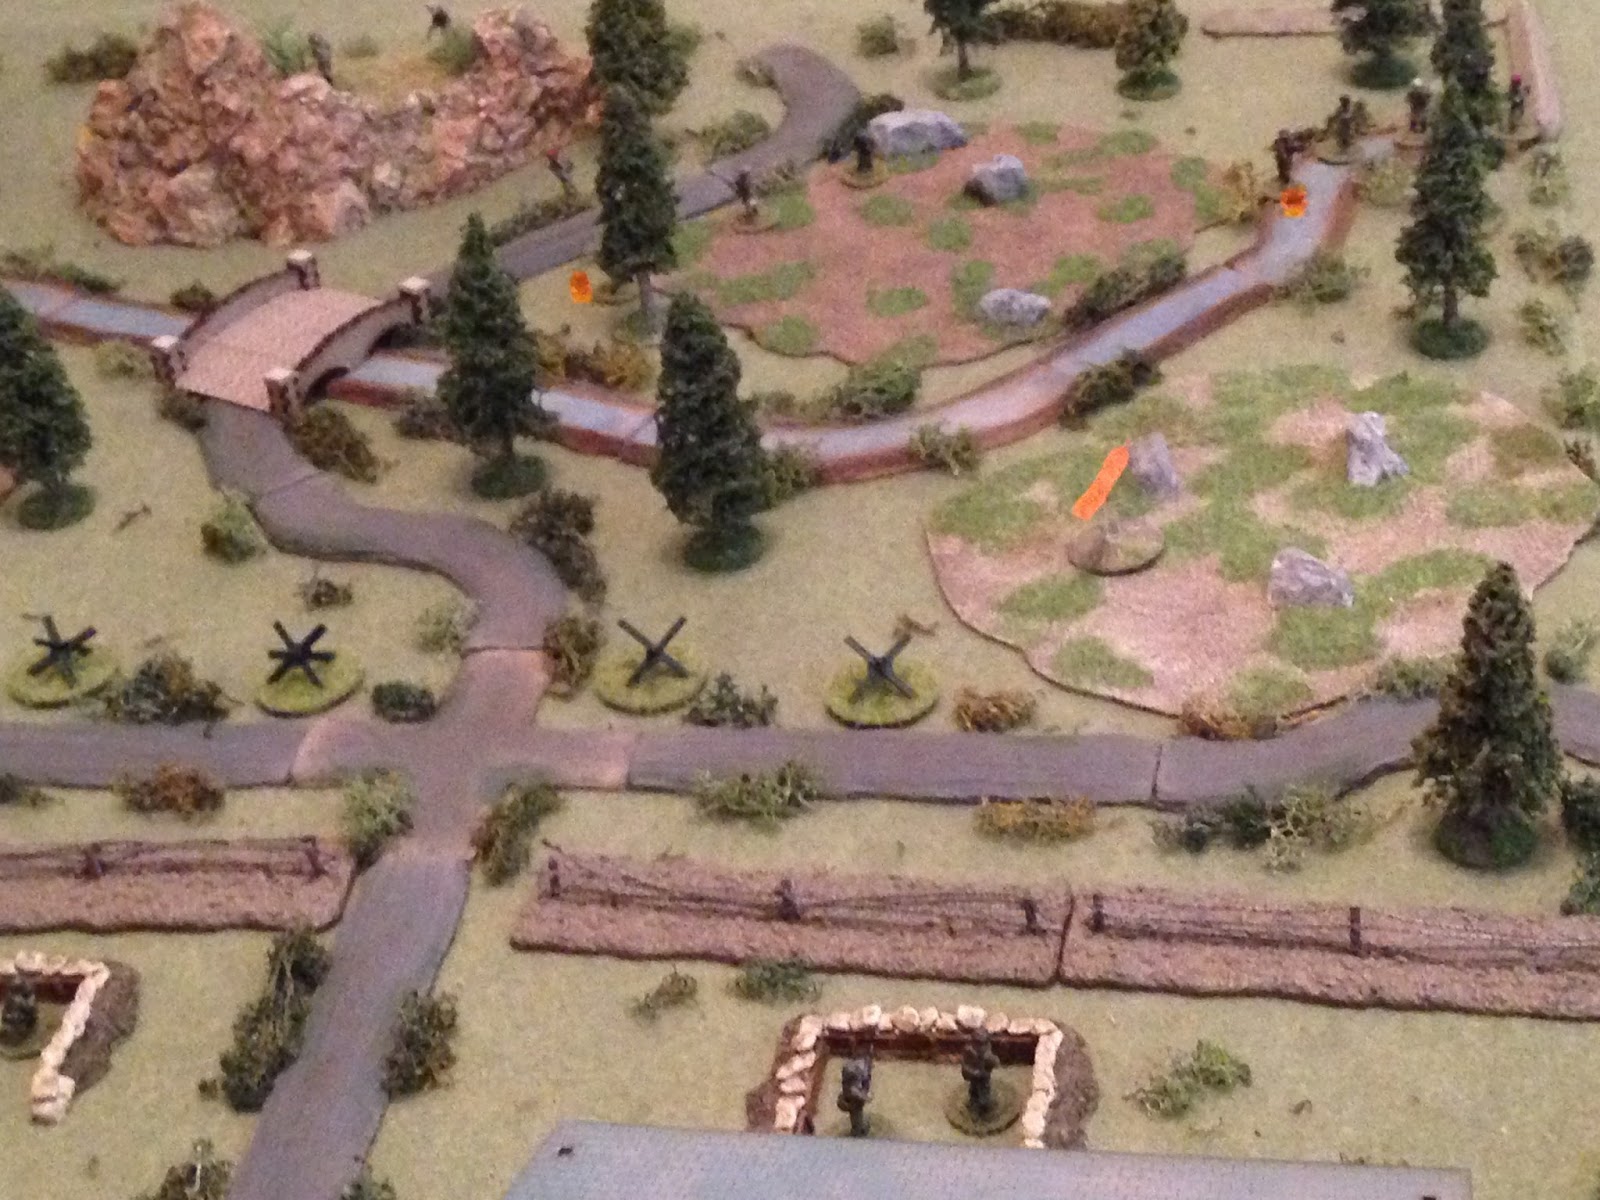
Overview of map, north is up. Once again we have a small stream running the board, northeast to southwest, bridged over a hardball road running east-west then meeting a north-south running hardball road east of the bridge. East of that road is a string of concertina wire with three bunkers (bunker 1, 2, and 3 from top to bottom) and a guard tower at center right. Behind them (on the right) is a barracks and an outbuilding. There are two patches of rough ground (top left, bottom center), and a rocky outcrop at far left.

Map with forces added: at bottom left you see the assault team, Team 6-4+ (mission is simply to infiltrate the base). At top left you see Team 6-2 and CDM 1st Squad (mission is to attack the perimeter, open a hole, and demonstrate so that Team 6-4+ can infiltrate to the target building, which is off the map to top right). You can see FRY (enemy) troops in the three bunkers, in the guard tower, and milling about the barracks (top right) and outbuilding (far right, which has an armored personnel carrier parked near it, unmanned).
Looking northwest to southeast at the northwest (top left) corner of the table, you see Tico leading three CDM members forward towards the enemy perimeter. Bunker 1 is at top left, Bunker 2 at top center (barely visible behind tree), and Bunker 3 at top right, right of the Guard Tower.
Looking west to east across the center of the table from the CLEF baseline, at left you see Blue leading three more CDM members forward (Bunker 2, or B2, at top left), while a CDM sniper (with Dragunov) and a grenadier climb the rocky outcropping (center right).
Looking southwest to northeast at the southwest (bottom left) corner of the board you see Blade walking point for Team 6-4+, looking to sneak up and through the perimeter while Team 6-2/CDM 1st Squad do their thing.
A west to east look at Bunkers 1 (left) and 2 (right). You can see two more enemy troops behind them, on either side of the APC.
Same view, B2 (left) and B3 (top right), with Guard Tower between them (one enemy trooper in the tower).
And with that, ladies and gentlemen, the stage is set, time to fight!
The fight is supposed to start with the grenadier and sniper opening fire, but they don't get into position in time and so Tico (bottom center) and Bear (center right) are stuck fanning their guys out into skirmish line and moving forward with no real cover fire.
While in the southwest, Rooey and Team 6-4+ creeps forward.
Enemy forces in the northern section of the line react to the shadows and scattered gunfire by reinforcing bunkers 1 and 2 (one man each).
The enemy soldier in the tower suddenly finds himself with a clear shot at Blue, and takes it.
Luckily the rounds go wide of the mark.
The sniper (far left, atop rocky outcropping) is finally in position and returns fire on the tower (far right), pinning the enemy soldier there.
And then B1 (bottom center) opens fire on Tico (top right)...
And Tico is out of the fight.
@#$%!!! A CDM troop returns fire, missing.
But then Tico's team gets their stuff together and cuts loose on Bunker 1 (top center) in earnest.
One enemy soldier goes 'man down' (white bead in bunker) and the other falls back (red bead) and flops behind the bush.
And then Bear's team (center right) opens fire on Bunker 2 (top left)...
And gets the same exact result: man down in the bunker (far left, white bead), and fall back/hunker (bottom center behind APC, with red bead, next to other hunkering soldier at far right behind bush).
Next, the sniper (bottom center, with grenadier just right of him) fires on the enemy soldier in Bunker 3 (top right; the yellow bead at the base of the Guard Tower is to show the guy in the tower is pinned). The bad guy in B3 is hit and goes man down.
Then the grenadier (bottom left) fires a grenade at the Guard Tower.
You can't really see it, but there's a bad guy hiding at the base of the tower, in addition to the pinned guy in the tower. The explosion marker at the base of the tower marks where I want the grenade to land.
It hits right on target (I should have used some cotton to show it): the enemy at the base of the tower is out of the fight (left), and the guy in the tower is scared enough that he un-asses the tower and falls back to the outbuilding (right, red bead).
Holy @#$%, things are looking pretty damn good all of a sudden! The enemy doesn't have a single man in fighting shape (note all the white and red beads).
But the FRY troops get lucky and are able to start rallying everyone, and it goes pretty well for them, getting most of their guys back in the fight.
Based on their very poor performance two games ago, I had told myself that I was going to give the FRY very poor morale in future fights, but I didn't. It didn't feel right; I figured they're not out on patrol or something, they're sitting on their base, and they've got the Serbs here to bolster their confidence (not on the table here, but on the base).
In the center, Blue moves up to the bridge (far left), drawing react fire, though it missed.
Braving the enemy fire, Blue splashes into the stream, firing on the move at Bunker 2, missing.
On the far left, President Gregor's nephew (I need to come up with a name for him, can't just keep calling him 'the nephew,' but I'm scared if I do I'll forget it and end up using different names for him at different times. It's hard keeping all the stories straight!) moves up, drawing react fire (top left).
The enemy fire misses, and the Lieutenant (bottom left) opens fire on Bunker 1 (top left)...
Another bad guy down.
Then the CDM sniper (bottom left) fired on Bunker 3 (top right), pinning the enemy soldier there.
An enemy troop was hunkered at the outbuilding; he finds his testicles then moves forward (bottom right, it was a Random Event: Bravery) and fires on Blue (top center), pinning him.
But so much for bravery: one of Blue's boys (bottom center) returns fire and forces the bad guy to fall back off the map (top center)!!!
Bunker 2 (bottom center) opens fire on Blue again (top left), missing. Blue's guys return fire but miss too.
The sniper (bottom center) spots a bad guy lurking in the open between the buildings (top center left) and takes a shot, putting him man down.
One of Blue's boys moves up and rallies him (far left), then fires on Bunker 2, pinning the bad guy.
These CDM troopers are hot I tell ya!
And then Blue moves up and lobs a frag into Bunker 2 (blue bead)...
Great toss puts the bad guy man down.
Now, I've had a lot of good firing dice, but I haven't put many guys out of the fight, and it's starting to worry me.
The Yugoslavian leader (bottom right) sprints up, looking to rally the guy the sniper put man down last turn. But one of Blue's guys (center left) spots him and react fires...
Which causes the bad guy boss to fall back and hunker right where he started from (bottom left, red bead).
The bad guy in Bunker 3 (bottom center) is pinned, but he opts to fire instead of rally, and puts Blue man down (top center)...
If you're wondering, Team 6-4+ has been sitting tight in the southwest this whole time, just outside the wire, waiting for 6-2 and the CDM (only the CDM guys are still in the fight!) to clear the way.
Anyway, Blue is now on his back, but one of his boys returns fire on Bunker 3 (bottom right)...
Forcing the bad guy to fall back and hunker.
One of Blue's guys moves up (bottom center) and fires at the enemy leader (behind APC at top right), missing.
Another of Blue's guys moves up and fires at the bad guy leader again, missing again. He checks on Blue...
Out of the fight.
The CDM grenadier (bottom right) pops a grenade at the damn bad guy leader (top left)...
The near miss forces him to fall back off the map.
Without their leader now, the few remaining bad guys (seven guys minus two out of the fight and two run off the table) try to rally themselves back into fighting shape.
The bad guy in Bunker 3 (bottom left) is good to go, but the guy in Bunker 2 (far right) succumbs to his wounds.
One of Blue's guys moves up, right through the main gate, and fires at a bad guy that's already man down, missing.
Atop the rocky outcropping, the grenadier takes steady aim, with the sniper cheerleading.
The grenade hits Bunker 3, putting the bad guy there 'man down' for the third time this fight!
Another of Blue's CDM troops (bottom left) moves up and fires (top right, same guy the CDM soldier at center fired on), missing.
The bad guy at Bunker 3 (bottom left) self rallies (recovers, actually) successfully, but he's the last bad guy on the board because his buddy that was man down (top right) tries to self recover and bleeds out.
The CDM grenadier (top left) pumps another grenade at Bunker 3 (bottom right)...
And all bad guys have been eliminated from the map.
Meaning...
Mission accomplished, Team 6-4+ is able to move up...
And shoot through the hole in the enemy's defenses towards the target building.
The CDM troops police up Blue and fall back to get him medevac'ed.
And they do the same in the northwest for Tico. Then the CDM, without CLEF leadership, sets off to continue to make noise to hold the attention of nearby bad guys so that Team 6-4+ can work its way towards the target building. Overall, and despite the CLEF casualties, the mission went pretty damn well, with decent enemy casualties, light friendly casualties, and not only was the hole in the perimeter punched, it was done pretty damn quickly.
The medics took a look at Tico and Blue; Tico's okay, just needs some light duty for about a dozen days or so (eleven to be specific, according to my die rolls), but Blue has got it worse and will be evac'ed by to Cuba. Another CLEF member permanently out of the campaign.
Well, the first phase of the operation is finished, next is on to the target building for the actual In Extremis Hostage Rescue mission, conducted to secure Turk and Panda, currently being interrogated by a Serbian team. I've already played this, just need to write it up; I'm hurrying!
V/R,
Jack