WARNING: THIS FIGHT IS IN-SANE! AND NOT FOR THE SQUEAMISH (I had to cheat a little bit)!!!
It's 1700 on 3 Feb 1990, and the CLA's 1st Troop, 5th Tank Battalion, supported by F Company, 4th Infantry Battalion, follows up its earlier victory against the enemy's 2nd Armored Battalion by carrying the attack forward, pursuing them into the streets of Artemisa. The CLA pushes in with armor supporting dismounted infantry, but the CLA is about to discover the horrors of street fighting, and it will be particularly difficult as the CLA's spearhead has been cut off from the main body by regime artillery, forcing the CLA to push into the initial assault with a relatively small force.

D-Day
...
15) 4th Infantry Battalion's 1st Air Assault Company conducts an air assault southeast of Sandino to counter enemy mechanized forces of 3rd Infantry Battalion (forcing 1st Airborne Battalion's right flank).
16) 9th Popular Force Battalion conducts a spoiling attack on the regime's 7th Infantry Battalion in the Matanzas garrison.
17) 2nd Air Assault Company, 7th Infantry Battalion, inserts east of El Rincon to block the escape of the regime's 6th Armored Battalion.
18) C Company of the UWG fought a running battle in the Escambray Mountains to delay/halt the regime's 12th Mechanized Battalion moving west.
D+1
19) A Squadron SOF holds off the regime's 2nd Airborne Company, 1st Airborne Battalion at the Radio Station in downtown Havana, while B Squadron SOF and 8th Popular Force Battalion move to reinforce.
20) 2nd Airborne Battalion, attacks north of Sandino to eliminate the regime's 4th Infantry Battalion.
21) 7th Infantry Battalion, attacks north of Sandino to eliminate the regime's 5th Territorial Infantry Battalion.
22) Colonel Huistrella's Unconventional Warfare Group fight another desperate holding action in the Escambray Mountains, this time against the regime's 10th Territorial Infantry Battalion.
D+2
23) The 5th Tank Battalion squares off against the regime's 2nd Armored Battalion just west of Artemisa.
24) 9th Popular Force Battalion holds the line at Matanzas as the enemy's 7th Infantry Battalion attempts to break out to reinforce Havana.
25) 6th Infantry Battalion, with support from 5th Tank Battalion, engages the enemy 6th Armored Battalion's spoiling attack.
26) The 5th Tank Battalion and 4th Infantry Battalion take part in heavy street fighting in Artemisa against the regime's 2nd Armored Battalion.
 The opposing forces, with CLA on the right and regime on the left. The CLA is Pendraken Americans from their Vietnam range, with a WWII jeep and plastic Takara tanks. The regime is Minifigs modern Warsaw Pact, with a Pendraken German WWII FJ mortar team and plastic Takara tank.

Commander, F Co, 4th Inf Bn: Captain Chavez

Commander, 1 Troop, 5th Tank Bn: Captain Fordesante; as usual, not a leader, just a tanker. He really pisses me off in this fight. I can't believe Han/Indy/Jack let me down...
 The CLA force has a Command Stand representing Captain Chavez (infantry company commander), four (only four!?) rifle teams, two M-48s, and a jeep stand representing the 5th Tank Battalion commander.

5th Tank Battalion, Commanding Officer: Colonel Miguel Colavantes

"El Leon de El Sandino," already awarded the CLA's highest decoration for valor and gallantry, the Medall de Honor (F15): 4th Infantry Battalion, Commanding Officer: Colonel Cledado Estavante. You're probably wondering, 'why is Jack showing me this guy, he shouldn't be in the fight?' Well, consider it foreshadowing...
 The regime force, remnants of their 2nd Armored Battalion, has a Command Stand, five rifle stands (with RPGs), an AT5 Spandrel ATGM team, an 82mm mortar team, and a T-72 tank.
 Overview, north is up. The CLA force is spread across the left side of the map, at the outskirts of Artemisa, while the enemy is in the city. The regime troops are well aware Artemisa is their last stand.
 Captain Chavez, two rifle teams, and Captain Fordesante's tank in the north.
 In the south, Colonel Colavantes has two rifle teams and Tank 2 (T2).
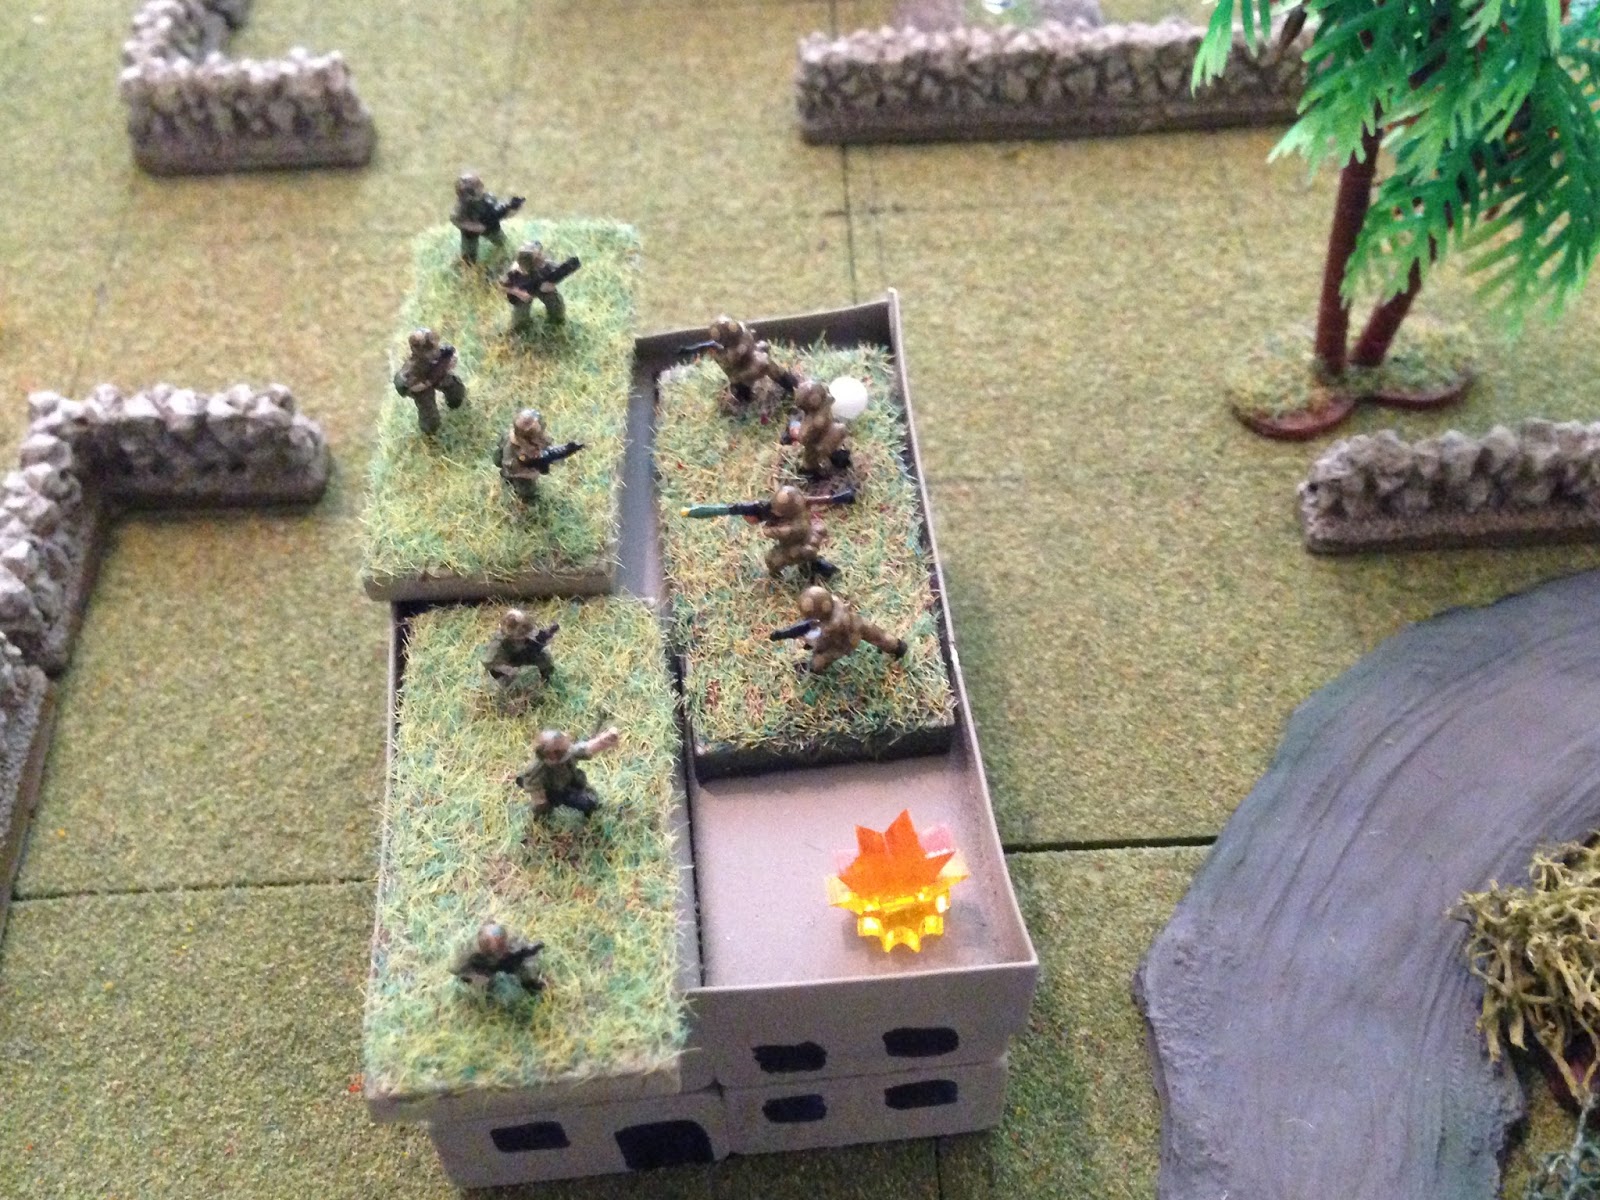
 Enemy forces in the north, with rifle teams all around, their CO at center right, their ATGM at far right (on roof), and their mortar at top right.
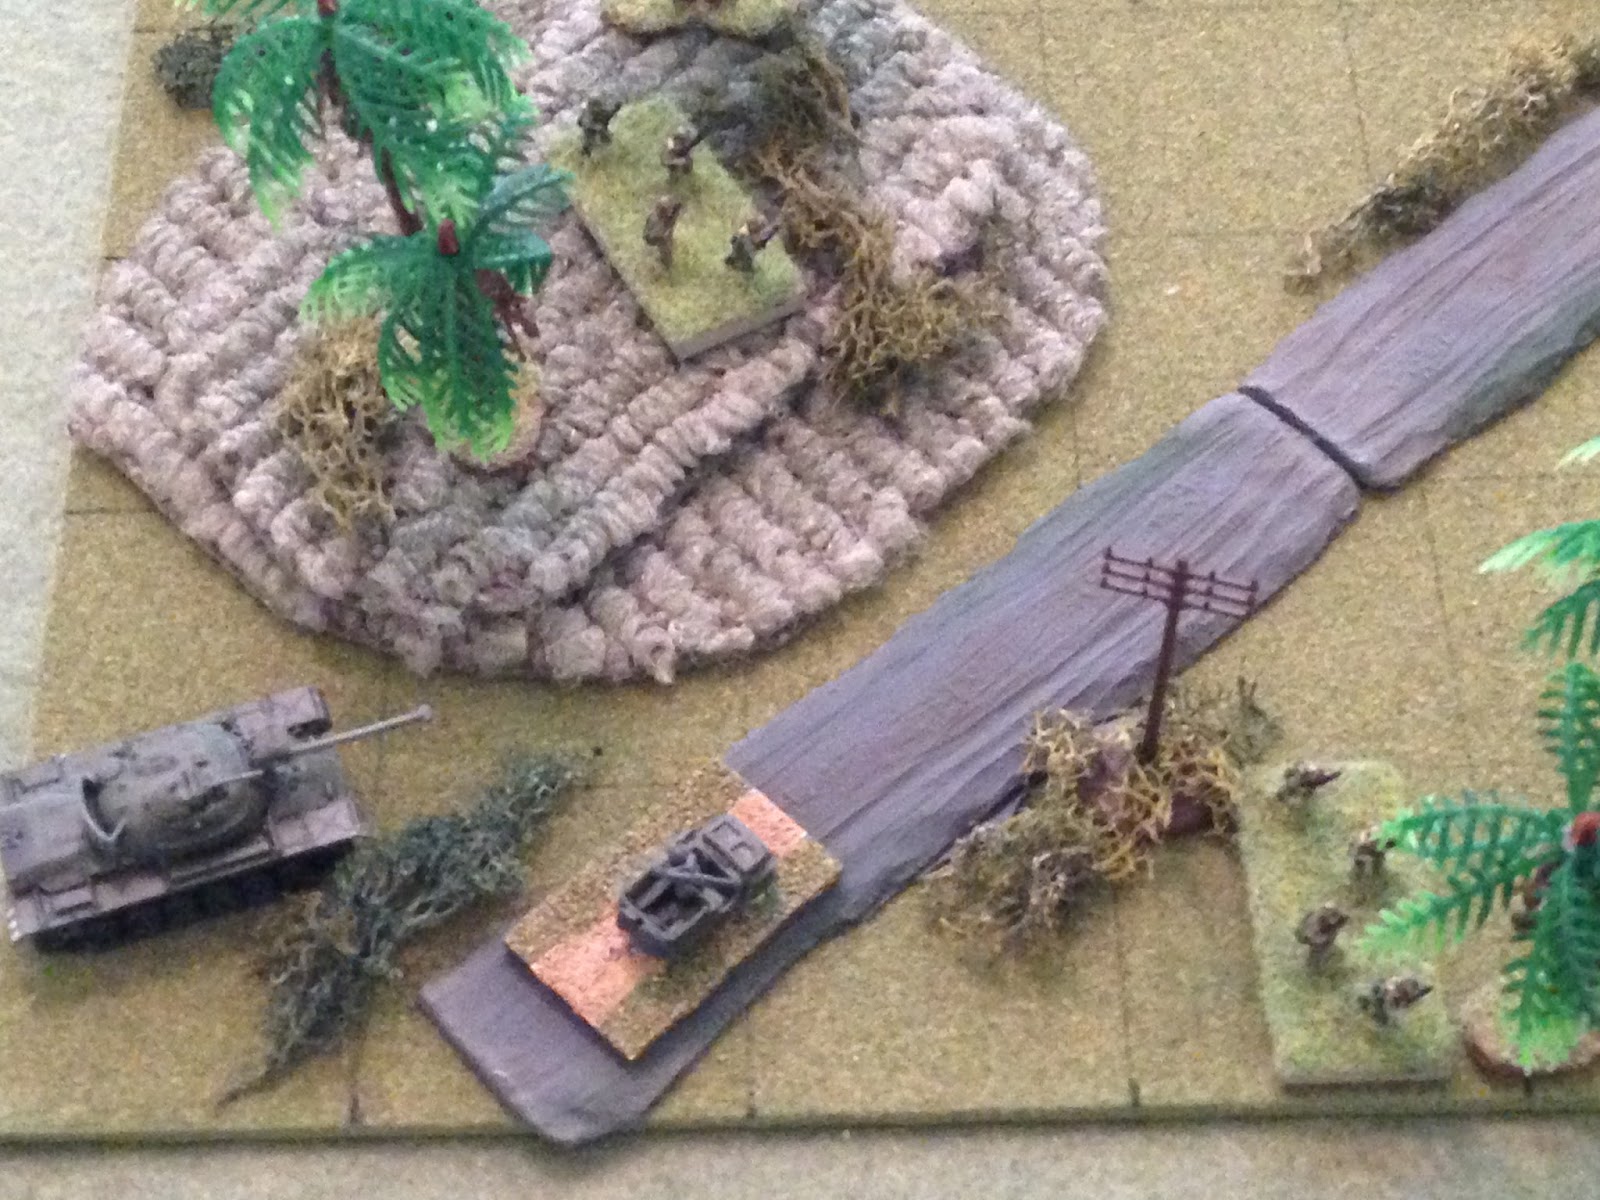
 View of the south, where you've seen everything at top, now feast your eyes on the T-72 hiding at the bottom of the screen.
The die roll says the regime forces are up first, and it starts with a bang...
 In the deep south, the enemy T-72 lines up T2 and fires...
 And right off the bat the CLA is down to one tank. Don't forget, they only have four rifle teams to start with.
 Then an enemy rifle team fires an RPG at Captain Fordesante's tank in the north...
 Forcing them to fall back.
 Another rifle team and another RPG attack, though this one lands short.
 The enemy ATGM team is well within range, but finds itself with a difficult shot on Captain Fordesante's tank, but they take the shot anyway. It misses.
 Enemy rifle fire rains down on Team 2 in the center, where they are taking cover behind a stout wall, which serves them well.
 But Team 3 in the south (atop knoll at bottom left) gets pinned by small arms fire.
 A second enemy team fires on Team 3 putting them out of the fight.
 The enemy mortar goes into action...
 Putting heavy casualties on Team 4 in the south.
 Colonel Colavantes rallies them, and they fire at an enemy team, but hit nothing due to the thick walls of the enemy building.
 Team 2 returns fire, to no effect, while Captain Chavez yells at Captain Fordesante to get his tank forward and into the fight. Fordesante yelled something about getting help and drove off the map!
 While in the far north, Team 1 fired ineffectually.
 With no tanks in the fight, Colonel Colavantes realizes it's up to him to do something. He leads Team 4 forward, looking to get into range to use their LAWs against the enemy tank. But the T-72's coax MG barks...
 And sends the good Colonel and Team 4 scooting back to cover (from far right explosion).
 In the center, Team 2 sees everything falling apart around them and decides to rush ahead. The enemy opens fire...
 But Team 2 makes it to the wall and opens up, putting heavy casualties on the enemy!
 Seeing Team 2's success, Team 1 in the north decides to try the same thing, and sprints out into the street, where the enemy promptly opens up on them...
 And sees them fall back into cover and hunker behind the wall.
 Recalling his training ("reinforce success, not failure"), Captain Chavez sprints to Team 2, leaving Team 1 (top left) to sort out its morale issues on its own. Being that this was a momentous occasion, I allowed the enemy to react fire on Captain Chavez' HQ Section (can't usually shoot at command stands)...
 But the brave Captain not only made it to Team 2, he promptly led them into close combat with the stricken enemy team in the building (for risking the react fire, I let the CO motivate Team 2 to an 'extra' move. Desperate times call for desperate measures, and the CLA is down to three rifle teams with no support, against five rifle teams with a tank and a mortar)...
 The Captain and Team 2 put the enemy team out of action, and then Chavez immediately gets on the radio and starts screaming for help.
 In the south, the T-72 crept forward to get line of sight to Team 4, then fired, but the CLA team was already hugging the ground and so suffered no further ill effect.
 Another bit of luck as the enemy mortar fires on Captain Chavez and Team 2, but the CLA troops take advantage of the thick overhead cover and easily weather the storm.
 Looking to speed up the CLA assault's demise by taking advantage of a stricken team in the north, the enemy rifle team there leaves the cover of their building to move forward and fire on Team 1. Their fire had no effect, but they had to stop at the wall anyway, but now are in position to close assault Team 1 next turn, and the odds of success are heavily in their favor (and Team 1 won't get to react fire).
But then there's a lull in the fighting, which the CLA puts to good effect (the CLA roll a 'scurry'). First up on the agenda is rallying Team 1, which is swiftly accomplished.
 In the south, Colonel Colavantes rallies Team 4...
 And they rush the T-72...
Yes, a little cheating: you're not supposed to be able to close assault during a 'scurry.'
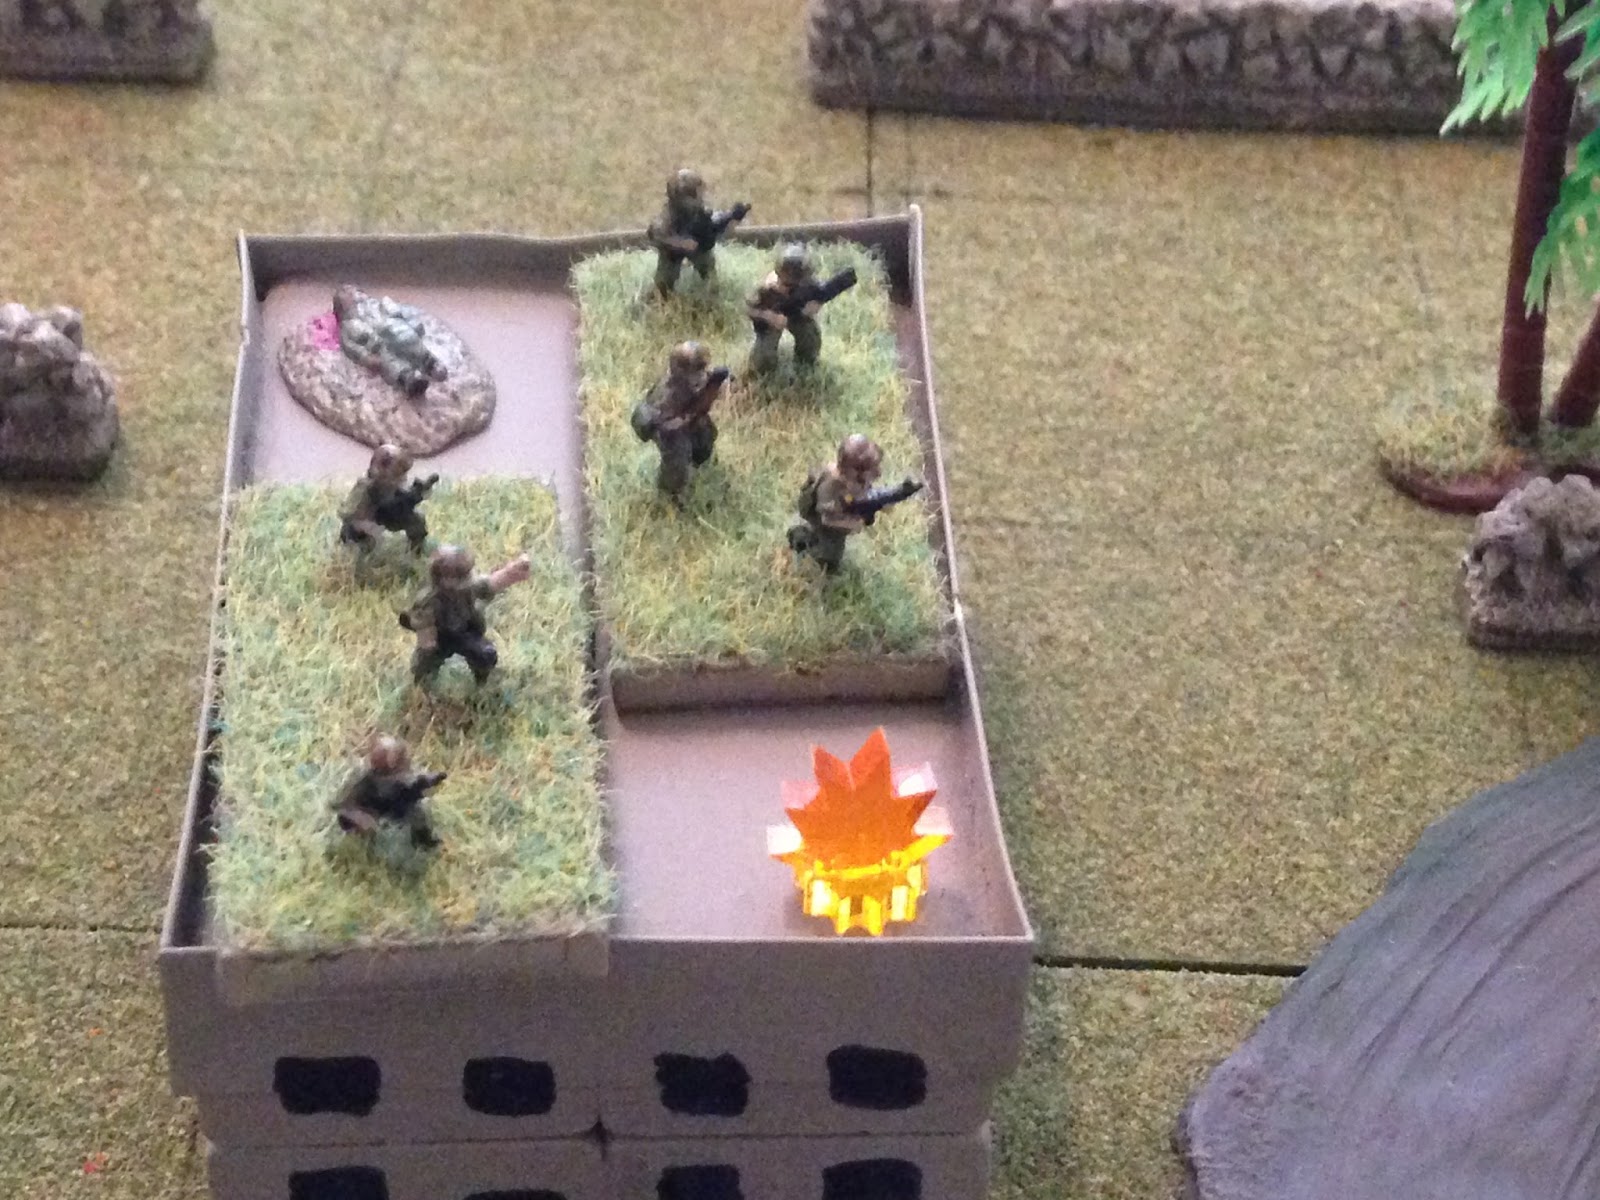
 The Colonel and Team 4 troopers climb all over that T-72, and finally get several grenades into the crew spaces, knocking them out. Colonel Colavantes then leads Team 4 into a nearby building (top right).
 The enemy CO fell back (into building at top left), while a rifle team moved south into cover (top right).
 This picture is looking south to north (Team 1 is off camera to left, with the Colonel and Team 4 off camera to right), and captures more cheating as Captain Chavez leads Team 2 into close combat against the enemy team that just left cover to go after Team 1...
 Still looking south to north, Captain Chavez and Team 2 beat the enemy team, then move into the nearby building (top center, they started in the building at bottom center; Team 1 is at top left).
 With the Colonel and Team 4 safely ensconced in a building, the enemy CO decides there's only one thing to do: he orders his ATGM team to fire, and the missile causes heavy casualties on Team 4. Take a good look at that rifle team at bottom right...
 Because, like a well-oiled machine they dash across the street and into close combat with Colonel Colavantes and Team 4...
 Taking advantage of the shock of the missile strike and casualties, they quickly put the CLA troops out.
 The enemy mortar fires on Captain Chavez and Team 2, to no effect.
 Captain Chavez calls Team 1 forward; they sprint across the street, but as soon as they reach the wall (top left) enemy troops (far right) open fire, pinning them there.
 Captain Chavez, having watched his only other team get pinned, knows only to keep moving forward, which he does with Team 2, braving enemy fire...
 And returning fire, which puts the enemy team out of the fight, and forces the mortar team to fall back (top right, red bead)!
 An enemy team lays down cover fire on Team 2 and Captain Chavez, while the enemy CO (center top) sprints towards his mortar team, looking to rally them...
 But the cover fire was more than cover fire, apparently, as it put Captain Chavez and Team 2 out of the fight.
This leaves Team 1, who is pinned at the wall, as the only CLA unit on the board...
 At which point Colonel Cledado Estevante, holder of the Medall de Honor, leads reinforcements from his 4th Infantry Battalion forward. He also managed to persuade Captain Fordesante, in his M-48, to take part in the fight. Team 1 (yellow bead) rallies...
 And the force fans out to continue its assault on Artemisa.
If you it bothers you tremendously that I've been cheating so much, you can just say "Jack got his ass kicked in Fight #26a, from here on out is Fight #26b."
 Wanting to help clear the way for the tank to move up, Team 1 rushes forward and fires on the enemy ATGM team, pinning them.
 Captain Fordesante promptly pushes his tank forward; they halt, then fire a 90mm HE round into the building. The building shakes, but the enemy troops inside are no worse for the wear.
The enemy promptly rallies its mortar team and ATGM team...
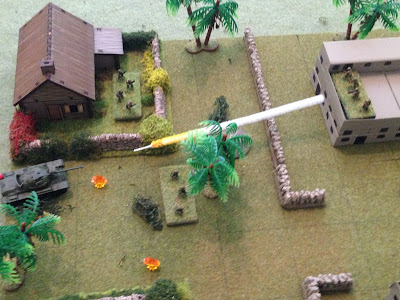
 Then fires an RPG at the thin top armor of Captain Fordesante's tank...
 Knocking it out.
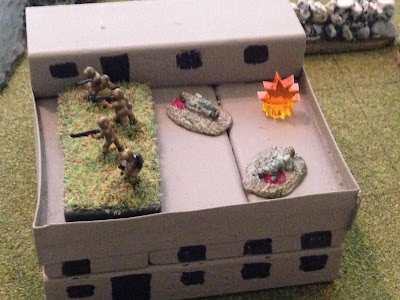
 In the south, an enemy team fires on Team 8, knocking them out. Team 7 returns fire, to no effect.
Are you kidding me!? I brought in reinforcements, and I'm still going to lose!?
 Team 1 fires, putting heavy casualties on the enemy rifle team in the bottom right building (with ATGM next to them, and the enemy CO still kinda hanging out in the middle of nowhere at right center).
 Team 6 (top left, on ground, with Team 1 just to their right in the building) opens fire, pinning the enemy's ATGM team (bottom right, yellow bead).
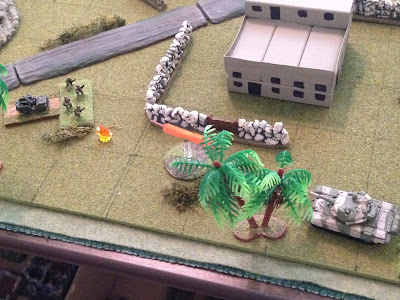
 Looking east, Colonel Estevante leads Team 7 past Fordesante's burning tank, where they put fire on the enemy's mortar team, getting heavy casualties.
Can we seize the opportunity? Team 1 is in good shape (at bottom left), as is Team 6 (off camera to bottom left), while the enemy CO is kind of standing around at center left (right next to the 'tracer'), while the mortar team and a rifle team are 'men down,' and the ATGM is pinned. They do have one rilfe team in good shape still, off camera to right.

 And then they sprint forward, ending at the wall next to the Colonel and Team 7.
 The enemy CO has to make a tough decision: does he go north and rally the mortar team (top center), or south and rally the rifle team (far right). He chooses the latter, so he sprints into the building and tries to rally the rifle team, but they've taken too many casualties and melt away!!! He does, however, manage to rally the ATGM team, though it's not a whole lot of use against infantry in the open.
 In the south, the enemy rifle team pops up (bottom right), and Team 7 react fires, but misses.
 The enemy fires on Team 1, and pins them.
Off camera at top right, the mortar team tries to rally, but they stay 'men down.'
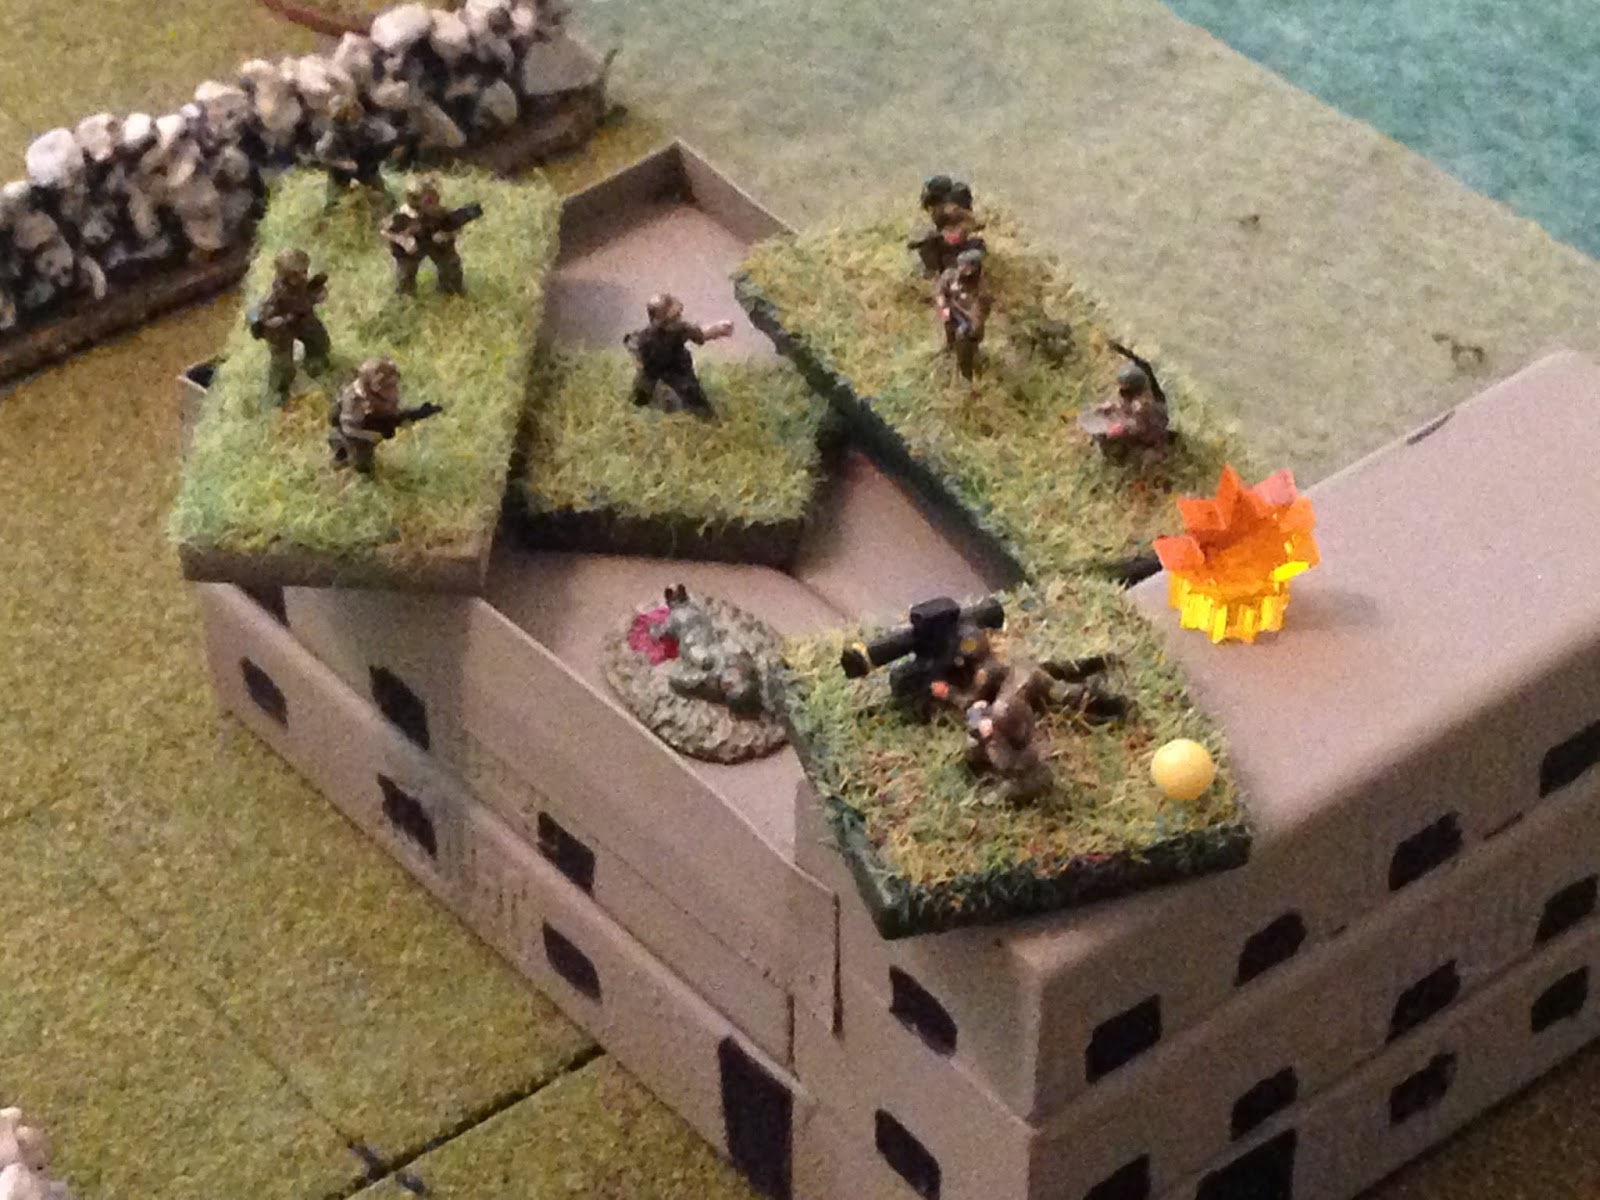
 Team 6 moves up (top left) and fires on the enemy ATGM team, pinning them (far right, yellow bead), while Colonel Estevante (center) rallies Team 1...
 Then leads them in a sprint across the street and into close combat with the enemy CO and a pinned ATGM team...
 With the Lion of Sandino present, the issue was never really in doubt, was it?
 With that, the enemy's mortar team (top right) and last rifle team (bottom left) surrender to the CLA troops. There are still remnants of 2nd Armored Battalion out there running around in the city, so the fight for Artemisa is not finished. The way I see it, the stoic defense by this handful of regime troops bought the men behind them time to rally and reorganize.
Wow, what a fight! I ain't too proud to admit I got my ass kicked, and I'm not ashamed that I brought reinforcements in to keep the fight going as, in the overall scheme of things, it had to happen anyway. I'd have just left the table set up, pulled the troops down, re-rolled the force compositions, and went at it again. So doing it this way saved me a little time, and was a lot of fun, for me anyway! I don't mind losing, I just want a good fight, though I need to have an ultimate victory as my whole Imagi-nation thing doesn't work if the revolution fails. So work with me on this, please ;)
Casualties:
CLA: ~40 KIA/WIA, one M-48 destroyed, one M-48 damaged (repairable).
Regime: ~35 KIA/WIA, ~10 POW, one T-72 destroyed.
Colonel Estevante was awarded the Estrella de Plata for his actions in leading the reinforcements in to salvage the attack, as well as leading the final close assault which broke the back of the enemy's defense. The Colonel was also lightly wounded and received the Corazon Purpura.
Colonel Colavantes was decorated with the Estrella de Plata for his valor in leading the close assault to knock out an enemy tank. The Colonel was later killed in action.
Captain Chavez was decorated with the Estrella de Plata for his indomitable spirit in always pushing forward, and for his valor in leading several close assaults. Captain Chavez was also awarded the Corazon Purpura as he was wounded and is out for the remainder of the campaign.
Lt Proviso, Team 1, F Co, 4th Inf Bn, was decorated with the Estrella de Bronce for leading several close assaults.
Sgt Cesare, Team 2, F Co, 4th Inf Bn, was decorated with the Estrella de Bronce for leading several close assaults. Sgt Cesare was killed in action.
Sgt Espinale, Team 4, F Co, 4th Inf Bn, was decorated with the Estrella de Bronce for close assaulting an enemy tank. Sgt Espinale was wounded in action and out for the remainder of the campaign.
Well, that's the last fight of D+2, need to do up the SITREP and plan the next set of fights for D+3.
V/R,
Jack

Commander, F Co, 4th Inf Bn: Captain Chavez

Commander, 1 Troop, 5th Tank Bn: Captain Fordesante; as usual, not a leader, just a tanker. He really pisses me off in this fight. I can't believe Han/Indy/Jack let me down...

5th Tank Battalion, Commanding Officer: Colonel Miguel Colavantes
"El Leon de El Sandino," already awarded the CLA's highest decoration for valor and gallantry, the Medall de Honor (F15): 4th Infantry Battalion, Commanding Officer: Colonel Cledado Estavante. You're probably wondering, 'why is Jack showing me this guy, he shouldn't be in the fight?' Well, consider it foreshadowing...


The die roll says the regime forces are up first, and it starts with a bang...


But then there's a lull in the fighting, which the CLA puts to good effect (the CLA roll a 'scurry'). First up on the agenda is rallying Team 1, which is swiftly accomplished.


Yes, a little cheating: you're not supposed to be able to close assault during a 'scurry.'


This leaves Team 1, who is pinned at the wall, as the only CLA unit on the board...


If you it bothers you tremendously that I've been cheating so much, you can just say "Jack got his ass kicked in Fight #26a, from here on out is Fight #26b."


The enemy promptly rallies its mortar team and ATGM team...


Are you kidding me!? I brought in reinforcements, and I'm still going to lose!?


Can we seize the opportunity? Team 1 is in good shape (at bottom left), as is Team 6 (off camera to bottom left), while the enemy CO is kind of standing around at center left (right next to the 'tracer'), while the mortar team and a rifle team are 'men down,' and the ATGM is pinned. They do have one rilfe team in good shape still, off camera to right.

Team 1 (top left, with Colonel and Team 7 at center left at palm tree) fires on the enemy ATGM team, but misses.


Off camera at top right, the mortar team tries to rally, but they stay 'men down.'


Wow, what a fight! I ain't too proud to admit I got my ass kicked, and I'm not ashamed that I brought reinforcements in to keep the fight going as, in the overall scheme of things, it had to happen anyway. I'd have just left the table set up, pulled the troops down, re-rolled the force compositions, and went at it again. So doing it this way saved me a little time, and was a lot of fun, for me anyway! I don't mind losing, I just want a good fight, though I need to have an ultimate victory as my whole Imagi-nation thing doesn't work if the revolution fails. So work with me on this, please ;)
Casualties:
CLA: ~40 KIA/WIA, one M-48 destroyed, one M-48 damaged (repairable).
Regime: ~35 KIA/WIA, ~10 POW, one T-72 destroyed.
Colonel Estevante was awarded the Estrella de Plata for his actions in leading the reinforcements in to salvage the attack, as well as leading the final close assault which broke the back of the enemy's defense. The Colonel was also lightly wounded and received the Corazon Purpura.
Colonel Colavantes was decorated with the Estrella de Plata for his valor in leading the close assault to knock out an enemy tank. The Colonel was later killed in action.
Captain Chavez was decorated with the Estrella de Plata for his indomitable spirit in always pushing forward, and for his valor in leading several close assaults. Captain Chavez was also awarded the Corazon Purpura as he was wounded and is out for the remainder of the campaign.
Lt Proviso, Team 1, F Co, 4th Inf Bn, was decorated with the Estrella de Bronce for leading several close assaults.
Sgt Cesare, Team 2, F Co, 4th Inf Bn, was decorated with the Estrella de Bronce for leading several close assaults. Sgt Cesare was killed in action.
Sgt Espinale, Team 4, F Co, 4th Inf Bn, was decorated with the Estrella de Bronce for close assaulting an enemy tank. Sgt Espinale was wounded in action and out for the remainder of the campaign.
Well, that's the last fight of D+2, need to do up the SITREP and plan the next set of fights for D+3.
V/R,
Jack