All,
AKA, Unit 101's 8th Fight of Operation Payback
It's 1130 on 14 Jul 1990, and Unit 101 is in the thick of it near Langkawi, Malaysia. After going it alone caused logistics and force projection problems for the Cubans, and drew the ire of some erstwhile allies (or at least neutrals and potential allies), Major Villanueva and Unit 101 are working a bilateral operation with Malaysian Special Forces to take down The Persian, a terrorist with ties to the ambush of a Cuban diplomatic envoy in Morocco.
The Persian's compound is relatively remote, and while not fortified, it does have a large contingent of armed men protecting it. The Cubans and Malaysians just finished Phase 1 of the operation, which was securing the southern end of The Persian's compound. Several vehicles were hit and moderate casualties suffered; Rake (Unit 101's senior enlisted man) and Captain Choy (the Malaysian SF commander) quickly reorganize the task force. Major Villanueva, leading the Unit 101 direct action element which will close assault The Persian's house, moves up to join the task force on the southern end of the compound, leading a couple Malaysian vehicles with replacements forward.
Rake and Captain Choy quickly got one of the damaged M-113s back into action, then integrated the new vehicles and replacement troops. Everyone reviewed the scheme of maneuver and checked comms, then stepped off, crossing the line of departure. Phase 2, the securing of the north end of The Persian's compound, is under way (Phase 3 is Major Villanueva leading the shooters to take down The Persian's house).
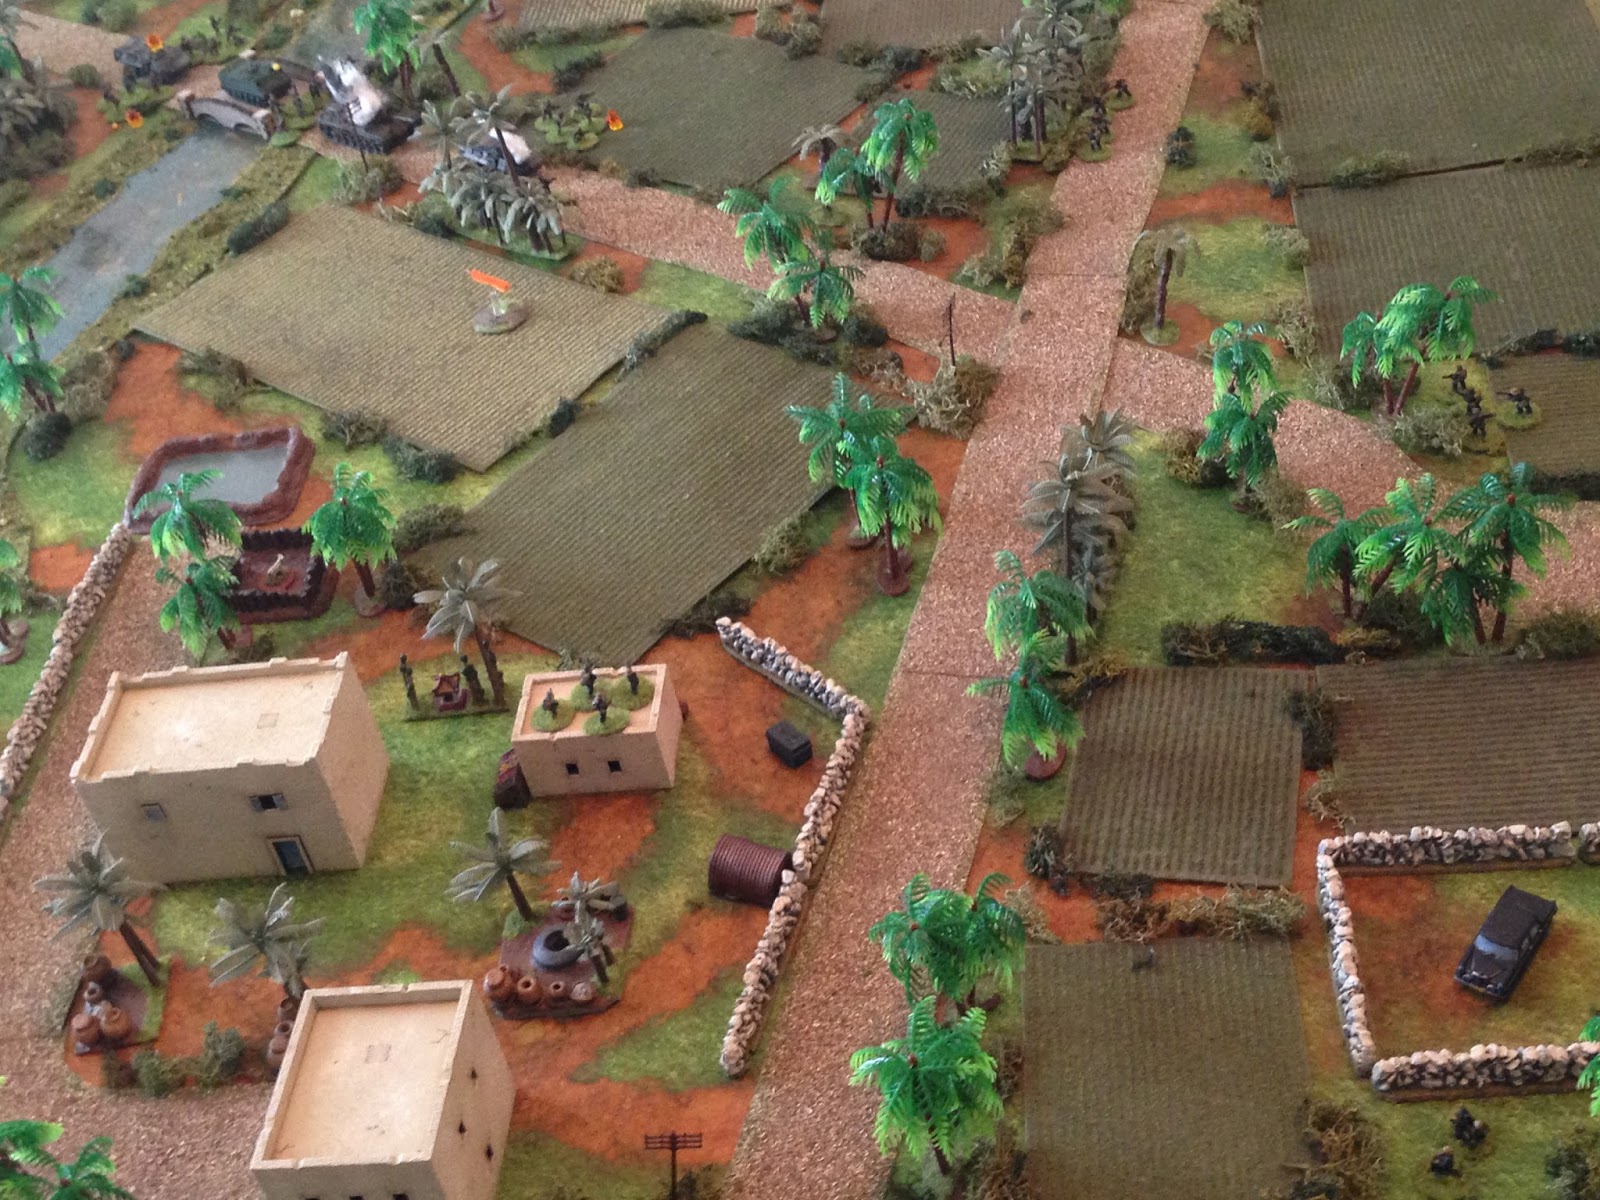
Overview of table, north is up. The Persian's house is at top left, the north end of the compound at top center, with a coconut grove just east (right) of the eastern-most buildings. The Cuban/Malaysian task force will enter the table in the southeast (bottom right).
The table is 4' x 4' on a new mat I bought, played out solo in 15mm using Ivan's "5Core Company Command" rules, though with "Five Men at Kursk"-style activation (each team and vehicle gets an activation dice, each team and vehicle can act and react once per turn).
The opposing forces, resplendent in 15mm. The M-113 is Old Glory, the M-48 and Technical are Peter Pig, the VABs are QRF, the bad guy infantry is Peter Pig, and the good guy infantry is Flashpoint Minis.
Here is the good guy force for fight number one. Two VABs and an M-113 carrying four rifle teams, the Malaysian command team, and the Cuban team, and an M-48 tank with 90mm gun.
Callsigns are as follows:
Captain Choy's team: Red Dog 6
Rake's Cuban team: Blue Dog 33
Malaysian Rifle Team 1: Cobra 11
Malaysian Rifle Team 2: Cobra 12
Malaysian Rifle Team 3: Cobra 21
Malaysian Rifle Team 4: Cobra 22
VAB 1 (carrying Cobra 11 and 12): Viper 43
M-113 (carrying Red Dog 6 and Blue Dog 33): Twister 32
VAB 2 (carrying Cobra 21 and 22): Viper 44
M-48 tank: Tiger 27
Not pictured is the follow-on force for Phase 3:
M-113 carrying Major Villanueva's team: Twister 39
Major Villanueva's team: Blue Dog 22
The Malaysians are Flashpoint ARVN troops, the Cubans are Flashpoint Aussies.
The bad guys, or, more appropriately, the potential bad guys. I'm using blinds (with dummies) to figure out enemy troop composition and placement, so I don't know how many bad guys will actually be on the table, but this is how many they could have. Seven rifle teams (two with RPGs), an MG team, a recoiless rifle team, an 82mm mortar team, a command team, and a Technical with .50 cal HMG.
The troops are all Peter Pig NVA/VC. And Martin, they are very bad guys! ;)
Overview of the map, this time with troops placed. I got kinda lucky on the bad guy blinds: there are not nearly as many bad guys as there could have been, and while they have another damn mortar, that's the only heavy weapon they have. You can see the good guys on the road at bottom right, and the bad guys really spread out, with some at left, top left, top center, and top right.
The good guy initial setup: a VAB, Viper 43 (carrying Cobra 11 and 12) is in the lead, followed by the tank (Tiger 27), Twister 32 (carrying the two command teams, Red Dog 6 and Blue Dog 33), followed by the other VAB, Viper 44 (carrying Cobra 21 and 22). Major Villanueva's team, Blue Dog 22, starts off map, but will enter in M-113 Twister 39 as the compound gets closer to being secured, then they will dash directly for The Persian's house.
In the southwest the enemy has two infantry teams, one with RPG, the other just a 'regular' rifle team. A second rifle team can be seen at top left.
The northwest corner. The guys from the top left of the previous pic are at bottom left. The Persian's house is at top left, where the enemy mortar team shelters behind a stone wall. There is a rifle team on the building at top right.
The northeast corner of the table, with the guys from top right of the previous pic now at top left. The coconut grove is at top center, and you can barely see them, but there's a rifle team back there. Lastly, the enemy has an RPG team at far right, on the east side of the river.
The bad guys have a decent amount of troops, but are really lacking heavy weapons, and they are seriously spread out across the table, meaning it's going to be really hard for them to support each other. The good guys are once again walking into an ambush, and I have a feeling this whole fight will turn on how much the bad guys are able to accomplish in the opening salvo. If the good guys can weather the initial storm, their overwhelming firepower and the enemy's inability to support each other should come into play.
Another look at the northeast corner, looking from behind enemy lines. You can see the bad guy rifle team at the grove (bottom right) and the RPG team on the east side of the river (far left), which actually puts them in a great flanking position on the good guys, who are at top left and will be moving over the bridge and up the road from left to right.
Time to go!
The Cuban/Malaysian column gets moving, with Viper 43 pushing forward onto the bridge, followed by the tank, Tiger 27. Here you can see Major Villanueva's M-113, Twister 39, has pulled up at the tail end of the column.
The enemy maintains a tight rein on those trigger fingers...
So the column continues, with Twister 32 on the bridge, Viper 43 and Tiger 27 over it. Here you can see Major Villanueva's track has peeled off (bottom right), waiting for confirmation the north end of The Persian's compound is secure. Then they'll dash up the road and hit the house.
"RPG!!!" That damned enemy team on the east side of the river makes its presence known.
They send a rocket straight for the side armor of Tiger 27.
And their aim is true; the rocket slams into the side of the turret. A small explosion, then some muffled explosions from secondaries inside. Smoke billows out of the tank, though none of the crew make it out. The crew of Twister 32 is pinned (you can just see the yellow bead on the hull of the M-113).
Well, my overwhelming firepower didn't last all that long, now did it?
All the troops dismount their vehicles. It's deja vu all over again!
As the Cuban and Malaysian troops hit the deck and look to get themselves organized and into the fight, an enemy team in the southwest (bottom left) launches a second RPG, this time at the lead VAB, Viper 43 (top center, with Tiger 27 burning right behind it).
The rocket slams into the armored personnel carrier, immobilizing it! The crew bails out, while Cobra 11 is suppressed (red bead) and Cobra 12 is pinned (yellow bead).
The RPG had just gone out from the team at top left when their buddies at bottom center opened fire on Cobra 12, suppressing them (top center).
In the north, an enemy rifle team (bottom center) opens up on the column (top center), pinning Cobra 21, still on the south side of the bridge (top center, with Cobra 11 suppressed behind the trees at center top right and Cobra 12 suppressed at top right).
Then the enemy mortar team (bottom right) gets in on the action, pumping rounds at the column (top left, with the enemy rifle team that just fired in the building at center bottom left).
82mm mortar rounds rain down on the rear of the column, suppressing the crew of Viper 44 and pinning Cobra 22 (yellow bead at bottom). Cobra 21 is at top right, already pinned by enemy rifle fire.
From the west, an enemy rifle team moves up (far left, with an RPG team at center and another rifle team at bottom right, which is the southwest corner) and fires on the head of the column, putting Cobra 12 'men down' (top right)!!!
I said this fight would come down to the opening salvos; the bad guys seem to be getting their damn licks in!
In the north, an enemy rifle team moves into the grove (bottom center right, with the initial RPG team at top left and the good guys at top center).
Captain Choy's command team, Red Dog 6 (bottom center) spots the enemy in the grove (top center) and opens fire...
But the rounds miss, and the bad guys (bottom right) return fire on Red Dog 6 (top left), though they miss too.
Time to get moving!
The Cubans of Blue Dog 33 (left) try to rally the pinned crew of Twister 32, but they stay pinned.
Blue Dog 33 then sprints to the head of the column (center left, from the bridge at bottom right), where they move to Cobra 12 and rally them back into the fight. Rake gets on the radio and calls for close air support, but can't raise the gunship! I thought we had this worked out by now!!!
At the rear of the column, Cobra 21 (center bottom) is pinned, but they help Viper 44 (right below them) rally, then they open fire on the grove (top center), pinning the enemy team there.
Twister 32's crew is pinned (the M-113 on the bridge at bottom center), but they man the .50 cal and open fire on the enemy building in the north (top left), but can't manage to hit anything...
The rear VAB commander, Viper 44, tries to rally Cobra 22 (yellow bead at bottom center).
But they're not having a good day and fall back, suppressed (red bead at bottom left, from center). While starting off a little shaky, their Sergeant manages to rally them back into the fight, and they take up good firing positions.
Viper 44 (bottom right) then turns its machine gun on the building that Twister 32 missed (top left) and cuts loose, putting the enemy rifle team there 'men down.'
Interesting. Like I said, if the good guys can hang in, their heavy machine guns and air support should be able to hurt the bad guys, even in cover, and the bad guys are so spread out they're going to have a hard time rallying troops back into the fight.
Viper 44 then falls back out of the mortar impact zone (bottom right).
Capt Choy and Red Dog 6 (bottom center right, between the tree and the bridge) face north and fire on the bad guys that initiated the ambush, the RPG team on the east side of the river (top center, with the grove at top left), pinning them.
Red Dog 6 then dashes up to Cobra 11 (top center, from bottom right), rallying them.
Cobra 11 (bottom right) then cuts loose with their rifles at the enemy rifle team at top left (there's an enemy RPG team in the trees at far left). The bad guys suffer 'men down'!
Some handy shooting there! With all the Cuban/Malaysian teams getting rallied, there's no way the bad guys are going to be able to move into position to rally each their suppressed/men down teams.
Cobra 11 decides they need to keep moving to clear mortar alley, so they dash ahead (top center, from top right), where they draw fire from the enemy RPG team in the southwest (bottom left), which pins them.
Thus ends Turn 1.
The enemy situation at the beginning of Turn 2 is already not looking so hot. They've got teams 'men down' in the building at center bottom left and just right of the crossroads at center top right, with no easy way to get troops to them to get them rallied. The guys at center top right at least have an RPG team nearby, but they're going to draw all kinds of react fire if they move right now. So the bad guys open up with their mortar team (bottom right again), on the head of the Cuban/Malaysian column (top left), hoping to do some damage that will allow their teams some freedom to maneuver.
Unfortunately for me, the rounds come in right on target. Cobra 12 is knocked out (bottom left), grabbing their casualties and looking to get out of Dodge, while Blue Dog 33 and Red Dog 6 are both pinned (yellow beads at bottom right and top center). Cobra 11 is pinned on the road off camera to left, while the VAB and M-48 seen here are both knocked out.
In the southwest, on the enemy's far right flank, the rifle team there (bottom center, with RPG team at top left) opens fire on Blue Dog 33 (top right).
The bad guys (top center) miss, and the Cuban Special Operations troops of Blue Dog 33 (bottom left) return fire, putting the enemy rifle team 'men down'!
The enemy RPG team in the southwest (bottom left) looks on in disbelief; their leader directs their fire at Cobra 11 (top center).
The bad guys (in the trees at top center) miss, but Cobra 11 (bottom center) returns fire and misses too.
The bad guys in the southwest are in a jam; they can't seem to hit anything, and they've got 'men down' teams at top left and bottom right. The RPG team (center) decides to move right to try and get their buddies on the right flank back in the fight.
But the movement (top left) draws the attention of Cobra 22 (bottom center), who was sitting tight on the south side of the bridge (bottom center). They cut loose, pinning the enemy RPG team in the road.
Back in the north, the other enemy RPG team, the one on the east side of the river (bottom center), opens fire on Red Dog 6 (top center).
The bad guys (top right) miss, and Captain Choy and his men (bottom center) return fire, but they miss too.
With the northern RPG team (top left) exchanging fire with Red Dog 6 (top center), the enemy rifle team in the grove (bottom center) opens fire on Cobra 21 (top center left)...
Suppressing them (red bead). But Viper 44 immediately pulls up alongside them; Cobra 21 rallies as Viper 44's machine gun sends a steady stream of tracers into the grove (top center)...
Knocking out the enemy team there. They grab their casualties and fall back, heading for the exit.
Cobra 21 then moves up, onto the bridge (top center left, from center bottom right), where they rally the M-113, Twister 32 (on bridge).
Then, to top it off, Cobra 21 turns its guns on the enemy RPG team on the east side of the river (top center) and opens fire.
The enemy RPG team is knocked out!
The tide has definitely turned, the enemy is on the ropes.
Twister 32 wants to get the hell off the bridge; they pick their way forward, doing their best not to run over any friendly crunchies. They end up on the north side of the road (top center left), adjacent Red Dog 6 (just below them, with Blue Dog 33 at bottom left).
Red Dog 6 moves up the road to Cobra 11 and rallies them.
The Cubans of Blue Dog 33 move up (bottom left) as Cobra 12 drags its wounded to the rear (far right, with Cobra 11 and Red Dog 6 at top left and Twister 32 at top center).
Blue Dog 33 (bottom center) takes careful aim at the enemy RPG team pinned on the road (top center left) and opens fire.
The enemy RPG team, so near to being able to help their 'men down' comrades (white bead), are cut to pieces by the Cuban Special Ops troops (left).
With the only 'healthy' team in the southwest gone, the two 'men down' rifle teams are dead meat. There's no way friendly teams can reach them to get them rallied.
Rake (bottom left, part of Blue Dog 33) is finally able to raise the gunship on comms, just as Cobra 11 moves up (top center) and spots the enemy mortar position (off camera to top left).
In the rear, Cobra 22 moves up to the bridge, as Twister 39 begins creeping forward carrying Major Villanueva's Blue Dog 22.
Turn 3 begins with the enemy line shattered, but a few die-hards still holding out. The enemy mortar team (bottom right) has eyes on Cobra 11 (top left)...
And drops several 82mm HE rounds right on top of them, knocking them out of the fight!
As Cobra 11 gets pounded at top left, Red Dog 6 and Blue Dog 33 move up in the south.
Viper 44 brings up Cobra 22 (bottom left) and Twister 32 brings up Cobra 21 (top center, with Red Dog 6 and Blue Dog 33 at center left).
Twister 44 and Cobra 22 move up in the south, chasing off the remnants of one enemy team (bottom left) and capturing two more (top left and bottom right).
While in the north Twister 32 stands overwatch while Cobra 21 captures an enemy team.
Cobra 11 and 12 fall back across the bridge with to establish a casualty collection point.
Twister 39, carrying Major Villanueva's shooters creeps forward (top left), waiting to hear the north end of the compound is secure.
While the gunship finally makes its arrival. It lines up on the enemy mortar position (top left) and makes a gun run from southeast to northwest, careful not to hit the target building (off camera to left).
The minigun makes quick work of the enemy mortar team.
Red Dog 6 calls the compound secure, and Twister 39 guns its engine, screeching to a halt (bottom center) at the entrance to The Persian's house (top center).
Major Villanueva and the shooters of Blue Dog 22 debus the M-113 and fan out, closing on the target building. Well, mission accomplished! The north end of the compound is secure and Blue Dog 22 has been deposited at the target building, to carry out what will be the last fight of Operation Dragon Forge.
The fight went about as I expected it to go (once I saw how light and dispersed the enemy opposition was), though with heavier casualties than expected. The Cuban/Malaysian force suffered 20 casualties, an utterly burned out M-48 tank, and a damaged VAB, while the bad guys suffered 20 casualties and 15 men captured. The Malaysians did a great job rolling with the punches in what was a pretty damned effective opening blast from the ambush, despite close air support not really showing up for the fight.
Next up is the final takedown, to see if we can capture The Persian alive.
V/R,
Jack