On a quick admin note, I just wanted to throw out that this battle report documents my FIFTIETH (50th) table-top game using Nordic Weasel Games' "5Core Company Command" rules. They sprung out of Ivan's "Five Men In Normandy" rules, and I was fortunate enough to have played a small role in bringing them to light. Certainly they won't be the only set of rules I ever play again, but insofar as we wargamers are always on the search for the "Holy Grail" of rules, I can say that, for tactical games at the reinforced platoon to reinforced company level from WWII to present (and possibly even earlier than WWII), I have no need for rules as I've found them. On to the battle, which is the first of D-Day +2 (D+2), the third day of fighting in the War of Liberation.
It's 0830 on 3 Feb 1990, and tanks of the CLA's 2nd Troop, 5th Tank Battalion, supported by C Company, 3rd Infantry Battalion, have run square into enemy armor of the 78th Tank Company and 70th Motor Rifle Company, 2nd Armored Battalion, just west of the city of Artemisa, on the island's western end.
...
14) 2nd Airborne Battalion engaged enemy armored forces of the 6th Armored Battalion in the village of El Rincon, en route to the Bay of Pigs landing site.
15) 4th Infantry Battalion's 1st Air Assault Company conducts an air assault southeast of Sandino to counter enemy mechanized forces of 3rd Infantry Battalion (forcing 1st Airborne Battalion's right flank).
16) 9th Popular Force Battalion conducts a spoiling attack on the regime's 7th Infantry Battalion in the Matanzas garrison.
17) 2nd Air Assault Company, 7th Infantry Battalion, inserts east of El Rincon to block the escape of the regime's 6th Armored Battalion.
18) C Company of the UWG fought a running battle in the Escambray Mountains to delay/halt the regime's 12th Mechanized Battalion moving west.
19) A Squadron SOF holds off the regime's 2nd Airborne Company, 1st Airborne Battalion at the Radio Station in downtown Havana, while B Squadron SOF and 8th Popular Force Battalion move to reinforce.
20) 2nd Airborne Battalion, attacks north of Sandino to eliminate the regime's 4th Infantry Battalion.
21) 7th Infantry Battalion, attacks north of Sandino to eliminate the regime's 5th Territorial Infantry Battalion.
22) Colonel Huistrella's Unconventional Warfare Group fight another desperate holding action in the Escambray Mountains, this time against the regime's 10th Territorial Infantry Battalion.
23) The 5th Tank Battalion squares off against the regime's 2nd Armored Battalion just west of Artemisa.
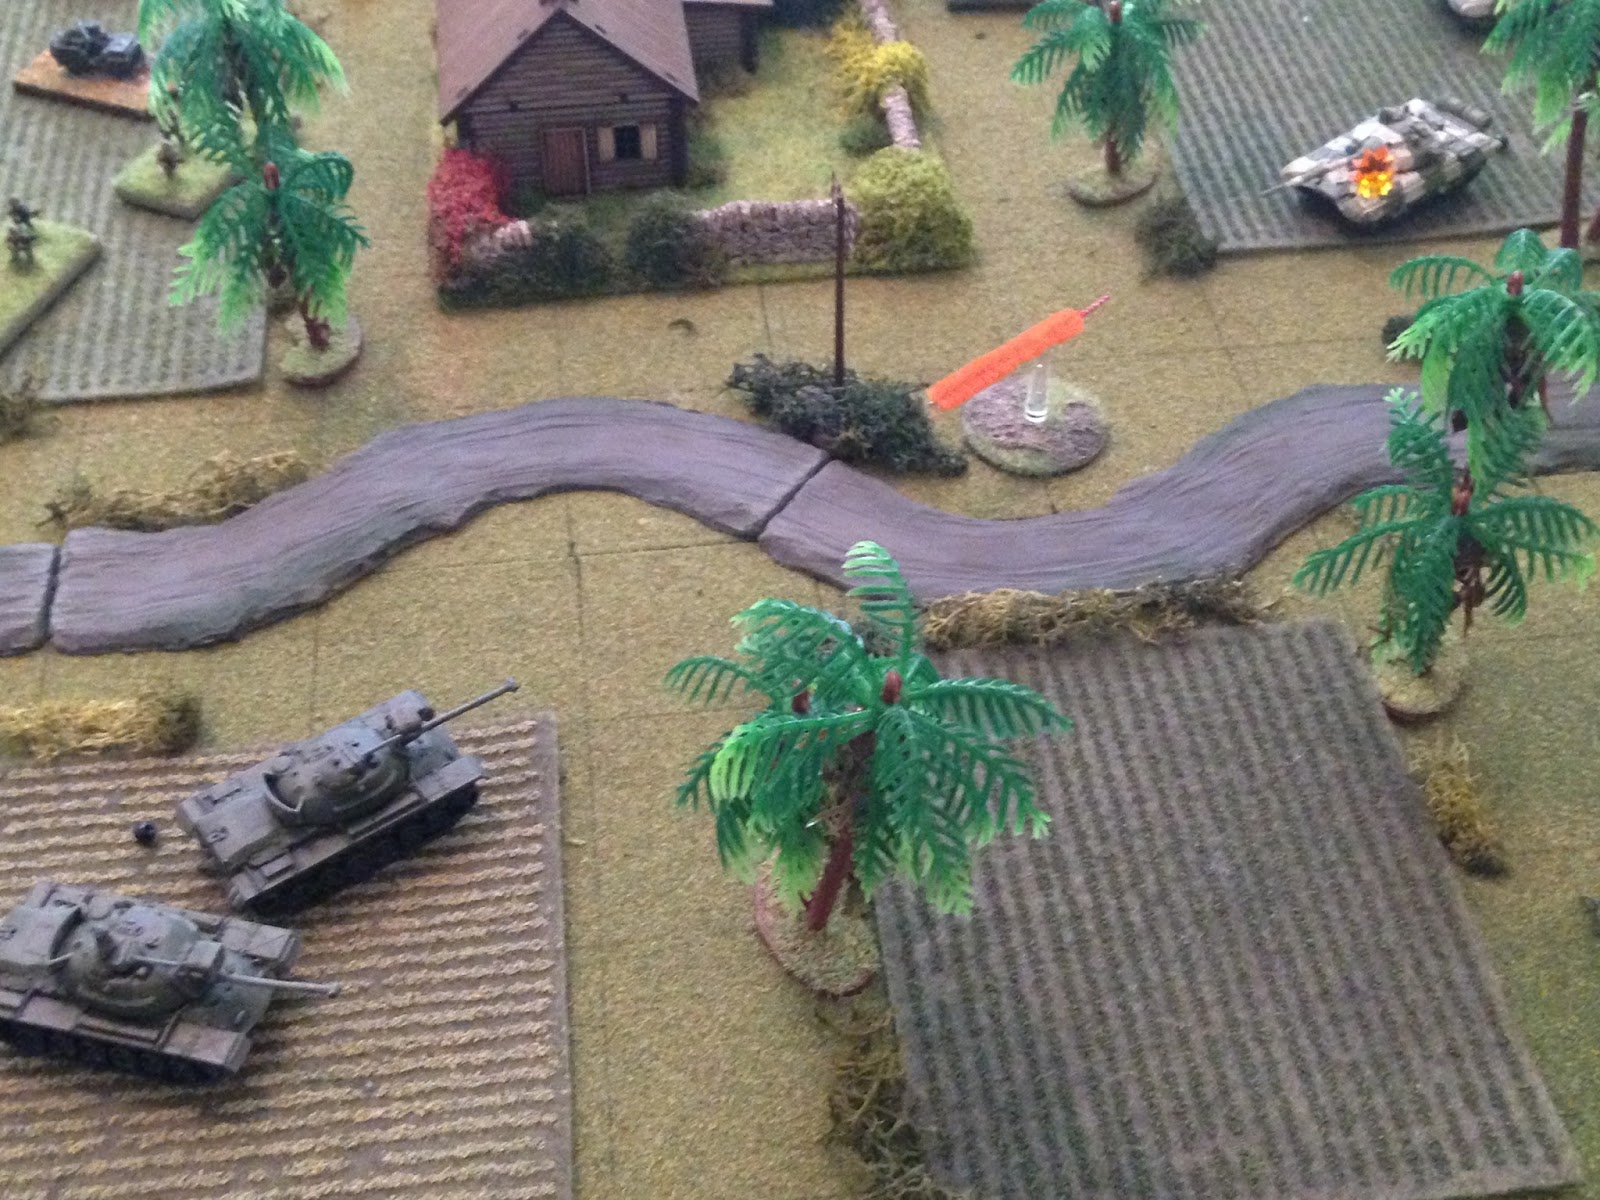
The opposing forces, with CLA on the right and regime forces on the left. The CLA is made up of Pendraken Americans and M-113s from their Vietnam range (the TOW on one of the 113s is from Minifigs), and plastic Takara M-48s. The regime is made up of modern Warsaw Pact troops from Minifigs, along with their BMPs and some Takara T-72s.
 Commander, 2 Troop, 5th Tank Bn: Captain Solar. He will be on table, but will not be treated as a command element, just as one of the tankers.
 Commander, C Co, 3rd Inf Bn: Capt Cruze
The CLA forces has a Command Stand, five rifle stands, an M-113 TOW, an M-113 .50 cal, three M-48A3s, and a jeep carting around the 5th Tank Battalion's commander.
 5th Tank Battalion, Commanding Officer: Colonel Miguel Colavantes
 The regime force has a Command Stand, four rifle stands, four T-72s, and two BMP-2s.
The opposing forces, clashing head-on in a classic meeting engagement, with CLA on the left (west) and regime on the right (east).
In the southwest, Captain Cruze has two rifle teams, while Captain Solar has his tank and one other.
While in the north, Colonel Colavantes has a tank, the HMG and TOW tracks, and three rifle teams.
In the northeast, the enemy has two tanks, and a BMP with two rifle teams (mounted). At bottom right is the enemy CO.
In the southeast, two more tanks and another BMP with two rifle teams mounted up.
A quick opposed roll, which the Communists win, and it's game time.
To start it off, a T-72 rolls forward in the southeast (far right), pulls up, then launches a 125mm round at Captain Solar's tank, missing...
Solar's crew replies, and the offending T-72's gun is knocked out, though the crew stays with the vehicle.
The other southern T-72 rolls forward and fires on the other M-48 (we'll call it T1), also missing.
Though T1's return fire also missed.
T1 is drawing a lot of attention; a T-72 in the north rolls up and fires, pinning the crew.
Sticking in the north, the enemy BMP there moves up, kicks out its two infantry teams, then fires its 30mm gun on Team 3, pinning them.
Amidst all the smoke and confusion of the mechanized fight, there is suddenly a lull, and T1 and Team 3 are able to rally (random event - 'lull').
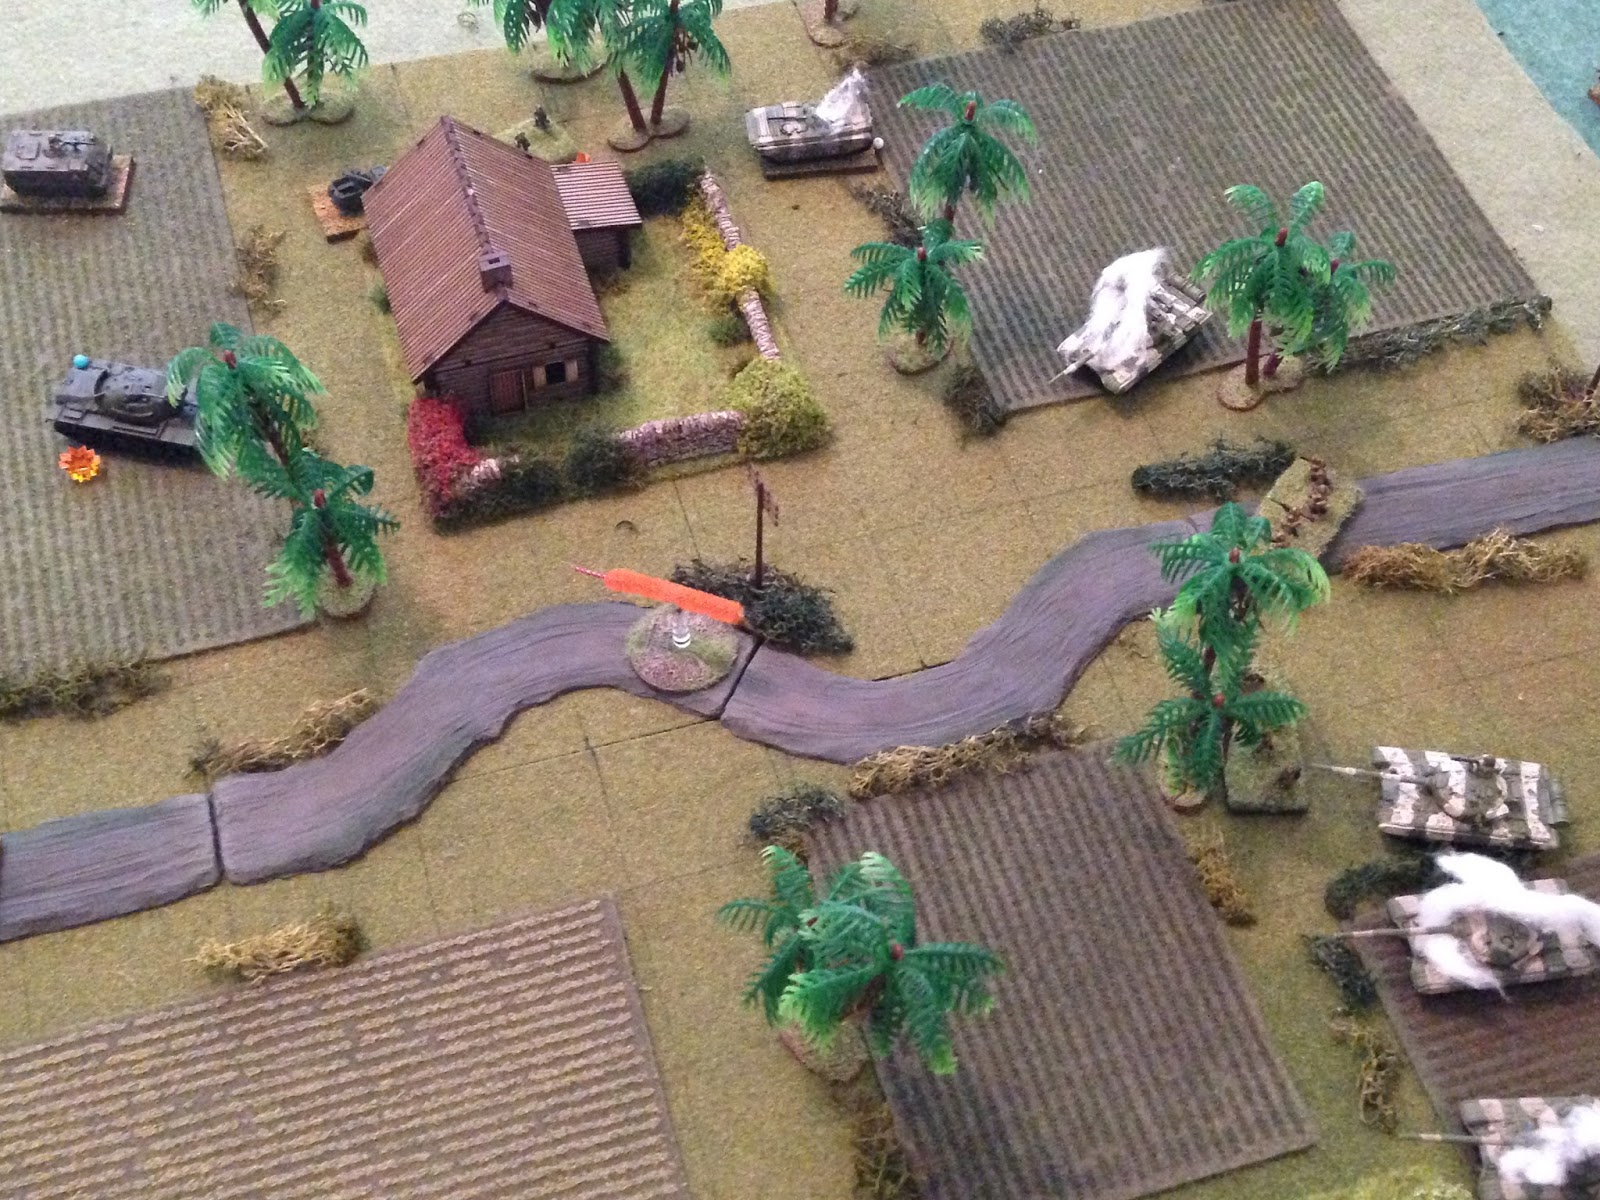
The HMG track opens up with its .50 cal on the enemy BMP in the north...
Pinning the BMP crew (top left), and forcing a rifle team to fall back (bottom right, red bead).
This is immediately followed up by Team 3 rushing ahead and loosing a LAW rocket at the BMP...
The BMP (top left) is immobilized, and the crew pops out, while the other rifle team in the north falls back (bottom right, next to their mates).
T1 rolls up and fires...
And knocks out a T-72!
Captain Solar rolls his tank up next to T1, then fires on a T-72 in the north...
Knocking out another T-72, and forcing one of the hunkering rifle teams (red beads at center right) to run off the map. The other northern T-72 returns fire on Captain Solar's tank, but misses.
At top right, the enemy CO rallies a rifle team, while the damaged T-72 (center right) retreats, but draws fire from Captain Solar's tank...
Ka-Boooooom!!!!
That's three burning T-72s and an immobilized and abandoned BMP. Things are not going well for the regime's 2nd Armored Battalion.
The BMP in the south drops off its human cargo (bottom right), then charges up the middle (center) and fires its 30mm gun on T1...
Forcing the CLA tank to fall back (bottom left, from center explosion).
The enemy's remaining tank moves very close to Captain Solar's M-48 and fires, but the round skips off, pinning the crew.
Wow, the regime's die rolling needs some work, they're having a rough time of it.
While the CLA's dice are doing just fine: the enemy CO leads a rifle team forward (center right), and Team 2 react fires...
Forcing the riflemen to fall back (bottom right, from center explosion).
In the south, an enemy rifle team moves up; Team 4 react fires, but misses.
The enemy riflemen fire on Team 4, pinning them.
In the north, having already knocked out a BMP with a close range anti-tank rocket, Team 3 looks to replicate their earlier success. The infantry move forward aggressively, then fire a rocket at the flank of the T-72... but miss.
The enemy tank returns fire with its machine guns, forcing Team 3 to fall back (far left, from explosion at top center).
Staying in the north, Tank 3 (far left, with Captain Solar's tank at bottom center) moves forward, and the enemy tank snap fires...
Forcing T3 (top left) to fall back (from explosion at bottom center).
Colonel Colavantes moves forward to Team 3 (top center, above house), and tries to rally them, but only gets them up to 'pin.' The TOW M-113 moves up and hastily fires an ATGM at the enemy T-72, but the missile soars wide...
The enemy T-72 returns fire...
Knocking out the TOW track, and forcing the two northern rifle teams to fall back (bottom center, red beads).
In the south, Captain Cruze leads Team 5 forward; the enemy AFV opens fire, but the CLA infantry dash through it.
Team 5 fires a LAW at the BMP...
The round hits but doesn't penetrate, though it forces the BMP and one rifle team (center, red bead, fell back from just off camera to left) to fall back.
The last enemy tank is making quite a stand: it fires on Captain Solar's tank...
Forcing Solar and his crew to fall back (top left).
The T-72 then falls back and rallies a rifle team (center top), while the enemy CO sprints south (between the two red beads) and tries to rally his men. The rifle team is good to go, but the BMP crew has seen enough death and destruction and heads for the hills!
The recently rallied rifle team moves back up to the positions in the southern house it just abandoned. Captain Cruze and Team 5 react fire, but miss...
The enemy team fires, but they miss too...
Poor bad guys, their dice no worky.
Team 5 cuts loose again, and pins the enemy riflemen.
But then the enemy team cuts loose a vicious fusillade...
Which puts Team 5 and Captain Cruze's HQ section out of the fight (top right), and forces Team 4 to fall back (bottom center, next to T1, also hunkering). Tank 1 tries to rally, but they fail and run off the map!
The CLA's attempts at rallying are turning disastrous: T1 has already left the map, and then Tank 3 (bottom left) and Captain Solar's tank (center) manage to rally, but then Teams 1 and 2 (bottom center teams in the trees) both ran off the map! But then Team 3 (top left) managed to rally.
What was once firmly in hand no longer seems so.
The enemy T-72 (far right) re-positioned slightly, then fired on Captain Solar's tank (top left), jamming his turret and putting the vehicle out of the fight!
The enemy sprinted a rifle team north (top center) to cover their right flank, and they fired on Team 3, to no effect.
While the enemy team in the southern house fired on Team 4 and missed, too.
Then another enemy rifle team (top right) fired on Team 4...
And that fire pushed Team 4 back to the table edge.
Both sides are pretty damn beat up at this point: the CLA has their Battalion Commander, one operational tank (and one damaged tank), one M-113 (with HMG), and two rifle teams. The regime has its CO, a T-72, and three rifle teams.
The enemy T-72 took another shot at Captain Solar's damaged tank, but missed.
Then Team 3 (top left) fired on the enemy's northern rifle team, but missed.
Captain Solar ordered his gunner to take command of the vehicle (bottom left) and fall back in search of maintenance crews to repair the tank, then sprinted to T3, took command, and moved them forward into a hull down position (top center). Meanwhile, the HMG track moved over and took cover behind the burning M-113 (bottom right).
Colonel Colavantes lead Team 3 forward (top center, from top left), while, off camera (in the southwest corner of the table) Team 4 rallied up to pin.
The enemy responds by having its T-72 move into cover, and shifting a second rifle team over to counter Team 3 and Colonel Colavante (top right).
The enemy CO moves up in the far south and rallies his rifle team there.
The T-72 takes a tough shot on Captain Solar, now in T3, and misses...
T3 returns fire with an equally tough shot...
But lands a lucky blow, knocking out the last enemy tank!
Colonel Colavantes and Team 3 move forward and capture two enemy rifle teams, thought the third, and the enemy CO, manage to escape. It was a bloody fight, but the CLA came out the better in what was a very evenly matched fight, that, quite frankly, mostly turned on the poor die-rolling by the regime force. In any case, the CLA will now take the next step forward in the west, into the city of Artemisa, on their way to liberate the capital city of Havana.
Casualties:
CLA: ~20 KIA/WIA, one M-48 damaged, one M-113 destroyed
Regime: ~25 KIA/WIA, four T-72s and one BMP destroyed
Captain Cruze, CO of C Company, 3rd Infantry Battalion, was severely wounded and is out for the remainder of the campaign.
Captain Solar, CO of 2nd Troop, 5th Tank Battalion, was decorated for valor with the Estrella de Plata, for the leadership and courage displayed in 1) placing his vehicle (T2) in the line of the fire of the enemy's norther armored force to protect T1's flank, 2) staying on the battlefield and continuing the fight after his tank was rendered ineffective, and 3) knocking out three enemy tanks (two with T2, one with T3). Also lightly wounded, awarded the Corazon Purpura.
Well, there's one, three more to write up and post!
V/R,
Jack


Another exciting AAR. As a treadhead, its nice to see a tank-oriented game using the rules.
ReplyDeleteChris,
DeleteThanks man. I think the rules handle tank-oriented games well, they just need more room than my 2' x 2' mini-table. They've worked really well on a 4' x 4', so long as I don't try to throw a whole tank company (per side) on there...
I'm definitely more a 'tanks support the infantry' guy, so I don't do this too often, but it's kinda fun ;)
V/R,
Jack