TF Hammer vs FLA 4th Company
Major Chavez
Commander, TF Hammer
Distinguished Service Cross, 2 x Silver Star, Purple Heart, War of Liberation and South Leon campaigns
Lieutenant-Colonel Halabrio
Commander, Task Group Halabrio
Distinguished Service Cross, Silver Star, War of Liberation, Operation Payback, and South Leon campaigns, one Combat Jump
Major Chavez leads his Task Force Hammer into combat against Communist insurgents of the Free Leon Army's (FLA) 4th Company in the city of Janaf, which is also the site of the sole bridge over the river Shalabi. TF Hammer has pushing hard, breaking through the enemy's second line of defense (along the River Shalabi) before it was fully formed, hoping to 'blitzkrieg' their way into the South Leon capital city of Pendrakenville, but now they are being counterattacked as the Communists attempt to contain the penetration. The overall Task Group commander, LtCol Halabrio, has decided to attach himself to the assault element, leaving Major Chavez in overall commander but willing and able to assist as necessary, functioning as a second command stand for the Cubans.
This is a simple attack/defend scenario; the Cuban goal is to hold the ground, while the Communist goal is to re-take the city and bridge.
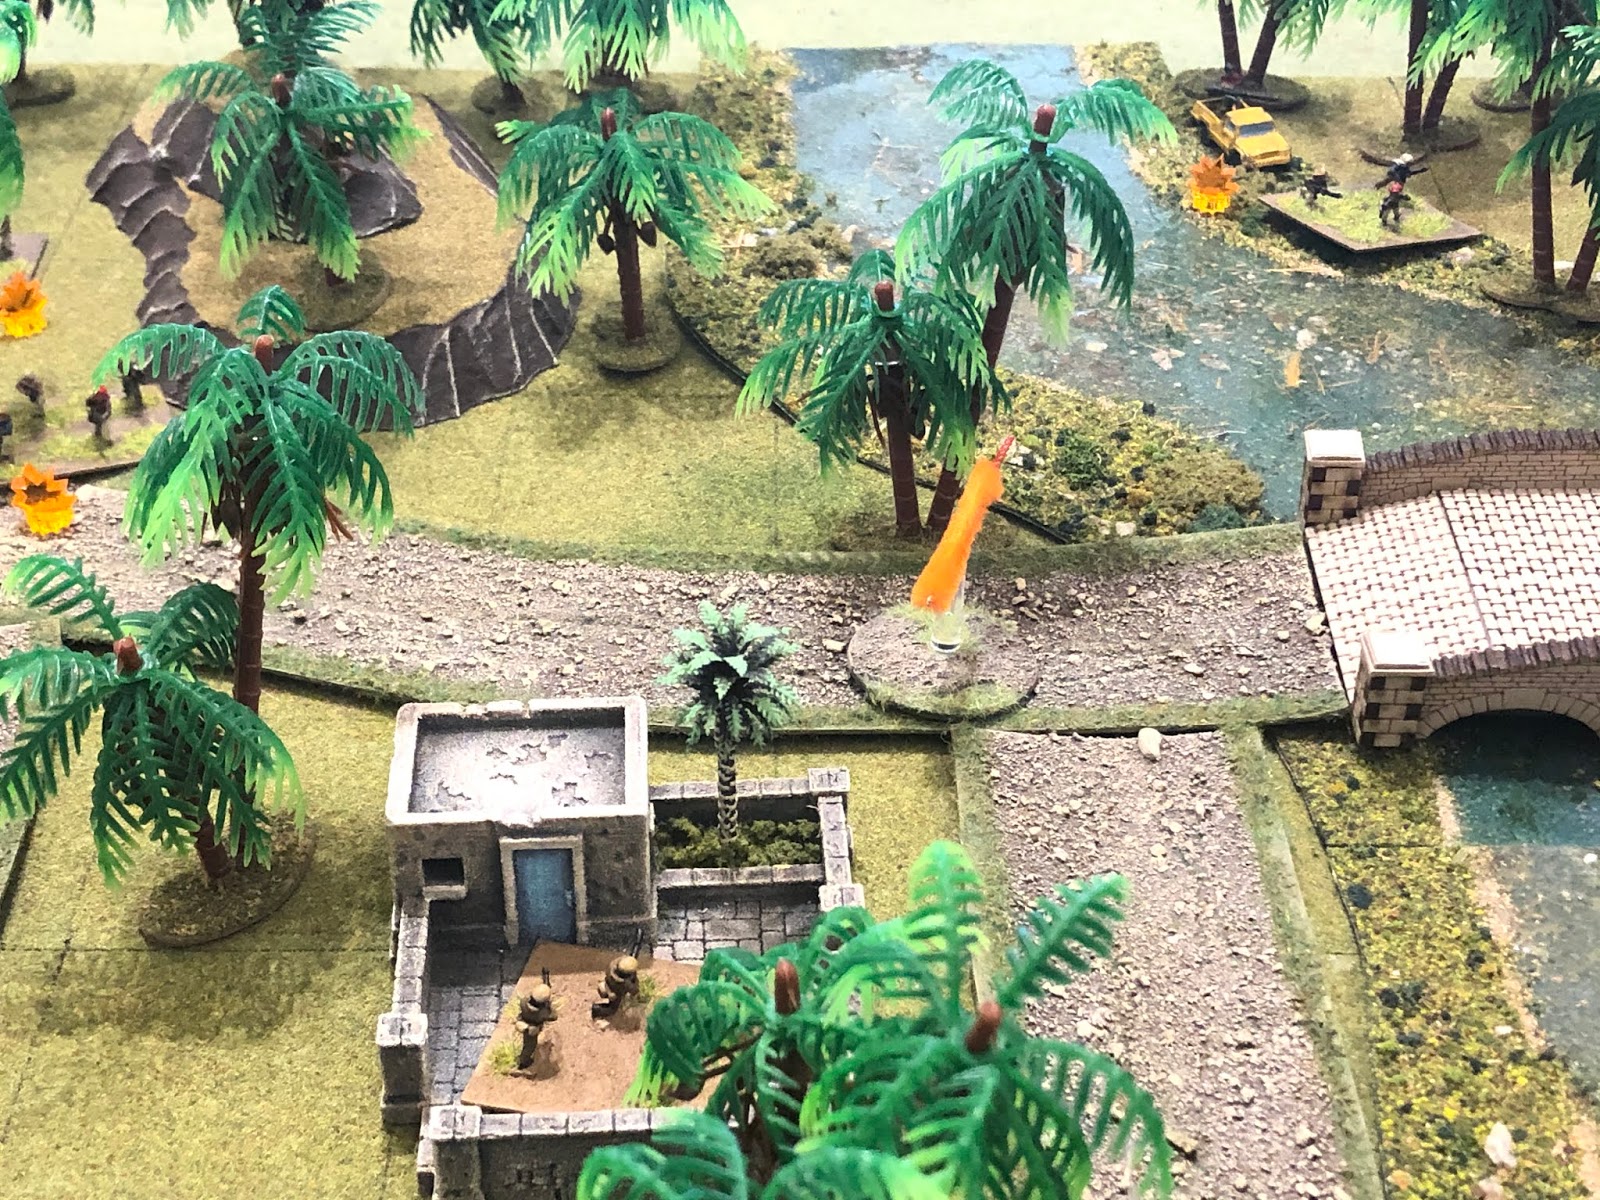
Overview, north is up, with Cubans defending the lower half of the table and the Communist insurgents attacking from the northern (top) edge of the table, on both sides of the River Shalabi. There is a stone bridge over the river, and the buildings are made of stone as well, so afford decent cover even against modern, high-velocity weapons. Notable buildings:
1) the Hotel (bottom left)
2) the Weigh Station (left)
3) the District Seat (top center)
4) the Post Office (center)
5) the Warehouse (center top right, just right of the District Seat)
6) Ahmed's Café (bottom center)
7) the Garage (right bottom center, 'long' building just right of Ahmed's Café)
8) the Tax Stand (right center, above the Garage)
9) the Police Box (just right of the Garage)
10) Ir-Hab University (far right bottom)
11) the Clinic (far right, above the University)
12) the Butcher Shop (top center right, above and between the Warehouse and the Clinic)
13) Hell House
The opposing forces, allies on left and Communists on right.
The figures are all 10mm from Pendraken, Minifigs UK, and Butler's Printed Models. I'm using Ivan's "5Core Company Command," playing on a 3' x 2' surface with simple terrain to speed up the process. The hootches are from Jimmi at Flashpoint Minis, the roads are from Fat Frank, the hills are from Warzone, the fences are from Sarissa, the fields are from Hotzmats, the trees are cake toppers, and when you see the rivers, they're from Wargamers Terrain. I'm playing solo and will randomize enemy deployment using a system of blinds borrowed from Joe Legan's "Platoon Forward."
In terms of caliber of forces, the SLA, FSNL, and FLA troops will all be treated equally, except for the fact the FLA troops will be treated as fanatics, in terms of their willingness to advance into close combat. The Cubans are more tactically and technically proficient, and so they will receive extra firing dice, better rallying capability, bonus in close combat, and sometimes will have a second command stand on the table.
TF Hammer has a few heroes present:
Major Chavez, TF Hammer CO, has been awarded Distinguished Service Cross and two Silver Stars
LtCol Halabrio, TG Halabrio CO, has been awarded the Distinguished Service Cross and Silver Star
*It seems that Major Chavez and LtCol Halabrio are in quite the duel to one-up each other in the medals for valor department.
Oh, and there's LtCol Halabrio, the Task Group commander. That is probably the clearest, brightest photo of a 10mm figure I have ever taken! This is a Minifigs' Australian from their Vietnam range. I love the boonie covers and big packs!
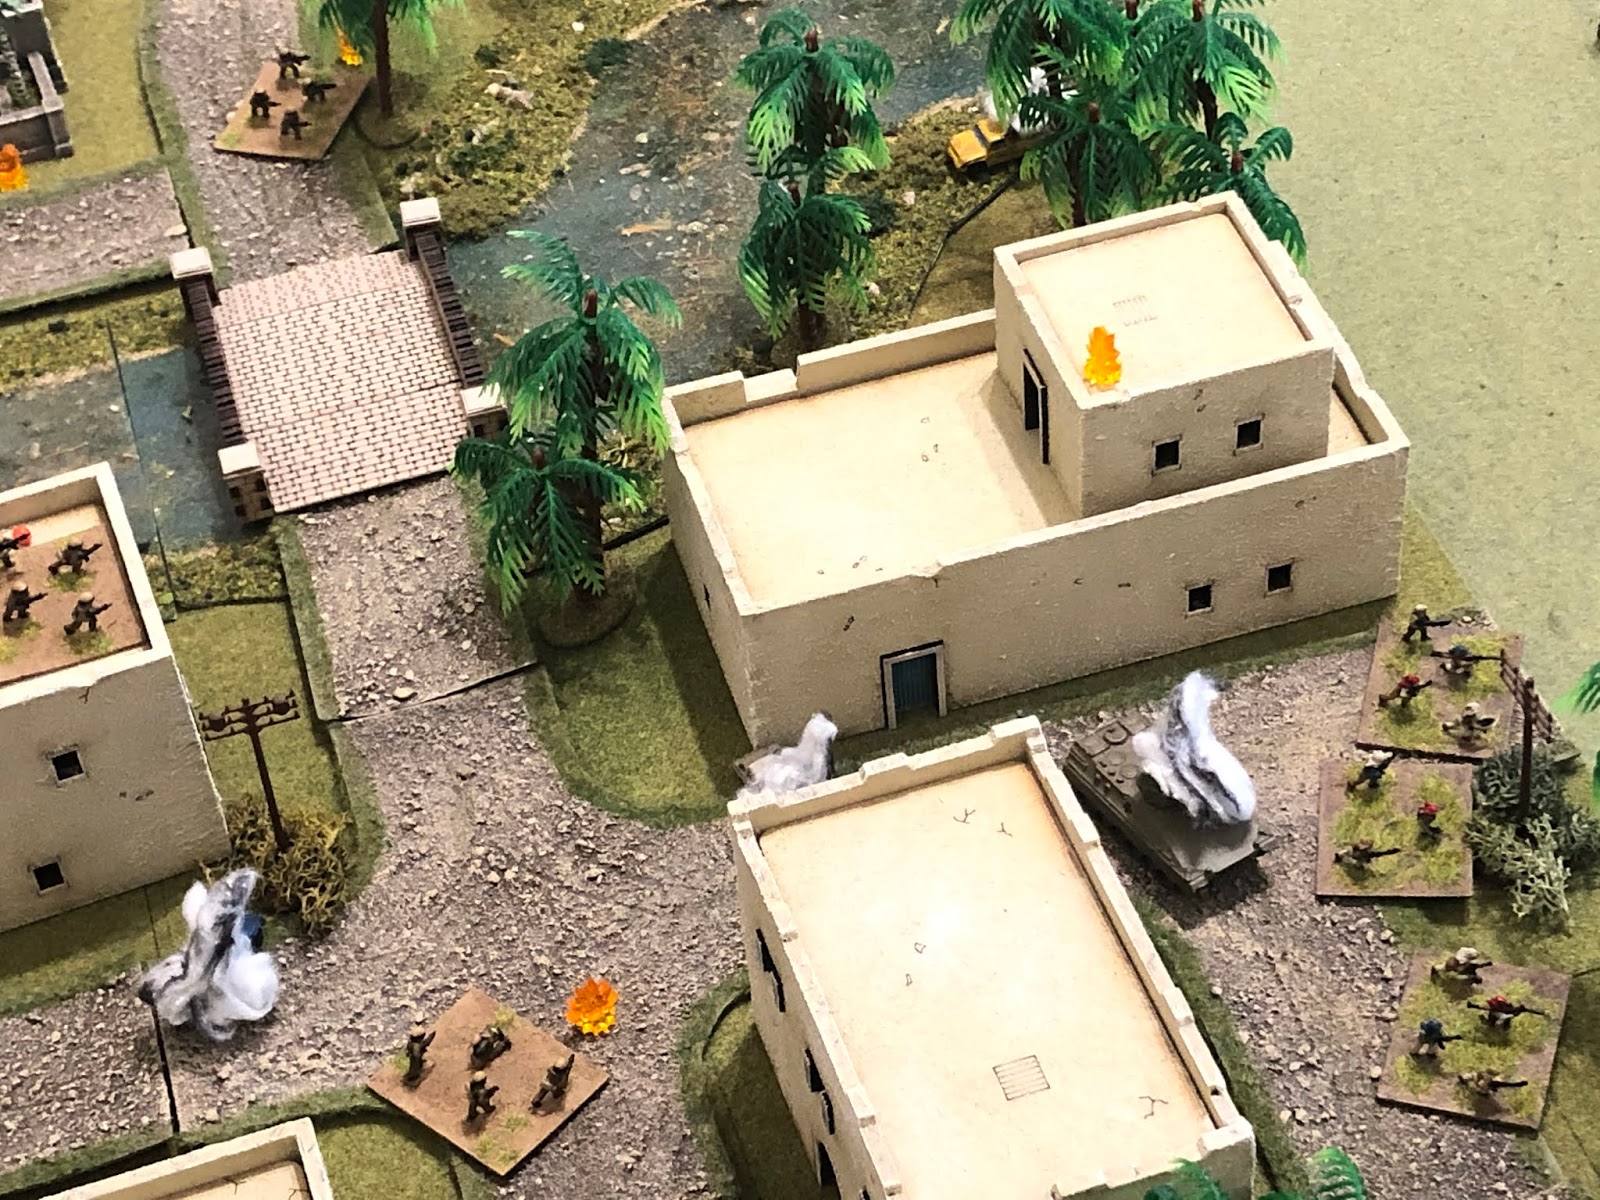
Let us get on with the unpleasantness! The fight gets off on the right foot: the good guys get off the first shots in the engagement, with the Milan ATGM team leading...
And quickly knocking out the BTR!
The Milan crew smiles and pats themselves on the back (far left) as Hammer 05 (bottom left) gets in on the act, firing on the bad guys atop the Clinic (top right) and putting them 'men down,' which is a virtual death sentence as they cannot rally themselves and the bad guys will have a very, very hard time getting someone that far over to rally them.
Over in the center, atop the Post Office, Hammer 03 (bottom center, with Marder 01 still burning at top right from the last fight) opens fire on the District Seat (center/top), suppressing one enemy team and pinning the other!
On the Cuban far left, Hammer 01 opens fire on enemy infantry in the open, putting the target 'men down' and suppressing their comrades in the trees (top left)!
From the south center of the line, atop Ahmed's Café (bottom center, with Hammer 03 at top right), Hammer 04 adds its fire to the mix, targeting the enemy troops in the northwest (top left), to no effect.
And then Hammer 02, in the Weigh Station (bottom center left), opens fire on the enemy Commander and Technical (top right)...
But they (far right) miss and the bad guys return fire with their (bottom left) 12.7mm HMG, pinning the Cubans.
And then the Communist BMP (bottom left) returns fire on Hammer 01 (far right), to no effect.
*Pretty damn hot, straight out the gate! The good guys roll up a 'Firefight!' and cause a whole lotta havoc. Should go easy, right? ;)
The BMP rallies the nearby suppressed rifle team (bottom left), then pushes ahead to rally the 'men down' rifle team (right)...
But since they're previous round of fire failed to pin or suppress Hammer 01 (bottom right), the Cubans are able to react, launching a LAW rocket at the thinly armored BMP!
What!!!??? I missed the picture!!!??? My apologies, you know how I like to show burning armored vehicles; Hammer 01's aim was true and the BMP was knocked out!
On the other side of the river, the Communist Commander moves into the District Seat (left) to rally his troops, as the Technical (bottom left) opens fire on the Post Office (top right), targeting Hammer 03...
Hammer 03 (top left) goes 'men down,' but the lead enemy rifle team fails its rally and falls back, suppressed (red bead at bottom right, from center)!
LtCol Halabrio moves up to rally Hammer 02 (top right) but they stay pinned, as Hammer 01 moves up (center left, from bottom right).
The enemy's far right rifle team (bottom left) spots them (center right, with LtCol Halabrio and Hammer 02 at top right) and opens fire, but misses!
Hammer 01 reaches the cover of the burning BMP and returns fire, but they miss, too...
While in the Cuban center, Major Chavez moves towards the Post Office (bottom center, from bottom right) to rally the 'men down' Hammer 03, as Hammer 05 pushes ahead, into the intersection (center, from bottom right), firing as they go and suppressing the enemy rifle team atop the District Seat (top left, with their CO below them and the suppressed team that failed and fell back just right of them).
While back in the Weigh Station (bottom left), Hammer 02, though still pinned, opens fire on the enemy Technical (top right) and suppresses the crew!
On the Cuban far left, an enemy rifle team moves up to rally their 'men down' comrades (left), drawing fire from Hammer 01 (right)...
The 'men down' bad guys manage to rally, but Hammer 01's fire knocks them out! Then the remaining bad guy rifle team opens fire at point-blank range (with 1K 2S), and totally misses!
On the other side of the river, the Technical's crew (bottom left) self rallies as the Commie CO moves up and rallies his suppressed rifle team atop the District Seat (top center left).
Major Chavez takes his command group into the Post Office (top center right) and rallies Hammer 03 as LtCol Halabrio breaks his foot off in Hammer 02's ass (center left bottom, in the Weigh Station) and gets them rallied (after failing last time).
LtCol Halabrio then leads Hammer 01 into close combat with the last rifle team on the enemy's right flank, dodging react fire as they go...
The Communist team is knocked out (bottom left) and LtCol Halabrio and Hammer 01 push east (top left), looking to get into a covered firing position on the enemy Technical on the other side of the river (top right).
And as that close assault is winding to a close (top right), Major Chavez' command group and Hammer 03, atop the Post Office (bottom left), open fire on the enemy CO and rifle team in the District Seat (bottom right)...
But they (top left) miss, and the enemy's (bottom right) return fire suppresses them! This puts Hammer 05 (bottom left), intent on close assaulting the District Seat, in a precarious position as the enemy is not suppressed.
They say 'hell with it' and start to go anyway (center right), but the bad guys in the District Seat (far left) take them under fire and put them 'men down'!!!
Hammer 05 is 'men down' and Hammer 03 (bottom right) is suppressed, making them ripe for the pickin'...
In an attempt to relieve pressure on the Cuban center (top center), Hammer 02 rushes forward, out of the Weigh Station (bottom center) and into the street, looking to get into position on the Technical (far left)...
The Technical crew spots them and opens fire with the DshK...
But the HMG fire is ineffective and Hammer 02 looses a LAW rocket in response!
The Technical (bottom left) goes up in flames! The Communist Commander and rifle team (top left) have a court-side view of the carnage...
*Man, I've never seen an HMG roll as badly as that Technical has been rolling all game. They literally could not roll to save their life ;)
The remaining Commies head for the hills (bottom right), their counterattack having failed!
Major Chavez and Hammer 03 move over to check the 'men down' Hammer 05 (white bead at center)...
But they're gone...
Hammer 03 pushes further up Main Street, where they manage to capture the enemy's 'men down' rifle team that was abandoned when their comrades ran off. Like I said, that was all but inevitable, there was pretty much no way the bad guys were going to be able to get a unit up to them to get them rallied.
Anyways, game over, another Cuban victory!
TF Hammer valiantly defends the bridge from counterattack (with a very fortuitous helping hand from getting the first activation and rolling a 'Firefight!' for the first activation), sending the Communist FLA's 4th Company reeling. The Communists fall back to the north (B8, from C8), and TF Hammer pushes east (C9, from C8) to exploit the gap!
Well, not too much to say but sorry, not the most exciting fight. I had higher hopes, thinking the bad guys would have a decent shot, but that damned first activation going to the Cubans, and then being a 'Firefight!' on top of that, really made things tough. On top of that, I used random deployment for both sides, but neither was disadvantaged, with both sides looking about like you would have expected, where you would have placed them anyway, except maybe the bad guy BTR being on Main Street and Hammer 04 being so far in the rear. So you really get the gist of it, I'd set it up with dummy and real blinds so that there was actually interpenetration, so that Communist forces were actually in and among the Cuban defenders, having infiltrated prior to the Cubans consolidating their positions, but all the interpenetrating blinds turned out to be dummies...
Communist: ~25 men killed, an HMG-armed 'Technical,' a BMP, and a BTR destroyed, and ~5 men captured
Next up we have Captain Madre-Animral's Task Force Bowie chasing down, catching, and punishing the FLA's 3rd Company, coming right up!


No comments:
Post a Comment