TF Hammer vs FLA 5th Company
Major Chavez
Commander, TF Hammer
2 x Silver Star, Purple Heart, War of Liberation and South Leon campaigns
Lieutenant-Colonel Halabrio
Commander, Task Group Halabrio
Distinguished Service Cross, Silver Star, War of Liberation, Operation Payback, and South Leon campaigns, one Combat Jump
Major Chavez leads his Task Force Hammer into combat against Communist insurgents of the Free Leon Army's (FLA) 5th Company in the city of Janaf, which is also the site of the sole bridge over the river Shalabi. TF Hammer is pushing hard, seeking to break through the enemy's second line of defense (along the River Shalabi) before it is fully formed, hoping to 'blitzkrieg' their way into the South Leon capital city of Pendrakenville. The overall Task Group commander, LtCol Halabrio, has decided to attach himself to the assault element, leaving Major Chavez in overall commander but willing and able to assist as necessary, functioning as a second command stand for the Cubans.
This is a simple attack/defend scenario; the Cuban goal is to crush their enemies on the way to the capital, the Communist goal is to hold the ground.
Overview, north is up, with Cubans attacking from the west (left) board edge and the Communist insurgents defending the remainder of the table, up to the River Shalabi. There is a stone bridge over the river, and the buildings are made of stone as well, so afford decent cover even against modern, high-velocity weapons. Notable buildings:
1) the Hotel (bottom left)
2) the Weigh Station (left)
3) the District Seat (top center)
4) the Post Office (center)
5) the Warehouse (center top right, just right of the District Seat)
6) Ahmed's Café (bottom center)
7) the Garage (right bottom center, 'long' building just right of Ahmed's Café)
8) the Tax Stand (right center, above the Garage)
9) the Police Box (just right of the Garage)
10) Ir-Hab University (far right bottom)
11) the Clinic (far right, above the University)
12) the Butcher Shop (top center right, above and between the Warehouse and the Clinic)
13) the Hell House
The opposing forces, allies on left and Communists on right.
The figures are all 10mm from Pendraken, Minifigs UK, and Butler's Printed Models. I'm using Ivan's "5Core Company Command," playing on a 3' x 2' surface with simple terrain to speed up the process. The hootches are from Jimmi at Flashpoint Minis, the roads are from Fat Frank, the hills are from Warzone, the fences are from Sarissa, the fields are from Hotzmats, the trees are cake toppers, and when you see the rivers, they're from Wargamers Terrain. I'm playing solo and will randomize enemy deployment using a system of blinds borrowed from Joe Legan's "Platoon Forward."
In terms of caliber of forces, the SLA, FSNL, and FLA troops will all be treated equally, except for the fact the FLA troops will be treated as fanatics, in terms of their willingness to advance into close combat. The Cubans are more tactically and technically proficient, and so they will receive extra firing dice, better rallying capability, bonus in close combat, and sometimes will have a second command stand on the table.
Major Chavez' force consists of: Command stand, six rifle stands, and two Marder Infantry Fighting Vehicles. These troops are Minifigs' Israelis with BPM vehicles.
TF Hammer has a few heroes present:
Major Chavez, TF Hammer CO, has been awarded two Silver Stars
LtCol Halabrio, TG Halabrio CO, has been awarded the Distinguished Service Cross and Silver Star
Team Leader, Hammer 03, has been awarded the Silver Star
Oh, and there's LtCol Halabrio, the Task Group commander. That is probably the clearest, brightest photo of a 10mm figure I have ever taken! This is a Minifigs' Australian from their Vietnam range. I love the boonie covers and big packs!
It is time for the commencement of hostilities, but first, the bad guys roll up a random event, and it's "Straggler," so they get another rifle team added to the fight, which comes on at top right, between the Butchers Shop and the Clinic.
Okay, now we fight!
And it begins with the white Technical (bottom left) opening fire on Hammer 05 (top right), in the Weigh Station...
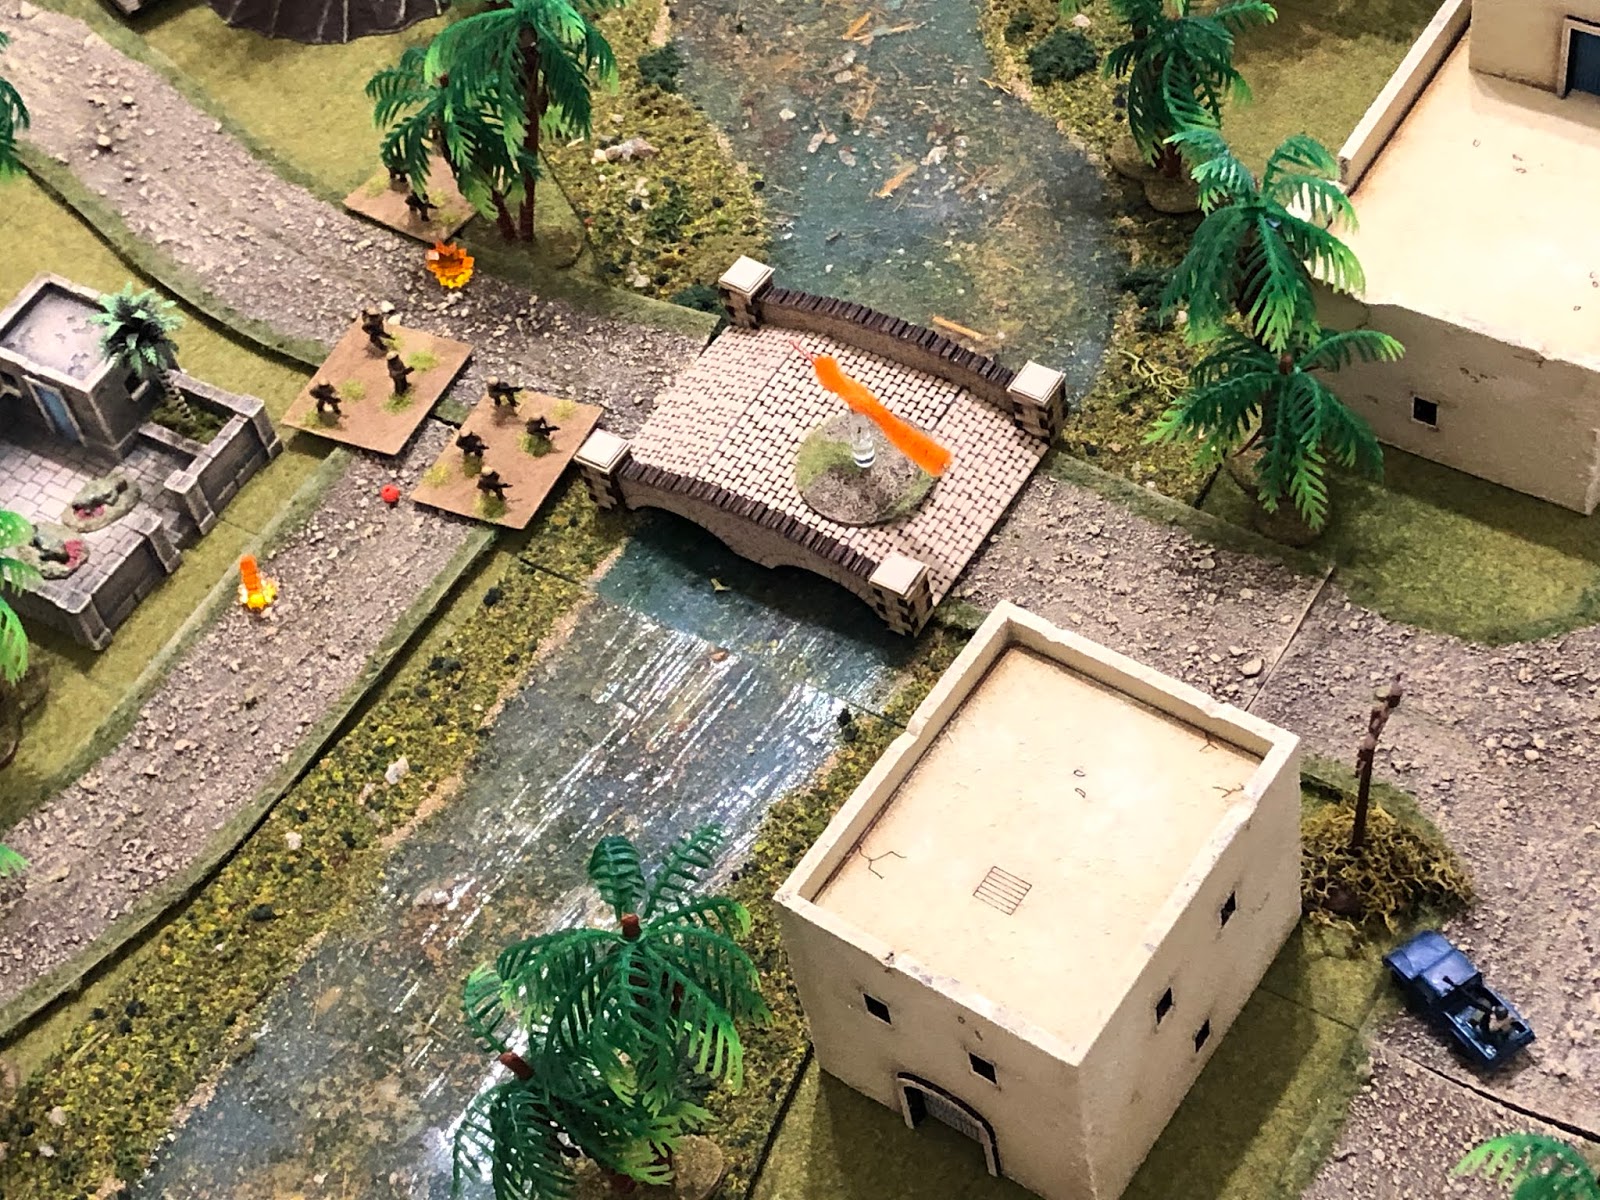
And very quickly one of the Cuban rifle teams is knocked out (far left) and another is suppressed (Hammer 03, red bead just left of the bridge), as the blue Technical (bottom right) opens fire on Hammer 04 (top center left, in the trees).
Things are looking grim as Hammer 04 (casualty figures beneath the trees at center left) goes down in a hail of 12.7mm slugs!!! Both Marders (bottom left and bottom center) return fire on the Technicals with their 20mm auto-cannons, but they only manage to pin the blue Technical, which is behind the Post Office (top center right, the white Technical is behind the District Seat, top left).
From the enemy's left flank, a rifle team atop Ahmed's Café (bottom center) fires on the bridge, where Hammer 03 and Major Chavez' command group are taking cover (top center), to no effect.
The enemy rifle team on the Hell House (bottom center right) opens fire on Hammer 06, on the Hotel (top left)...
The Commie fire is ineffective and Hammer 06 (bottom left) returns fire, suppressing the enemy rifle team (top center).
Major Chaves rallies Hammer 03 (far left) as Hammer 06 (bottom right) opens fire on the white Technical (top center left), suppressing it!
Marder 01 (far left) looks on as Marder 02 pushes forward, onto the bridge (far right)...
Enemy troops atop the Tax Stand (far right) launch an RPG...
But it misses and Marder 02 opens fire on the blue Technical with its 20mm gun...
The blue Technical is knocked out as Hammer 02 dismounts between the Post Office and District Seat (center).
They immediately charge the white Technical...
But enemy riflemen atop one of the University buildings (bottom center) spot them (top center right) and open fire, pinning them and stopping their close assault in its tracks!!!
The bad guys in the University (off camera to bottom right) continue pouring fire into Hammer 02 (center), putting them 'men down,' as enemy infantry atop the Post Office (bottom center) fire on Marder 02 (top left) with their small arms and somehow manage to pin the tracked vehicle's crew!
The bad guys on Ahmed's Café (bottom center) continue pouring fire into the bridge, pinning Hammer 01 as Major Chavez looks on helplessly (top left)...
Back atop the Hotel (bottom center), Hammer 06 is the only unit really stuck in; they open fire on the bad guy's atop Ahmed's Café (top right), putting them 'men down'!
*There's a real opportunity there, with those two rifle teams suppressed and 'men down,' if the Cubans can get someone across the river and into them before their CO can get them rallied.
On a side note, if you're wondering why Hammer 06's fire has been so effective, please remember they're shooting down on everyone.
Back at the bridge, Major Chavez rallies Hammer 03.
Then leads them forward, across the bridge, but he can't reach the 'men down' Hammer 02 (top right), so he halts and rallies the pinned Marder 02.
Which then bravely pushes on up to the intersection to rally Hammer 02 (center).
Hammer 02 is good to go, back in action, and they close assault the white Technical, which is suppressed...
Knocking it out (top left), before crossing the intersection to close assault the enemy rifle team and Commander atop the Tax Stand!
And things are rolling: Hammer 02 take out the bad guys in the Tax Stand (top right), then moves south, looking to get at the bad guys in the Hell House (left) and the guys in Ahmed's Café (bottom left), both of whom are suppressed (one is 'men down,' actually). But they can't quite reach their target on their follow-up move.
Marder 01 moves up to the bridge (center top, from top left).
The remaining bad guys all push forward, desperate to cut off the Cuban foothold across the bridge! They push rifle teams at top center (just visible behind the Warehouse), top center right (in the trees to the right of the Warehouse), center right (just above the trees to the right of the Tax Stand), and at bottom center, just below the Garage, and even their Recoiless Rifle team pushed up (right center top, between the Warehouse and the Clinic), looking to get a better shot on the Cuban IFVs.
And they keep hustling forward: the Recoiless Rifle team gets into the trees on the right side of the Warehouse (center right) as a rifle team climbs atop the Warehouse, and another rifle team gets atop the Tax Stand (center left).
*Both sides rolled 'scurries,' so lots of movement with no react fire.
While the enemy rifle team on the far left flank dashes across the street and manages to get atop Ahmed's Café to check on their 'men down' comrades.
But it's no good, they've taken too many casualties and the few remaining survivors have lost their bottle, so the team is out of action (casualty figures at center bottom)!
*That was lucky for the Cubans.
But danger lurks on the far right: an enemy rifle team is able to sneak up on Marder 02, using the fire and smoke from the white Technical to mask its movement!
But the Marder's crewmen are somehow able to fight off their attackers, knocking them out (casualty figures at far left)!!! They then push south, pulling up past Hammer 02 (right).
Marder 01 pushes up and cuts left (top center) as Major Chavez and Hammer 03 jump up on the roof of the Post Office (bottom center).
Once Marder 01 rounds the corner they kick out LtCol Halabrio and Hammer 01.
While in the south, Hammer 02 gets after the enemy team atop the Hell House...
But the Commies (bottom left) were jsut playing possum, and when they saw the Cubans pop onto the roof they fought like a mother protecting her cubs, throwing Hammer 02 back into the street (red bead at center), suppressed! Major Chavez and Hammer 03 (atop Post Office, top left) couldn't believe their eyes!
So Hammer 06, still atop the Hotel (bottom left), opens fire, suppressing the bad guys (right top) that just threw Hammer 02 out into the street.
While Hammer 03 (atop the Post Office, far left) fires on the bad guys atop Ahmed's Café (far right), putting them 'men down'! Major Chavez orders them to prepare for close combat...
But the bad guys atop the Tax Stand (bottom right) open fire on them (top right)...
But Hammer 03 ignores the fire and charges the suppressed bad guys in the Hell House (bottom right, from left)...
But again the bad guys in that damn house (bottom right) manage to throw back an assaulting Cuban rifle team despite being suppressed!!! Hammer 03 falls back (red bead at far left, with Hammer 02 still suppressed at center), suppressed, as the bad guys smile and pat each other on the back.
Major Chavez immediately leads his command group down to rally Hammer 02...
They're good to go, and they immediately close assault the Hell House for a second time!
But this time they don't get thrown back, this time Hammer 02 gets knocked out (far right)!!! The bad guys are feeling spunky, so they leave the Hell House and move up towards the bridge, where they close assault Hammer 03 (left)!!!
*There is real danger here, the Cubans are getting rolled up...
Hammer 03 goes down in a flurry of point-blank fire and grenades, and then the Communist insurgents climb atop the roof of the Post Office (center, from bottom left), overlooking Major Chavez and his command group, with buddies atop the Tax Stand (top right) doing the same thing!
The bad guys from the Hell House decide to push their luck, descending upon Major Chavez and his command group...
But the Major and his men knock them out (bottom left), then climb into the Tax Stand (top right) to clean out the bad guys there...
Knocking them out to eliminate all Communist forces south of the main east-west running artery (well, except a 'men down' team atop Ahmed's Café that is without hope as they cannot self rally and there are no friends to come over and help them), they charge across the street, into the enemy's Recoiless Rifle team (right)...
Easily putting them out of the fight!!! But while they're doing that (botom right), the enemy team atop the Warehouse (top center)...
Decides to put an RPG into Marder 01!
The thinly-armored IFV is knocked out and Hammer 01 is suppressed!
The insurgents come down and engage Hammer 01 and LtCol Halabrio in close combat...
LtCol Halabrio and Hammer 01 defeat the enemy troops (right), then move up (bottom center), linking up with Major Chavez and his command group (far left).
Marder 02 moves down the street, where the enemy team atop Ahmed's Café (the ones that were 'men down') surrender to them.
And it's done!!! Despite very heavy casualties, TF Hammer has secured the city of Janaf, seizing the bridge over the River Shalabi and penetrating the enemy's second defensive line before they could fully form it!
TF Hammer takes the bridge at Janaf (C8), eliminating the FLA's 5th Company. They hold in place to consolidate and reorganize after heavy casualties, expecting the enemy to counterattack as soon as they're able.
Man, again TF Hammer manages to give us a helluva fight, another knock-down, drag-out, no holds-barred barn burner of a game. Okay, enough clichés for now... The fight started off kinda rough, but then Cubans seemed to gain the upper hand and things looked like they were going to be easy when both Marders got across the bridge and then split, Marder 02 fighting off a close assault and heading south while Marder 01 headed north. But then those damn Commie defenders at the Hell House started making trouble, throwing back two different Cuban rifle teams in close combat (while suppressed, no less!), then chasing them down and knocking them out! If Major Chavez and his command group weren't able to stop the bad guys there, I have every reason to believe the bad guys would have rolled up the two Marders and Hammer 01 with Major Halabrio. But they didn't, and it was awesome! ;)
Cuban: ~25 men and one Marder IFV knocked out
Communist: ~50 men and two HMG-armed 'Technicals' destroyed, with ~5 men captured
Decorations:
Major Chavez, Task Force Hammer commander, was awardee the Distinguished Service Cross for saving the attack on Janaf when an enemy team counterattacked, knocking out two friendly rifle teams. The enemy team then close assaulted Major Chavez and his command group, with defeat collapsing the Cuban right flank and likely cutting off two Marder IFVs, a rifle team, and the Task Group commander, LtCol Halabrio. But Major Chavez and his command group not only defeated the counterattacking enemy team, they then counterattacked themselves, knocking out the enemy's central defensive position and eliminating a second rifle team and a reoiless rifle team in the process.
Hammer 02's Team Leader was posthumously awarded the Silver Star for leading close assaults that knocked out an enemy HMG-armed 'Technical,' a rifle team, and the enemy commander. Unfortunately, he was later killed in a second attempted close assault on the so-called "Hell House" after being repulsed earlier.
Next up we have the Campaign's Turn 5 map moves, but then I can tell you we're right back here with Major Chavez' Task Force Hammer in Janaf when the FLA's 4th Company counterattacks in an attempt to re-take the bridge.


No comments:
Post a Comment