SLA A Company vs FSNL 6th Company
The South Leon Army's A Company is defending against the FSNL's 6th Company, which is advancing from north to south down Route 1, trying to break through the SLA line to reinforce and resupply their comrades in and around Pendrakenville. This is a simple attack/defend scenario; the Cuban goal is to hold the ground, while the Communist goal is to crush their enemies on the way to the capital. The SLA defenders are bolstered by a team of commandos from the Cuban Task-Force 23, led by the task force commander.
Silver Star, Bronze Star w/V, War of Liberation, South Leon, and Operation CNN campaigns
The opposing forces, allies on left and Communists on right.
The figures are all 10mm from Pendraken, Minifigs UK, and Butler's Printed Models. I'm using Ivan's "5Core Company Command," playing on a 3' x 2' surface with simple terrain to speed up the process. The hootches are from Jimmi at Flashpoint Minis, the roads are from Fat Frank, the hills are from Warzone, the fences are from Sarissa, the fields are from Hotzmats, the trees are cake toppers, and when you see the rivers, they're from Wargamers Terrain. I'm playing solo and will randomize enemy deployment using a system of blinds borrowed from Joe Legan's "Platoon Forward."
In terms of caliber of forces, the SLA, FSNL, and FLA troops will all be treated equally, except for the fact the FLA troops will be treated as fanatics, in terms of their willingness to advance into close combat. The Cubans are more tactically and technically proficient, and so they will receive extra firing dice, better rallying capability, bonus in close combat, and sometimes will have a second command stand on the table.
The SLA's A Company consists of: a command stand, four rifle teams, an M-113 "ACAV," an 81mm mortar team, and a Machine Gun team, with a TF23 team in support. These troops are Pendraken US from their Vietnam range, except for the TF23 team, which is Minifigs' Australians from their Vietnam range.
SLA's A Company also has some heroes amongst its ranks:
The M-113's vehicle commander (known as Scar 1-1) was awarded the Bronze Star w/V.
*Yeah, finally remembered to bust out the Pendraken NVA to face the Pendraken US...
The SLA pickets are Alpha 02 (top center left) and Alpha 04 (on hill at top right), and the SLA defensive line is, from left to right: Alpha 01, Captain Stelosavo's TF23 team, the MG team (atop the hill), the mortar team (just visible in the trees below the MG team, the SLA Company Commander, and Alpha 03.
The Communists have rifle teams at left, center left, center bottom (in trees), right, and top center, with their ZSU just off the road at right and their commander just ahead of them.
The battle begins with a Communist 'scurry,' which is good for the bad guys, lets them sneak right up on the SLA defenders without drawing fire.
The Communist force advances, though it's hard to sneak with an armored vehicle rumbling straight down the road... The Communist commander (center, just above the ZSU) spots the SLA picket, Alpha 02 (in trees at center left), and orders the rifle team atop the hill (top center) to assault!
The Communist troopers silently dash forward into close combat with Alpha 02!
But the resolute SLA defenders (bottom left) stand their ground and force their assailants to fall back, suppressed (red bead at top right)!!!
In response, Captain Stelosavo and his TF23 team (center top, from left) dash forward to help them (top right)!
And then all hell breaks loose! Alpha 04, the picket on the right, spots the encroaching enemy rifle teams and opens fire at point-blank range, but they don't do so well in the dark and only manage to pin one of them!
*The Cubans rolled up a 'Firefight!', so it's on, but then these knuckleheads only get one pin??? I gave them 2K 3S dice, a ridiculously high number for a single rifle team, but I felt warranted based on the tactical situation, which is an ambush at point-blank range against closely compacted enemy forces (three rifle teams practically on top of each other).
But luckily for Alpha 04, while they're busy firing horribly, they're RTO is on the horn with the mortar team, telling them "...danger close, we're about to be overrun, bring it right in on top of us!!!"
The SLA 81mm mortar team (bottom left) begins dropping HE rounds, firing in support of Alpha 04's (top right) fire mission...
The mortar men are a bit too cautious, not wanting to hit their own men they go long, which does knock out a Communist rifle team (far right), but leaves Alpha 04 (top left) with two others right on top of them!
*Damn 'Firefight!', the pickets needed a 'normal' activation, they were supposed to fire and fall back...
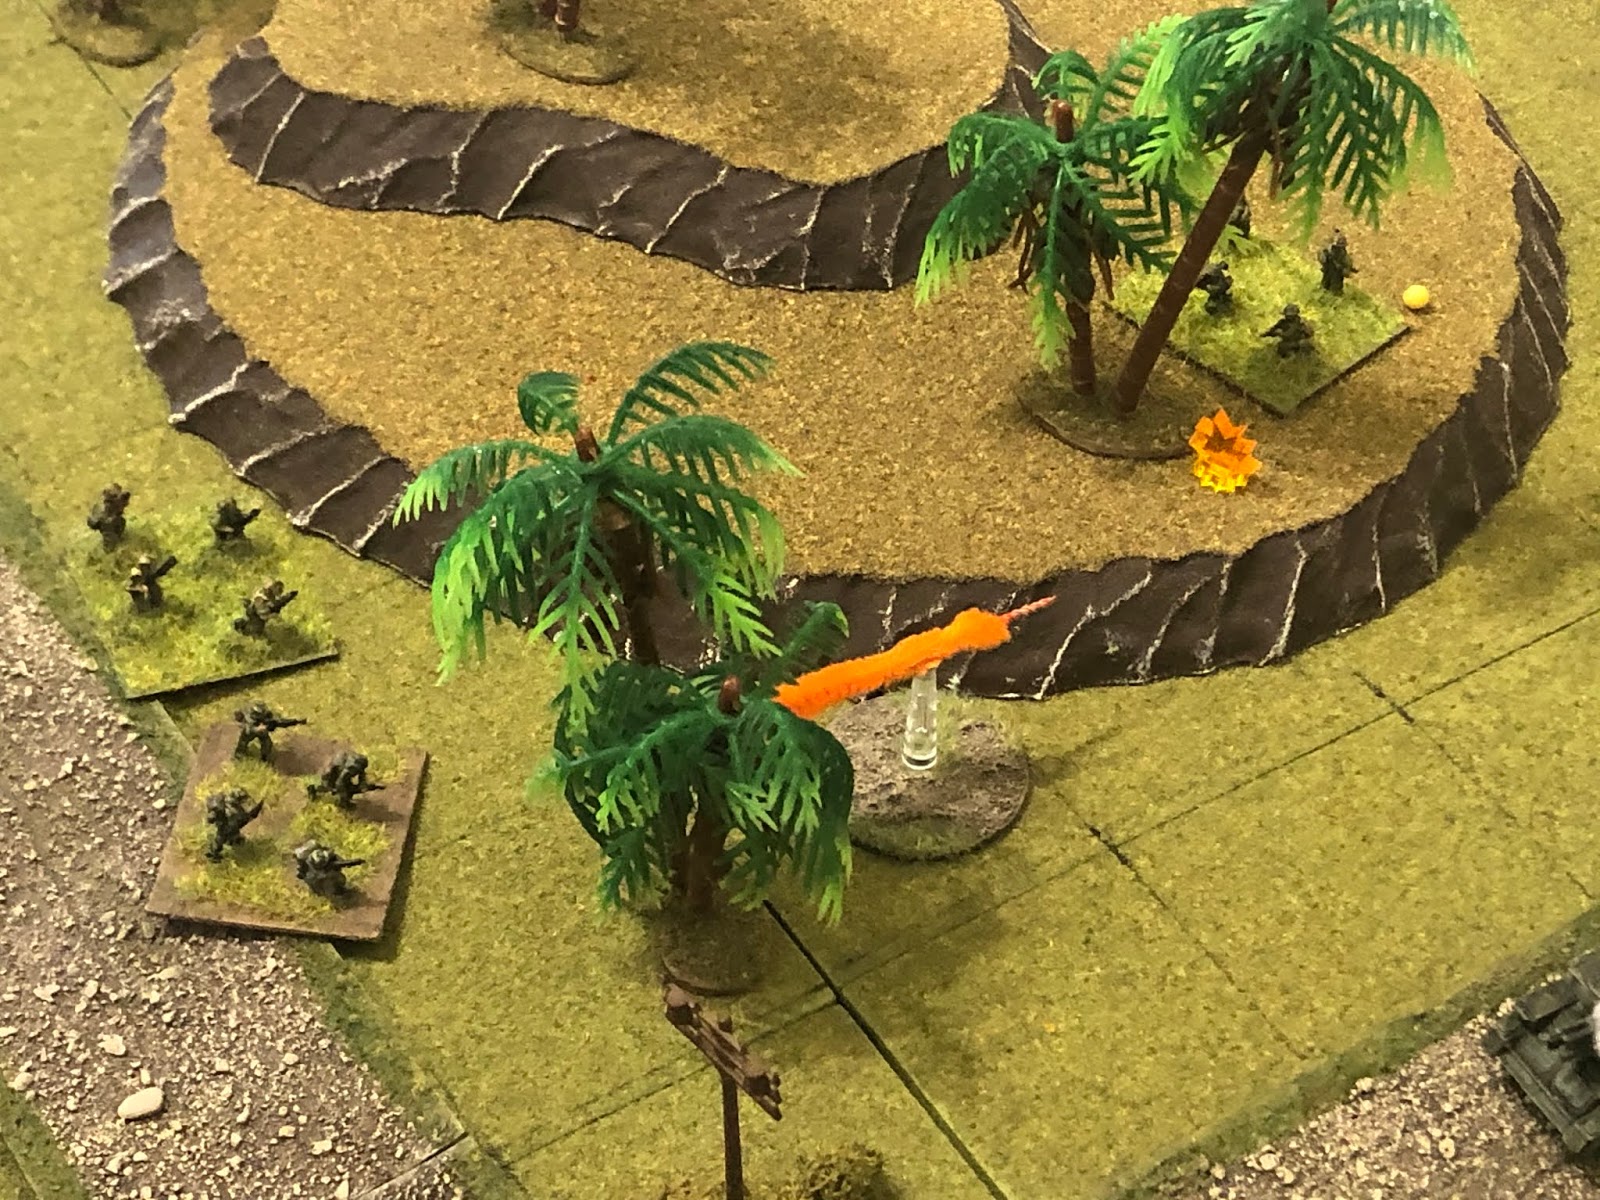
But then hammer drops: Scar 1-1 (bottom left) opens fire with its .50-cal HMG and two M-60 MGs, targeting the thin-skinned ZSU-23-4 (top right)...
The 7.62mm rounds bounce off and ricochet, pinning the enemy commander, but the .50-caliber rounds slice straight through, setting the enemy vehicle on fire!
The MG Team (on hill at left) and Alpha 03 (in sandbagged position at bottom center left) open fire in support of Alpha 02 (center right top, just above the crossroads, with bad guys above them on the hill)...
But the fire is high and ineffective as the SLA defenders work hard to ensure they don't accidentally hit their own men, so Alpha 02 (bottom left) opens fire themselves, suppressing the enemy rifle team on the hill (top right, with the Communist commander pinned at bottom right).
*Yeah, I'm giving a decent penalty for firing dice because it's dark, so lots of misses.
The enemy CO (top center) self rallies, as his two rifle teams on the left flank (bottom center) fire into Alpha 04 at point blank range, suppressing them.
The SLA 81mm mortar team (bottom left) responds to Alpha 04's (top right) desperate pleas for help: "You gotta bring it in closer, they're everywhere and they got us pinned down, we're about to get overrun!!!"
And this time the mortarmen put it right on the money, putting both enemy rifle teams 'men down,' as well as keeping Alpha 04 suppressed (bottom left), though I don't allow them to fall back (that's what normally would happen to a suppressed team that gets a second suppressed result), it would feel like it's letting them off the hook. I play it that Alpha 04 is truly suppressed, small arms fire crisscrossing the sky and fragments from their own mortars zinging past, so they burrow into the earth, not going anywhere.
Captain Stelosavo's TF23 team continues pushing forward (center left, with Alpha 02 above them and Alpha 04 at far right), reaching the crossroads.
Alpha 02 gets a wild hair up their ass and decides the time is right to charge! The enemy command team spots them coming and opens fire...
But the hearty SLA troopers are not effected and close with the enemy!
But the enemy commander (bottom right) stands tall, firing his pistol into the assaulting troops, and turns them away! Alpha 02 falls back (far left), suppressed!!!
*What!!!??? That was going to end the fight! All he had to do was knock out the weak little enemy command stand, then turn up hill and knock out the two suppressed rifle teams and the two 'men down' rifle teams would have been forced to surrender.
The enemy tries to regroup: the Communist Co moves down (center bottom, from center) to assist his two 'men down' rifle teams (white beads at bottom center left, with Alpha 04 suppressed I the trees at bottom left), while the two suppressed rifle teams on the right (top center right) attempt to self rally.
One manages to get 'up' to pinned (yellow bead at left), but the other panics and runs (red bead at right, from left)!
Captain Stelosavo and his team dash up and rally Alpha 02 (left, from bottom left).
Captain Stelosavo's team (bottom left) opens fire on the nearby pinned enemy team (top right)...
Suppressing them (top center), then moves into the street (center bottom, from left), near the enemy commander (bottom right).
While Alpha 04, on the SLA far right, self rallies.
Back on the left, Alpha 02 charges the enemy team TF23 just suppressed!
But the Commie troops gun them down in their tracks!!!
*Wow, Alpha 02 was just snake-bit in close combat, ending up in a draw against a weak command team, and losing to a suppressed rifle team!
With Alpha 02 down (far right top, casualty figures on hill, with TF23 team below them and Alpha 04 at bottom right), the SLA CO moves up with (center left) with the M-113, Alpha 01 (top center), and Alpha 03 (bottom center).
Then the enemy rifle team that just whacked Alpha 02 (bottom right) spots Captain Stelosavo's team in the street (center top) and opens fire...
Captain Stelosavo's team (top right) goes 'men down,' and the Commie team charges out to finish them off (top center right), but the SLA MG team (bottom left) spots them and opens fire, pining them down and saving the TF23 team!!!
*I realize as I'm typing this that I probably should not have allowed the SLA MG Team to fire as that's a long way to see in the dark...
With Captain Stelosavo's team (top left) 'men down,' the Communist commander moves over to rally his two 'men down' rifle squads (right)!
One ends up being out of the fight, but the other is good to go and opens fire on Alpha 04 at point-blank range...
Alpha 04 is knocked out (casualty figures at bottom center), and then enemy team that did it dashes right to close assault Captain Stelosavo's team (top left)!!!
Here's what I rolled (black is Allies, red is Commie). Looks great, but Captain Stelosavo's team is 'men down'...
The Cuban commandos are knocked out (casualty figures at right) and the enemy team pushes up to the edge of the village (bottom center)!!!
Alpha 03 (bottom center, with the SLA Company Commander at far left) spots them (far right) and opens fire...
*Again, being dark and with all the concealment in the village, probably shouldn't have allowed that shot to happen. Need to do a better job of remembering it's dark. Probably need to go back and look at the last fight (also in the dark) to see how many times I let long range shooting/spotting occur...
The SLA fire is ineffective, as is the Communist (bottom right) return fire.
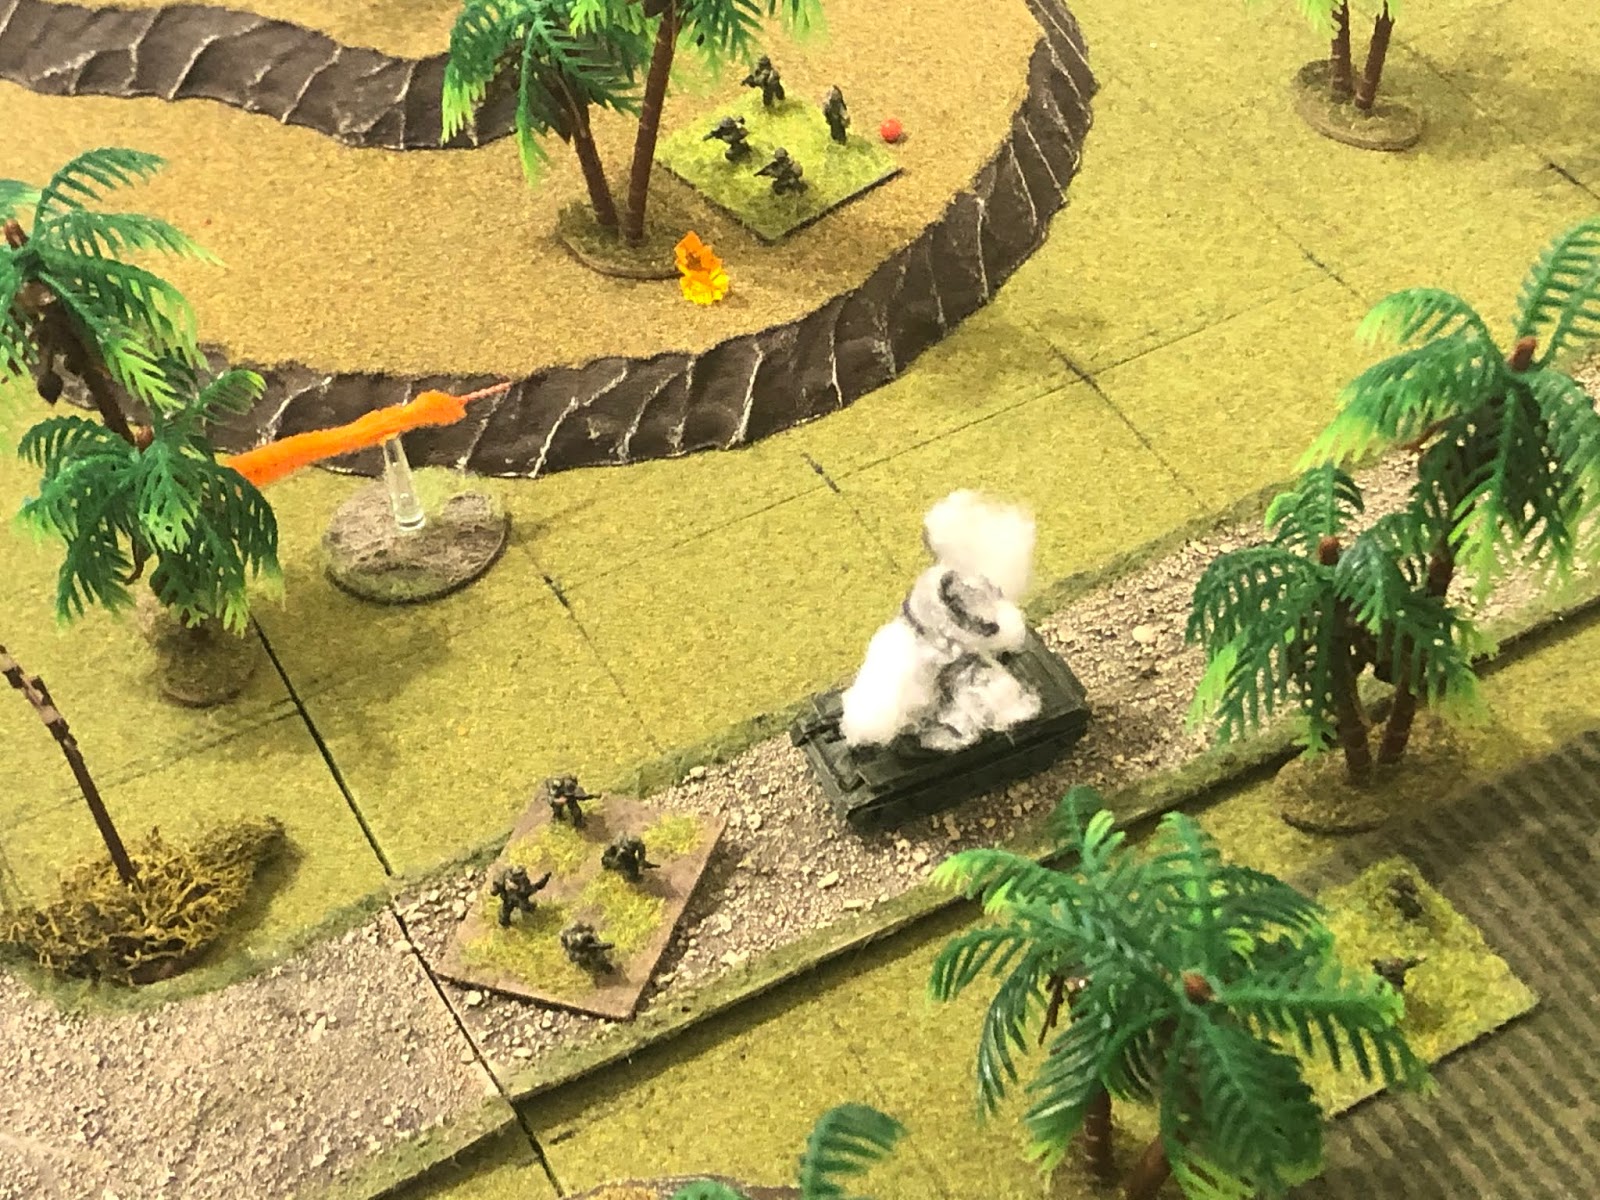
But the Scar 1-1 (bottom left) gets the .50-cal and one of its M-60s going, putting the enemy team (top right) 'men down.'
*Now that made sense, the M-113 crew could see muzzle flashes from the enemy rifle team's firing.
The SLA MG team (bottom left) opens fire on the enemy rifle team in the center (top center).
But the MG fire is high, so the bad guys return fire (bottom right), pinning them down!
But now the SLA mortar team (bottom left) engages them (top right)...
And they go 'men down,' too!
The enemy CO moves up (center right, from far right) to survey the situation.
Then charges down into the street to rally his rifle team (center, from bottom right).
But they're out of the fight!!!
So the enemy commander gathers his two surviving rifle teams and falls back!

The SLA A Company's defensive line held (B6) forcing the FSNL 6th Company to fall back. FSNL6 will most likely continue to withdraw, likely will hold, and less likely will counterattack next turn.
Man, I thought that was going to be a lot easier than it turned out to be, and even then I was cheating, letting the SLA troops take some long range shots that probably didn't make sense for some night fighting. Their casualties weren't too bad, but what really hurt was the Cuban commando team getting knocked out, sure as hell am not happy about that! I rolled it up and Captain Stelosavo was only wounded, but it's bad enough to require evacuation to Cuba and he's out for the remainder of the campaign in South Leon. I suppose I should have been more clever with the deployment and movement of the Communist ZSU-23-4, but I also shouldn't have let the M-113 take that long range shot on it. They certainly would have heard the enemy vehicle, but would not have seen it, unless we're firing flares now, too, which is not how I'm playing...
Cuban: ~15 men, including Captain Stelosavo being badly wounded and evacuated to Cuba
Communist: ~25 men and a ZSU-23-4 destroyed
Bowie 02 Team Leader was awarded the Bronze Star w/V for fighting off an enemy assault that had just eliminated Bowie 01, then counterattacking and eliminating the threat and stabilizing the Cuban left flank.
Next up we have the Turn 4 map moves, and we'll see where those take us.


The dice were against you a lot in this game. Time to break out those magic dice again :-)
ReplyDeleteI have little time for gaming it seems these weeks (months!) but have started on these last 10-ish game reports you have posted. It may take me a while to get through them.
Take care!
Shaun,
DeleteHey buddy, I hope all is well! Yeah, magic dice would have come in handy ;) There is no excuse for not reading my batreps! I’m not accomplishing anything right now; I wrenched my back and have been down hard. Very, very frustrating to have time but be unable to paint or play...
V/R,
Jack
Oh no - back stuff is just all round bad stuff and can be so frustrating. Hope it all works well for you in the end. I feel for you man - I ended up having an operation for my slipped disk about 8 years ago.
DeleteShaun,
DeleteThanks man. I haven't had surgery, haven't even seen a doctor, probably scared to ;) I've had this happen once before, about five years ago, had me down for pretty much a full week.
V/R,
Jack