SLA D Company vs FLA 1st Company
The South Leon Army's D Company is attacking into an urban area to defeat the FLA's 1st Company and remove it as a threat to the Cuban/SLA rear area. This is a simple attack/defend scenario; the SLA goal is to clear the urban area of insurgents, while the FLA's goal is to inflict heavy casualties, tie down Allied forces (keeping them from attacking east towards Pendrakenville), and hold out until reinforcements arrive. The SLA troops are bolstered by a team of commandos from the Cuban Task-Force 23.

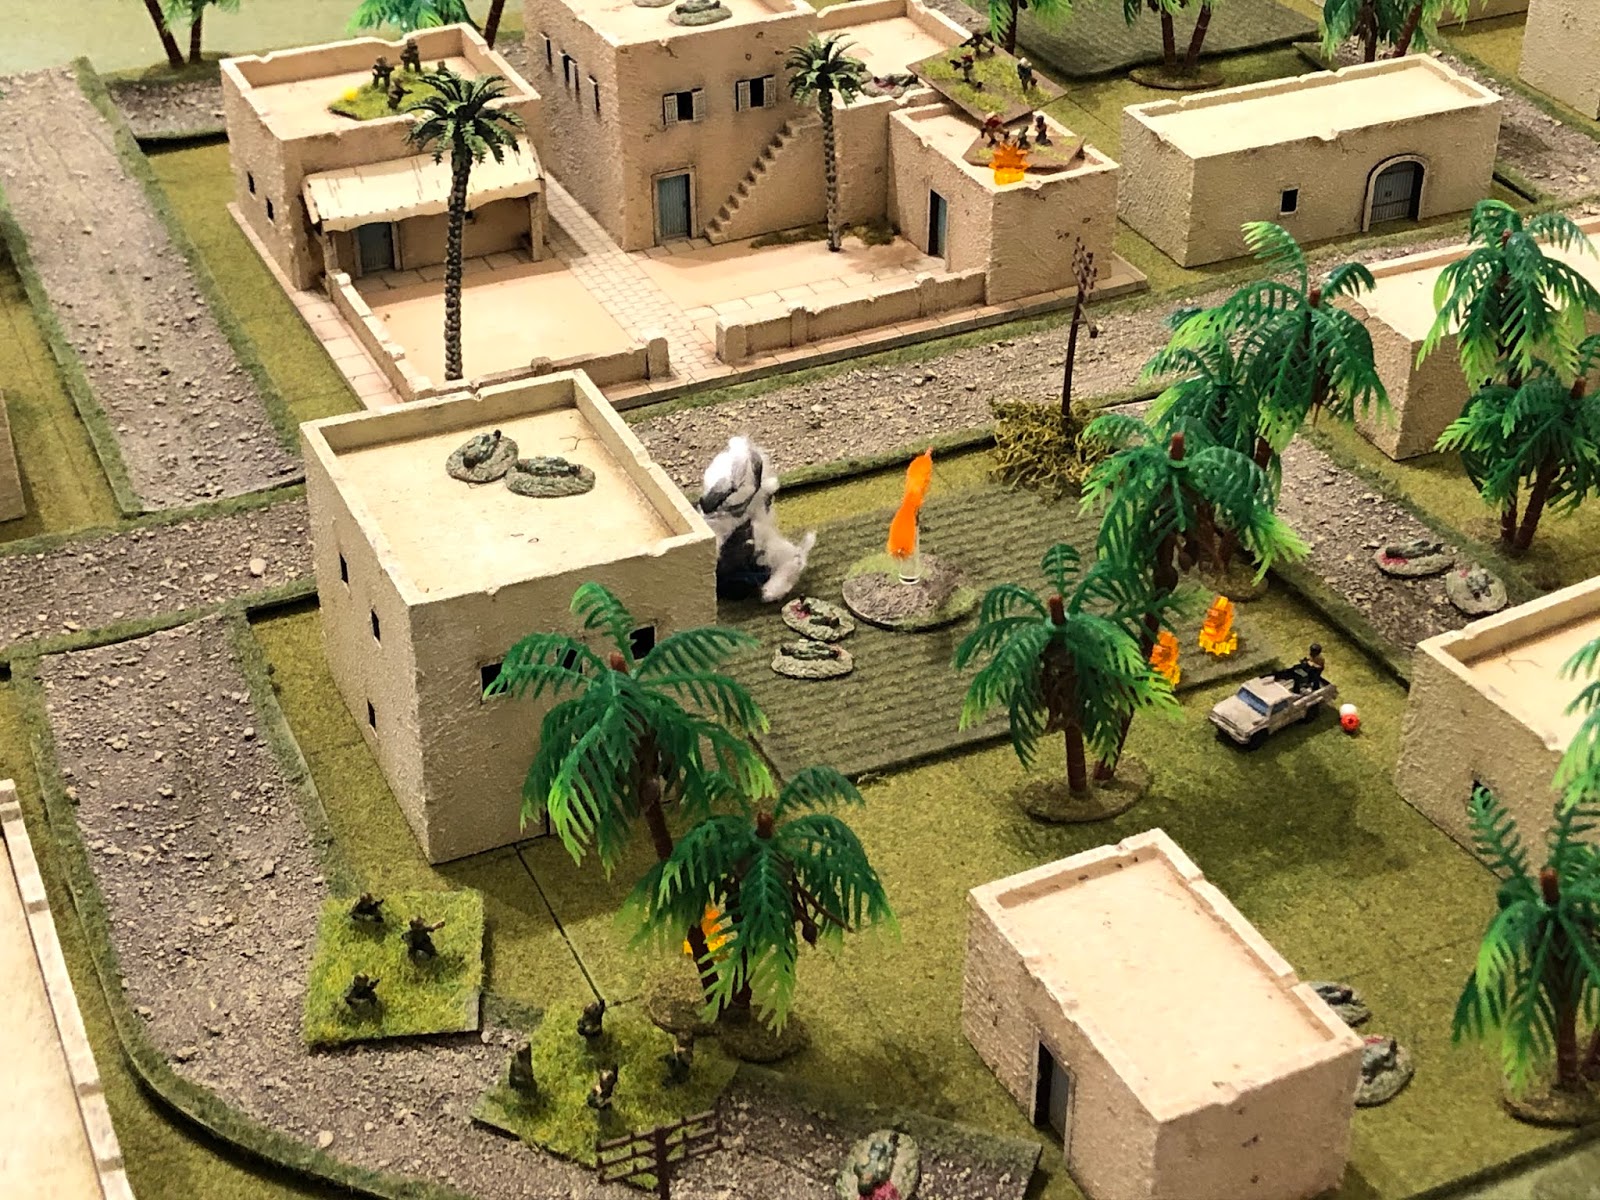
Overview, north is right. This is the village of Senilathan, relatively modern in South Leon terms, with electricity and running water running between its stone buildings housing families, businesses, and local government. The Bazaar is at center top, the Governors' Mansion is at top right, the Police Barracks is at far right, the Shoe Factory is at bottom left, and the Auto Repair Shop is at bottom center. The rest of the buildings are domiciles. The village is surrounded by jungle and there are several small hills nearby.
The opposing forces, allies on left and Communists on right.
The figures are all 10mm from Pendraken, Minifigs UK, and Butler's Printed Models. I'm using Ivan's "5Core Company Command," playing on a 3' x 2' surface with simple terrain to speed up the process. The hootches are from Jimmi at Flashpoint Minis, the roads are from Fat Frank, the hills are from Warzone, the fences are from Sarissa, the fields are from Hotzmats, the trees are cake toppers, and when you see the rivers, they're from Wargamers Terrain. I'm playing solo and will randomize enemy deployment using a system of blinds borrowed from Joe Legan's "Platoon Forward."
In terms of caliber of forces, the SLA, FSNL, and FLA troops will all be treated equally, except for the fact the FLA troops will be treated as fanatics, in terms of their willingness to advance into close combat. The Cubans are more tactically and technically proficient, and so they will receive extra firing dice, better rallying capability, bonus in close combat, and sometimes will have a second command stand on the table.
D Company's force consists of: Command stand, six rifle teams, an M-1919 .30-caliber Machine Gun Team, and a TOW anti-tank guided missile (ATGM) team. They are also accompanied by a team of commandos from TF23. These troops are Pendraken US forces from their Vietnam range, except for the MG team, which is WWII US Marines, the TOW, which is from Minifigs UK's modern US range, and the TF23 stand (far right), which is are Minifigs' Australians from their Vietnam range.
Another thing: the SLA defenders also have some heroes amongst their ranks:
-The commander of D Company was awarded the Silver Star following fight #12 and the Distinguished Service Cross following fight #33
-The team leader for Delta 04 was awarded the Bronze Star w/V following fight #12 and the Silver Star following fight #33
The Communist force consists of: a command stand, four rifle stands, a recoiless rifle stand, and two Toyota "Technicals" mounting 12.7mm DshK heavy machine guns. These troops are Minifigs' Modern Urban Insurgents.
The SLA starting positions: Tm 1at far left, Tm 2 to their right with the MG team behind them, then Tm 3 at center, with the SLA CO leading Teams 4, 5, and 6, which are stacked up and ready to go. At far right is the TF23 Team and the TOW.
The Communists have rifle teams at far left, left top, center top, and on the road (between the trees) at center bottom, with their recoiless rifle team on a rooftop at center top (just below a rifle team) and their CO just right of them. The HMG-armed Technicals are at left and on the hill at bottom right.
Let us fight! The FLA insurgents begin the battle when a rifle team (top right) spots the SLA troops sneaking up between the Shoe Factory and a nearby domicile and opens fire (far left).
Team 5 is knocked out and Team 6 is suppressed...
But Team 4, led by their gallant team leader (bottom left), returns fire and suppresses the enemy rifle team (top right)!
And then the Communist recoiless rifle team (bottom center, atop one of the buildings in the Bazaar) fires on Team 3 (top center).
And a second SLA rifle team is knocked out (bottom left)!
As the recoiless rifle team (right top) is firing 107mm HE rounds at the hapless government troops, the insurgent commander decides to move up (center, from far right), looking to assist his suppressed rifle team in the front line (far left).
On the SLA far left, Team 1 (bottom left) spots insurgents atop a building in the Bazaar (top right) and opens fire, suppressing them.
And then Team 1 pushes forward (center left, from far left).
But the nearby Technical (bottom center left) spots them (top center) and opens fire with its DshK...
But the enemy gunner misses and Team 1 makes into the cover of some nearby trees (center top), as Team 2 and the MG team move up onto a nearby roof for a better view (center, from bottom left).
But the other enemy Technical (bottom right) spots the movement (top left) and opens fire with its heavy machine gun, pinning the MG team and putting Team 2 'men down'!
On the SLA right, TF23 and the TOW ATGM team move up, onto the roof of the Shoe Factory (far right), as the SLA CO rallies Team 6 (red bead at far left).
But once again SLA movement has drawn enemy fire: the Communist rifle team in the trees at bottom right spots the TF23 and TOW team (top left) and cuts loose with their AKs and RPKDs, to no effect.
But then the rear Technical (bottom right) lays into them (top left), suppressing the TOW team and putting the TF23 team 'men down'!
*Damn, the SLA assault is crumbling under the weight of the enemy fire.
While the other Technical (bottom center) takes another shot at Team 1 (top center left, with Team 2 'men down' and the MG team pinned atop the building at left) and puts them 'men down'!!!
*The SLA force is ripe to be rolled up by close assault, with three teams 'men down' and one suppressed, if the Communists can just get to them.
The SLA MG team (bottom center) returns fire on the Technical, immobilizing it and suppressing the crew.
And then the team (yellow bead at bottom center) turns the gun on the Bazaar (top right)
One enemy rifle team goes down as another and the recoiless rifle team are suppressed!
The enemy's rear Technical (bottom right) returns fire on the SLA MG team (top left)…
Suppressing them (top left)! The situation rapidly deteriorating, the SLA CO moves atop the Shoe Factory (bottom right) to rally the TOW and TF23 team as Teams 4 and 6 move up (center, from bottom center).
The enemy rifle team in the road (bottom right) spots the SLA CO (top left) and opens fire, but he's able to get the TF23 team and TOW rallied nonetheless.
But then the MG team attempts to self rally but fails and falls back (red bead at left, from atop the building, where Team 2 is 'men down,' with Team 1 'men down' in the trees above them)!
There is a lull in the fighting as each side pauses to lick its wounds (the Communists rolled a 'scurry,' plus a random event, 'fall back,' which allows every team that desires to retreat). The enemy rifle front line rifle team that was suppressed (at far left) takes the opportunity to fall back (center), meeting up with their commander, who rallies them.
They then move to rally the suppressed Technical crew (center left) as the rifle team in the street moves left (bottom center, from center right) and the commander hauls ass back across the street and into the Bazaar (top center).
He is then able to rally the suppressed rifle and recoiless rifle teams (top left) as the rear Technical moves up (center, from bottom right).
*Holy crap, the bad guys just got all their suppressed troops back in the fight!
The good guys respond: the TOW ATGM team moves up to the crossroads (center left, from bottom center) as Team 6 (on roof at center), Team 4 (in trees below them), and the TF23 team (near house at bottom center right) all advance. The SLA CO pushes west (center, from bottom center), looking to get across the street to rally the MG team and Team 1 and 2 (center top left).
*But the good guys were able to respond, getting into strong position, with most of their units in fighting shape.
The SLA CO gets up on the roof with Team 2, but they stay 'men down' (left), as the TOW launches a missile into the Bazaar!
Another Commie rifle team is knocked out and the recoiless rifle team is pinned!
And as the Bazaar is cracked (top center right), the TF23 team (bottom center) opens fire, targeting the Technical and nearby rifle team (center), suppressing the Technical crew and putting the rifle team 'men down'!
As Team 6 (bottom left, with the newly 'men down' enemy rifle team just below them and the TF23 team at bottom right) opens fire on the enemy rifle team (top right) opposite the TF23 team.
The enemy troops are suppressed (bottom center), as Team 6 comes down and charges into close combat, easily knocking out the suppressed Technical and 'men down' rifle team (top left), then moving onto the team they suppressed!
The SLA troopers finish them off (casualty figures at bottom center), then move up (center, between trees), looking to get into the enemy's rear area (the Bazaar is at top center, the remaining Technical is just visible at top right).
The enemy Commander rallies the recoiless rifle team (bottom center), which promptly sends a 107mm HE round towards the government attackers (top center).
The Cuban commandos of the TF23 team take it in the shorts, while Team 4 is suppressed!
*Luckily, none of the Cubans were killed, but Goodie and Chick were wounded badly enough to be evacuated back to Cuba.
With the recoiless rifle team (top left) enjoying some success, the Communist Technical moves up (bottom center)...
Team 6 (bottom left), who's already knocked out one of the enemy Technicals, quickly launches a LAW rocket...
But the rocket misses and the Technical returns fire with this heavy machine gun, putting Team 6 'men down'!
On the SLA left, the CO finally gets Team 3 back in the fight (bottom center, atop the building) as the MG team rallies (bottom left).
Then moves over (top center) and rallies Team 1.
*The SLA force was incredibly lucky in this fight, with its entire left flank suppressed. The Communists, with only four rifle teams on the board, simply didn't have the infantry to get up there into close combat to take advantage.
The TOW team moves up, onto a nearby roof (top left), as Team 4 self rallies (bottom left), but Team 6 is still 'men down' and extremely vulnerable (top right).
And the bad guys seek to capitalize on this: the Technical advances on them, machine gun blazing...
The SLA team is knocked out (far right) and the Technical moves up, into cover (center right).
Where it immediately opens fire on Team 4 (far left), putting them 'men down'!
But as Team 4 (far right) is getting beat up, Team 2 (bottom left), finally back in the fight, sights in on the Technical (top center) and returns fire...
The crew of the Technical (bottom left) is pinned by Team 2's (top center) fire, but the Communist recoiless rifle team (bottom right) fires on the TOW team (left)...
And knocks them out!
Team 2 (bottom left) again returns fire, pinning the recoiless rifle team (top right).
As Team 1 (bottom left, with the CO next to them and the MG team sitting idly by at bottom center) opens fire on the Technical (top right).
Team 1's fire (top left) is ineffective, as is the Technical's return fire (bottom center). The two continue exchanging fire, with (somehow) the Technical coming out on the worse end of it, suppressed!
As the Technical (bottom center) is suppressed, the recoiless rifle team is still thumping (top right). This time they line up a shot and fire on Team 2 (atop building at top left).
And they knock out another damn SLA rifle team (atop building) and the damn MG team (bottom left), and pinning Team 1 (top center, with the CO just visible below them)!!! The CO attempts to rally them...
*That damned recoiless rifle team has pretty much single-handedly decimated the SLA force. In all honesty, the Communist force should have retired once it lost its last rifle team (leaving only the CO, recoiless rifle team, and Technical), but they're doing so well I figured I'd let them keep hammering away.
Having said that, the SLA force has also taken horrendous casualties and should have retired, now down to only their CO and two rifle teams (Teams 1 and 4), but this has turned into a battle of annihilation...
But a roll of 'snake-eyes' sees them stay pinned; nevertheless, he orders Team 1 forward (far left, from bottom left), then he hauls ass into the intersection (center), trying to reach Team 4 (top right) and get them rallied.
The Communist Commander (bottom right) see the SLA CO (top center) and immediatey grasps what he's doing; "Gunner, fire on that government rifle team (Team 4, top left)," trying to knock them out before the SLA CO can rally them.
*Then the SLA troops catch a lucky break: they roll a 'Scurry' with a random event, "Let'em Have It!", which allows a single team to fire twice.
Team 4 (far right) was already 'men down,' and so the enemy recoiless rifle team's (top left) shot had no further affect on them (had a very small chance of knocking them out, but didn't), and the SLA CO safely reached them and rallied them back into the fight as Team 1 (far left bottom) got into great position on and cut loose on the Technical (top center), immobilizing the vehicle and suppressing the crew.
Team 4 (bottom left) fired on the Communist recoiless rifle team (top center), suppressing them...
And then charged into close combat with the Technical's suppressed crew!
The Technical was knocked out (bottom right) and Team 4 advanced, capturing the Communist Commander and recoiless rifle team and ending this ferocious fight in the streets of Senilathan!
Th SLA D Company's attack on Senilathan (B2) was to be lauded, but ultimately it was, for them, a Pyrrhic victory, which resulted in the destruction of both the Communist Free Liberation Army's 1st Company AND the SLA's D Company! Both sides were simply ground into dust and removed from the campaign map as they no longer constitute effective fighting forces.
Wow, I'm kinda flabbergasted at how that went down. With the disparity in the size, quality, and armament of forces I figured this would be a relatively easy attack for the SLA force. It was fighting in town, so there was going to be blood, but I didn't expect anything like how it turned out. And it sort of took on a life of its own: like I said, each side, at different times, should have retired after taking heavy casualties, but this became so vicious, such a blood debt, that neither side was going to give in. Another aspect that weight heavily on the game was friction; I apologize as I didn't comment that much on the game mechanics, but there were a lot of Firefights and Scurries rolled up, when that was really the last thing that side needed at that moment, and that really kept them from exploiting a major opportunity to finish off, or at least put a serious dent in, their opposition. But ultimately the biggest tactical problem in the game was the Communists' lack of infantry to capitalize on suppressing the entire SLA left flank. Luckily for me, they just couldn't get a rifle team over there to roll up that flank, because they just didn't have enough rifle teams to get over there!
Communist: ~30 men, with 10 more captured and two 'Technicals' destroyed
Delta 06 Team Leader was awarded the Silver Star for leading a counterattack that destroyed two Communist rifle teams and an HMG-armed 'Technical.' Unfortunately this was awarded posthumously as he was killed in action later in the battle.
Next up we have Captain Madre-Animral's Task Force Bowie taking on the FSNL's 4th Company for a third straight time! TF Bowie attacked them at H-Hour, pushed them back, moved up and attacked them again, pushed them back again, and now those crazy Communists are mounting a last-ditch counterattack!


No comments:
Post a Comment