All,
It's been several days since crossing the frontier, and TF Trojas is looking for action. It's 1500 on 8 April 1990, and Team 6-4 has been briefed, geared up, and conducted its movement to the objective area. Lt Trojas was informed by local agents that the leader of a local cell of the Cronistrian People's Army (CPA, the local Communist Militia supporting General Ambroz Zlatan's communist takeover of Cronistria) scheduled a meeting in a farmhouse in the nearby village of Perzezl. Trojas immediately put Team 6-4 on the task of proceeding to the meeting location and eliminating the CPA cell. Sergeant First Class "Rooey" Contreras was only too happy; he and his boys were itching for action, and Willow (KIA from Team 6-3) was a friend of his.

The opposing forces: the CLEF has five shooters of Team 6-4, while the enemy force is a bit more hazy. The CLEF shooters will be moving into the objective area in a hurry; while en route to the meeting site, Lt Trojas radioed that new information had come in that the CPA meeting would take place at ~1500 local time, but that several truckloads of Cronstrian National Guard (CNG, or communist regulars) had left their barracks and would arrive in Perzezl between 1530 and 1545. So, Rooey needed to get Team 6-4 in, locate the CPA, take them out, then get out of dodge before the CNG troops showed up.
So the CLEF troops don't have time to conduct a proper reconnaissance of the objective area. Instead, they'll try to get their Designated Marksman to high ground, but the other four will pair up and move in, attempting to identify the enemy as possible.
To simulate this on the tabletop, I will not place the enemy soldiers on the table until/unless they are spotted. I will place 14 'blinds' on the table, and CLEF troops will have to move up and spot them. Some of the 14 will be dummies, and I won't know how many bad guys are in the fight until all the blinds have been diced for. I'm looking to have between 4 and 9 bad guys, so we'll see what happens.
Team 6-4, from right to left: Rooey, Blade, Shady, Redrum, and Goss. Rooey, Blade, Shady, and Redrum all have silenced M-4 carbines, while Goss has an accurized, silenced M-16.
The nine potential bad guys, with the leader up front. These are communist militia of the CPA; these figures will also be used in future games as 'good guy' militia of the Cronistrian Democratic Militia.
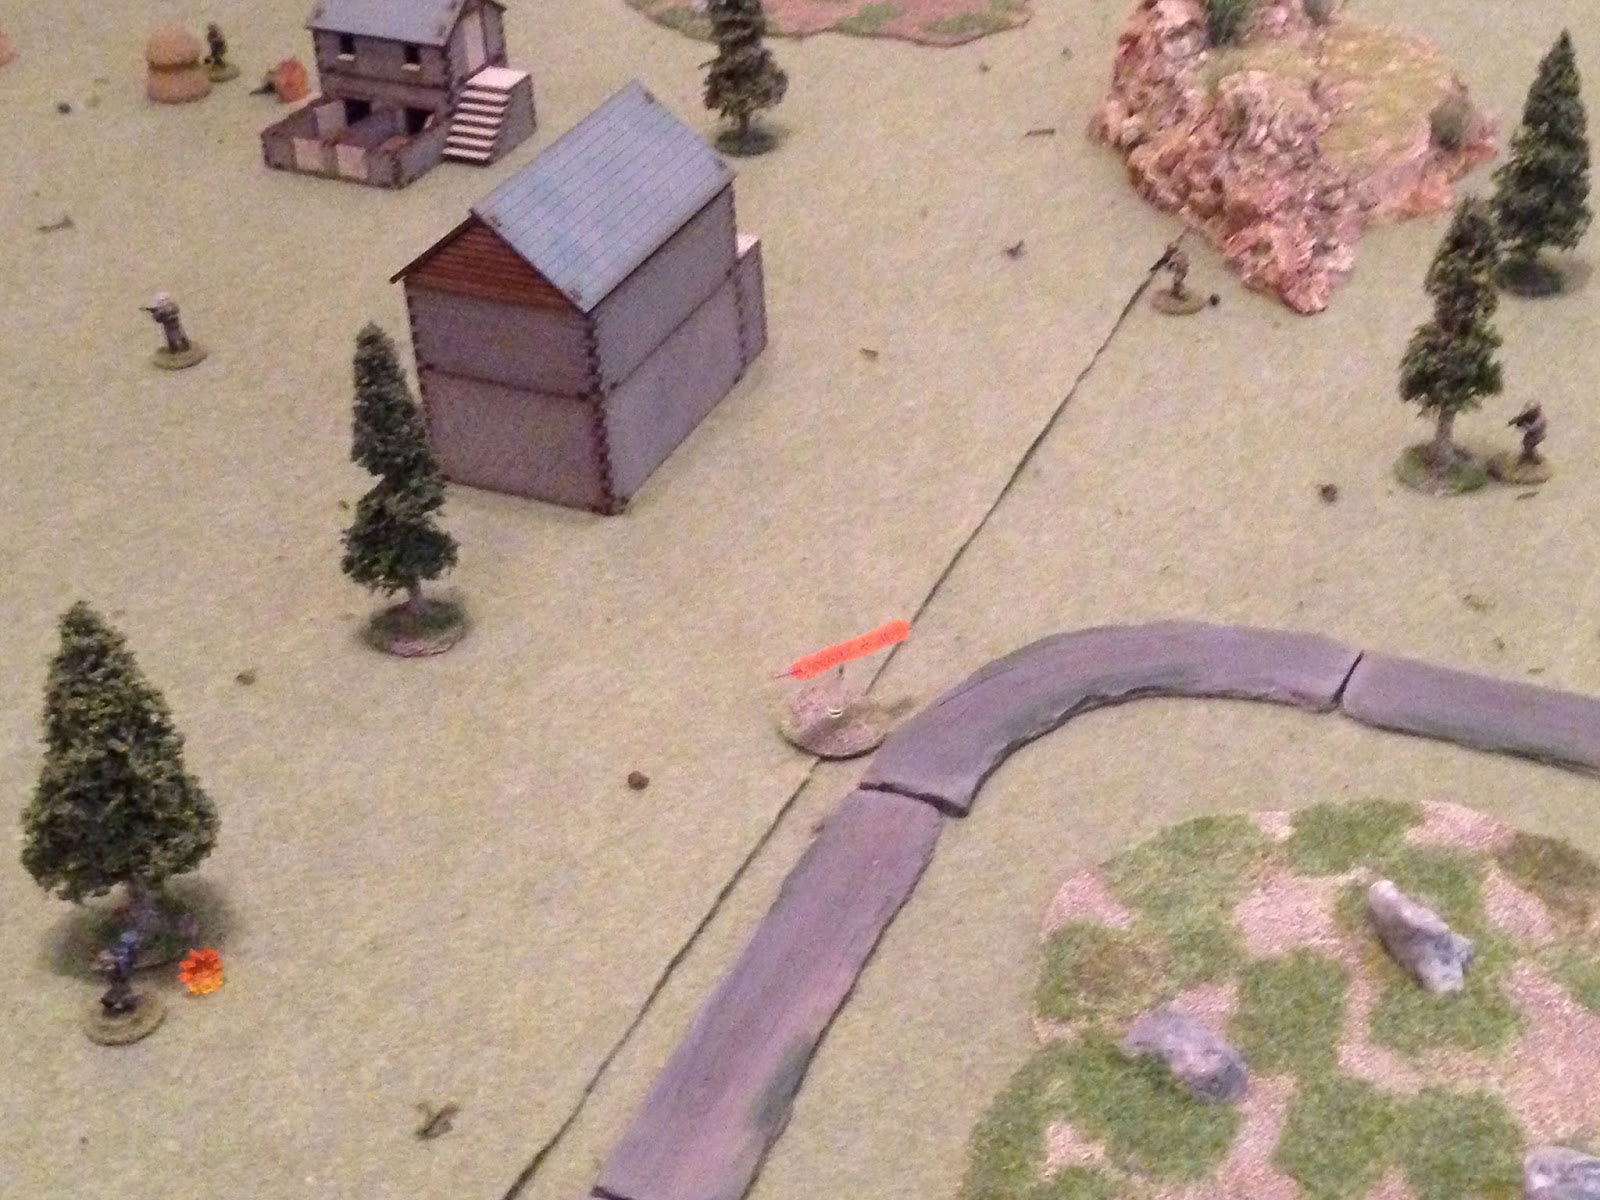
Overview of table, north is up. Team 6-4 is entering from the top left (northwest) and bottom left (southwest) corners. You see a couple patches of rough ground, a couple rocky outcroppings (bottom left and top center, a chicken coop (bottom center left), and three buildings. Clockwise from left, they are B1, B2, and B3. Little purple beads, serving as blinds, are scattered across the center and right of the map, and in all three buildings (14 blinds total).
A look at the bottom left (SW) corner, showing Goss atop the outcrop, and Rooey and Blade at the chicken coop (center right).
The top left (NW) corner, showing Shady and Redrum.
Looking west to east, with Shady and Redrum at far left, Goss at bottom right, and Rooey and Blade at far right. B1 at center, B2 to its top left, B3 at top center.
Looking NW at B1, showing two blinds.
Looking north at B2, showing three blinds.
Looking NE at B3, showing three blinds on the top floor, one on the bottom floor, one at bottom right, one at far left, and one at top center.
Looking NW at B3, you can see another blind at top right, one at far left, and one at bottom center right.
Rooey gets on the intra-squad radio: "Alright gents, this is it. Everyone stay frosty; Goss, you're switched on as Guardian Angel but otherwise we're holding to knife-fight range. Blade you're with me, Shady and Redrum, time to go."
**Guardian Angel means Goss is on overwatch to spot and call out hostiles, but isn't shooting except to save someone's life or until the one of the shooters starts the firefight. Rooey, Blade, Shady, and Redrum are looking to get as close in as possible before the firefight starts, so they're not engaging until they are forced to.
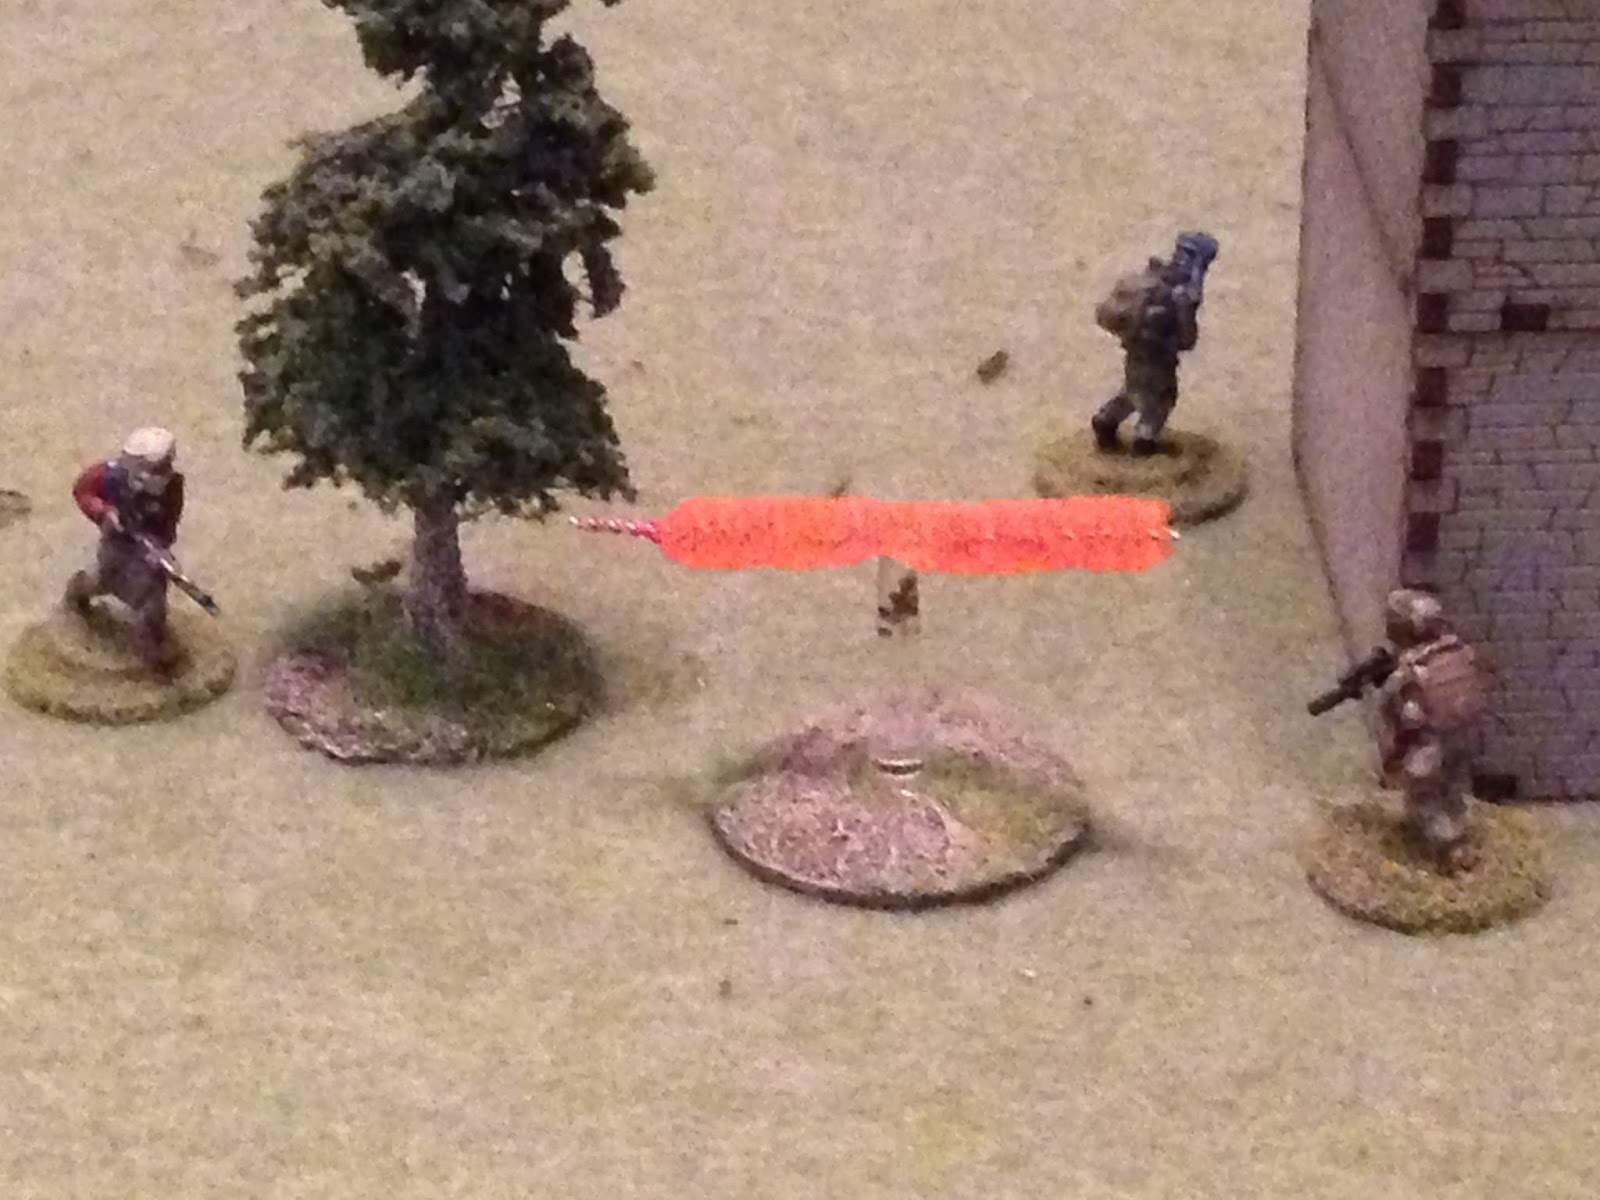
Goss (bottom left, with Rooey and Blade at bottom right) is glassing the area and begins calling out contacts: "Rifle, just outside east corner of B3. Rifle, north corner of B3, ground floor."
Blade (far left, with Rooey at bottom left, Goss off camera to bottom left) moves up and clears B2: "Confirm Tango east end of B2, rest of B2 all clear."
Rooey (far left) moves left to Blade, looking east (up): "Confirm 1 Tango, ground floor of B3, rifle, haystack 15 meters south of B3."
Redrum (far left, with Shady at bottom center) moves up: "Rifle, treeline, 20 meters northeast of B3."
Shady joins Redrum: "Confirm Tango, ground floor, B3, no others, can't get a look at 2nd floor. Confirm one Tango, east end of B2, no others."
Looking west to east from the southwest, Goss (bottom left) spots another: "Rifle, treeline, 15 meters southeast of B3." That's Rooey and Blade below him (center left).
Blade spots one too: "Rifle, B1, east side of B1, outside behind wall. I've got no Tangos inside B1."
Rooey begins scanning the 2nd floor of B3: "Pistol, 2nd floor B3, center."
Redrum and Shady (bottom left) hold tight and take a good hard look.
Redrum: "Rifle, northeast corner, exterior of B3."
Shady: "Confirm no Tangos B1, 1 Tango 2nd floor B3."
As an interesting aside, I rolled up the random event "Spooked," which makes you pick a random guy and roll a shock dice to see what happens. I did, and luckily nothing happened. If someone decided to flinch, well, that would suck because now he'd need to be rallied. But if someone fell back and hunkered, he would need to be rallied AND would probably have been spotted by the enemy. Pretty lucky.
So, all the blinds are cleared up, eight bad guys on the board. Time to go loud. Well, almost.
I'd be remiss if I didn't give the enemy a turn. So, I rolled a direction dice and distance dice for every single guy, then moved them, and diced to see if they spotted any CLEF troops. If you look here, you see where the guys moved. None of the CLEF troops were spotted, but the guy at far left (just below B1) is real close to Blade and Rooey, who are off camera just below him.
Another look at the bad guys milling about, with Rooey and Blade at bottom right. Time to get crazy.
Rooey: "Goss, these guys are everywhere, we're as close as we're gonna get. Why don't you start us off? Tango, 1st floor of B3."
Goss (bottom center, with Rooey and Blade at center): "Roger boss, on the way." You can see Goss's tracer at center, on its way to the commie on the first floor of B3.
The bad guys are caught totally by surprise: the target soldier is hit, man down. The leader, on the second floor, is pinned, and the sentry who was at the center of the pic fell back to bottom right and hunkered.
Blade begins shuffling north, opening fire once he gets a good sight picture on the nearby hostile.
The bad guy is out of the fight, and Blade takes up position.
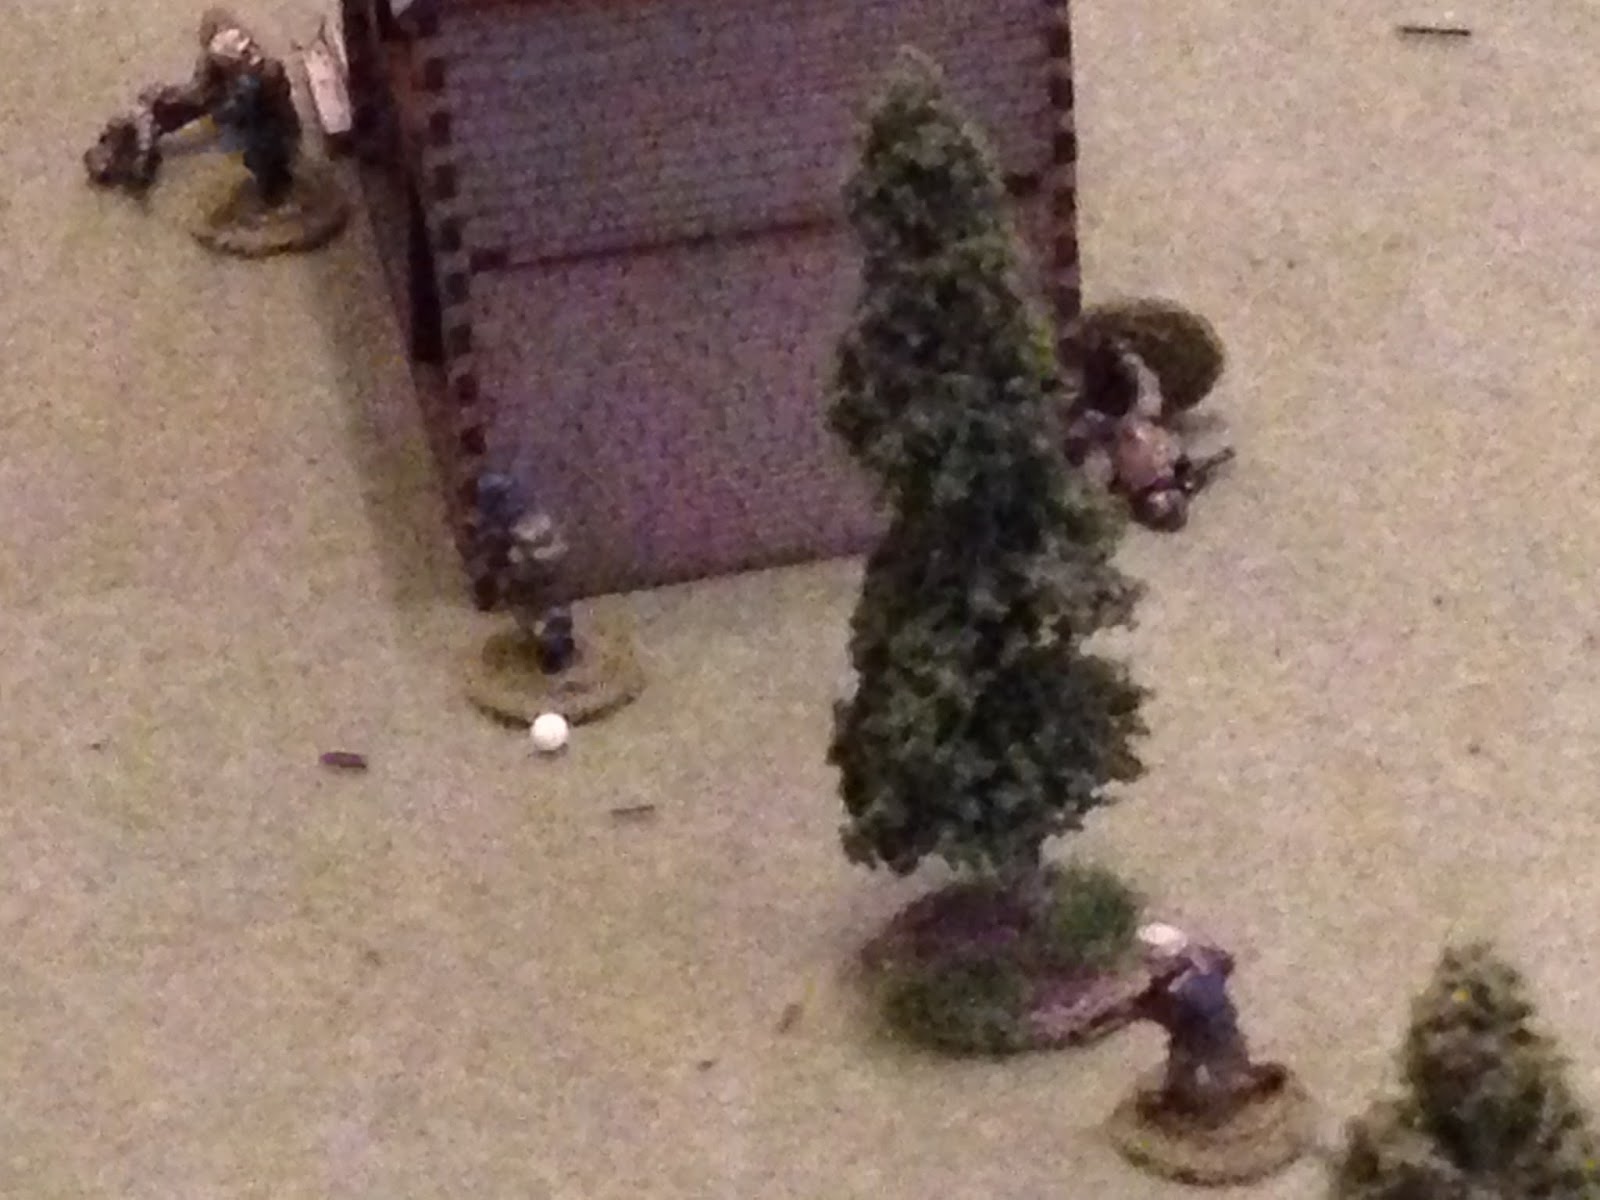
In the northwest (looking southeast, with Redrum at bottom left), Shady (bottom center) moves up, unspotted by the bad guy at top center. At top right is the guy hit by Goss.
Shady takes his shot, and it's a good shot (I had another random event, "accurate fire," an extra kill dice)... and misses!
In the southeast, a hostile moves up (bottom right), drawing guard fire from Rooey (far left).
And the bad guy opens fire on Blade, who thought he was hiding behind a haystack. Blade goes 'man down.'
Similarly, in the northeast a hostile moves up (bottom left), drawing guard fire from Redrum (top right), which pins the guy, stopping him cold in his tracks.
Rooey sprints to Blade, checks him over, and gets him back on his feet. Just a scratch, ya big sissy!
Blade then moves up into B1 (center left, with Rooey at bottom left), getting pretty close to the bad guy at top right.
Close enough that the bad guy felt pretty good about falling back to some cover.
You can see Shady's feet at top left.
In the southeast, the bad guy that roughed up Blade moves up and rallies his hunkering buddy, but only gets him up to pinned.
While the two bad guys in B3 try to rally: the guy on the ground floor is good, but the leader stays pinned. Which really makes it difficult for him to escape by running away from the CLEF Special Forces. It's also hard for the bad guys to get someone up there to rally him as the only access to the 2nd floor is via the stairwell at bottom right.
In the northwest (looking southeast), Shady and Redrum sprint towards the back side of B2 (center).
While their bad guy counterparts work: one moves up to rally the pinned guy (bottom left, with Shady and Redrum at top right), successfully.
And then he moves closer to the CLEF troopers.
It's hilarious, because this happened to me (not the enemy) last game: what just happened was the CLEF rolled a scurry, moved around, and the bad guys get to move around too. They moved pretty aggressively in anticipation of a normal or firefight activation, which would allow them to rough up the CLEF guys. But, the bad guys just rolled a scurry too!
For folks not a fan of the scurry, I love it, it causes people to be surprised, to be able to cross ground that never could have happened in more 'conventional' games. Maybe not for everyone, but I LOVE it. Again, how many times have you read of the dug-in prepared defender that was simply overwhelmed by violence of action? Many, I'd imagine. How many times have you seen it done on the tabletop (and I don't mean via the superman 'these troops get +3 to everything,' I mean by unexpected maneuver that enabled the attacker to get on a flank or into close combat)?
The pinned bad guy in the southeast tries to rally...
But falls back and hunkers.
While the leader is finally able to get back into fighting shape.
And the bad guys in the north reposition in and around B2.
On the flip side, Shady sits tight (center), while Redrum moves right.
And then Shady drops the hammer: he opens fire, putting rounds into one bad guy, then pivoting south (top) and putting more into another one.
The first guy is immediately out of the fight, while the other is 'man down' (white bead).
And then Blade (far left, with Redrum at center, just left of the bad guy target in B2, and the guy Shady just put man down at far right) opens fire, getting man down on the hostile in B2.
With Blade at bottom left, Redrum (far left) peaks around the corner and opens up on the bad guy on the ground floor of B3, putting him man down (again, he'd just rallied the one from Goss off!).
Back in the southwest, Goss opens up on the bad guy in the field south of B3, putting him out of the fight.
Finally, Rooey (bottom left, with Blade just above him and Redrum just above him) opens fire on the Communist leader (2nd floor of B3), pinning him down.
Wow, what a firefight! Every single bad guy on the board is suffering, with one pinned, one hunkering, and three more man down (also have three out of the fight). So, you'll forgive me if I got a bit cocky. Sorry for the spoiler, but things get a bit silly. And when I say silly, I don't mean silly, I mean they start to suck real bad...
So, the first bad news is the bad guys roll up a random event, "bravery," so their rifleman hunkering in the southeast corner of the board suddenly shakes off the ill effects of CLEF gunfire, charges ahead (center, from red bead at bottom center), and opens fire on Shady, on the right side of B2.
And he's not just brave, but apparently a great shot too. Shady goes down like a sack of potatoes...
The 'man down' militiaman next to Shady tries to self rally, but stays down.
But Goss has seen enough of our little brave terrorist, and puts him on his ass (man down).
We need to make something happen here, finish up this fight before the bad guys pull another rainbow from betwixt their cheeks. So I act with daring...
Well, not too daring, actually, there's a couple bad guys set up 'man down,' like bowling pins. Redrum goes screaming into close combat, piece o'cake!
Apparently the bad guy was playin' possum, 'cause he sprung to life as Redrum reached him, and overpowered the CLEF Special Forces trooper! What!!!???
Then the bad guys roll up another random event, "Just a Scratch," meaning one of their 'out of the fight' guys was probably only unconscious, so he comes to and springs back into action. I roll it up...
And, in the northeast, the guy that Shady shot in the face was only grazed, and he's back in the fight (bottom right, with Shady above him, and the bad guy and Redrum at top left).
The guy that dropped Redrum takes a shot at Blade, but misses.
And Blade's return fire once again puts this guy 'man down.'
The guy on the first floor of B3, after going man down twice, is back on his feet, back in the fight.
Blade hops the wall of B1, then dashes across the open ground and into close combat with the man that just shot at him, the guy that put Redrum out of the fight.
Blade puts him out, then moves to the next bad guy...
Blade puts a second hostile down, then moves on a third, who snap fires but misses.
Blade puts the third bad guy out of the fight (far left), then moves to the northwest corner of B3 (top center right).
In retrospect, I screwed up, I should have let the bad guy on the 1st floor of B3 (top right, just visible in the shadows) guard fire at Blade as he was moving up. Only a 33% chance of making something happen, but stranger things have happened. Oops...
Now, for those of you thinking I don't want pushover games, that I try to make them interesting, you're flat wrong! Remember, I'm playing campaigns, I'm following characters that I want to not only survive, but to win and be showered in glory. So pushovers are fine. But they don't happen very often; these rules just have a way of making weird stuff happen, of opening the door again for the other team.
Rooey moves over into hard cover in B1 (bottom left).
And Goss decided to come down from his perch, moving towards the chicken coop.
The Communist leader, on the second floor of B3 (with Blade at far left) successfully self-rallies once again, while his minion on the ground floor, having just watched Blade on his rampage, is scared @#$%less and falls back to the south (bottom center).
In the field south of B3, the man down commie tries to self recover but fails an succumbs to his wounds.
With his rifleman laying down cover fire on Rooey, the enemy leader retreats to the stairs, looking to get out of dodge.
And the cover fire has the desired effect, driving Rooey back and causing him to hunker.
Dammit, that leaves only Blade and Goss to stop the bad guys from getting away.
After firing, the bad guy rifleman fell back (center, behind haystack, coming from the corner of the building at top center right).
Then the CLEF rolls up a damn firefight, but Goss and Blade can't see anything, so it's a waste, other than Rooey successfully self rallies. Because they couldn't see anything, I could have converted the firefight to a scurry. But then that would have allowed the bad guys to move without me getting the opportunity to fire, so I chose not to.
The bad guy leader (center right) and rifleman (bottom right) fall back, trying to escape off the table edge, and the rifleman fires on Goss (top left), but misses.
As does Goss's return fire...
But then Goss moves right, clearing his field of fire, and cuts loose again, dropping the hostile.
While Rooey moves forward towards the Communist Militia cell leader, who calmly draws his pistol and begins firing. But he's cross-eyed and the rounds sail harmlessly by.
Rooey continues his shuffle and calmly lines up his shot, squeezing a round on every other footfall...
Game over, mission accomplished.
Holy crap, my heart can't take much more of this! It started off okay, I got the upper hand (vicious firefight), they came back (failed close combat, couple random events), I stormed ahead again (Blade's rampage), the leader almost got away, then I bagged the buck. Wild.
Team 6-4 promptly searched the bodies/area for intel, policed up their gear and casualties, then exfilled the area, RTB, home in time debrief and a brew. After the debrief, Lt Trojas: "Good job Rooey, way to set the tone. Having said that, we're going to have to tighten this up. After our two fights, the bad guys have got to be aware there's a new player in the game, and I suspect they'll send someone special to look for us."
Casualties:
Cuban:
Redrum is fine, just knocked out in close combat.
Sgt "Shady" Fonseca was severely wounded, bad enough to be evacuated to TF Trojas Fwd, then on to Cuba. His time in Cronistria is finished.
Cronistrian People's Army: 8 KIA
SSgt "Blade" Escalante was recommended for the Cruz Servicio Distinguido for heroism under fire, close assaulting and overpowering the enemy's right flank, personally reviving the team's faltering attack.
Well, that's it for now, more fights to come this weekend.
V/R,
Jack


That came down to a straight hollywood moment at the end, very nice :-)
ReplyDeleteYeah man, it worked out funny that way. The team had done a good job of keeping the bad guy leader pinned in the house, but he almost slipped away, coming down to his Guard fire on the team leader missing and Rooey dropping him. A lot of fun!
DeleteV/R,
Jack
Great AAR!
ReplyDeleteThanks Joe, glad you liked it.
DeleteV/R,
Jack