It's 1930 on 1 Feb 1990, and the CLA's C Company, Unconventional Warfare Group, is charged with blocking east-west running fast routes through the Escambray Mountains (just east of Cienfuegos), the goal being to isolate powerful regime forces at Camaguey, Las Tunas, Holguin, and Santiago de Cuba and prevent them from influencing the fight in the west, with Havana being enveloped from both west (Playa Colorada landing site) and east (Bay of Pigs landing site).
C Company has spent the past several hours variously conducting reconnaissance to identify enemy columns heading west, and dispersing to dodge harassing regime ground attack aircraft ("I thought our flyboys were supposed to take care of all that..."). In any case, C Company has identified an enemy column of Task Force A, 12th Mechanized Company, sallying forth out of Holguin; the Company Commander quickly issues orders for a hasty ambush. It would turn into what would surely be one of the most ferocious firefights of the entire War of Liberation...
1) B Squadron SOF destroyed a radar site in support of amphibious landings at Playa Colorada (5). B Sqdn then egressed and linked up with CLA rotary wing assets for their follow-on mission in Havana (6).
2) C Squadron SOF destroyed a the Cuban military's communications center.
3) 1st Para Battalion dropped in and seized a bridge to screen the landings at Playa Colorada (5).
4) 2nd Para battalion dropped in and eliminated a Castro-regime garrison to screen the landings at the Bay of Pigs (just west of (4).
5) 1st Marine Company, 3rd Infantry Battalion, made an amphibious assault at Playa Colorada.
6) A Squadron SOF attacked a Castro-regime SAM site near Havana, which failed to clear the way for B Squadron's helo assault into Havana.
7) 2nd Marine Company, 6th Infantry Battalion, landed at the Bay of Pigs then turned east and ran into a strong enemy force, which it handily defeated.
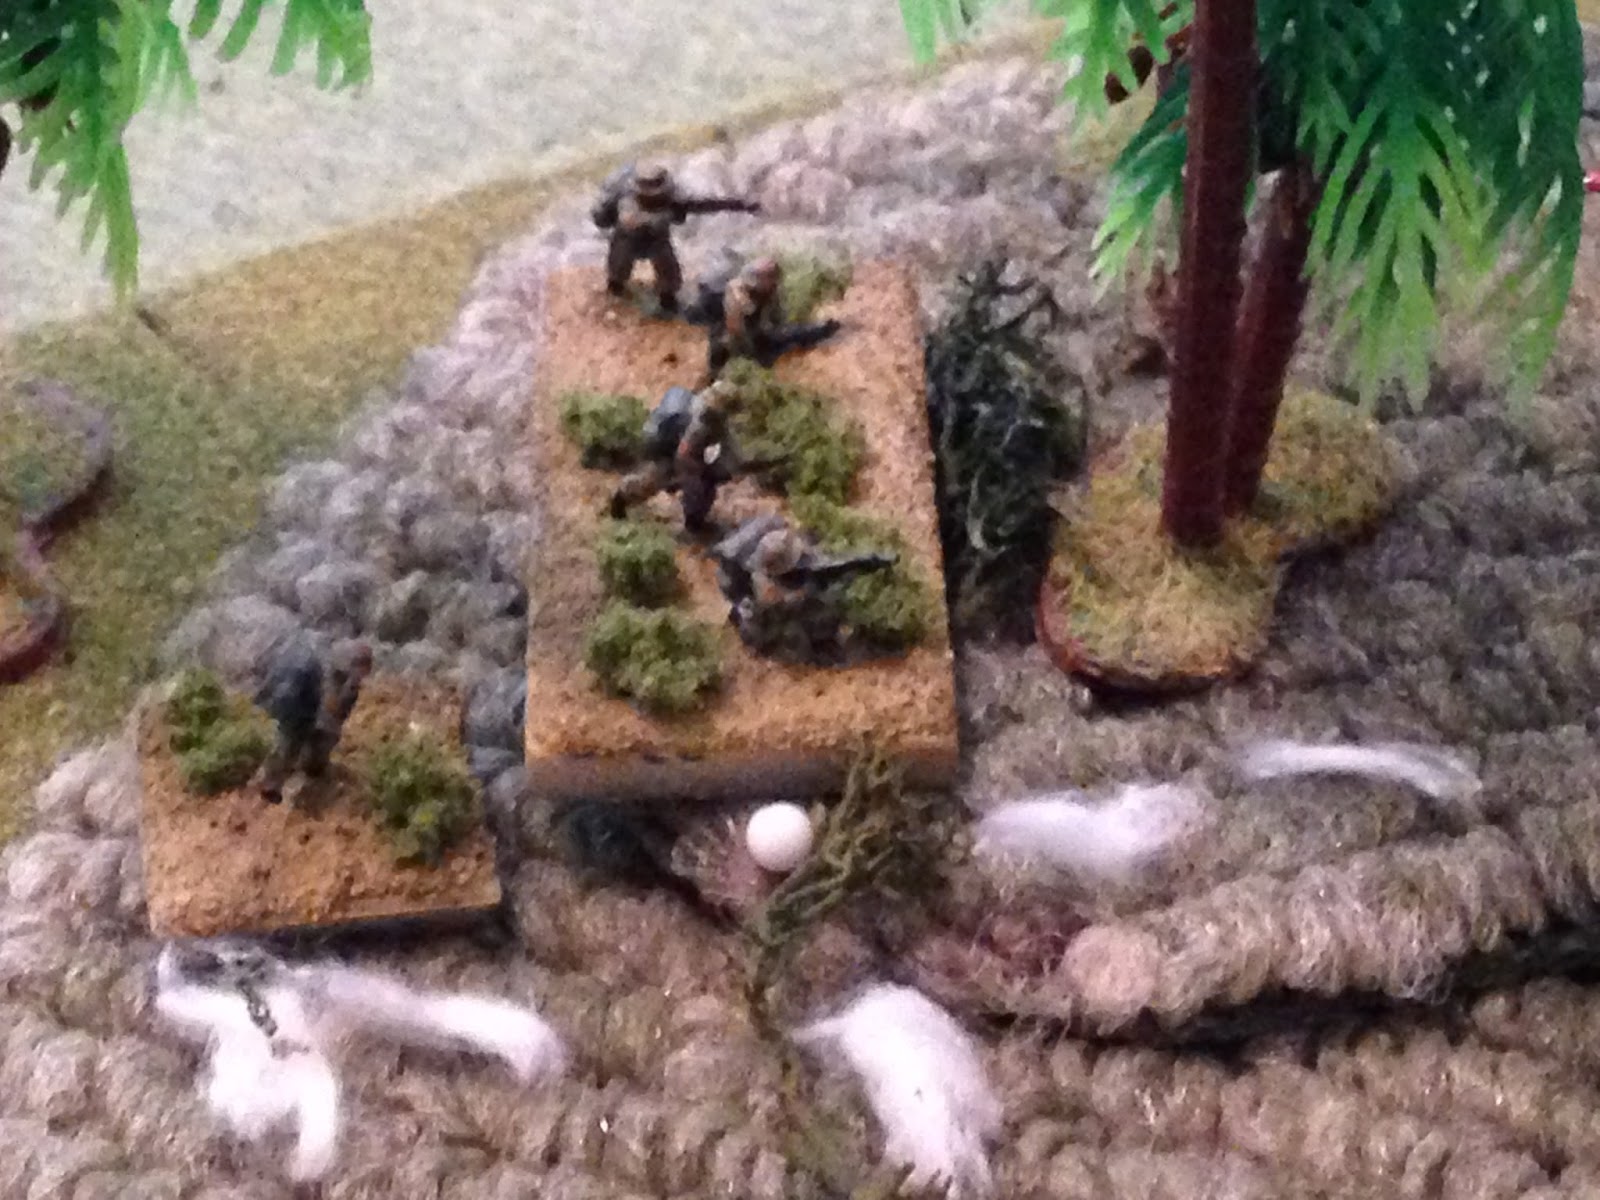
8) B Company of the UWG pursued and destroyed an enemy garrison in the Escambray Mountains.
9) B Squadron SOF conducted an aerial insertion into Havana to seize a radio station and broadcast news of the invasion.
10) 10th Popular Force Battalion seized and destroyed the Pedroso bridge to protect the Bay of Pigs landing site from the Matanzas garrison.
11) 1st Airborne Infantry Battalion successfully fought off a regime counterattack near the bridge at Sandino, protecting the western (Playa Colorada) landing site from the Pinar del Rio garrison.
12) 6th Infantry Battalion fought through an enemy ambush while pushing inland from the Bay of Pigs landing site.
13) 8th Popular Force Battalion ambushed a mechanized column of the enemy 2nd Armored Battalion, just west of Havana.
14) 2nd Airborne Battalion engaged enemy armored forces of the 6th Armored Battalion in the village of El Rincon, en route to the Bay of Pigs landing site.
15) 4th Infantry Battalion's 1st Air Assault Company conducts an air assault southeast of Sandino to counter enemy mechanized forces of 3rd Infantry Battalion (forcing 1st Airborne Battalion's right flank).
16) 9th Popular Force Battalion conducts a spoiling attack on the regime's 7th Infantry Battalion in the Matanzas garrison.
17) 2nd Air Assault Company, 7th Infantry Battalion, inserts east of El Rincon to block the escape of the regime's 6th Armored Battalion.
18) C Company of the UWG fought a running battle in the Escambray Mountains to delay/halt the regime's 12th Mechanized Battalion moving west.
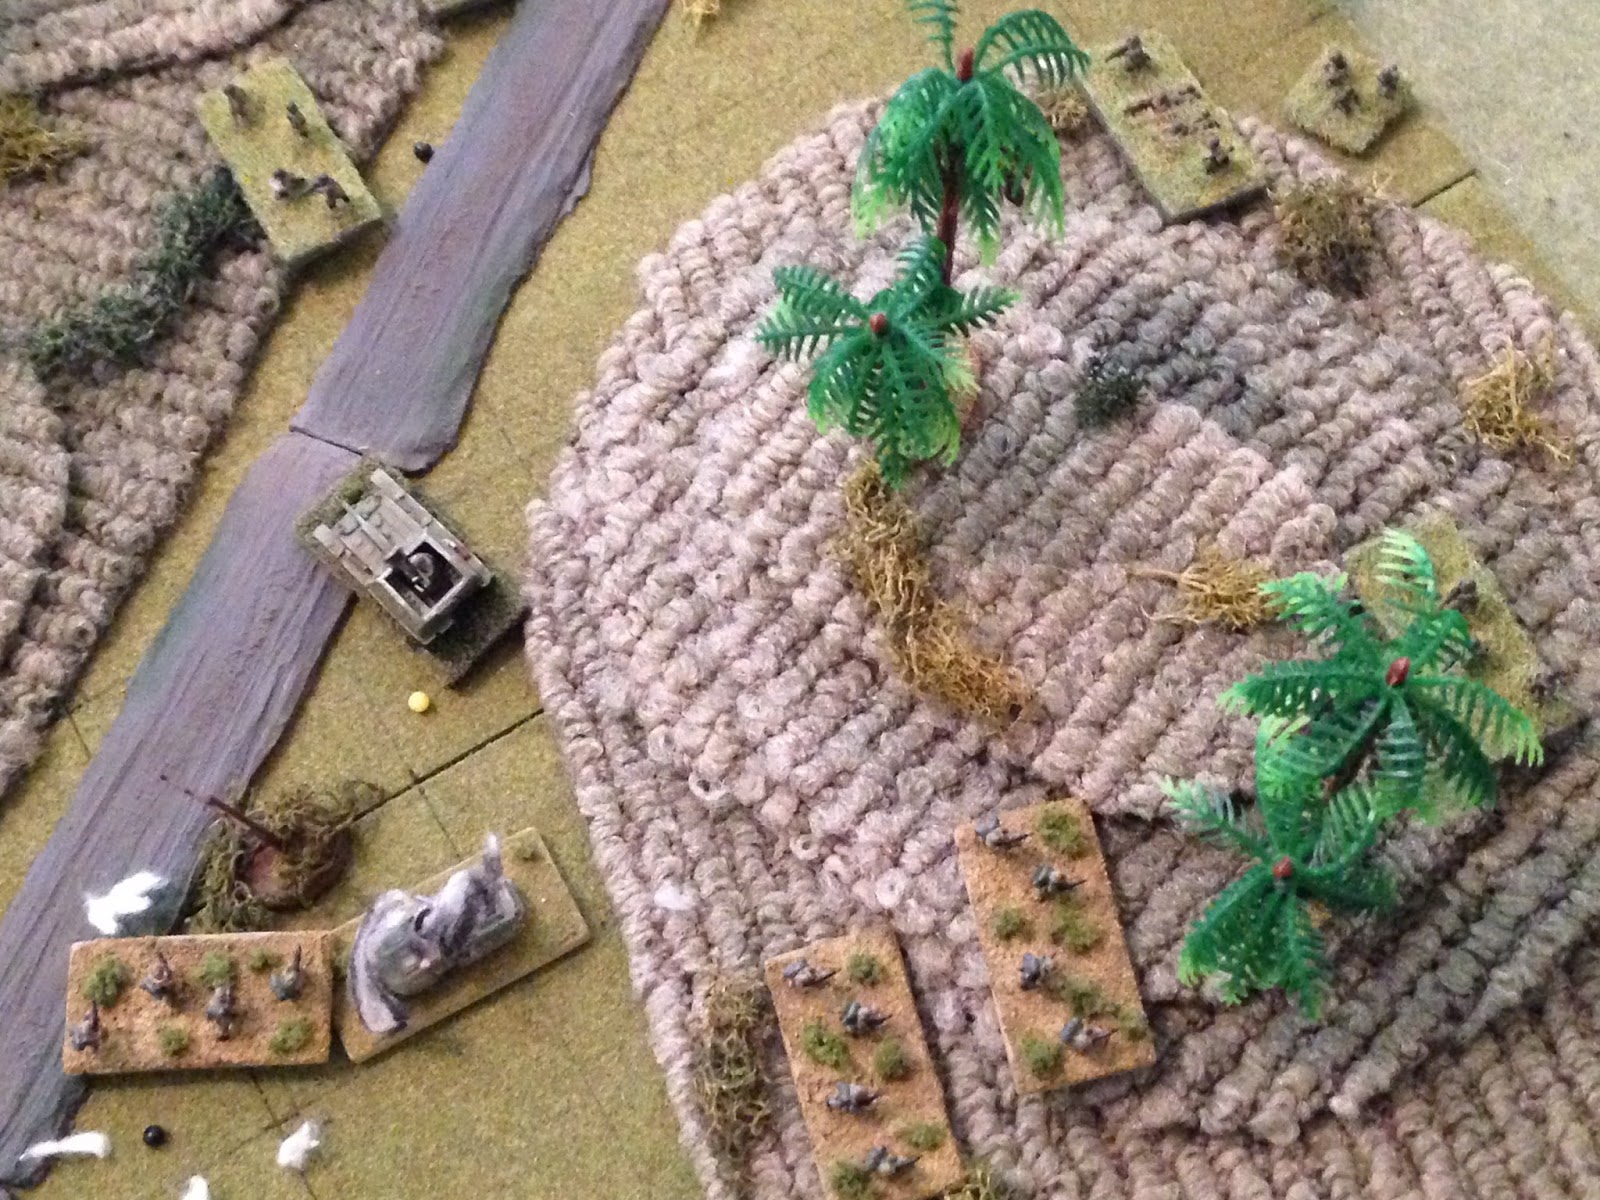
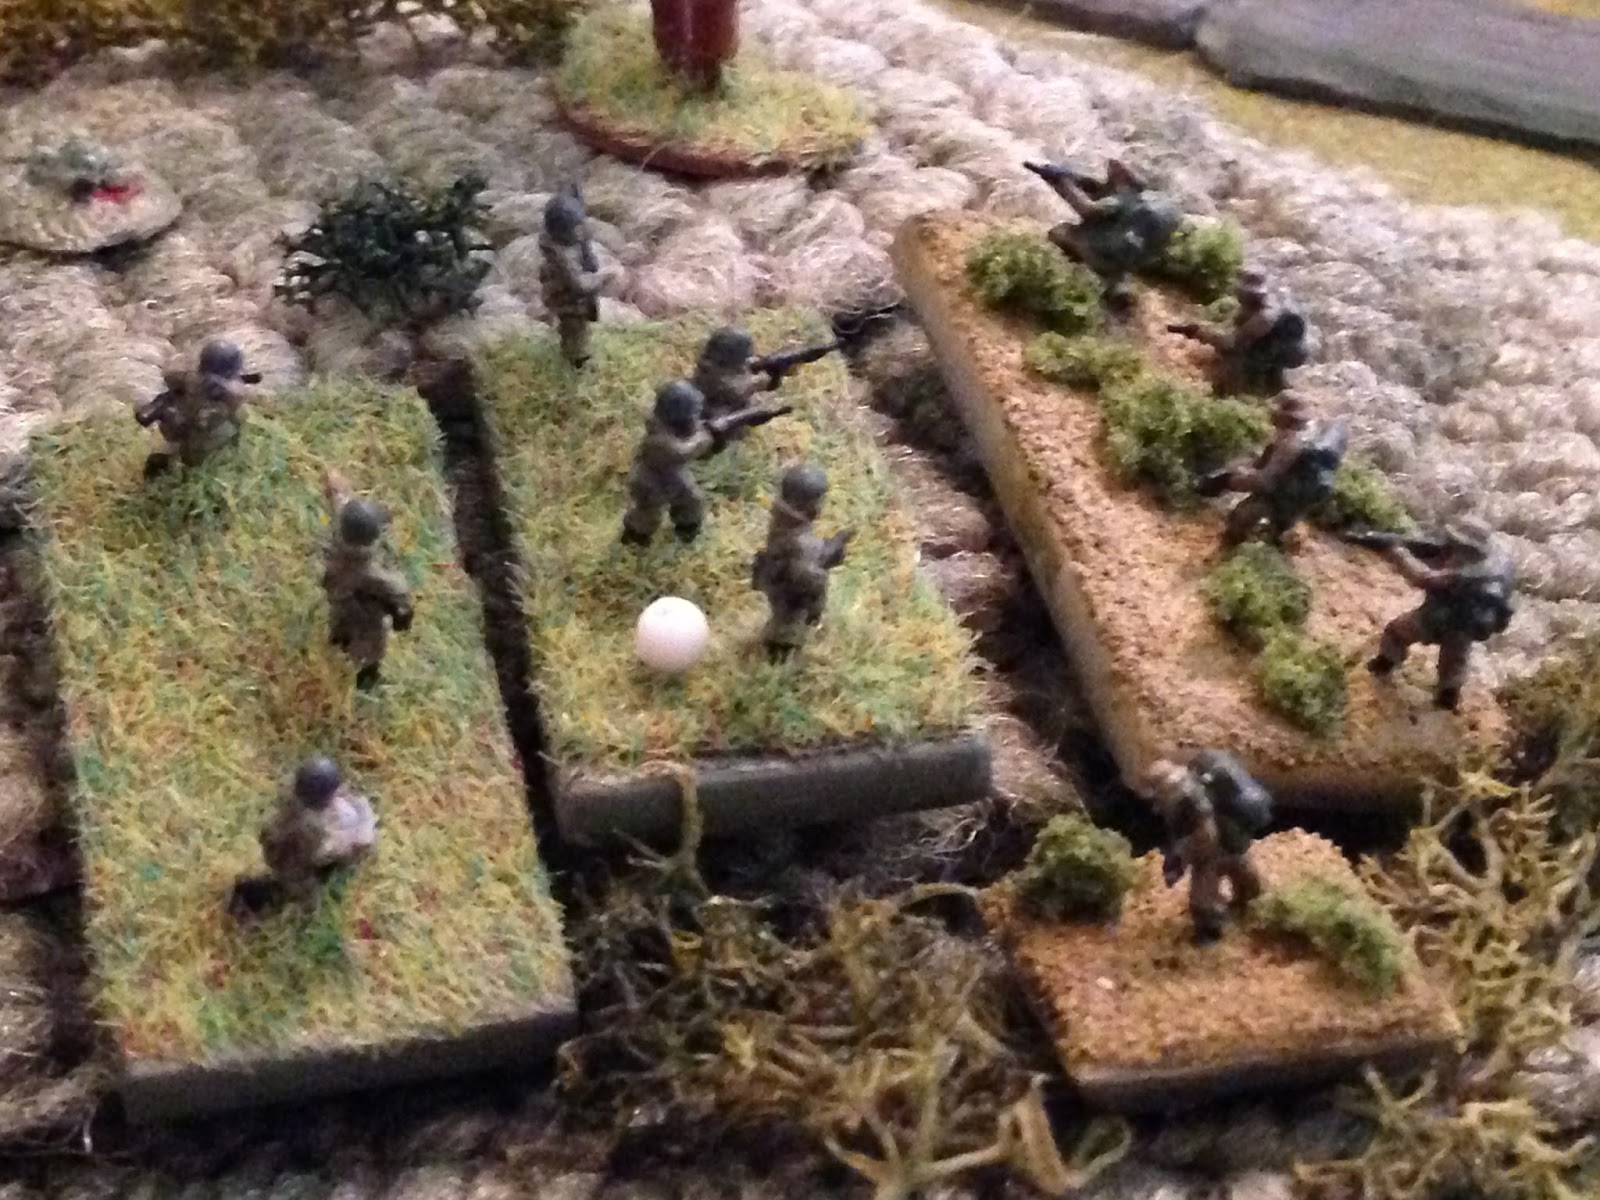
The opposing forces, with regime forces on the left and the CLA on the right. The CLA are Minifigs Australians from their Modern Range, and the regime forces are Argentinians from Pendraken's Falklands range, with an M-8 armored car and two SU-76s, also from Pendraken.
 Captain Gonzalez, Commander, C Co, Unconventional Warfare Group
The CLA has a Command Stand representing their Company Commander (unfortunately it has four figures vice three, just like the regular rifle stands), six rifle stands, and a single leader figure representing their Battalion Commander.
Each rifle team is carrying multiple LAWs, but they have to get to very short range for them to be effective.
 CLA Unconventional Warfare Group, Commanding Officer: Colonel Hector Huistrella
The regime force has a Command Stand, six rifle stands, an MG team, an 82mm mortar team, a very old M-8 armored car, and two very old SU-76s.
Overview of the map, north is up. The enemy armored column is on the highway at top right, but they also have an infantry force at bottom right. The CLA is also split into two forces, with Colonel Huistrella and three rifle teams in the north, and Captain Gonzalez and three rifle teams in the south.
The Colonel's northern force.
The enemy armored column, already deployed for action.
The enemy infantry force in the southeast, with three rifle teams and their MG team.
The Captain's force in the south. Please note that the CLA force is maintaining a wide dispersion to counter the enemy's area fire weapons (mortars and HE from main guns).
Fight's on!
In the north, Colonel Huistrella pushes his teams forward.
As does Captain Gonzalez in the south, though he's more focused on the enemy's infantry force (top right) than their armored column (off camera at top).
The enemy reacts in the north, pushing vehicles up the highway, infantry fanning out on both sides (but primarily the northern side), and their mortar sets up bottom right).
And they inch forward in the southeast, getting their machine gun into position (bottom right).
The mortar immediately goes into action...
Targeting Team 3 in the south (far left, with white puffs around it, but they're hard to see)...
And putting them out of the fight (that's Captain Gonzalez next to the casualty figure).
Not a great start...
In the north, the M-8 Armored Car moves up and fires on Team 6, but the tough Special Forces troopers hold their ground...
And return fire with a LAW, but it misses.
An SU-76 moves up and fires on Team 5, with the Colonel next to them, pinning them.
The other SU-76 moves up, and Team 4 opens up with their squad weapons, to no effect...
The SU-76 turns on them and fires, pinning Team 4.
Back in the south, the enemy MG opens up on Team 1, causing heavy casualties.
Colonel Huistrella tries to rally Team 5, but they fall back (bottom left, red bead, from center white puff), so he moves to Team 4 and tries to rally them, but they stay pinned (top left center). They fire a LAW at an SU-76...
The rocket skips off the frontal armor of the SU-76, but it's enough to force them to fall back (top right). Enemy infantry return fire on Team 4, but they hold their ground.
Team 6 cuts loose with another LAW at the M-8...
The armored car goes up in flames (bottom right), and Team 6 (bottom left) moves up, drawing react fire
But the SF troops of Team 6 press through it and take up position near the vehicle they just destroyed. Oh, and the rocket also pinned the SU-76 (yellow bead).
In the south, Captain Gonzalez moved over to Team 1 and rallies them, then they pour small arms fire into the enemy machine gun team...
Causing heavy casualties on the MG, and forcing a rifle team to fall back (bottom right).
The enemy mortar (top right) fires on Team 6 (bottom left)...
Causing heavy casualties.
Damn, the mortar's had two shots, one KO and one 'men down.'
The enemy CO falls up the barrage by rushing to the SU-76 in the center (the other is hunkering off camera to top right) and rallies them.
And the enemy CO orders the SU-76 to overrun Team 6, who is in disarray from the mortar rounds...
Team 6 puts up a terrific fight, but the SU-76 puts them out of action. The SU-76 moves forward towards Captain Gonzalez' force in the south; Team 2 launches a rocket...
Which knocks out the enemy armored vehicle; the enemy CO fell back (top left).
In the south, an enemy rifle team moves over to rally their machine gun team, but they stay 'men down.' The enemy rifle team fires on Team 2...
Knocking them out and pinning Team 1.
This fight has been absolutely deadly.
Back in the north, Team 4 opens up on enemy infantry near the highway (which is just off camera to right)...
One enemy team is put out of the fight, and the other suffers heavy casualties. Colonel Huistrella moves over to Team 4 to rally them, and is successful. Off camera to bottom, Team 5 self rallies.
Back in the south with Captain Gonzalez' force, Team 1, reeling from its two sister teams being knocked out, opens fire on the enemy rifle teams opposite them, but to no effect.
@#$%!!! This will likely allow the enemy MG to rally...
In the north, the SU-76 (top right) rallies, the 'men down' rifle team rallies (top center), and the other enemy rifle team (bottom right) opens up on Team 4 (top left), but misses. The mortar (also at bottom right) can't fire on Team 4 because it has friendlies too close to Team 4. The enemy CO is at bottom left, next to the burning SU-76 and M-8, which are just off camera.
In the south, the enemy rifle team at top right finally rallies, but the MG team tries to rally, fails, and runs off the map. The enemy makes up for this by using the other two rifle teams in the south to fire on Captain Gonzalez and Team 1...
Putting both of them down, killing Captain Gonzalez.
For those keeping score, the CLA force is down to Colonel Huistrella and two rifle teams. The regime has their CO, an SU-76, five rifle teams, and their mortar. To say the situation is dire is a vast understatement.
I roll to see if the CLA force decides to pack it in, but Colonel Huistrellas is a tough SOB:
"Now you listen to me, it's time to Cowboy the @#$% up!" - Colonel Huistrella
An enemy rifle team in the north opens fire at close range on the Colonel and Team 4, but the SF troops shake it off. But then the enemy gets clever: the rifle team falls back, clearing the way...
For the enemy mortar (bottom right, with a rifle team; their CO is at bottom left, and the team that just fell back is at top right, with the SU-76) to fire on Team 4...
Causing heavy casualties...
Off camera, the enemy CO falls back towards the mortar.
At top left, Colonel Huistrella is able to rally Team 4, while Team 5 moves up (far left) to get in the fight, but they draw enemy fire, though it just rolls off their backs.
Team 5 fires on the enemy team and SU-76 in the top right corner...
The enemy rifle team goes down in a hail of gunfire, and that's enough to convince the last vehicle commander that he needs to make tracks out of here!
The Colonel leads Team 4 up (center top), and they open fire...
Forcing the enemy rifle team there to retreat off the map (you're looking at the enemy CO, their mortar, and the empty spot where the rifle team used to be).
Another enemy rifle team rushes over to fill the gap (far left) and opens up on Team 4, but hits nothing!
Then the other enemy rifle team (they're down to two; bottom right, below the other rifle, the CO, and the mortar) moves up and fires on Team 5 (far left, with the Colonel and Team 4 at top center), but they can't seem to land a punch either.
Team 5 returns fire...
Oh, that's good, that's really good. In game terms that's 1) knockout, 2) fall back and hunker, and 3) pin.
The enemy team atop the hill (bottom center, white puff) is knocked out, the rifle team next to it is pinned, and the mortar (far right, red bead) runs for the hills.
Team 5 follows up their fusillade by moving forward (center, from far left).
The Colonel and Team 4 rush across the street and trade fire with the pinned enemy rifle team; Team 4 totally misses, while the enemy pins Team 4 at the base of the hill. That's the enemy CO behind his rifle team, and Team 5 is at top center left, next to the barely visible burning M-8.
The enemy undertakes another round of fire on Team 4, missing; Team 4 responds, putting heavy casualties on the enemy rifle team. Colonel Huistrella rallies Team 4...
Then leads them into close combat with the stricken enemy rifle team and their Commanding Officer.
The CLA force is successful, the enemy's Mechanized Task Force A has been thrown back!
Holy @#$%, I'm going to have a damn heart attack! What a fight! Down to the last man and the last bullet, and I don't tend to do that very often, but the dice told me to keep going. I'm glad I did, and I would be glad even had the CLA lost, so long as they went down gloriously.
Of course, Colonel Huistrella is being decorated with the
Cruz Servicio Distinguido.
Captain Gonzalez and Team 1's Sergeant Gravio were both awarded the Estrella de Bronce and Corazon Purpura.
Team 4's Sergeant Gouveia received the Estrella de Plata and Corazon Purpura (he was lightly wounded). He is now the Acting Company Commander for C Company.
Casualties:
CLA: ~50 KIA/WIA
Regime: ~50 KIA/WIA, one knocked out M-8 Armored Car, and one knocked out SU-76 self-propelled gun.
Well, this completes D-Day for the War of Liberation. Now I need to figure out what the fights are for D+1. More to come.
V/R,
Jack


Cool.
ReplyDeleteLove the bases on the CLA units and the missile markers (again!)
I wonder what will happen in the next engagement??
Thanks Jim. The next few engagements start off bad, but end up well (for me), then the Unconventional Warfare Group does it again!
DeleteV/R,
Jack
Wow, what a way to end day 1!
ReplyDeleteYeah man, it was pretty intense. SPOILER ALERT: D+1 ends the same way!
DeleteV/R,
Jack
Great report! And I agree with Boggler; I really like those unconventionals.
ReplyDeleteAwesome campaign Jack.
Thanks Javier. When I bought them from Pendraken I wasn't sure what I was going to do with them, but I'm getting good use from them now.
DeleteV/R,
Jack
A nailbiter! While I am not intending to comment on every report, this one was too good to pass up. Those last few teams really hung on - a few times I thought they were goners.
ReplyDeleteAnd it has Auusie figures in it that were on the winning side too.
Yeah, what a fight! Actually, the UCW (Aussie figures) had a few fights up in the Escambray mountains that were legendary, some of the funnest games I've ever had.
ReplyDeleteV/R,
Jack