All,
AKA The reduction of Dubrovna, Fight #1
It's 0725 on 1 July 1990 and Battlegroup Elias is moving up to the line of departure, preparing to jump-off into yet another attack. It's been a busy few days, but if today goes well, enemy forces on the west side of the capital city of Miran will be totally eliminated. Thus begins the first of 6-10 modern skirmish fights; I'm playing with my 7-year old son, and we're playing co-op, so that each of us controls a 'good-guy' fireteam of four men against the enemy squad of 6 to 8 men (depending on a die roll).
If you're a loyal follower of Cuba Libre, go ahead and skip down to the last bullet-paragraph before the map. If not, and you're bored:
It's recently come to my attention that not all of you out there in wargaming land have bothered to read every single one of my batreps, thus you may be confused about what the heck all this talk about Cubans, Cronistrians, Miran, etc..., is about ;)
So, for the uninitiated, here's a synopsis:
-In Feb 1990, Cuban exiles, with substantial support from several Western nations, staged an invasion of Cuba to depose its dictator and install a constitutional republic. The invasion was a roaring success, and the war was over after five days of heavy fighting (32 tabletop fights can be found on this blog under the label "Liberation").
-A transition government was put into place, elections were held, and a new government was quickly established. The Cuban military was essentially split in two: a Home Defense Force (about 75% of the military), which never leaves Cuba, and the Cuban Liberation Expeditionary Force (or CLEF; about 25% of the military), which is an all-arms, air-ground force deployable to all corners of the globe, fighting for the cause of freedom.
-There have been some minor operations, but the first sizable deployment was of a Cuban Special Forces A-Team to the (fictional) Balkan republic of Cronistria. It's 1990 and the Soviet Union and Yugoslavia are falling apart; Cronistria has declared independence and is striving to become a democracy, but Communist hardliners and Yugoslavian federalists are actively opposing this. Fighting broke out between the Cronistrian Democratic Militia (or CDM, the good guys) and Cronistrian Communist Army (or CPA, the bad guys); the Cuban SF troops were deployed to support and train the CDM. The Cuban SF (designated Task Force Trojas) performed their mission very well, surpassing expectations, to the point Cuban leadership began to believe they might actually succeed in helping Cronistria become an independent, stable, and free state. With this realization, the Cuban leadership deployed additional, conventional forces to Cronistria (reinforcing success). The Cuban element in Cronistria is now known as Task Force Galban, a roughly battalion-sized element composed of three mechanized Battlegroups (Aguilera, Caballero, and Elias), and Lt Trojas' SF detachment.
-CDM and Cuban forces had been marching on the Cronistrian capital city of Miran, but had become stalled by heavy fighting in the village of Brezno, just southwest of the capital (see map, below). Upon arrival of the mechanized elements of TF Galban, they were immediately thrown into battle. Two days ago they conducted a series of lightning quick attacks to encircle Miran from the west (eight fights in "Operation Chokehold," on this blog they are Cronistria fights 14-21, and 24, with 22, 23, and 25 being a Special Forces operation gone wrong).
-So, this blog concept, 'Cuba Libre,' is really nothing more than a vehicle for me to play out whatever modern ideas and scenarios I feel like playing, in the overall concept of a single 'history,' if you will, as I follow the exploits of the various units and leaders of the Cuban Liberation Expeditionary Force. To illustrate, I felt like playing some skirmish-level games using my Peter Pig US Marines and my Eureka Russians. I didn't really care about climate, so I used Cronistria. If I wanted Arctic or desert, I would have just made up a new operation somewhere in the world (like I just played out Operation Pay-Off because I wanted to play Special Forces against terrorists in the Middle East). It's great!
-I'm a big fan of Ivan Sorensen's "5Core" series of rules, having played Five Men in Normandy (skirmish), 5Core Company Command (company/battalion-level), and 5Core Brigade Command (brigade/division-level). I love the activation process, which puts limits on what I'm able to do and forces interesting decisions to be made, and I love the combat processes, which are simple, quick, and to the point. Most recently, Ivan put out a new/updated/modified version of 5 Men in Normandy, known as Five Men at Kursk (5MAK). I modified these slightly to play out modern games, and that's what I'm using for this set of skirmish fights.
-CDM forces currently have their hands full clearing Brezno, and have asked for Cuban assistance. Colonel Galban acquiesced to this request, sending Battlegroup Elias to aid their allies. Battlegroup Elias left Stanje (see map, below), heading south to attack the rear of the Communist defensive positions, located atop Hill 489 and in the town of Dubrovna.
Yellow arrows show the Cuban advance during Operation Chokehold. Now tasked with aiding their Democrat allies, Battlegroup Elias staged out of Stanje (#7 above), moved south (down), and is attacking Hill 489 and Dubrovna (#5 above), to assist their allies fighting in Brezno (#1 above).
Overview, north is up. Shown is the slope of Hill 489; the Cubans will enter from the south/southwest (bottom/bottom left), while the Communists enter from the north/northwest (top/top left). The situation is Cuban infantry of Battlegroup Elias are dismounted and conducting a movement to contact, when they run into a Communist patrol in the early morning mists of July 1, 1990.
The Cuban mission is to defeat the enemy patrol in order to clear the path to this morning's first objective, the enemy defensive line atop Hill 489.
The opposing forces, with bad guys on the left and good guys on the right. The Cubans will always have eight men (so that my son and I can always control four guys, each), while the bad guys will roll to see if they get 6, 7, or 8 guys. Here they got eight...
The Cuban squad is eight men in two fireteams, 15mm Modern Marines from Peter Pig, painted up in temperate MARCAM. These are anonymous squads within Battlegroup Elias, not named characters, so I'm going to use a generic set of names through each of this series (of six) battle reports. We are not following a single squad, or even a single platoon; I just don't feel like trying to come up 48 different names for this set of fights. So, please bear with me ;)
Team 1:
Team Leader: Corporal Lira
SAW Gunner: LCpl Galban
Assistant Gunner: PFC Aguilar
Scout: Private Salazar
Team 2:
Team Leader: Corporal Lupe
SAW Gunner: LCpl Garcia
Assistant Gunner: PFC Abrera
Scout: Private Solis
The bad guys are 15mm Modern Russians from Eureka Miniatures, painted up in 'Sun Bunny' camo. Each game we roll to see how many bad guys there will be on table, with the options being 6, 7, or 8 men. With eight men they get two whole teams, each of a grenadier, a machine gunner with PKM, and two riflemen with AKs.
Overview, this time with troops. At top you see the two Communist teams, and the Cubans are at bottom, with Team 1 at bottom left and Team 2 at bottom right.
A closer look at the two Cuban fireteams; both are moving in Ranger file, picking their way up the slope of Hill 489, in the same order of march: Scout, Leader, SAW gunner, and assistant gunner.
The enemy patrol, coming down the mountain. It's time to fight; we dice off to see which side will go first.
As luck would have it, a Communist (top right) spotted Team 1's point man, Pvt Salazar (bottom left, with Team 2's pointman, Pvt Solis, at bottom right) at the same time Salazar spotted him. But the bad guy was quicker on the draw, and his AK rattled 7.62mm rounds out. Those rounds missed, cutting leaves off the nearby tree, but the bad guy at top left...
Also spotted Salazar (bottom center right) and fired.
Suppressing him (red bead at bottom left). The next bad guy in line spotted Pvt Solis (bottom right) and cut loose, pinning him.
Further up Hill 489 (top left), an enemy machine gunner rattled off a long burst at Team 2's leader and SAW gunner (bottom right).
Cpl Lupe looks for the source of fire as LCpl Garcia goes down.
Cpl Lupe (bottom right) spots the muzzle flashes (top left) and fires a 40mm grenade.
BAM! The enemy gunner is suppressed (red bead), while a rifleman is knocked out of the fight and another is pinned (yellow bead). The two hurting bad guys immediately try to get back into the fight: the pinned man is good to go, while the suppressed guy only gets 'up' to pinned.
A bad guy moves up on the left, but none of the Cubans spot him. He opens fire on Pvt Solis and Cpl Lupe (far right).
Cpl Lupe (center) goes down.
Further up the hill, a bad guy creeps forward (top center), but Team 1's leader, Cpl Lira (bottom left, with Pvt Salazar suppressed just above him) spots him and fires.
The enemy trooper goes down (bottom center), and another is pinned (yellow bead at far right). The casualty at top left is from Cpl Lupe's grenade.
Cpl Lira (bottom center) then tosses a frag (blue bead at left) up the hill.
Before rushing up to aid Pvt Salazar, who's back in the fight.
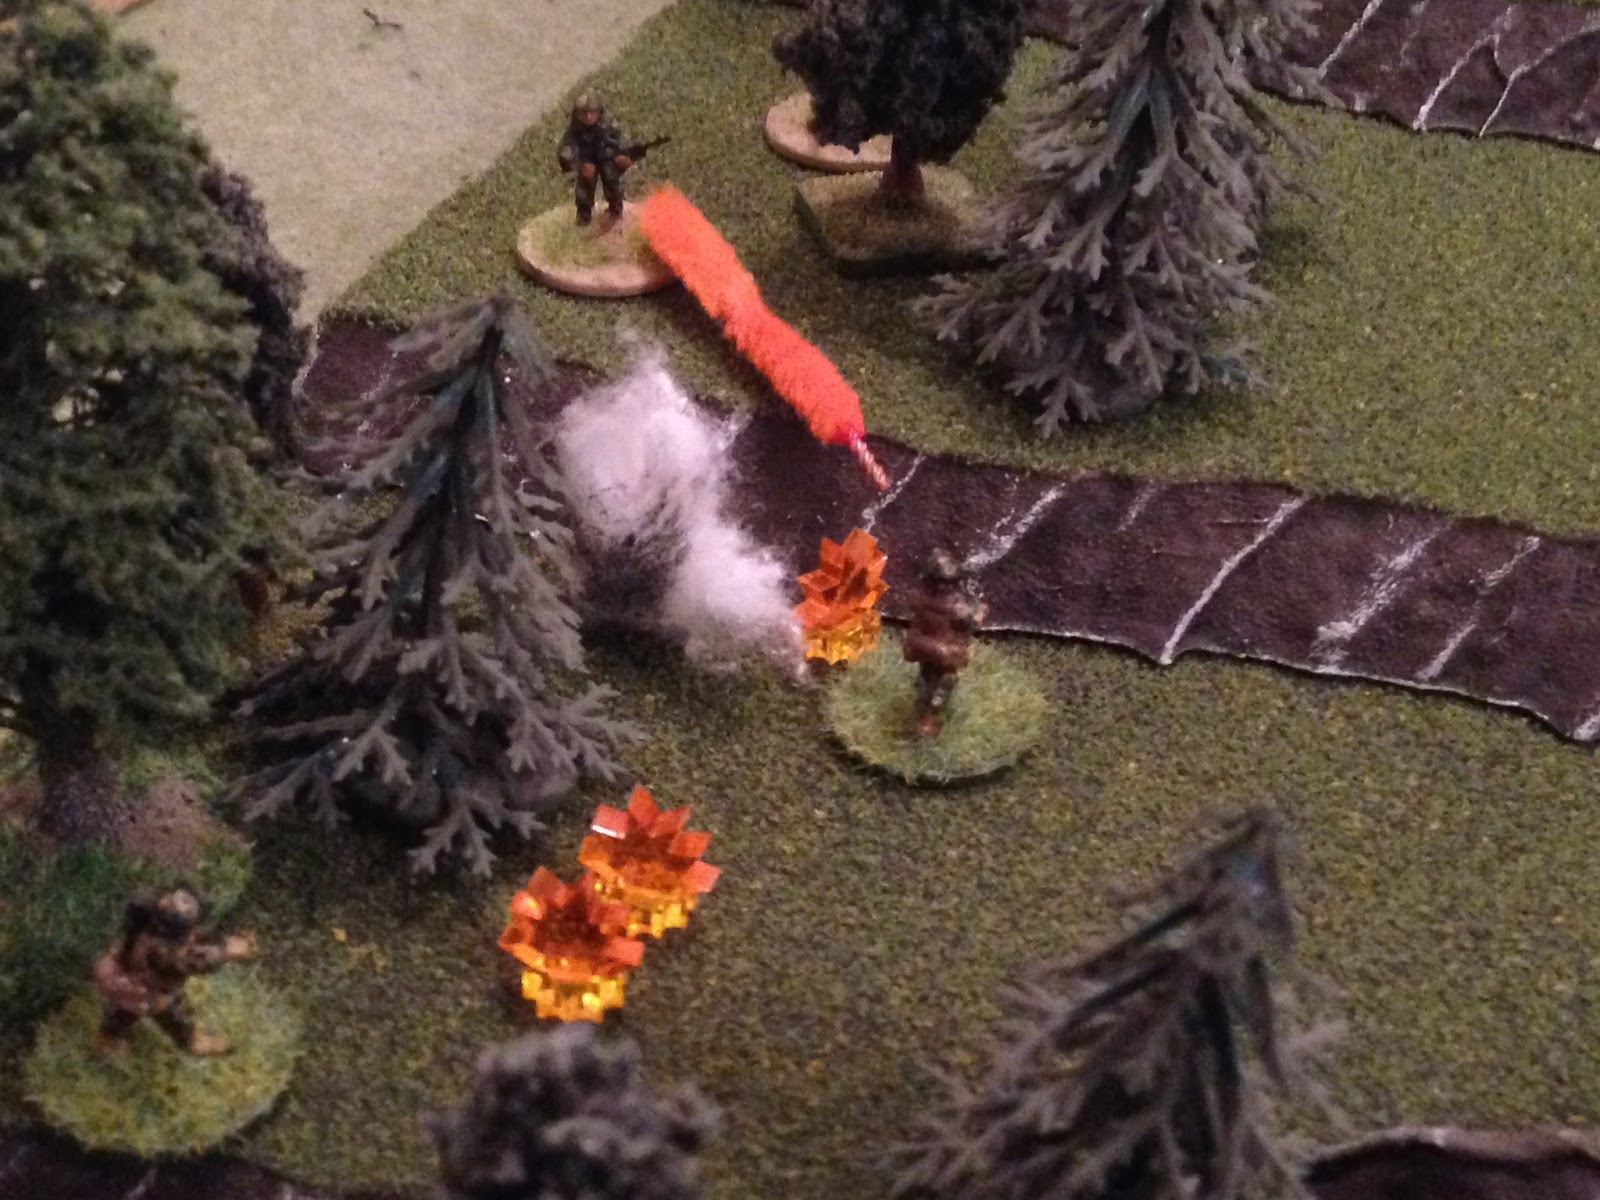
But the bad guys (top right) spotted the grenade and booted it back down the hill, exploding harmlessly between them and Cpl Lira and Pvt Salazar (bottom left).
Despite the nearby explosion, Pvt Salazar (bottom left) spots movement at top right. He shoulders his weapon and fires, dropping a Communist soldier. But he's unaware that Cpl Lira's grenade didn't knock out the nearby bad guys...
And so Salazer moves up the hill, right into the face of a bad guy, who opens fire with his PK machine gun!
But the rounds miss! Salazar twists and fires, but he misses too!!!
As Salazar and his bad guy trade fire (far left), Pvt Solis (bottom right) spots an enemy troop further up the hill (top left) and fires, knocking him down.
While back on the left, LCpl Galban rushes up to aid Pvt Salazar, cutting loose with his SAW.
But Galban misses, and the bad guy's PKM rattles again, but he misses too!!!
What the hell!!!??? Four times a man has fired at point blank range, and four times he's missed.
Back on the right, PFC Abrera moves up and rallies Pvt Solis.
While Team 1's assistant gunner, PFC Aguilar, sprints ahead, up the hill, bridging between the two teams (center).
On the left, the PKM roars again, this time finding the mark. LCpl Galban is knocked down and Pvt Salazar is suppressed. Cpl Lira (bottom left) and PFC Aguilar (bottom right) look on in horror...
As Pvt Solis (bottom right) returns fire, pinning the enemy gunner.
But a buddy rapidly moves up to the PK gunner.
Aguilar (bottom right) spots him, and fires.
Dropping both bad guys!
With Aguilar's victims at bottom left, further up the hill a bad guy spots his buddy lying on the deck, bleeding. He moves up to check on him (center top left).
But PFC Abrera (bottom center right) spots the movement and fires, pinning the Communist.
But he still manages to crawl to his knocked down buddy and check him: he's good to go, back in the fight (bottom left). At top right, the PK gunner pinned by Cpl Lupe's grenade rallies himself back into the fight.
PFC Abrera (bottom right, next to Pvt Solis and with PFC Aguilar to his left) slaps in a fresh magazine and fires again on the pair of bad guys at top left.
One down, one suppressed (red bead).
With PFC Abrera (bottom right) laying down cover fire, PFC Aguilar continues to move up the hill (top center, with Cpl Lira and LCpl Galban visible at left, Pvt Salazar just off camera).
But the just rallied enemy machine gunner (top left) spots Aguilar (bottom right) and rips off half a belt at him.
Ahh, the obligatory action shot. My apologies, as usual. In any case, PFC Aguilar wisely drops back down, suppressed, but Cpl Lira immediately sprints to him, rallying him, but only up to pinned. At left, Pvt Salazar self rallies and he's good. But someone needs to get to LCpl Galban (white bead) to check on him....
Then Cpl Lira (bottom center right), with 7.62mm rounds from the PKM still ripping by, calmly sights in on the enemy machine gunner (top center) and fires, dropping him! This leaves but a single, suppressed, enemy soldier on the field of battle (red bead just left and below of the machine gunner).
Team 2 falls back to prep their men for CASEVAC.
While Team 1 moves up the slope to capture the last enemy soldier, officially ending the fight in victory for the good guys! Cpl Lira calls in for CASEVAC with two WIA, as well as a SITREP to inform Battlegroup Elias HQ the way to the crest of Hill 489 is clear, though it appears the enemy has established a bunker line there that is going to need to be taken care of.
The boy and I are quite pleased with ourselves, getting away with 7 bad guy KIAs and 1 EPW for only two WIA. Not just winning, but winning in style, accomplishing the objective of defeating the enemy patrol to clear the approach to the defensive line atop Hill 489. Which, as luck would have it, is the next fight, so stay tuned ;)
V/R,
Jack


Woohoo something to look forward to in 2017 !!!
ReplyDeleteYou bet, one a day for the next five days. Well, four now ;)
DeleteV/R,
Jack