It's 1700 on 5 Feb 1990, and C Squadron of the CLA's Special Operations Forces is in the air. 1st Airborne Battalion's sharp fight in northern Havana with Venezuelan paratroopers set the CLA General Staff into a flurry of activity. With the small amount of Venezuelans introduced into the battle-space, as well as their dispersal to three different locations on the island (northern Havana, northeastern Havana, and just east of Bayamo on the eastern end of the island) it was immediately apparent they were not in Cuba to put up a serious fight. CLA intelligence officers immediately set to work to determine what the Venezuelans were there to do.
Intelligence stated the regime's government and military executive staff had dissolved, with it being very much an 'every man for himself' environment as they attempted to flee the island. But there was no info on El Presidente. The regime's senior formation leaders were still arguing back and forth via radio about whether to keep fighting or not, and, if so, how to best coordinate their efforts.
HUMINT and SIGINT sources began to paint a picture: El President was preparing to depart Cuba, with Venezuelan paratroopers in Havana to escort him away; where, how, and when were still unknown, though it was determined that the Venezuelan Captain Chavez' unit was a blocking force, the assumption being the Venezuelan force in northeastern Havana must be the element charged with securing El Presidente.
CLA Intelligence continued to press, and at 1600 local time, the breakthrough came: a bitter regime officer came forward to inform Generalissimo Waraldonez that El Presidente was to meet with Venezuelan paratroopers at the Playa Riviera Hotel in northeastern Havana at 1700. HUMINT sources were begged, cajoled, and interrogated, and radio intercepts were scrutinized, and all signs pointed to the regime officer's story being correct.
The CLA's Commanding General quickly met with the Special Operations Commander, Colonel Quilveras, and a capture or kill order was issued. Colonel Quilveras notified Captain Bosanova,who quickly collected two teams of shooters and boarded a waiting UH-60 Blackhawk.

So far we've had:
...
D+1
19) A Squadron SOF holds off the regime's 2nd Airborne Company, 1st Airborne Battalion at the Radio Station in downtown Havana, while B Squadron SOF and 8th Popular Force Battalion move to reinforce.
20) 2nd Airborne Battalion, attacks north of Sandino to eliminate the regime's 4th Infantry Battalion.
21) 7th Infantry Battalion, attacks north of Sandino to eliminate the regime's 5th Territorial Infantry Battalion.
22) Colonel Huistrella's Unconventional Warfare Group fight another desperate holding action in the Escambray Mountains, this time against the regime's 10th Territorial Infantry Battalion.
D+2
23) The 5th Tank Battalion squares off against the regime's 2nd Armored Battalion just west of Artemisa.
24) 9th Popular Force Battalion holds the line at Matanzas as the enemy's 7th Infantry Battalion attempts to break out to reinforce Havana.
25) 6th Infantry Battalion, with support from 5th Tank Battalion, engages the enemy 6th Armored Battalion's spoiling attack.
26) The 5th Tank Battalion and 4th Infantry Battalion take part in heavy street fighting in Artemisa against the regime's 2nd Armored Battalion.
D+3
27) The 5th Tank Battalion and 3rd Infantry Battalion are stymied by a spoiling attack east of Artemisa by the regime's 2nd Armored Battalion.
28) 10th Popular Force Battalion and the regime's 7th Infantry Battalion trade supporting fires in eastern Havana, then grapple in heavy street-fighting.
29) The 6th Infantry Battalion, supported by the 3rd Troop, 5th Tank Battalion, defeats the regime's 6th Armored Battalion in fierce fighting to secure the city of Cienfuegos.
D+4
30) 1st Airborne Battalion secures Artemisa, then pushes into Havana, where they run into unexpectedly heavy resistance.
31) CLA SOF carries out a bold plan to secure El Presidente in northern Havana, as Venezuelan paratroopers seek to whisk him away to safety.
 The opposing forces, with CLA on the right and enemy on the left. The CLA is made up of Rebel Minis' SWAT troopers painted up as Direct Action shooters, while the regime forces are various Warsaw Pact and Modern Africa codes from Peter Pig. El Presidente is a Rebel Minis Pulp character.
So this is a dramatic departure from the norm (for Cuba Libre) in that 1) I'm using 15mm troops, rather than my beloved 10mm, and 2) I'm using the 5Core rules "5 Men in Normandy" ("5MIN," modified) rather than 5Core Company Command, which is what I used for the previous 30 battles.
The reason for the switch is that I think both the figures and the rules are better for this fight (and the next one), which are small-scale, skirmish-level raids. I've purposely made the Venezuelan paratroopers a much larger force, and they will be treated as 'ordinary' soldiers, opposed by CLA Special Operations types. The only real modification I made to 5MIN was to have the CLA SOF troops fire with double dice (2K 2S), and those firing dice would be applied to any targets within 6" of each other, meaning the CLA SOF trooper will fire at one target, but with four dice, it is possible to 'hit' or effect other targets. While it is normal within 5MIN to have shock dice affect nearby enemy troops, I'm playing that, in the unlikely event the CLA SOF guy fires and gets two kills, he will kill the target and another enemy within 6" of the target. Also, if a CLA trooper is fired on without effect, he may return fire, even if he has already acted that turn.
I also split the enemy into two forces, and had them roll activation separately.

Commander, C Squadron: Captain Bosanova, leading the strike. His mission is simple: do not allow El Presidente to leave the island.
 Close up of the CLA force: eight shooters, all treated the same.
 A terrible picture of the enemy force: there are 16 Venezuelan paratroopers (12 rifles, 2 LMGs, and 2 RPGs), and El Presidente, who is armed with a pistol.
 Overview of the map, north is up. El Presidente has been secured by a small contingent of a Venezuelan paratroopers in the bottom left (southwest) corner, and their job is to escort him to the larger force of Venezuelan paratroopers in the top right (northeast) corner, where they have a skiff standing by to whisk him away to a waiting seagoing vessel. The CLA force is not on the board.
*Forgive my 'skiff.' I looked around and all I had was an old Axis and Allies landing craft, so it'll have to to.
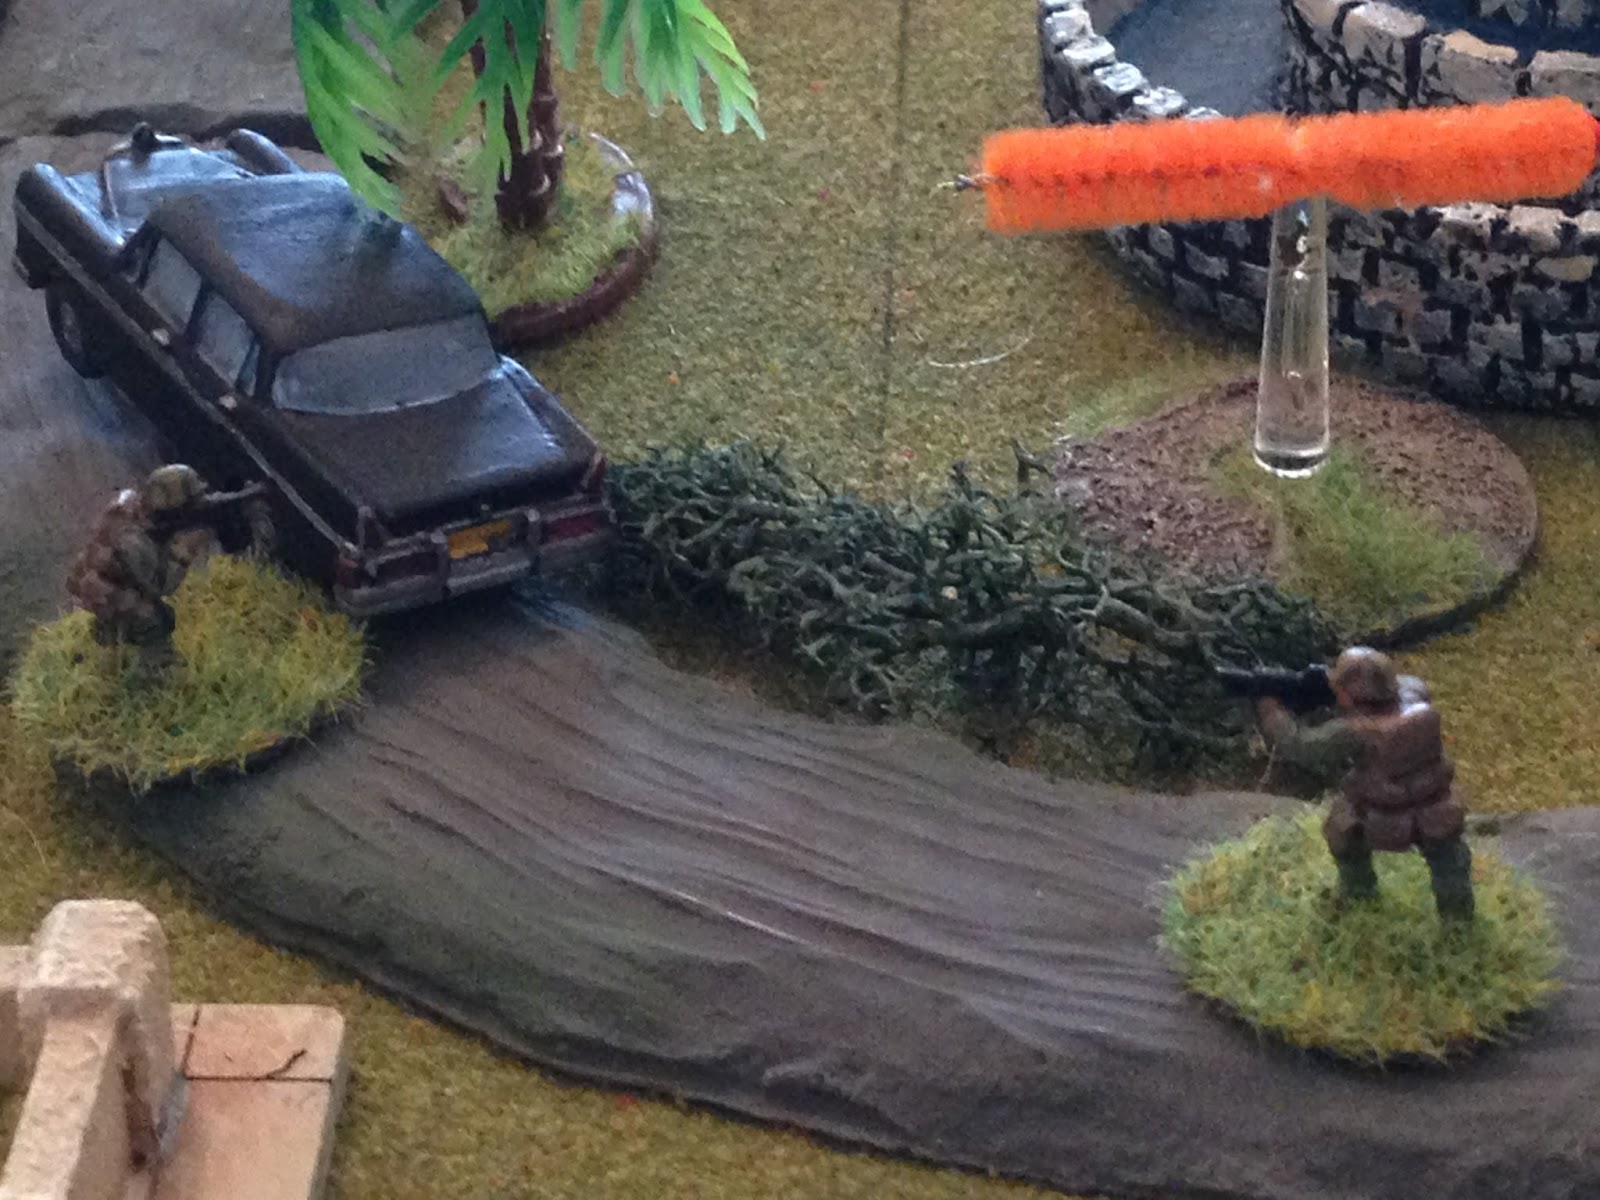
 The bottom left (southwest) corner, where a small force of Venezuelan paras have just made contact with El Presidente at the Hotel Playa Riviera. El Presidente, in order to maintain secrecy, drove himself to the rendezvous.
 The larger force of Venezuelan paras in the top right (northeast) corner, with the skiff.
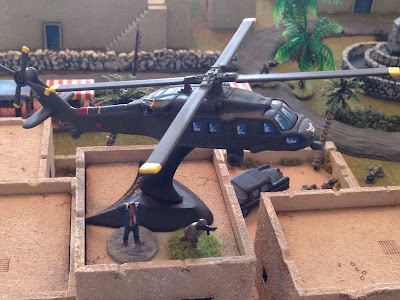
 A Venezuelan paratrooper looks on in awe as, suddenly, a Blackhawk appears out of nowhere...
 Flares...
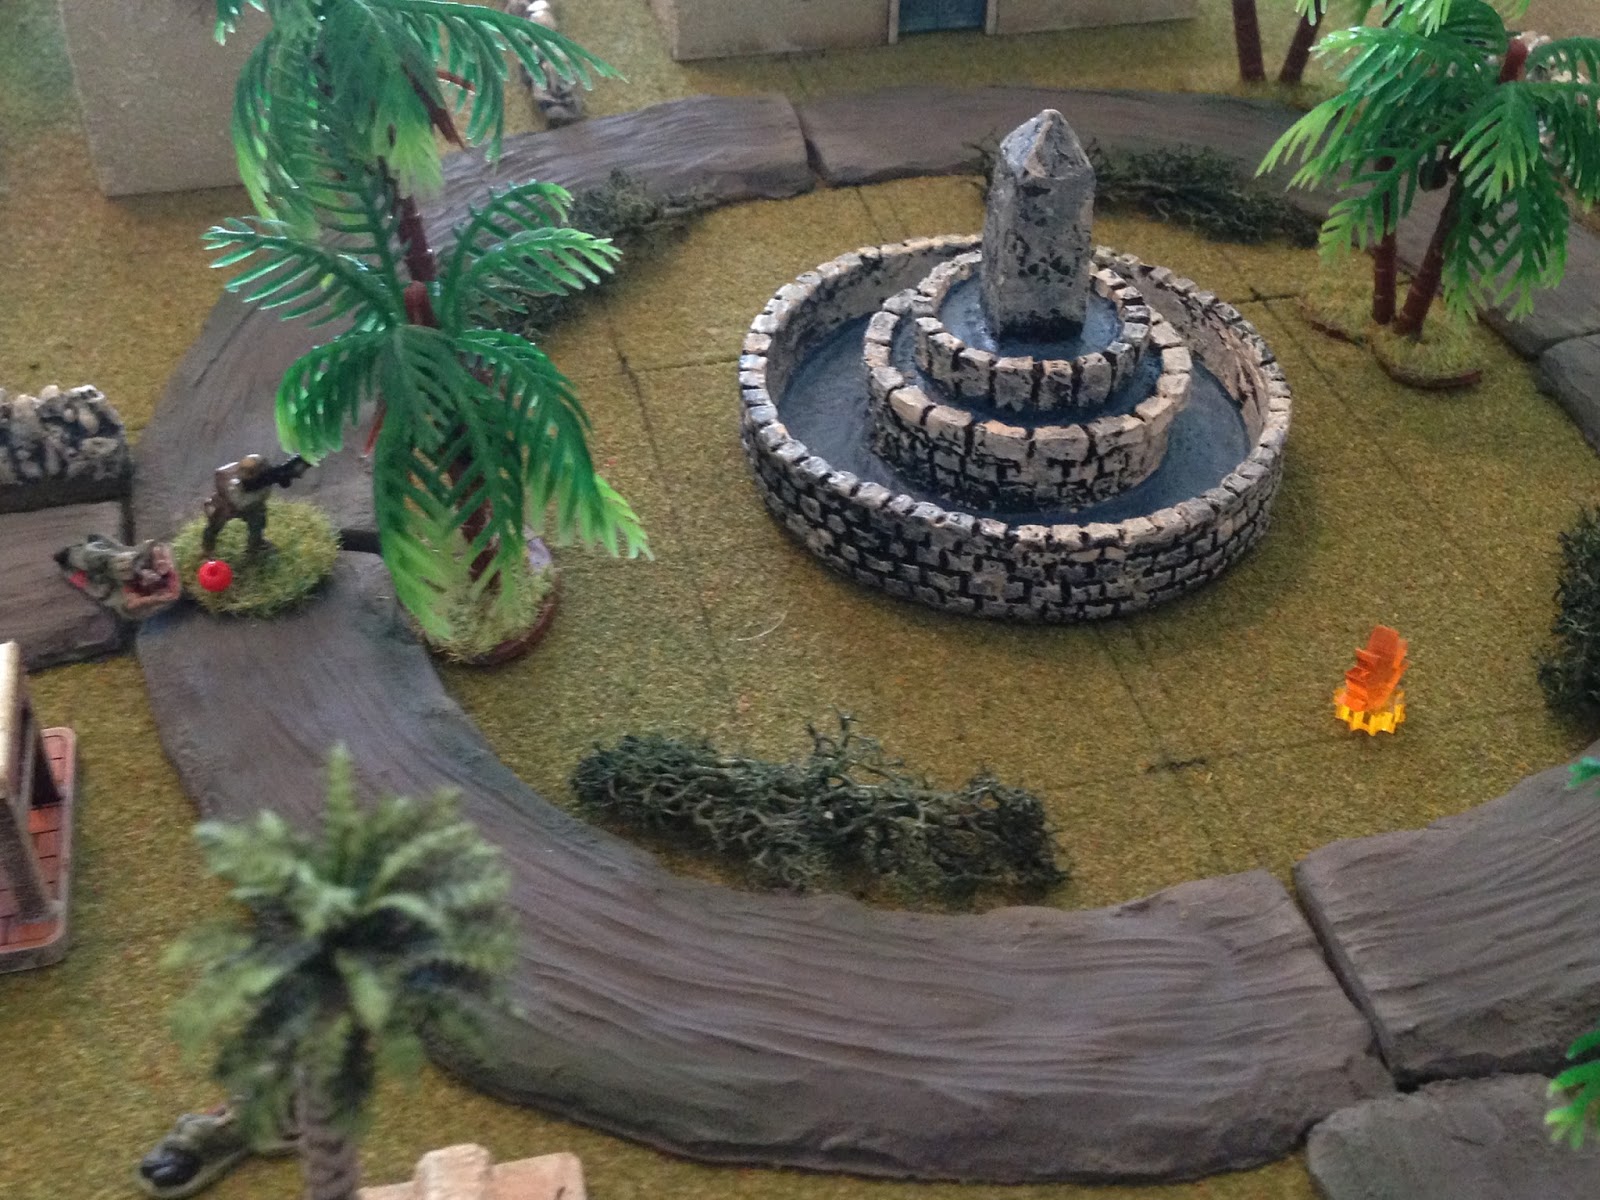
 And disgorges two teams of CLA shooters who fast rope down near the fountain.
 The SOF troopers fan out as the UH-60 hastily departs the scene. The helo will take up position nearby to swoop in once El Presidente has been secured.
Let's get it on!!!
 The action starts with a CLA shooter moving up to take out the nearby sentry...
 Which he does.
 He is immediately followed by Captain Bosanova, who moves aggressively towards El Presidente. But apparently he's not a very good shot, and manages only a pin on the closes Venezuelan (remember, 2K 2S, and only a pin!).
 The Team Sergeant, Sergeant Benavides, moves up (top right) and fires at the rifleman to the left of El Presidente...
 Sgt Benavides (top left) knocks the rifleman down (can't see the white bead, but he's at the explosin to the left of El Presidente), forces the LMG (center, red bead) to fall back, and pins the RPG gunner (bottom right, yellow bead).
 On the other side, one of the CLA shooters moves to a rooftop (far left) and fires (top right)...
 Putting an enemy rifleman down.
 Another shooter (far right, near fountain) moves over and fires on the guard on the rooftop (bottom left), knocking him down (white bead, and you can see the white bead on the guy to the left of El Presidente now).
 Then tragedy strikes: El Presidente pulls his pistol, moves forward, and fires on Captain Bosanova...
 Putting him out of the fight.
 An enemy soldier moves over on the rooftop and tries to rally his mate, but the man stays down. He then fires on a shooter (top center)...
 And the CLA trooper is down.
 In the northeast, an enemy rifleman moves up (top right), drawing react fire from the CLA shooter on the house, but he misses.
 The enemy fires at the shooter at far left, but misses.
 Still in the northeast, an RPG gunner mounts a house (top right), drawing react fire from the CLA shooter at far left, but he misses too...
 The RPG comes in...
 Putting one shooter out and knocking another down.
 An enemy rifleman moves up the beach and pops into the alley, drawing react fire...
 Which forces him to fall back (red bead).
 Back in the southwest, Sgt Benavides pushes for the objective, moving up and firing...
 One rifleman runs off the map (far right, with Benavides at top left), while El Presidente is pinned.
 Sgt Benavides hops the wall, subdues the 'man down' rifleman, and takes El Presidente into custody!!!
 In the center, a shooter moves to check on his buddy (white bead)...
 But he's out of the fight. Not good, that's three down out of the eight-man team.
 He (top right) opens fire (bottom left)...
 Knocking out both enemy troops there.
 Sgt Benavides moves El Presidente to the roof, then fires down on the two enemy soldiers there, but only manages to re-pin the RPG gunner.
These dice are killing me!!!
 The RPG gunner in the northeast (far right) fires his rifle (I don't let them fire an RPG every damn turn), and pins the shooter on the house (far left).
 Looking to seal the deal, an enemy LMG gunner moves up (far right) and fires on the same shooter, but doesn't hit anything!
 But the shooter's return fire also misses! Dammit!!!
 Another enemy rifleman pops up in the northeast (far right), drawing Guard fire that, of course, misses...
 And he (far right) fires down on the fountain, knocking down a shooter (top left). Of course.
 Back in the southwest, the two enemy troops near El Presidente successfully rally themselves, but then Sgt Benavides drops a frag on them (blue bead)...
 The RPG gunner is down, the LMG gunner hunkers.
 In the northeast, a shooter (bottom left) fires at the RPG gunner (top center)...
 Putting him down (center, with shooter off camera to left) and pinning the rifleman beyond (far right).
 The shooter then falls back and rallies his buddy (fell back from center left).
 The injured shooter, now back in the fight (bottom left), opens fire (center right, at the wall)...
 Forcing the enemy rifleman to fall back (top center, red bead, from bottom left).
 He then picks up a wounded brother and hauls him to the hotel (bottom left, from top right).
 In the northeast, the LMG gunner (far right) has another go at the shooter on the roof (far left), pinning him.
 An enemy rifleman moved up the beach (far right), and took a shot at the just-pinned shooter atop the roof (far left), missing...
 The shooter (far left) returned fire to top right...
 Knocking the enemy soldier down (top center), and forcing another to fall back (bottom right, red bead).
 The enemy soldier at far right opened fire with his AK on the shooter at far left...
 Forcing him to fall back (far left, from far right), but he took the down shooter with him (oops, another SOF Mod I made ;) ).
 Sgt Benavides (bottom left) gets on the radio and summons then Blackhawk, then coolly opened fire on the enemy LMG in the northeast corner (top right)...
 Knocking him down (white bead).
 Another shooter (far left, behind wall of Hotel) opened up on the enemy rifleman on the rooftop (top right)...
 Knocking him down.
 While the UH-60 swooped in, hovered, scooped up "The Package," then heads off in the direction of Generalissimo Waraldonez' Command Post.
MISSION ACCOMPLISHED!!!
 Sgt Benavides lets go on the cowering enemy LMG gunner...
 Out of the fight.
 Sgt Benavides, with four men down, rushes downstairs and moves to a nearby casualty (top center). He and the shooter at center right load the casualties in El Presidente's sedan, then the shooter takes the wheel...
 And pulls forward while Sgt Benavides leads him, laying down covering fire.
 The remaining shooter moves the last casualty to the sedan with Benavides still laying down covering fire...
 Benavides (left) is laying it down while the shooter from the rooftop hustles over...
 They mount up...
 And make good their escape!
Sure, that last part was really just a 'cinematic cut scene' and not really the game, but hey, the mission was a success, I was tired, and I wanted to see the shooters successfully get out of there.
Wow, that was intense! I really thought I'd made the shooters too powerful, but that's clearly not the case as 4 of 8 went down, while the enemy lost 8 of 16, not including the captured El Presidente. I think these will work nicely for those 'Blackhawk Down'-type games. Another 'admission' is that I did not afford the enemy the opportunity to fire on the CLA helicopter. To be honest, it just didn't fit the script; I wanted the mission to go one of two ways: the CLA moves in and seizes El Presidente, or the CLA gets gunned down and El Presidente gets away. For the sake of time and fluidity, I didn't want any other weird stuff going on (not that there's anything wrong with that, and I'm sure I will in future games), and I wasn't going to have the CLA shoot El Presidente.
The good news is that the CLA SOF troops suffered no fatalities: Captain Bosanova and three others were badly injured, and one is walking wounded, but all survived.
Captain Bosanova was awarded the Estrella de Bronce for valor, and the Corazon Purpura.
Sergeant Benavides, for his gallantry above and beyond the call of duty, was awarded the Cruz Servicio Distinguido.
Well, El Presidente is in custody. You'd think that would end the war, right? But no, there's one more fight!
V/R,
Jack
D+3
27) The 5th Tank Battalion and 3rd Infantry Battalion are stymied by a spoiling attack east of Artemisa by the regime's 2nd Armored Battalion.
28) 10th Popular Force Battalion and the regime's 7th Infantry Battalion trade supporting fires in eastern Havana, then grapple in heavy street-fighting.
29) The 6th Infantry Battalion, supported by the 3rd Troop, 5th Tank Battalion, defeats the regime's 6th Armored Battalion in fierce fighting to secure the city of Cienfuegos.
D+4
30) 1st Airborne Battalion secures Artemisa, then pushes into Havana, where they run into unexpectedly heavy resistance.
31) CLA SOF carries out a bold plan to secure El Presidente in northern Havana, as Venezuelan paratroopers seek to whisk him away to safety.

So this is a dramatic departure from the norm (for Cuba Libre) in that 1) I'm using 15mm troops, rather than my beloved 10mm, and 2) I'm using the 5Core rules "5 Men in Normandy" ("5MIN," modified) rather than 5Core Company Command, which is what I used for the previous 30 battles.
The reason for the switch is that I think both the figures and the rules are better for this fight (and the next one), which are small-scale, skirmish-level raids. I've purposely made the Venezuelan paratroopers a much larger force, and they will be treated as 'ordinary' soldiers, opposed by CLA Special Operations types. The only real modification I made to 5MIN was to have the CLA SOF troops fire with double dice (2K 2S), and those firing dice would be applied to any targets within 6" of each other, meaning the CLA SOF trooper will fire at one target, but with four dice, it is possible to 'hit' or effect other targets. While it is normal within 5MIN to have shock dice affect nearby enemy troops, I'm playing that, in the unlikely event the CLA SOF guy fires and gets two kills, he will kill the target and another enemy within 6" of the target. Also, if a CLA trooper is fired on without effect, he may return fire, even if he has already acted that turn.
I also split the enemy into two forces, and had them roll activation separately.
Commander, C Squadron: Captain Bosanova, leading the strike. His mission is simple: do not allow El Presidente to leave the island.


*Forgive my 'skiff.' I looked around and all I had was an old Axis and Allies landing craft, so it'll have to to.


Let's get it on!!!


These dice are killing me!!!


MISSION ACCOMPLISHED!!!


Sure, that last part was really just a 'cinematic cut scene' and not really the game, but hey, the mission was a success, I was tired, and I wanted to see the shooters successfully get out of there.
Wow, that was intense! I really thought I'd made the shooters too powerful, but that's clearly not the case as 4 of 8 went down, while the enemy lost 8 of 16, not including the captured El Presidente. I think these will work nicely for those 'Blackhawk Down'-type games. Another 'admission' is that I did not afford the enemy the opportunity to fire on the CLA helicopter. To be honest, it just didn't fit the script; I wanted the mission to go one of two ways: the CLA moves in and seizes El Presidente, or the CLA gets gunned down and El Presidente gets away. For the sake of time and fluidity, I didn't want any other weird stuff going on (not that there's anything wrong with that, and I'm sure I will in future games), and I wasn't going to have the CLA shoot El Presidente.
The good news is that the CLA SOF troops suffered no fatalities: Captain Bosanova and three others were badly injured, and one is walking wounded, but all survived.
Captain Bosanova was awarded the Estrella de Bronce for valor, and the Corazon Purpura.
Sergeant Benavides, for his gallantry above and beyond the call of duty, was awarded the Cruz Servicio Distinguido.
Well, El Presidente is in custody. You'd think that would end the war, right? But no, there's one more fight!
V/R,
Jack
Very exciting game! I'm glad that Sergeant Benavides took over the role of commander after Captain Bosanova got knocked out of the fight...a testimony to the leadership of the CLA!
ReplyDeleteChris,
DeleteThanks a bunch man! I had a lot of fun, and it was a real nail biter. When Captain Bosanova went down, my heart sank, then other shooters starting dropping like flies. Luckily we had old Benavides ;)
V/R,
Jack
I was thinking 2K and 2S, and reaction fire?...way to powerful. And the game opens and in their turn the CLA forces put men out and down everywhere. It seemed it would be one-sided. Sut then the regime got to activate and it became a lot more fair! So I can see where you are coming from, but it quickly showed that they 2K2S is not too bad, especially if outnumbered.
ReplyDeleteAnd I liked the way El Presidente changed from a pistol to hands on head when he became a prisioner. A nice touch!
Looking forward to reading the last one shortly.
Yeah, 2K and 2S for the Special Operations guys going up against twice as many bad guys, and barely pulled it off still! You'll find the 5Core system (at all three levels, skirmish, company, and brigade) is extraordinarily flexible, you can do a whole lot to add flavor, and it's pretty much impossible to break.
ReplyDeleteI was lucky to have a hostage guy to swap out once El Presidente got captured, I thought it was pretty cool ;) The only problem is that the hostage is almost 20mm tall, much bigger than the rest.
V/R,
Jack