It's 1100 on 4 Feb 1990, and the CLA's 2nd Marine Rifle Company, 6th Infantry Battalion, supported by tanks of 3rd Troop, 5th Tank Battalion, are conducting the final assault to destroy the regime's 6th Armored Battalion and secure the central city of Cienfuegos.
This is a major step in the CLA's operations to overthrow the Castro regime; in the west, the CLA has advanced and, minus a few regime holdouts in Artemisa (just west of Havana), has the weak remaining regime forces in Havana in a vice. While powerful regime forces remain on the eastern end of the island, they are shielded off by strong CLA forces posted across the center of the island, and the fall of Cienfuegos is a powerful military and morale blow to the Castro regime.

D-Day
...
17) 2nd Air Assault Company, 7th Infantry Battalion, inserts east of El Rincon to block the escape of the regime's 6th Armored Battalion.
18) C Company of the UWG fought a running battle in the Escambray Mountains to delay/halt the regime's 12th Mechanized Battalion moving west.
D+1
19) A Squadron SOF holds off the regime's 2nd Airborne Company, 1st Airborne Battalion at the Radio Station in downtown Havana, while B Squadron SOF and 8th Popular Force Battalion move to reinforce.
20) 2nd Airborne Battalion, attacks north of Sandino to eliminate the regime's 4th Infantry Battalion.
21) 7th Infantry Battalion, attacks north of Sandino to eliminate the regime's 5th Territorial Infantry Battalion.
22) Colonel Huistrella's Unconventional Warfare Group fight another desperate holding action in the Escambray Mountains, this time against the regime's 10th Territorial Infantry Battalion.
D+2
23) The 5th Tank Battalion squares off against the regime's 2nd Armored Battalion just west of Artemisa.
24) 9th Popular Force Battalion holds the line at Matanzas as the enemy's 7th Infantry Battalion attempts to break out to reinforce Havana.
25) 6th Infantry Battalion, with support from 5th Tank Battalion, engages the enemy 6th Armored Battalion's spoiling attack.
26) The 5th Tank Battalion and 4th Infantry Battalion take part in heavy street fighting in Artemisa against the regime's 2nd Armored Battalion.
D+3
27) The 5th Tank Battalion and 3rd Infantry Battalion are stymied by a spoiling attack east of Artemisa by the regime's 2nd Armored Battalion.
28) 10th Popular Force Battalion and the regime's 7th Infantry Battalion trade supporting fires in eastern Havana, then grapple in heavy street-fighting.
29) The 6th Infantry Battalion, supported by the 3rd Troop, 5th Tank Battalion, defeats the regime's 6th Armored Battalion in fierce fighting to secure the city of Cienfuegos.
 The opposing forces, with CLA on the right and regime on the left. The CLA is made up of US infantry from Pendraken's Vietnam range, with plastic Takara tanks, while the regime force is comprised of Argentinians from Pendraken's Falklands range.

Commander, 2nd Marine Co, 6th Inf Bn, Captain Spirovales, decorated with the Estrella de Plata

Commander, 3 Troop, 5th Tank Bn: Captain Basilone. Not a command stand, just head of the tankers.
 The CLA force has Captain Spirovales's Command Stand, six rifle stands, two M-48A5 tanks, and single leader figure representing their Battalion Commander.

6th Infantry Battalion Commanding Officer: Colonel Colonel Ricardo Colvasquez, already heavily decorated in the War of Liberation with the Estrella de Bronce and the Cruz Servicio Distinguido.
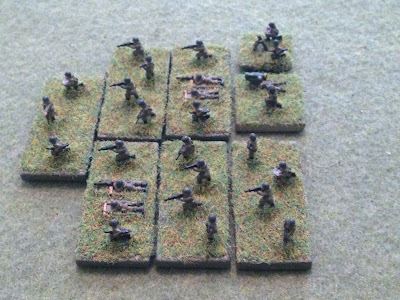 The regime force has a Command Stand, five rifle teams, a MILAN Anti-Tank Guided Missile (ATGM) team, and an 82mm mortar team. After participating in four fights previously, this armored battalion finds itself with no remaining serviceable vehicles.
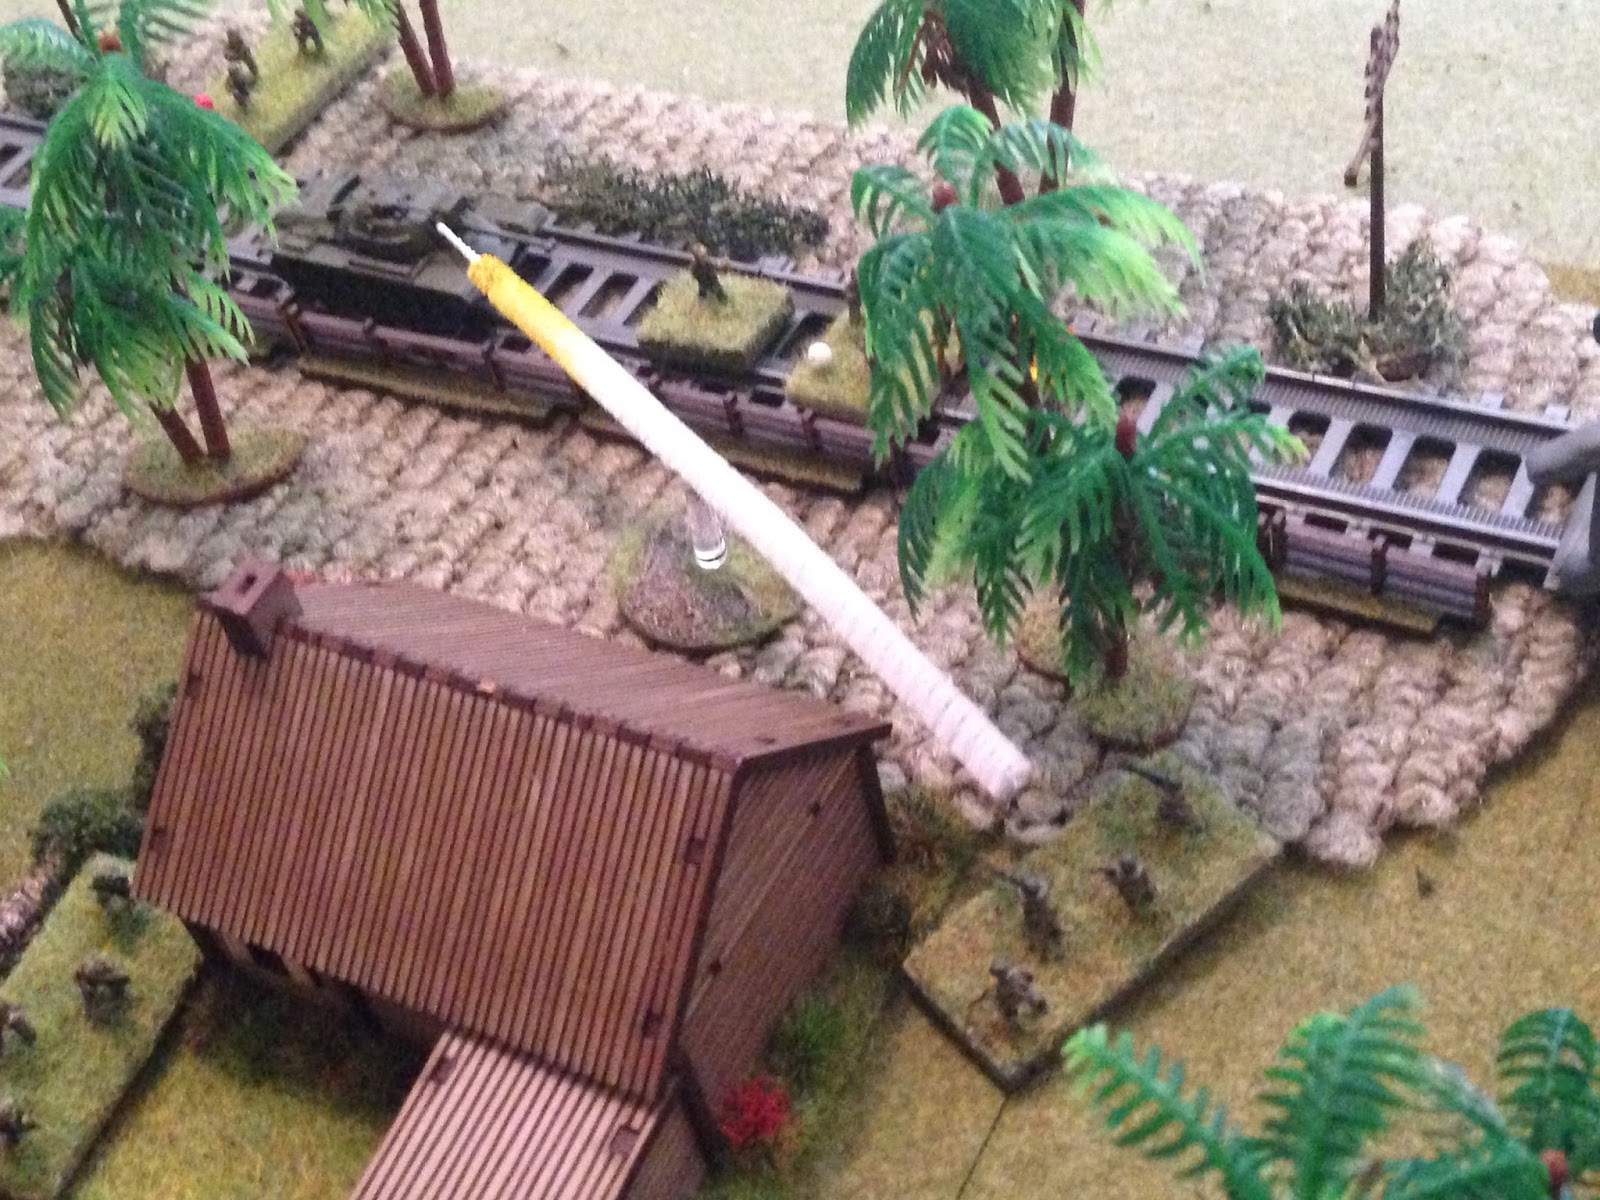
 Overview of map, north is up, with a stream (fordable by infantry but not vehicles) running north-south and bridges at center (road) and top center) railroad). The CLA is on the left (west), coming out of the city's downtown into the regime's final line of defense in the suburbs of Cienfuegos. The poker chips are enemy blinds (black are infantry and infantry dummies, while the white chips represent the ATGM and ATGM dummies).
 In the bottom left corner (southwest), Captain Spirovales has Captain Basilone's tank with him and three rifle teams.
 In the north, Colonel Colvasquez has a tank and three rifle teams.
 A look at the enemy's concealed defenders from the CLA's baseline (looking left to right, west to east).
 In the southwest, Captain Spirovales moves his men forward, followed by Captain Basilone in Tank 1 (T1).
 While in the northwest, Colonel Colvasquez pushes forward as well. At far right you see overlap, where one of Colvasquez' teams is bumped up against one of Spirovales's teams. Colonel Colvasquez certainly feels very exposed atop the railroad embankment, but knows its the only way to get his tank across the river...
The blinds are flipped, revealing the enemy force.
 In the southeast, you see an enemy rifle team very near the CLA troops (rifle in house at bottom center, with CLA just across river on left), another rifle team in house at far right, a rifle team dug-in on the road (you can't see the emplacement because of the tree), and the MILAN dug in just north of the road.
 Looking at the northeast, you can see the rifle team on the road (bottom center) with the MILAN dug in just to their north and their Commander near the stone railroad building (with orange roof). The enemy has a rifle team in the far north, dug in near the railroad bridge (top center right), and another rifle team very near the CLA troops (center left, between the left-hand house and the river, with CLA troops at far left).
The enemy placed, they immediately take the CLA under fire.
 It starts in the north at the railroad bridge, where the dug-in regime rifle team cuts loose with a vicious round of fire on Team 5...
 Causing them heavy casualties (center, white bead), and causing Team 4 to fall back (top left, red bead).
Things are going exactly to plan for the enemy; they cleared the CLA infantry out of the way...
 So the nearby rifle team could fire an RPG at close range at T2...
 Which busted it wide open, the crew barely escaping as secondary explosions overtook the armored beast.
 In the south, with the MILAN's field of fire to Captain Basilone's T1 obstructed (MILAN is just off camera to top center left), the enemy again takes a short range RPG shot, but it's a little tougher than the first one, owing to the palm trees in the rocket's path. The rocket makes it through, but glances off T1's turret, pinning Basilone and his crew.
 Team 2, caught in the open near the road bridge, returned fire, but the heavy stone walls of the villa easily absorbed the damage.
 Colonel Colvasquez tries to rally Team 5 (far right, white bead), but they are still trying to get a hold on their casualties, so he sprints to the rear to try to rally Team 4 (top left, red bead), but they run screaming from the battlefield!!! (the table edge is just off camera to the left) Team 5 finally self rallies and is back in good shape.
 In the CLA center, Team 6 (center, just above the house) and Team 1 (bottom center) move forward aggressively. The enemy rifle team (center, just right of house, adjacent Team 6) decides to hold their position, stay right where they are.
 At top left, Captain Spirovales goes and checks on his buddy, Captain Basilone, who lets him know they're ready for action, while Teams 2 and 3 hurriedly wade into the river, looking to come to grips with the enemy infantry (and keep them off the one remaining tank).
 Captain Spirovales ground guides Captainn Basilone's tank forward off the road, which is enough for the enemy rifle team leader to decide to fall back (to far right).
 In the southeast, the enemy rifle team in the rear house (bottom right, with team that just fell back at bottom center) moves over to accommodate the MILAN crew, who sprints across the street (from the bunker at top center right) and gets set up to fire on T1).
 Back in the center, the enemy rifle team, feeling the heat from Team 1 (bottom left) and 6 (top left), finally decides he'd better at least try to make good his escape, and so they fall back into the river (center).
 The regime troops call upon their mortar to take the road bridge under fire...
 With vicious consequences, putting Team 2 out of the fight.
And then the moment of decision...
 Or not! The MILAN looses a wire-guided missile at T1, but Captain Basilone screams a warning to the loader, who opens up with the coax and forces the ATGM crew to flinch. The missile strikes the ground beside the tank!
 Basilone's 90mm main gun roars in return...
 It doesn't knock anyone out, but it forces the rifle team and the MILAN team to fall back and hunker.
Because I'm benevolent, I let them hang on to the last centimeter of table, rather than making them run off the map.
 The enemy CO sprints south across the road (just left of the villa), looking to reach the MILAN and rifle team, rally them, and get them back in the fight (they are at top, behind the villa).
 Captain Basilone's main gun roars again...
 Once more forcing an enemy team to fall back (they didn't really go backwards, just south, to break line of sight, from the marker at top center).
 Team 3 (center left) pulls themselves out of the river (just off camera to left) and darts forward, drawing react fire from the enemy dug-in on the road (top right)...
 But they shrug it off and crash into close combat with the hunkering enemy rifle team.
 Team 3 dispatches the enemy troops (bottom left), then sprints forward (center).
They weren't close enough to get to the hunkering rifle and ATGM teams (far right). I must admit, that almost made me cheat, but I played it right and halted Team 3 short, taking cover in the villa. Surely the enemy CO is going to use his next turn to rally his boys and go after Team 3...
 In the center, Team 1 opens fire on the enemy troops caught at close range in the river...
 Hard to see, but they are eliminated, and then Team 1 sprints into the river at that same location (center), looking to split the enemy's defense and keep up the pressure.
 Concerned about getting cut off, the enemy's north rifle team sprints south into the railroad building (from emplacement at top center left). They are also now in better position to protect the mortar team (just right of the building), as the CLA's Team 1 is just off camera at bottom left (and the casualty figure at bottom left is the enemy team that Team 1 just knocked out).
 The CLA forces doggedly pursue in the north: Colonel Colvasquez and Team 5 sprint across the railroad bridge (top center), Team 6 splashes into the river (center left), and Team 1 moves up to the abandoned bunker (bottom center).
 The enemy CO (far right), with Team 3 (center left) just around the corner, quickly rallies the MILAN and rifle team.
 And the MILAN team (far right) moves out into the open to get a shot at T1, which Captain Basilone has just driven onto the road bridge.
 While the enemy CO leads his rifle team around the corner to deal with Team 3, who falls back a hair to straighten out the geometry (the enemy rolled a 'Scurry' for orders, and so couldn't move into close combat this turn; it's lucky in that regard, but it also allowed all the regime troops to rally and move into better positions).
 Captain Basilone's tank once again sends a 90mm high explosive round downrange...
 Pinning the enemy rifle team (center, yellow bead), and forcing the MILAN team to fall back and hunker once again (far right, red bead, with Team 3 just visible at bottom left).
 At extreme close range, but perhaps rattled a bit by the nearby detonation of a high explosive tank round, Team 3 exchanges fire with the enemy CO and rifle team, and neither side is hit!
 Team 3 seizes the initiative and charges into close combat with the enemy CO and rifle team, a dead even fight...
 And Team 3 comes out on top! They leave the casualties of the enemy CO and rifle team (center left) in their wake as they press forward into contact with the hunkering ATGM team...
Sorry, don't know why the flash popped on that picture, and only that picture.
 Team 3 hastily put the ATGM team out of the fight (top right, with enemy CO and rifle at far right), then movedup (top center, overlooking the pinned enemy rifle team on the road, with Team 1 at far left).
 Sandwiched between Team 1 (top left) and Team 3 (right), the enemy troops in the road surrender...
 Having watched one of their rifle teams surrender, and knowing their anti-tank weapon and commanding officer are out of the fight, it didn't take much for Team 5 (top left) and Team 6 (bottom center) to coax out the last enemy rifle team and their mortar team. The enemy's 6th Armored Battalion, who fought very hard during the campaign, is no more, and Cienfuegos has fallen!
A lot of fun, with the situation definitely in doubt for quite awhile, but some a very lucky miss by the enemy's ATGM, followed by some handy shooting by Basilone's tank, followed by Team 3's "Charge of the Light Brigade" cinched the victory. I still can't believe a single rifle team, without attached leader, was able to win three separate close combats. The CLA is awarding its third Medall de Honor for that feat.
Losses:
CLA: ~15 KIA/ WIA, one destroyed M-48A5
Regime: ~25 KIA/WIA, ~15 POW
Sergeant Trevino, Team 3, 2nd Marine Rifle Company Company, 6th Infantry Battalion, awarded the CLA's highest honor for gallantry, the Medall de Honor, and meritoriously promoted to Lieutenant.
Well, that's all the fights I've played so far, and I'm not sure how much gaming I'll get done this weekend as we're taking another 'mini-vacation,' heading for the mountains. But definitely more to come. I've got two more fights to play to close out D+3, and then I'm looking to finish the 'war' on D+4, though I'm not sure how many fights I'll need on D+4 to do that. I've been having a great time, but I need to move on to other projects!
I hope you've had as good a time as I have, and I promise none of my other projects will have this many fights!
V/R,
Jack
D+3
27) The 5th Tank Battalion and 3rd Infantry Battalion are stymied by a spoiling attack east of Artemisa by the regime's 2nd Armored Battalion.
28) 10th Popular Force Battalion and the regime's 7th Infantry Battalion trade supporting fires in eastern Havana, then grapple in heavy street-fighting.
29) The 6th Infantry Battalion, supported by the 3rd Troop, 5th Tank Battalion, defeats the regime's 6th Armored Battalion in fierce fighting to secure the city of Cienfuegos.

Commander, 2nd Marine Co, 6th Inf Bn, Captain Spirovales, decorated with the Estrella de Plata

Commander, 3 Troop, 5th Tank Bn: Captain Basilone. Not a command stand, just head of the tankers.

6th Infantry Battalion Commanding Officer: Colonel Colonel Ricardo Colvasquez, already heavily decorated in the War of Liberation with the Estrella de Bronce and the Cruz Servicio Distinguido.


The blinds are flipped, revealing the enemy force.


The enemy placed, they immediately take the CLA under fire.


Things are going exactly to plan for the enemy; they cleared the CLA infantry out of the way...


And then the moment of decision...


Because I'm benevolent, I let them hang on to the last centimeter of table, rather than making them run off the map.


They weren't close enough to get to the hunkering rifle and ATGM teams (far right). I must admit, that almost made me cheat, but I played it right and halted Team 3 short, taking cover in the villa. Surely the enemy CO is going to use his next turn to rally his boys and go after Team 3...


Sorry, don't know why the flash popped on that picture, and only that picture.


A lot of fun, with the situation definitely in doubt for quite awhile, but some a very lucky miss by the enemy's ATGM, followed by some handy shooting by Basilone's tank, followed by Team 3's "Charge of the Light Brigade" cinched the victory. I still can't believe a single rifle team, without attached leader, was able to win three separate close combats. The CLA is awarding its third Medall de Honor for that feat.
Losses:
CLA: ~15 KIA/ WIA, one destroyed M-48A5
Regime: ~25 KIA/WIA, ~15 POW
Sergeant Trevino, Team 3, 2nd Marine Rifle Company Company, 6th Infantry Battalion, awarded the CLA's highest honor for gallantry, the Medall de Honor, and meritoriously promoted to Lieutenant.
Well, that's all the fights I've played so far, and I'm not sure how much gaming I'll get done this weekend as we're taking another 'mini-vacation,' heading for the mountains. But definitely more to come. I've got two more fights to play to close out D+3, and then I'm looking to finish the 'war' on D+4, though I'm not sure how many fights I'll need on D+4 to do that. I've been having a great time, but I need to move on to other projects!
I hope you've had as good a time as I have, and I promise none of my other projects will have this many fights!
V/R,
Jack
Good stuff...clever use of the poker chips as blinds...what a neat idea!
ReplyDeleteThanks Jim. I use my poker chip blinds almost every game, I just don't usually photograph them, I wait to take pics until I 'reveal' the blinds. They're quick and cheap, so they work for me!
ReplyDeleteV/R,
Jack