All,
0530 on 6 Aug 1990
Mini-Campaign Fight #24
TF Hawk vs FSNL 8th Company
TF Hawk was pushing east towards the only bridge over the River Shalabi, looking to secure Task Force Hammer's lines of communication to the rear, but were slowed by the darkness and caught from behind by the FSNL's 8th Company. A hellacious fight ensued which saw TF Hawk's commanding officer killed in action (for the second fight in a row) and both sides recoiled into the darkness to rest and reorganize. Now 1st Lt Beriana has assumed command, but as he's getting their stuff straight and getting the boys in fighting shape, the Communist FSNL's 8th Company attacks them again!
This will be handled as a meeting engagement, with the Communists entering from the west and the Cubans from the east, using random deployment for both sides to simulate the chaos of fighting in the dark, running into contact while on the move, and the Cubans having to reorient 180 degrees to face their attackers.
Overview, north is right. There is a hardball road running west to east, with villages at bottom left and bottom right, as well as several knolls/hillocks, the most prominent of which became known as "Mortar Hill" (for reasons that will soon become obvious, center right top). Other than that we've got several cultivated fields and scattered jungle.
The opposing forces, allies on left and Communists on right.
The figures are all 10mm from Pendraken, Minifigs UK, and Butler's Printed Models. I'm using Ivan's "5Core Company Command," playing on a 3' x 2' surface with simple terrain to speed up the process. The hootches are from Jimmi at Flashpoint Minis, the roads are from Fat Frank, the hills are from Warzone, the fences are from Sarissa, the fields are from Hotzmats, the trees are cake toppers, and when you see the rivers, they're from Wargamers Terrain. I'm playing solo and will randomize enemy deployment using a system of blinds borrowed from Joe Legan's "Platoon Forward."
In terms of caliber of forces, the SLA, FSNL, and FLA troops will all be treated equally, except for the fact the FLA troops will be treated as fanatics, in terms of their willingness to advance into close combat. The Cubans are more tactically and technically proficient, and so they will receive extra firing dice, better rallying capability, bonus in close combat, and sometimes will have a second command stand on the table.
Lieutenant Beriana's force consists of: Command stand, six rifle stands, and an 81mm mortar team. The troops are Minifigs' Modern UK.
Additionally, there are some heroes present in TF Hawk/Dusty:
-1st Beriana, Hawk 03's Team Leader, who was awarded the Medal of Honor and meritoriously promoted to 1st Lieutenant
-Hawk 02 Team Leader, Bronze Star w/V
-Charles Gustav Recoiless Rifle Team Leader, Bronze Star w/V (not present in this fight)
*Please note that the old standard of having a Command stand and a separate single figure to represent Captain Villagrosa is now out the window since the previous TF Hawk Commanding Officer, 1st Lt Espinale, was killed in action and Captain Villagrosa assumed command of the combined Task Force Hawk-Dusty, but then he was killed, too...
The Communist force consists of: Command stand, six rifle stands, a BTR-80 armored personnel carrier, an AGS-17 30mm Automatic Grenade Launcher (AGL), and an 82mm mortar team. These troops and vehicles are all from Minifigs' Modern Soviets range.
Overview, this time with troops. You can see the Communists pushing ahead from the north (right, from top center to bottom center), while the Cubans are spread across the south side of the board (mostly far left, but with a few teams further north).
The Communists have two rifle teams at left center, with their CO at center, two more rifle teams right behind him, another atop Mortar Hill (top center right), and the last one at bottom center, with their AGL just left of them and their mortar team right of them. Lastly, their BTR is on the road, below Mortar Hill (center right top).
Let's get it on! The bad guys get the first initiative AND a random event: "Thought he was over there!", which allows the enemy to move one of my teams up to 6" in any direction. They elect to grab Hawk 03 and move it from its position in cover (bottom right), out into the open (center)!
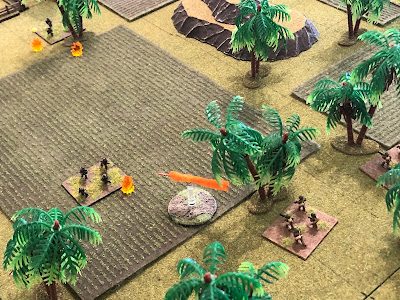
And the stillness of the pre-dawn air is broken by the enemy's AGL (bottom right) thump-thump-thumping out 30mm HE rounds at Hawk 04 (top left), pinning them.
This is immediately followed by a Commie rifle team opened fire on Hawk 03. Though caught in the open by close range small arms fire, they're only pinned.
But the enemy troops immediately charge into close combat!
But the scrappy paras of Hawk 04 knock the bad guys out and move up, towards the enemy AGL position (top center right)!
But as they move up (bottom left), another enemy rifle team (center right top, with the AGL at bottom right and their CO at far right) opens fire, catching them in the flank, pinning them again!
Hawk 03 hits the deck and returns fire...
But the exchange of fire does not go their way and they are knocked out (casualty figures at left center)!
The Cuban mortar team (far left) begins pumping 81mm HE rounds out, targeting Mortar Hill (top right)...
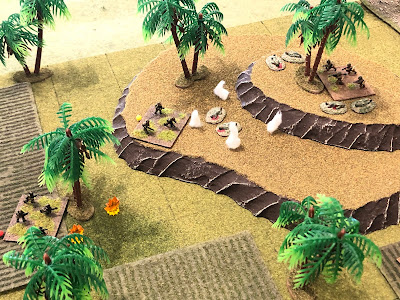
The enemy rifle team atop Mortar Hill is knocked out (casualty figures at far right) and the BTR crew is suppressed (far left)!
As soon as the mortar sheaf is complete, Hawk 01 charges up Mortar hill (center right) and fires a LAW at the BTR!
The BTR is immobilized, but the crew stays in the vehicle, suppressed!
Lt Beriana leads his command group up in the center (center, from far left, with Mortar Hill at top right).
The enemy mortar team (bottom right) adjusts and begins firing on the Cuban threat to their flank, atop Mortar Hill (top left)...
Hawk 01 goes down in a fury of 82mm shrapnel...
While in the center, the enemy rifle team that knocked out Hawk 03 9bottom center, with their CO at bottom right) opens fire on Hawk 02 (top left, with Mortar Hill at top right), putting them 'men down'!
And as Hawk 02 (top right) is getting fired up, the Communist AGL (bottom center right) again opens up on Hawk 05 (top left), this time putting them 'men down'!
Further back in the enemy's line (bottom center), two rifle teams open fire on Hawk 06 (top left), suppressing them!
*The Cubans are in BIG trouble, with 'men down' and suppressed teams all over the place.
The Cuban mortar team (far left) responds, targeting the enemy's center (far right)...
Putting a rifle team 'men down' (white bead at bottom center) and pinning their CO (yellow bead at bottom right), as Lt Beriana dashes forward (top left) under fire to rally Hawk 02, but they stay 'men down'!
Lt Beriana (far right) looks on helplessly as Hawk 04 moves up (center top, from far left).
While on the Cuban far right, Hawk 06 (red bead at bottom center, with Hawk 05 'men down' at left and the CO, Hawk 02 and 04 at top center right) attempts to self rally...
But they panic and fall back (far left, from bottom right)!
With so many Cuban troops suppressed or 'men down' and their mortar team breaking out more ready ammo, a lull ensues (bad guy 'scurry'), which allows the Communists to maneuver: a rifle team moves right and rallies the crew of the BTR (top right), while another rifle team moves up to rally their CO (left), but he stays pinned.
So he (yellow bead at center) can't help the 'men down' rifle team at top center left, while the AGL team and last rifle team moves up on the enemy's far left (bottom left and bottom center, respectively).
Lt Beriana continues to rally Hawk 02 (top center right, with Hawk 04 above them) and they're good to go, but Hawk 06 (red bead at bottom left) again attempts self rally and fails again, only managing to get 'up' to pinned...
As Lt Beriana leads Hawk 04 up onto Mortar Hill (center top left, with Hawk 02 at far left).
Hawk 02 (bottom left) begins laying down fire..
They (top left) end up exchanging ineffectual small arms fire with the bad guys (right bottom center).
So Hawk 04 (left) fires on the same bad guys (right), pinning the rifle team and their CO, hoping to open the way to close assaulting the enemy center, starting with their 'men down' rifle team (white bead at right center bottom).
The Cuban mortar team (far left) fires on the enemy rifle team and BTR on their right flank (top right)...
Suppressing both!
As the BTR crew and rifle team on the right (right top) are getting hit, the Communist AGL (bottom left) responds, swinging the gun right and firing on Hawk 02 (top center left, with the CO an Hawk 04 at top center, on Mortar Hill), but it's ineffective.
The enemy CO (yellow bead at center left) successfully rallies as his mortar team (bottom right) begins pounding Mortar Hill (top left)...
Hawk 04 is knocked out, Lt Beriana's command group is suppressed, and Hawk 02 is pinned!
With the Cuban left getting pounded on and around Mortar Hill (top center/left), the Communist CO looks on as a pinned rifle team moves up (yellow bead at center) to check on their 'men down' comrades (white bead)...
But they've been hit too hard and are out of the fight!
*I'm failing rally rolls like a champion this morning...
Lt Beriana rallies his command group (on Mortar Hill, top right) as his mortar team (top left), concerned about enemy troops encroaching on their undefended left flank, begins firing on them (bottom right)...
But the rounds are long and have no effect!!!
The pinned Hawk 02 (left) fires on the pinned enemy rifle team in the center (bottom center), putting them 'men down' and hopefully clearing the way for a Cuban assault up the middle.
The Communist Commander decides to move right (right top), where he rallies the suppressed rifle team and BTR crew, rather than move up to assist the 'men down' rifle team in the center (far left).
The freshly rallied enemy rifle team moves up Mortar Hill (center top, from bottom right) and fires down on Hawk 02 (top left), suppressing them.
And while that is playing out on/around Mortar Hill (top right), the enemy rifle team on the far left pushes ahead (bottom center, with the AGL just behind them), threatening to rollup the Cuban right flank, which is manned only by Hawk 06 (suppressed off camera to bottom left) and Hawk 05 ('men down' at far left, with no real hope to rally unless and until Hawk 06 gets back in the fight).
Lt Beriana is licking his chops, hoping to attack the enemy center ('men down' rifle team with white bead at right center)...
But he can't get his men moving (Cuban 'Firefight!')… The Cuban mortar team (bottom left) again engages the Communist troops on the Cuban right (top right)...
But again the Cuban mortar rounds are off the mark.
And the enemy takes advantage by pushing ahead, the rifle team leading and the AGL team following.
While the enemy CO dashes into the center, looking to rally his 'men down' team (left) now that the right flank is shored up, and his mortar team (bottom right) continues pounding Mortar Hill (top center left)...
Pinning Lt Beriana's command group (center) and keeping Hawk 02 (bottom left) suppressed.
Lt Beriana (top left) just can't get his men to move (another Cuban 'Firefight!'): too much heavy fighting, too many casualties, under some serious stress now. The Cuban mortar team (bottom left) keeps firing on the right flank, trying to hold the enemy at bay (top right)...
This time they finally manage to accomplish something, suppressing the enemy rifle team (left, with the AGL team behind them and the 'men down' Hawk 05 helpless at top left).
While the enemy mortar team (bottom right) continues pounding Mortar Hill (top left)...
Suppressing Lt Beriana's command group and keeping Hawk 02 (far left) suppressed. Luckily there is another lull in the action (good guy 'scurry') and the CO and Hawk 02 both manage to self rally!
While on the Cuban right, with enemy bearing down (center bottom/right), Hawk 06 again attempts to self rally, and for a third time in a row they fail, going suppressed again (bottom left)...
This thing has turned into a comedy of errors: the Communist respond with their CO moving up to rally his 'men down' rifle team (right) and the AGL team moves up to rally the suppressed rifle team (bottom left)...
And both fail! The 'men down' team stays 'men down' (top center), while the suppressed rifle team panics and falls back (right, from left)!!!
The enemy mortar team (bottom right) again pounds Mortar Hill (top center left)...
Suppressing Hawk 02 (left).
This is absolutely incredible... The Cubans roll yet another 'Fireight!', and again the mortar team (fa left) is the only team that can act. With the enemy rifle team advancing on the right flank turned back (off camera to bottom right, having been suppressed by them and then failed its rally and falling back, leaving the AGL team alone), they turn their attention back to Mortar Hill (top right) and open fire, Danger Close on Lt Beriana and Hawk 02...
The Communist rifle team atop Mortar Hill is knocked out!
The enemy mortar team (bottom right) immediately responds with its own fire on Mortar Hil (top center left)...
Pinning Lt Beriana's command group and keeping Hawk 02 (bottom left) suppressed. The good guys roll up a 'scurry,' so the CO and Hawk 02 both attempt to self rally...
What the @#$%!!!??? The two red dice are for the CO, the black dice is for Hawk 02. If you're not familiar with 5Core, that is really good if you're shooting and really bad if you're rallying. Since Lt Beriana is a Medal of Honor winner he gets two dice and gets to pick the best result, which means he gets to pick between being suppressed or pinned; he picks to stay pinned, while Hawk 02, already suppressed, rolls up another suppression...
So they are forced to panic and fall back (center top left, from trees at center top right)! To add insult to injury, Hawk 06 (bottom left tries to rally and fails for the fourth straight time, only getting 'up' to pinned.
As per usual, the enemy mortar team (bottom right) fires on Mortar Hill (top left) as their CO checks his 'men down' rifle team (left)...
The Communist rifle team fails and stays down (bottom center) as the mortar rounds go long, only keeping the Cuban CO (top center) pinned down.
With both sides suffering horrendously and, so far, indecisively, the enemy CO (bottom center) makes a rash decision...
He leads his command group into close combat with Lt Beriana and his command group!
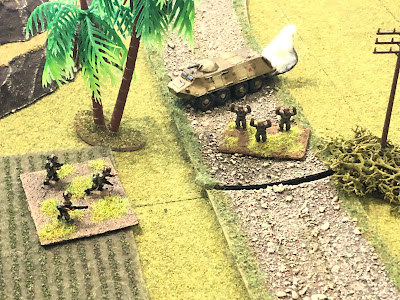
As you might expect, the Cuban Medal of Honor-winner wasn't having it; the good guys easily put out the enemy Command group, then move up, where their 'men down' rifle team surrenders...
As does their BTR crew.
While the remaining Communist troops (mortar team, AGL team, and a single rifle team) head for the hills (bottom right)!
The fight is over, and both battlegroups are eliminated (D7) from the campaign as neither constitute an effective fighting force. After 48 hours of non-stop, close-in combat that saw them lose their CO and then their acting CO, they fall back to the west in hopes of reconstituting at a later date.
Wow, that was... different. Don't misunderstand, it was mostly fun, but it really bogged down at the end, and yes, I admit it, the enemy Commander deciding to charge was a mercy kill. Whomever won that close combat was going to win the battle, and yes, it was weighted towards the Cubans owing to their quantitative advantage and their CO having won the Medal of Honor. But it's done and we're happily moving on ;)
Casualties:
Cuban: ~20 men
Communist: ~25 men, with another ~10 men and a damaged BTR-80 captured
Decorations:
-1st Lt Beriana, Acting CO for TF Hawk, was awarded the Bronze Star w/V for defeating the enemy's final assault on Mortar Hill in close combat, then counterattacking to capture an enemy armored personnel carrier and rifle team and drive the remaining forces off.
-Hawk 03 Team Leader was posthumously awarded the Bronze Star w/V for defending his suppressed team in close assault by an enemy rifle team and defeating them before being killed in action during a later close combat.
Next up we have Task Force Hammer, not led by LtCol Halabrio since Major Chavez was wounded, meeting the FSNL's 9th Company on the road to Pendrakenville.
V/R,
Jack


Thanks for sharing Jack Wonderful report, I like that assault on Motor Hill.
ReplyDeleteThanks man, it was a real ass-whooper of a fight!
DeleteV/R,
Jack
Your stuff always inspires me to buy more minis'!
ReplyDelete