It is now 0405 on 27 July 1990, and the twenty paratroopers of Lt Villagrosa's ODA-212 have descended to earth below silk canopies from a loaner C-130 as part of Operation Currahee, the Cuban operation to secure space for Cuban reinforcements to enter South Leon following the full-scale invasion launched by Fédération Socialiste Nationale de Leon (FSNL). Upon landing they formed up and assaulted any and all enemy positions identified (in the event, it would turn out that intelligence information provided by South Leon government elements, via Task Group Fulgencio, would prove quite accurate). This is the fifth fight following the drop, and the enemy is alert and expecting trouble.

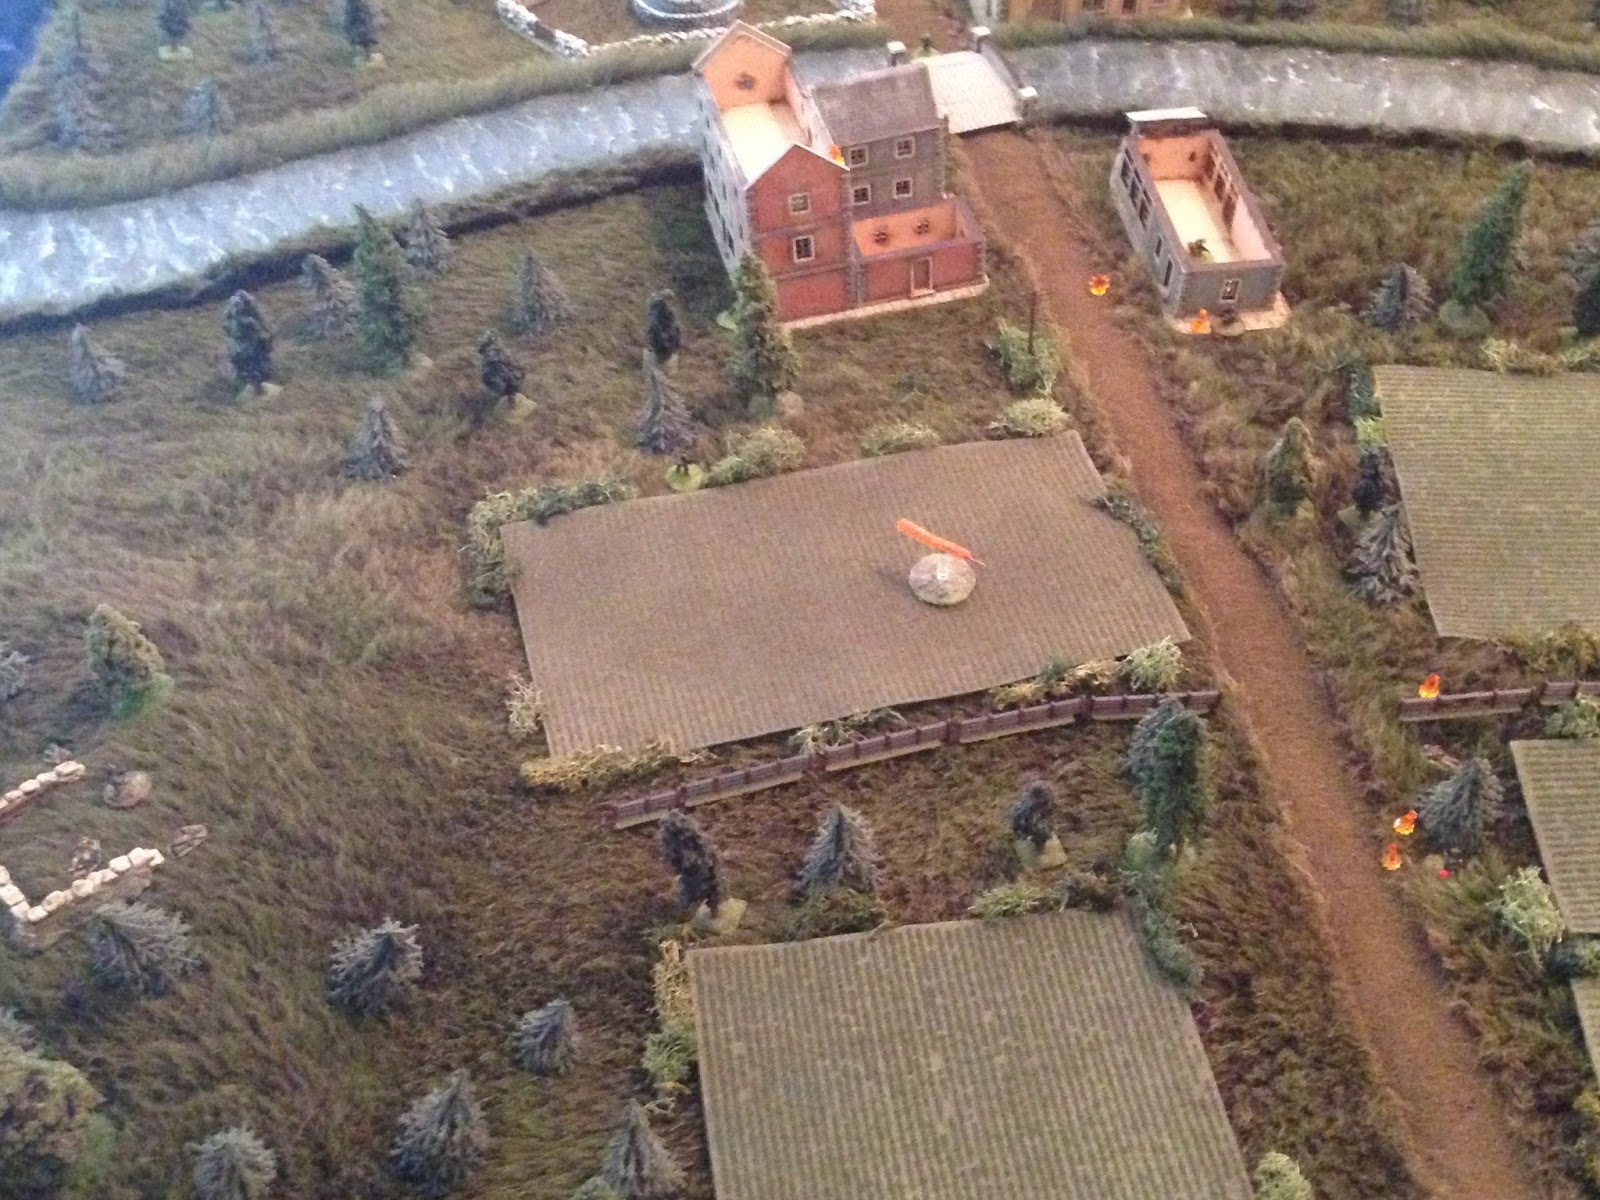
Overview of the entire battlespace (town of Gimbala, with Ruhala River running east to west), north is right. This fight is taking place at an enemy defensive position in the building on the southwest corner of the town (just left of the bridge, above the road), with the Cubans attacking from their rally point near the fence running east-west at bottom left.

The good guys, all twenty of them. Due to the strain of multiple deployments, the War of Liberation concluding only months ago, and the pace of expansion of the CLEF, this unit is more akin to a platoon of US Army Rangers than US Army Special Forces, despite being labeled an Operational Detachment Alpha (ODA). The troops are lined up in teams, with each row (top to bottom) being a team: at far right is the HQ element, consisting of Lt Villagrosa, the Det NCOIC, and two medics, then team 1, 2, 3, and 4, each consisting of a team leader, grenadier, SAW gunner, and rifleman.
I have created a roster for ODA-212 here on the blog, it's labeled "Task Force Dusty," but please keep in mind there has just been a parachute drop and the teams are scattered and mixed together in "LGOPs" (Little Groups Of Paratroopers).
I have created a roster for ODA-212 here on the blog, it's labeled "Task Force Dusty," but please keep in mind there has just been a parachute drop and the teams are scattered and mixed together in "LGOPs" (Little Groups Of Paratroopers).
These are Modern US Marines from Flytrap Factory.
 The bad guys, of which I'll be using between five and ten per fight. These are Battlefront 15mm East German mechanized infantry, with two leaders, two RPK LMGs, two RPGs, and six riflemen.
 Overview, north is up. The objective is the two buildings at top center, and the Cuban assault force is at right center. At left bottom is the position atop Hill 60, where PFC Gutierrez is standing watch and looking after the wounded Sgt Perena. At top right is the former enemy position south of the river, where Sgt Bautista and Doc Eusabio are holding the line. The remaining Cubans from those two assaults have met up in the field at center right and are preparing to launch the assault into Gambala.
 The Cubans fan out (bottom) and begin moving on the objective (top), where you can see some enemy troops scattered around the south end of town.
 The Cubans are, from bottom left to top right: SSgt Tomas, Team 3's leader, a former US Army and CLA paratrooper during the War of Liberation, hobbling around from a bullet wound to his left calf; PFC Oviedo, Team 2's machine gunner, a former university student that joined the CLA during the War of Liberation, fighting with the 8th Popular Front Battalion; Pvt Romero, Team 1's rifleman, just graduated high school and joined the CLEF after the War of Liberation; Lt Villagrosa, the commanding officer of ODA-212, a former US Army 'Green Beret' and paratrooper in the CLA during the War of Liberation; PFC Salena, Team 3's grenadier, the speedy little son of an electrician, he joined the CLEF after the War of Liberation; and PFC Arroyo, Team 4's rifleman, a 17-year old high school dropout known as "Shady" because he's greasy and only looks out for himself.
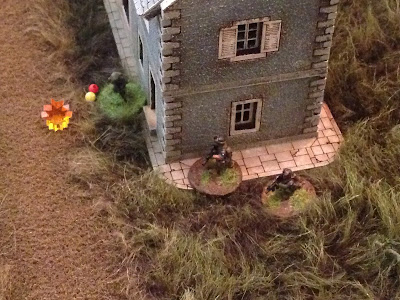
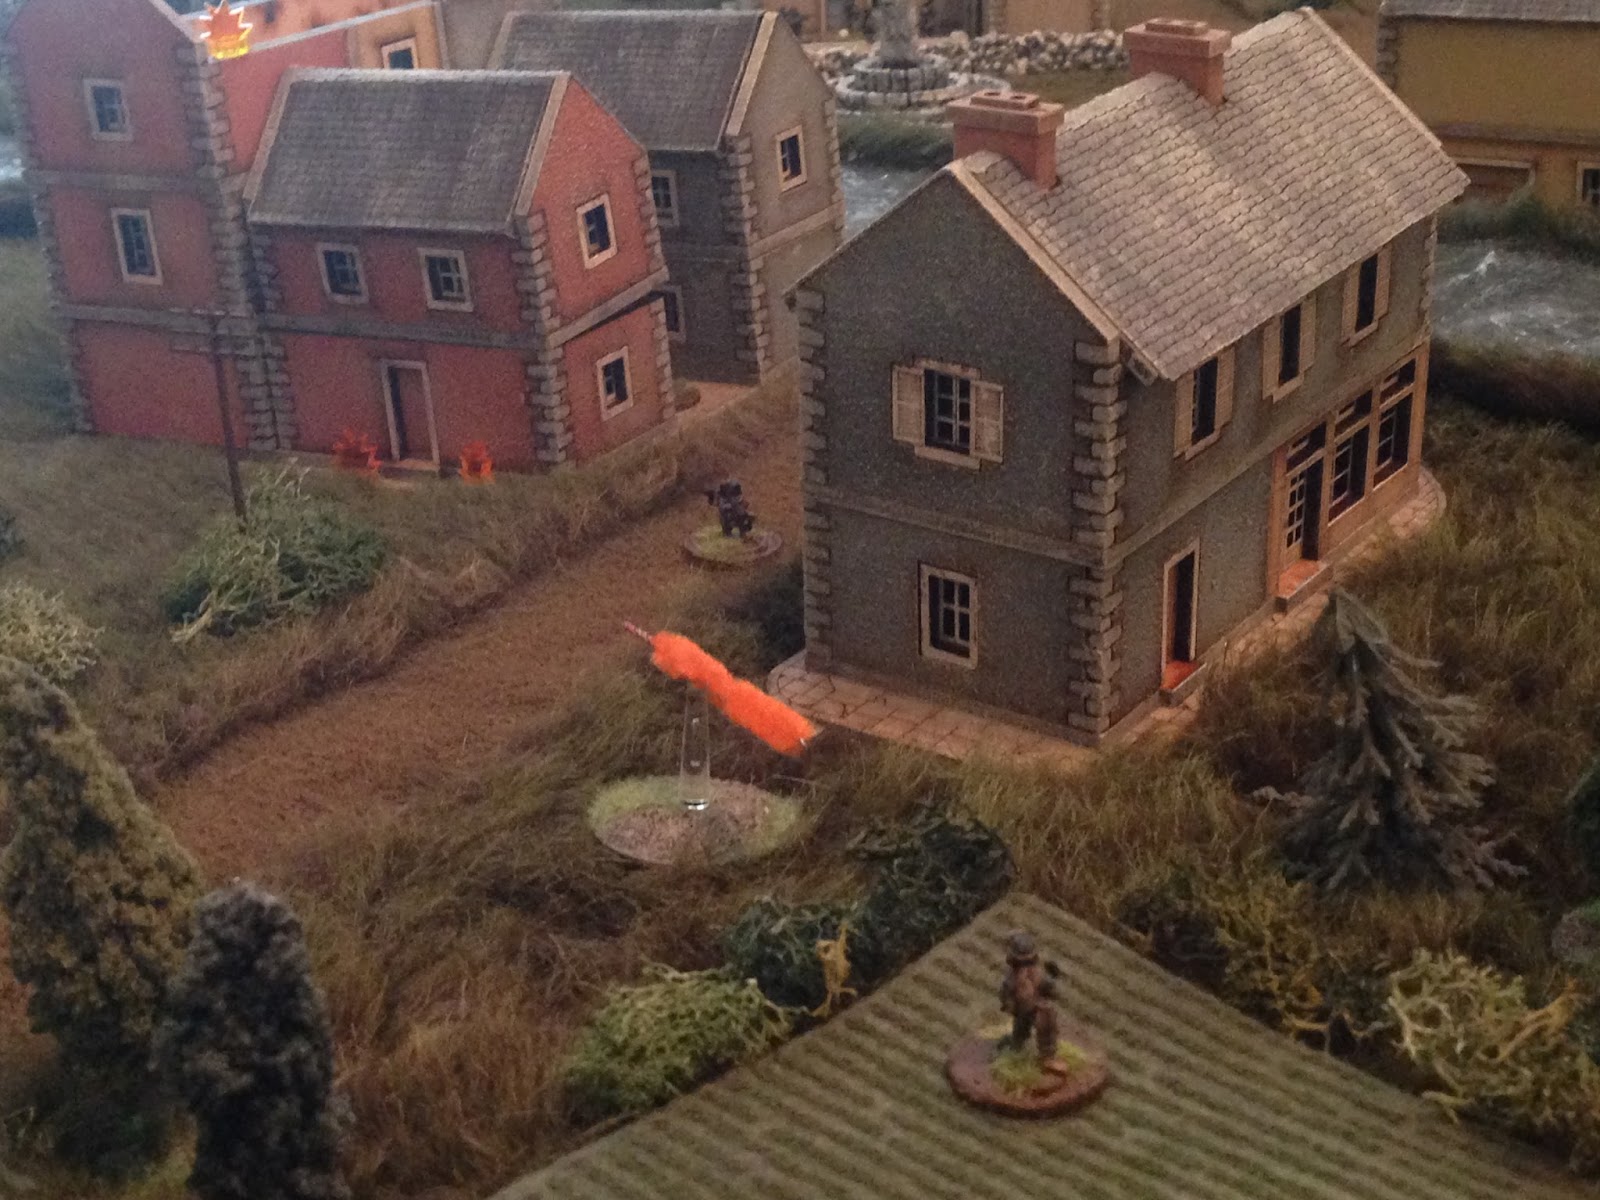
 Looking south to north at the enemy positions, they have a total of eight men. At bottom left, on the north side of the bridge, is an RPK light machine gun. Another RPK is on the 3rd floor, with a rifleman, of the building at center bottom, and another rifleman on the ground floor of the same building. At far left is the enemy leader, a Lieutenant, with another rifleman above him on the street. Just outside the center bottom building is an RPG gunner, and at bottom right is one more rifleman.
 As mentioned previously, the bad guys are alerted and ready to fight. Right off the bat they spot movement in the fields to the southeast (top center).
 They should probably have allowed the Cubans (top left) to get a bit closer, but they're a bit nervous and, wanting to make sure his comrades are aware of the threat, he levels his AK (bottom center right) and opens fire. The rounds miss, but everyone on both sides now know they're in a fight.
 On the enemy right, the rifleman (right center) and RPG gunner (bottom left) move up to see what the fuss is all about, but they don't see anything yet.
 But up on the 3rd floor, they're locked in. The RPK cuts loose with a long burst, walking tracers up until PFC Salna is struck in the chest and goes down!
 The other enemy LMG (bottom left) sits tight, not sure what his comrades are firing at, while the enemy Lieutenant moves up the street (center).
 PFC "Shady" Arroyo suddenly finds himself alone in the field (Lt Villagrosa is off camera to top left). Faced with the choice of helping to get PFC Salena out of the line of fire and bandaged up or moving into cover to save himself, Shady dives into the nearby bushes and curls up into the fetal position (green bead shows he's prone).
 Lt Villagrosa takes a knee (center) to figure out what's going on as Romero moves up into cover (left, in the trees) and takes a look around, spotting muzzle flashes from the building at top left.
 PFC Oviedo, the SAW gunner (center bottom, with SSG Tomas at bottom left, Lt Villagrosa at far right, Romero in the trees at center right) sights in on the 3rd floor window (top center left) and cuts loose with a long burst, hitting the enemy gunner in the chest! SSG Tomas fires too, but with the enemy gunner on his back there's nothing to hit.
 With his rifleman moving up to the corner to get a view (bottom right), the enemy Lieutenant dashes across the stree (top left, from right).
 Romero (bottom center left) spots the enemy rifleman in the street and fires. The rounds smack into the wall above his head, and he ducks back, pinned.
 Shady continues his attempts to save his own butt, totally abandoning Salena (bottom left) by crawling away from the firefight (just visible at far top right, between the bushes and fence. Just visible at top right are the sandbags of the former enemy position south of the river, where Sgt Bautista and Doc Eusabio are manning the perimeter). Lt Villagrosa is at top left.
 Oviedo (bottom center), the Cuban light machine gunner, keeps hosing down the 3rd story window (he doesn't know he already popped the enemy machine gunner there).
 While SSG Tomas (bottom center, Oviedo is just on the other side of the tree from him) spots the enemy Lieutenant (top center) and opens fire, missing.
 Lt Villagrosa shoulders his rifle and begins moving up (bottom center right), firing at the enemy Lieutenant (top center) the whole way. He's unaware of the enemy rifleman in the 1st floor of the red building and the RPG gunner at top left, and he knows that Romero shot at something at the corner of the gray building (you can see the yellow bead of the bad guy that's pinned there), but he's not sure what's going on there.
 At which point Romero moves up next to the boss and fires again at the rifleman he pinned, though he can't get a good shot at the cowering enemy soldier, what with Lt Villagrosa firing in front of him and SSG Tomas firing past him up the street.
 Oviedo keeps hosing down the 3rd floor window, while SSG Tomas thinks he spots movement off to the left (there's an RPG gunner and rifleman at top left); he quits firing at the enemy Lieutenant (top right) and takes a good look, but doesn't see anything. Off camera to top right, Shady is quite content to continue laying up in the bushes, and it begins to occur to SSG Tomas that he hasn't seen PFC Salena in a bit.
 Meanwhile, Lt Villagrosa acts a damn fool, jumping in front of Romero to move into the street and fire at the pinned enemy rifleman, but he misses because just as he squeezes the trigger...
 The enemy Lieutenant (bottom left) opens fire on him, sending rounds zipping past his head!
 But in the midst of all this, Romero (bottom center) manages to spot the second enemy machine gunner (top right, across the bridge) and the RPG gunner (far left).
 Lt Villagrosa hastily fires on the enemy Lieutenant, missing...
 Then falls back around the corner...
 While Romero fires on the pinned enemy rifleman again, hitting him in the left leg.
 Before joining the boss over out of the line of fire.
 Oviedo continues doing his job of keeping the enemy MG on the 3rd floor out of action.
 While SSG Tomas keeps popping at the enemy Lieutenant and missing...
 Lt Villagrosa tells Romero (bottom center) to hold tight while he dashes up the right side (far right, enemy Lieutenant at top left).
 And the bad guy Romero (bottom center) just shot in the leg drags himself into the building (center).
 Up on the 3rd floor, Oviedo's fire has been hellacious, keeping the FSNL rifleman pinned down, while the machine gunner finally comes conscious. The rifleman looks at his comrade; "sorry comrade, but I need to do something." The rifleman pulls out his first aid kit and hands it to the wounded machine gunner, then grabs the RPK and prepares to fight.
And then the tide begins to turn...
 As the rifleman works to get the RPK back into action (top left), the RPG gunner (bottom left) leans out and fires on Romero, missing.
 The enemy machine gunner on the north side of the bridge (bottom center) finally decides to get into the fight. Having watched as Oviedo (top center left) pours streams of tracers into the 3rd floor window (top right), he waits until the Cuban youngster is reloading then opens up, hitting Oviedo in the right thigh, putting him out of the fight!
 The enemy rifleman on the 1st floor (bottom center) opens fire on SSG Tomas (top center), but misses.
 From the far left, the enemy rifleman there (bottom left) sights in on SSG Tomas too, but misses also as the former US Army paratrooper, already wounded in the calf, digs his blouse buttons into the earth.
 As the enemy gunfire in and around Gambala grows substantially in volume, PFC Gutierrez (bottom left, atop Hill 60) faces about to see if he can help.
Yes, suddenly the Cubans, already outnumbered 8-6, find themselves with two men totally out of the fight and the enemy hasn't permanently lost anyone yet, so I need some help. Gutierrez spots the enemy rifleman (center, just above the field below the red building) firing on SSG Tomas (far right bottom)...
 Sights in, and fires. Missing, of course...
 SSG Tomas (bottom center) fires on the enemy Lieutenant, pinning him down between the buildings.
 While Romero (bottom right) returns fire on the RPG gunner, but he misses too. Meanwhile, Shady continues hiding in the bushes off camera to bottom right.
 Having pinned the enemy Lieutenant (you can just see the yellow bead at top center left), SSG Tomas (bottom center) shifts fire to the enemy machine gunner on the north side of the bridge and opens up, missing.
 Back on Hill 60, the enemy rifleman on the far left (top right) looks around to see where this new source of fire is coming from, just as Gutierrez (bottom left) adjusts his shooting position and fires again. The round skips off the ground and hits the enemy soldier in the head, knocking him down.
 Meanwhile, back on the right, Lt Villagrosa moves up cautiously (top right).
 Having knocked the enemy rifleman on the right down (center top right), Gutierrez (bottom left) aims at the enemy RPG gunner (top center right, at the corner of the red building) and fires, hitting him in the leg!
 As Romero dives through the window of the gray building, coming face to face with the pinned enemy soldier he'd shot in the leg! The enemy soldier simply stares at Romero with a look of pained resignation, scooting his rifle across the floor towards the young Cuban and raising his hands in surrender.
The enemy Lieutenant is still pinned at top left, and Lt Villagrosa is at far right.
 The enemy machine gunner on the north bank of the river (bottom left) continues trading fire with SSG Tomas (top center), to no effect.
 The enemy gunner on the 3rd floor (top left) and the enemy RPG gunner (left center) are still incapacitated by their wounds, thought the far right rifleman (bottom right) manages to slap a bandage on his damaged cranium and get back on his feet.
 And SSG Tomas (top center) finds himself in a very precarious position as the 3rd floor MG (bottom center, picked up by the enemy rifleman there) opens fire on him, making him the target of both enemy machine guns at this point.
 Lt Villagrosa pops around the north side of the gray building (bottom left), opening fire on the enemy Lieutenant (top center), hitting him in the leg and knocking him down.
 As the enemy Lieutenant goes down (bottom left), Lt Villagrosa moves up into the street and engages the enemy machine gunner on the north side of the bridge (top center), dropping him in the street, dead before he hit the ground!
 The enemy Lieutenant ducks into the nearby building, joining the rifleman on the 1st floor of the red building.
 As Lt Villagrosa (top center) is going on his rampage and the enemy Lieutenant is taking cover in the red building (left center), Romero (bottom right) zip-ties the wounded enemy soldier that just surrendered to him, leaving him lying on the floor and taking up position at a nearby window.
 With Lt Villagrosa having knocked out the northern enemy MG (top center right), SSG Tomas is able to raise up (bottom center) and fire on the enemy MG on the 3rd floor, and the round catches the enemy rifleman-turned-gunner in the head, putting him out of the fight!
Things are swinging back, though we're not out of the woods yet.
 Having popped the enemy rifleman (top right) in the head and then the RPG gunner in the leg (just visible at the red building at top center right), Gutierrez is amazed to see the rifleman stagger back to his feet. 'Well, okay,' he thought, before snapping off several more rounds at the rifleman, pinning him.
 On the Cuban far right (Romero is in the gray building at center left, Lt Villagrosa in the street above him, next to the bridge), Shady (bottom center right) realizes he hasn't been subjected to enemy fire for a couple minutes now. Furthermore, he's heard friendly M-16 fire from the far left (Gutierrez) and the center, and a slackening of enemy fire (both enemy MGs are now silenced). Sensing the fight is going their way and it's time to do his part, look like he was a valuable member of the team, he rises to his feet.
But as he does so he unknowingly takes his life in his own hands, and almost ends it! Sgt Bautista and Doc Eusabio are in the sandbagged position at far right, with the Sergeant covering east and Doc watching their rear. Well, when Shady popped up out of the bushes only fifteen feet away, Doc freaked out and snapped off a round! Shady's lucky the Doc ain't so handy with his shootin' iron. Shady cursed him out then began moving west. "What were you doing over here anyway, Shady?" asked Sgt Bautista. "Mind your own business, Sergeant," Shady muttered under his breath. "Say again, asshole?" But Shady was already gone.
 Romero (bottom center right) looks on as Lt Villagrosa moves up on the red building (top left).
 The enemy RPG gunner is still out of the fight (center), trying to deal with his mangled leg, and the rifleman at bottom right is still pinned down by Gutierrez (off camera to bottom right), but the enemy machine gunner hit in the chest (far left) on the 3rd floor is finally able to get himself back in the fight, albeit in a very limited capacity.
 Gutierrez (bottom left) keeps his sights on the enemy rifleman and squeezes off another couple rounds...
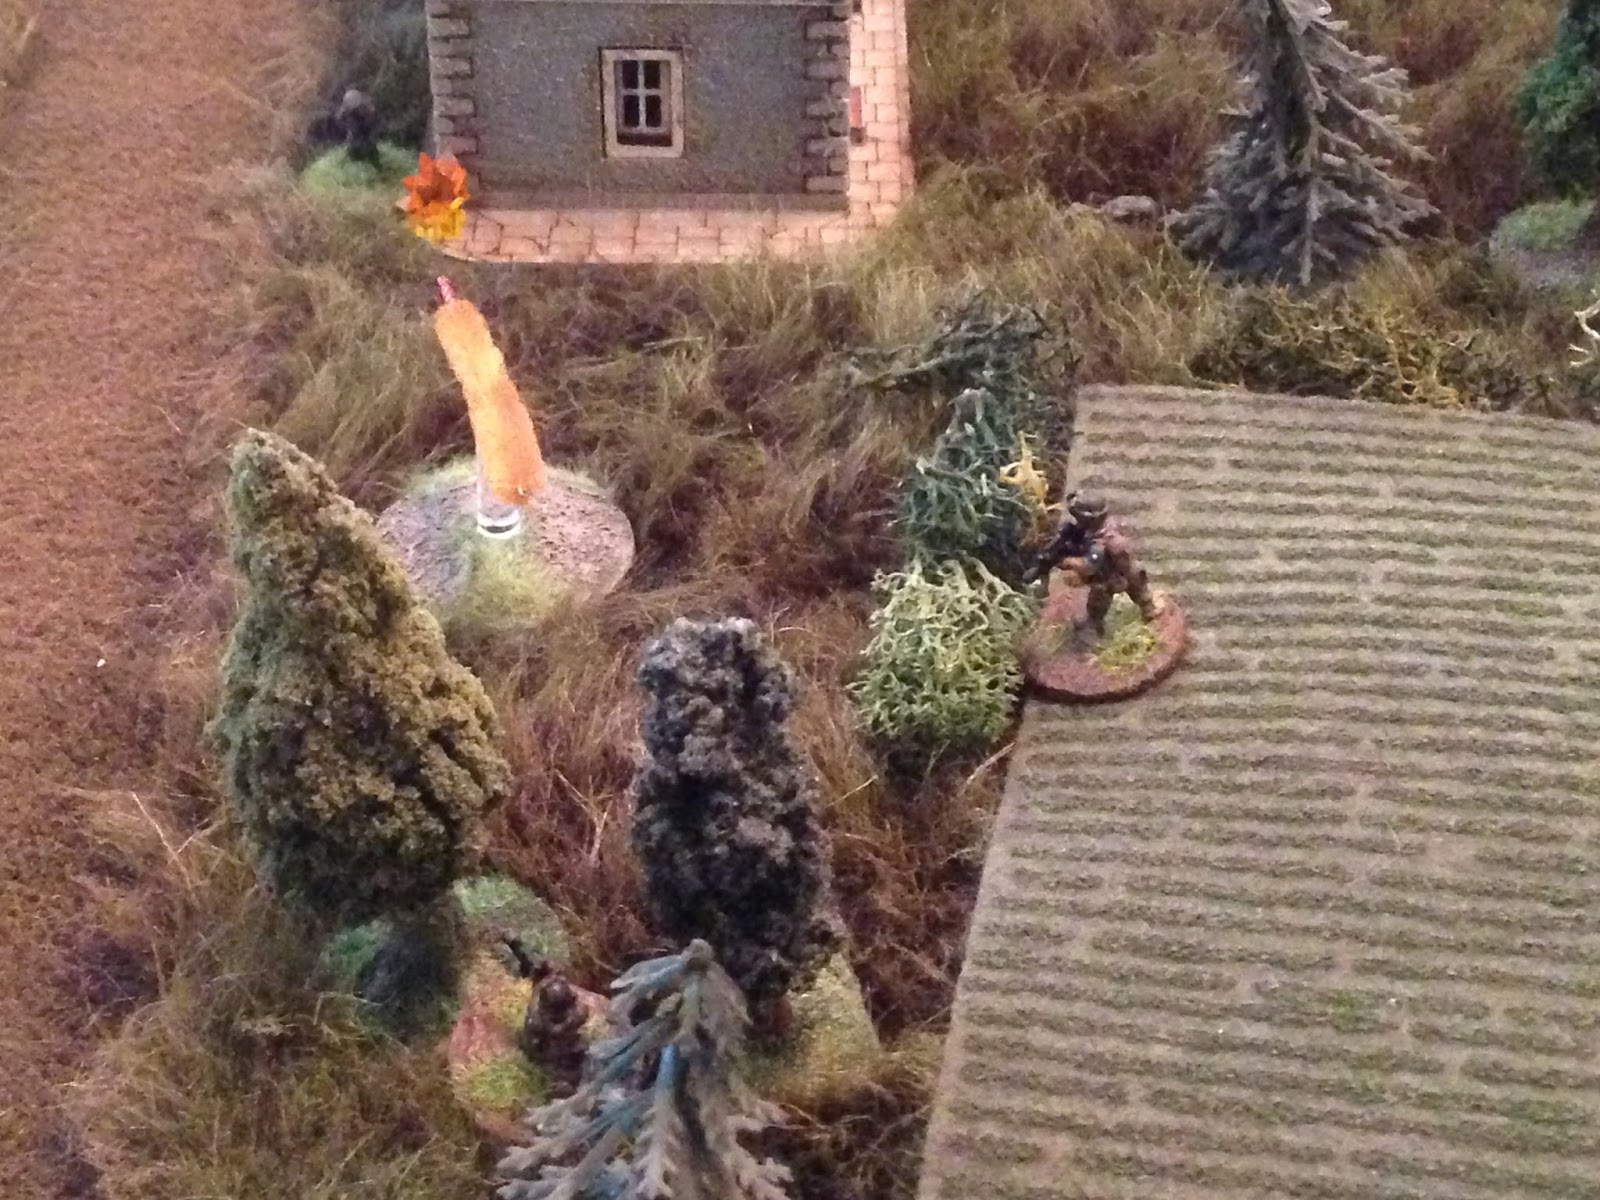
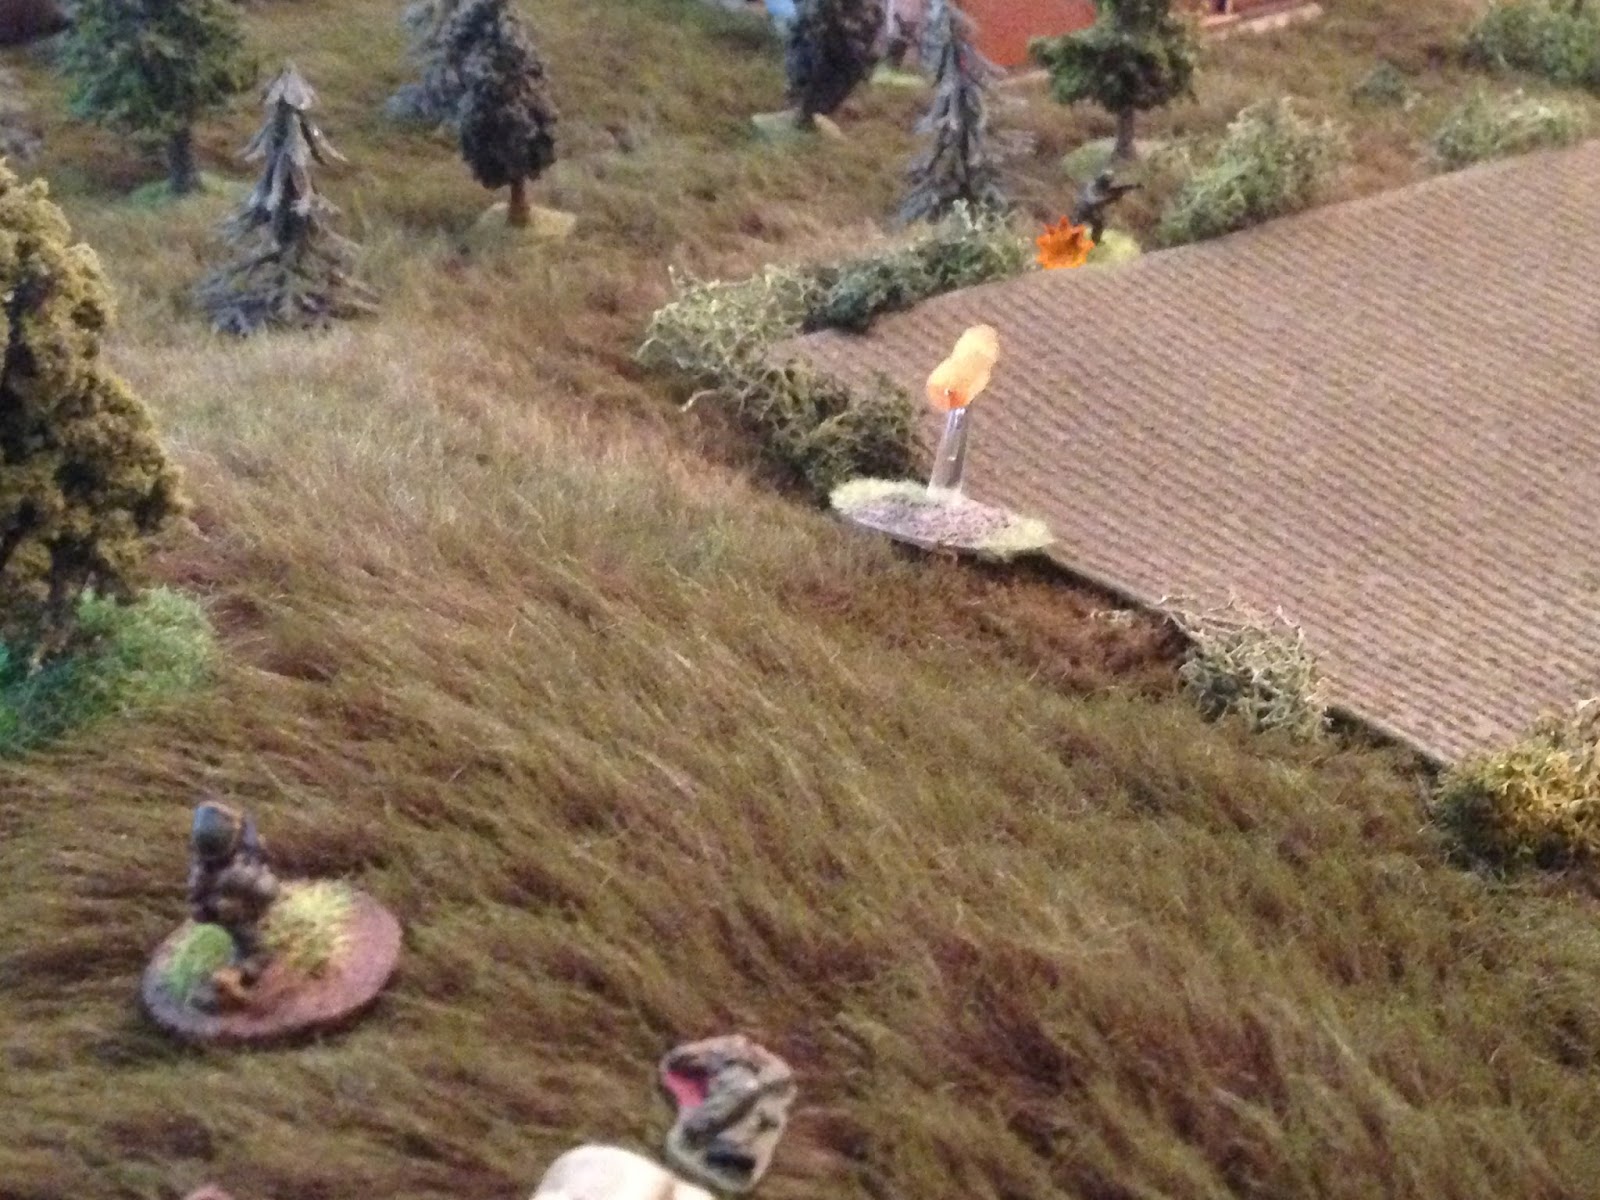
 The enemy rifleman flees (top center, from explosion at top left), but Shady (bottom center) spots him running and fires, hitting him in the chest and knocking him down!
He's greasy as hell, but he's a pretty damn good shot.
 And having watched his comrade get shot in the chest (right) is enough to pin the RPG gunner (left).
 SSG Tomas (bottom center), having silenced the enemy fire from the 3rd floor, sites in on the door on the 1st floor and opens fire, and Romero (in the gray building at top center) fires too, though neither hit anything.
 Lt Villagrosa (blue bead) finds himself uncomfortably close to the impact of SSG Tomas' and Pvt Romero's rifle fire, but he hangs in there. He pulls a frag out, pulls the pin, and lets the spoon fly.
 Shady moves up (bottom center right, Romero in the gray building at right, Lt Villagrosa at top center with blue bead) and fires...
 Hitting the enemy rifleman in the head again (bottom right)!!! He's still alive, but now he's been hit in the head twice and in the chest once. As he passes out from the pain, the RPG gunner backs off a bit (left).
 The enemy gunner on the 3rd floor (center left, RPG gunner at bottom left, Lt Villagrosa at top center, enemy Lieutenant at center right, with a rifleman with him but blocked by the 3rd floor) is finally patched up and ready to fight. He can't reach his RPK, which is lying under the dead rifleman, but he's able to grab the rifleman's AK. The gunner uses the rifle to fulcrum himself to his feet, then leans over to look out the window. And I'll be damned if he doesn't spot the Cuban Lieutenant standing there cooking a frag!!!
 As the wounded enemy gunner (bottom center right, with unconscious rifleman at bottom right) is staring at Lt Villagrosa (bottom center, obstructed by the buildings), the enemy riflemen on the 1st floor (bottom center, with wounded/pinned enemy Lieutenant) returns fire on SSG Tomas (top center, with Shady at far left and Romero in the building at bottom left)...
 Catching the Cuban NCO in the stomach, dropping him! Now we have SSG Tomas (bottom left), PFC Oviedo (left center bottom, and PFC Salena (top right) hit and out of the fight.
 Oblivious to the wounded enemy gunner struggling to raise his rifle and shoot (top left), Lt Villagrosa (right) tosses his frag (blue bead) into the 1st floor building with the enemy rifleman and wounded/pinned Lieutenant!
 Shady (bottom center) lays down fire as Romero dashes across the street (center, with Lt Villagrosa barely visible just above him).
 The enemy Lieutenant screams "grenade!", then rolls over and grabs it.
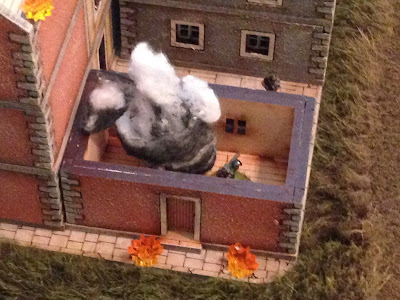 Just as it detonates, killing him and the rifleman!
 Very badly injured but not wanting to die, the wounded enemy machine gunner actually crawls out the window and drops down outside, where he finds himself next to the wounded RPG gunner and the thrice wounded rifleman, who just regained consciousness. "Guys, I think we need to get out of here!"
 Romero drags his prisoner out into the street from the gray building as Lt Villagrosa joins him. Shady also joins them in the street; "where the hell have you been? Never mind, Shady, go check the red building. Shady moves west around the building, and there's a sudden flurry of gunfire.
 Romero (far right) dashes up to give Shady a hand. "What the hell happened???" "The bastards were waiting in ambush, but I got the drop on them." "Really? All three of these guys have bandages on them." "Shove off, Romero, go coddle you're little FSNL souvenir back there in the street."
 And with that, Lt Villagrosa, Shady, and Romero drug the wounded enemy prisoner, SSG Tomas, PFC Oviedo, and PFC Salena over to Doc Eusabio on the south bank of the river. Doc took one look and cursed: "dammit, these guys are about bled out, and not even combat patched!!?? What the hell have you guys been doing?" Lt Villagrosa spoke quietly: "Shady, I don't recollect you doin' a whole lot of shooting, so I figured you must have been taking care of Salena and Oviedo." "Uhhh...." "We'll talk about this later. Doc, patch'em up, you guys hold your position, I wouldn't be surprised to see an enemy counterattack here soon. Romero, you and Shady grab your gear, we're moving out."
 "We're going to take the bridge and secure the north end of Gambala," he said as he led the other two Cubans up the street. The time was 0430, and as they began moving north Lt Villagrosa heard engine sounds and small arms fire break out to his right, in the east.
Doc Eusabio was able to save the three Cuban casualties, but it was ugly. PFC Salena had been hit in the ribcage and would be out of action for about two months. SSG Tomas was hit in the stomach and would be out for about three months. But PFC Oviedo was hit severely in the right leg. Perhaps if he'd have received immediate medical attention the leg could have been saved, but he didn't, so by the time he was shipped to proper medical facilities all they could do was amputate the leg in order to save his life. He was then placed on a ship back to Cuba, where it took 18 months of rehabilitation before he was medically retired from the Cuban Liberation Expeditionary Force.
Next up, SFC Medina leads the assault from the northwest corner of Gambala to take the enemy trenchline on the northern outskirts of town.
V/R,
Jack


And then the tide begins to turn...


Yes, suddenly the Cubans, already outnumbered 8-6, find themselves with two men totally out of the fight and the enemy hasn't permanently lost anyone yet, so I need some help. Gutierrez spots the enemy rifleman (center, just above the field below the red building) firing on SSG Tomas (far right bottom)...


The enemy Lieutenant is still pinned at top left, and Lt Villagrosa is at far right.


Things are swinging back, though we're not out of the woods yet.


But as he does so he unknowingly takes his life in his own hands, and almost ends it! Sgt Bautista and Doc Eusabio are in the sandbagged position at far right, with the Sergeant covering east and Doc watching their rear. Well, when Shady popped up out of the bushes only fifteen feet away, Doc freaked out and snapped off a round! Shady's lucky the Doc ain't so handy with his shootin' iron. Shady cursed him out then began moving west. "What were you doing over here anyway, Shady?" asked Sgt Bautista. "Mind your own business, Sergeant," Shady muttered under his breath. "Say again, asshole?" But Shady was already gone.


He's greasy as hell, but he's a pretty damn good shot.


Doc Eusabio was able to save the three Cuban casualties, but it was ugly. PFC Salena had been hit in the ribcage and would be out of action for about two months. SSG Tomas was hit in the stomach and would be out for about three months. But PFC Oviedo was hit severely in the right leg. Perhaps if he'd have received immediate medical attention the leg could have been saved, but he didn't, so by the time he was shipped to proper medical facilities all they could do was amputate the leg in order to save his life. He was then placed on a ship back to Cuba, where it took 18 months of rehabilitation before he was medically retired from the Cuban Liberation Expeditionary Force.
Next up, SFC Medina leads the assault from the northwest corner of Gambala to take the enemy trenchline on the northern outskirts of town.
V/R,
Jack
Is it just me or have there been an above average number of legs hot in the last few games? When it was going badly, I thought you were going to introduce another Cuban straggler as reinforcements!
ReplyDeleteThe leg wounds are just luck of the dice: I've created a chart that I roll on to see where guys get hit: head, chest, abdomen, groin, upper arm (left and right), lower arm (l and r), hand (l/r), thigh (l/r), calf (l/r), foot (l/r). Did it for a standing up guy, guy exposed from the waist up, and guy lying down.
DeleteRegarding introducing another Cuban straggler, hey! I do whatever it takes to win! ;) And as you saw, I needed something to stave off the butt-whoopin'! ;)
V/R,
Jack
I have the skirmish game Patrol:WW2 that has a d20 system for wound location, and also a great d20 roll for for what happens to a wounded soldier post-game (different results for light would and heavy wound), and another d20 if a wound ends up as permanent damage. I am hoping to use that (but not much else in the rules - altohugh they do seem like a good set). The rules also have 20 missions. I have this compulsion to play through all the missions and it is on my (long) list of future projects :-)
DeleteInteresting, I’m not familiar with those rules. Are they worth a look? Hell, maybe worth a look just for the 20 missions.
DeleteToo many projects for both of us...
V/R,
Jack
Patrol:WWw2 is expensive and available here:
ReplyDeletehttp://www.wargamevault.com/product/96867/Patrol-WWII
It uses a d20 and id fairly standard - activation, roll to hit, light wounds, heavy wounds. It does have 20 missions, campaign system, post-battle results etc. Even has a a Korean supplement as an appendix. It reminds me of Across a Deadly Field but with a lot more stuff included.