All,
AKA, Unit 101's 7th Fight of Operation Payback
It's 1025 on 14 Jul 1990, and Unit 101 is heading into action outside Langkawi, Malaysia. Following the successful raid in Lebanon which captured "The Mayor," intelligence information was discovered leading the team to its next target: "The Persian" is a Shiite Muslim born of Iranian parents in Lebanon in the mid-1960s, true name Ali bin-Schwammy-Roksamshammy (we'll stick with "The Persian"), and he's rumored to have details regarding the brokers of the ambush in Algeria. The Israelis were very helpful in assisting with logistics for the Unit to get to Langkawi in a speedy and clandestine manner.
Towards the end of the flight to Malaysia, the Israeli liaison officer leading the efforts to assist Unit 101 casually mentioned to Major Villanueva that the Cubans have many friends and supporters, and life might be easier if they made use of these relationships. He even pointed out some friendly faces in the Lebanese government that likely would have been more than happy to assist Unit 101 against The Mayor. Upon arrival in Malaysia, Major Villanueva reached back to headquarters in Havana, and was surprised to be put on the phone with the Minister of Defense, Generalissimo Cledado Estevante.
Following Major Villanueva bringing him up to date on events and plans, Gen Estevante mentioned the Lebanese had privately contacted him to ensure the Cubans knew they had friends, and the Italian government had called El Presidente directly to inform him they were less than pleased that Cuban operatives had entered their country clandestinely, then not-so clandestinely shot up the streets of one of its villages and killed a citizen. A bad guy, but a citizen nonetheless. With that, Major Villanueva felt compelled to offer up the Israeli officer's comments regarding Unit 101 operating unilaterally, and there it was decided this operation would be bilateral. While operational security was an issue (the fear that someone on the Malaysian side would alert The Persian and he would escape), there was more to the decision to go bilateral: first, Unit 101 was getting a bit frayed at the edges after six intense firefights in three different countries, with casualties, to boot. Second, the Israelis and their own intelligence folks stated all indications were that The Persian had quite the secure compound outside Langkawi, with plenty of hired guns and a cadre of hardcore lunatics. So going bilateral would not only 1) make everyone feel better and 2) make logistics considerably easier, it would also 3) allow Unit 101 to bring more guns to the fight. And they'd need them!
Gen Estevante contacted his Malaysian counterpart directly, and that evening Major Villanueva was put into contact with Captain Bok Choy of the Malaysian Special Forces in Kuala Lumpur. Major Villanueva and Capt Choy went over the details, formulated a plan, worked through the plan, and took it to the troops for some ad-hoc rehearsals. The Cubans wanted to get on target ASAP, and during the hours of darkness if possible, but it proved impossible to get all the troops and gear into place in time, and the Malaysians balked in any case, not wanting to go tearing through their own countryside in the dark, potentially putting their fellow citizens at risk, and not wanting to try to work with a foreign military they hadn't exercised with in the dark.
The plan was simple: Major Villanueva's second in command, "Rake," would take three other Unit 101 members and attach themselves to Capt Choy's platoon. Capt Choy's platoon would push northwest to The Persian's compound, which covered approximately three acres of land, escorting Major Villanueva and five Cuban shooters straight to The Persian's house, where they would perform the takedown, hoping to take him alive. The last three Cuban operatives had already infiltrated onto a hill northwest of The Persian's house, where they'd set up a hide and were conducting surveillance.
In place since approximately 0330, the three Cubans got into position, set up their gear, then took up one hour shifts with one man on watch and the other two sleeping. The sun came up at about 0600, and The Persian finally stepped out into the sunlight to stretch at approximately 1015. The surveillance team called it in to Major Villanueva and Rake, who immediately informed Captain Choy there was positive ID of the target at his home. The orders were passed and Capt Choy's platoon moved out.
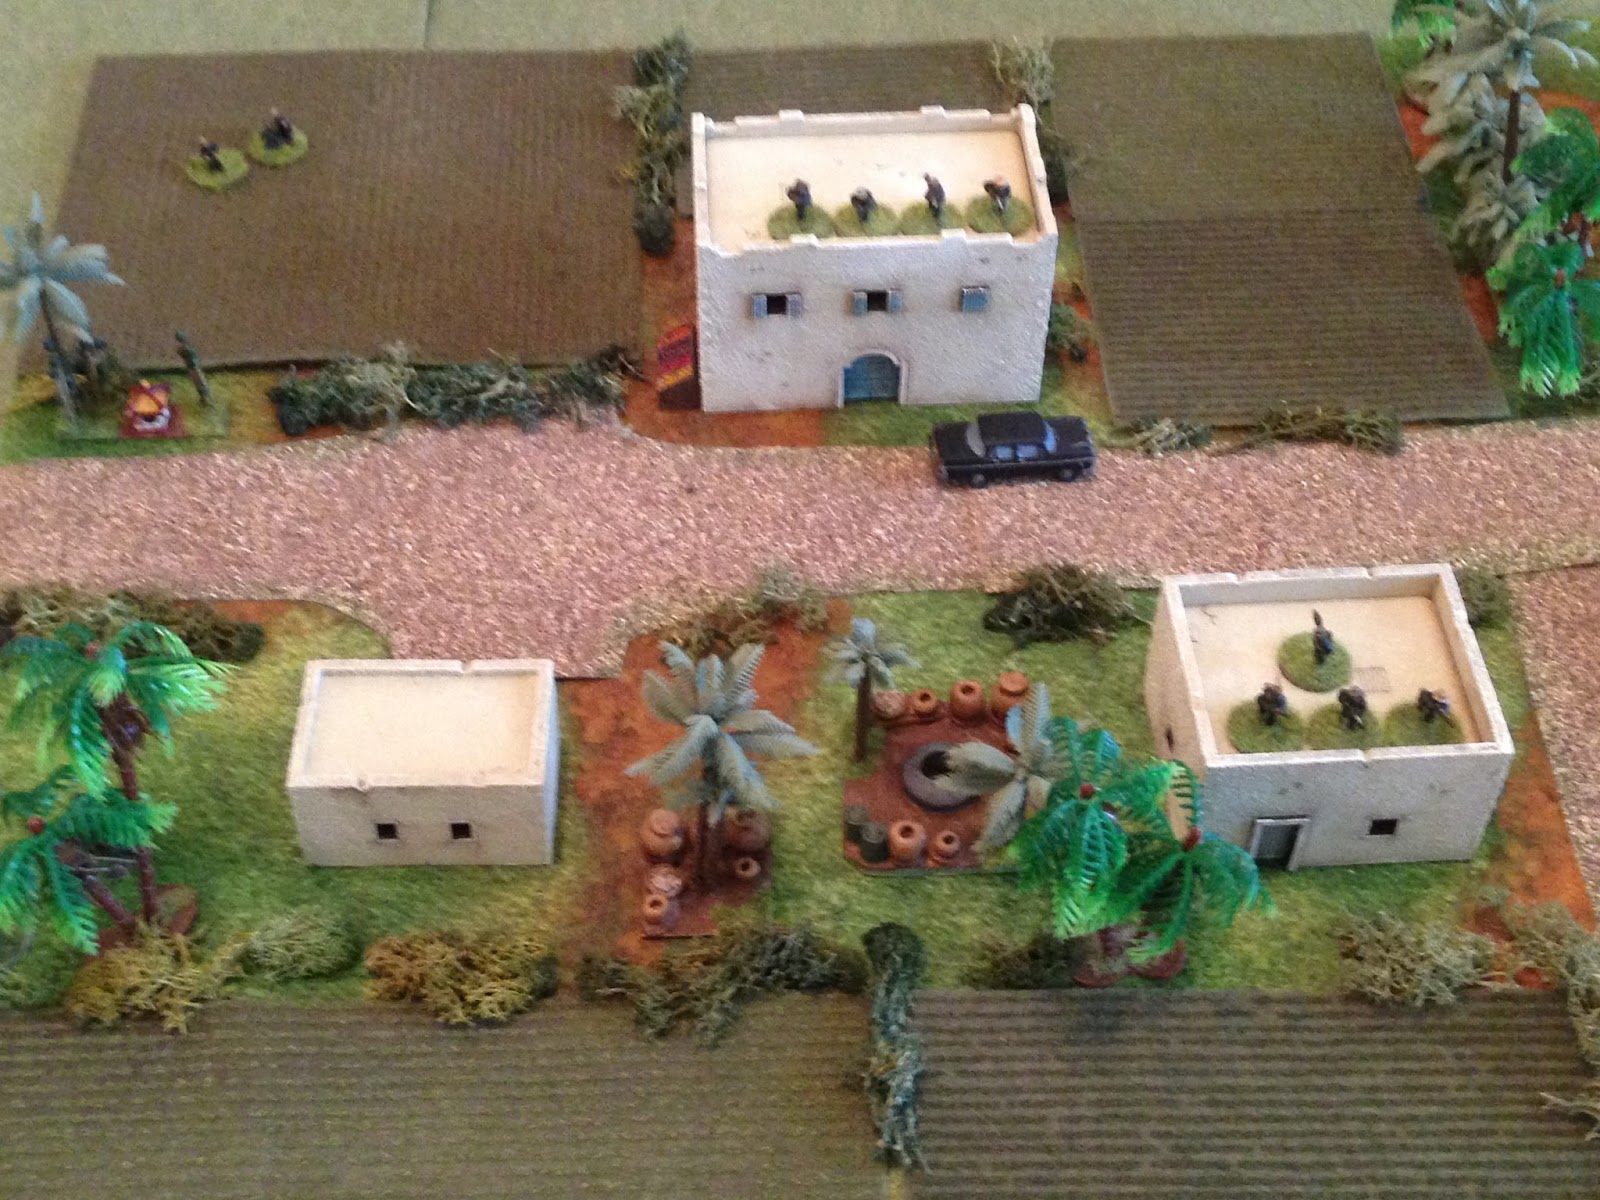
Overview of the battlefield, north is up. The southern end of The Persian's compound is at top center and top left (his house is off camera to top left about another 250m); the Malaysians and Cubans will enter the table in the southeast (bottom right). They are mounted, so they will move west (left) to the bridge, cross, then fan out and clear this portion of the compound before re-mounting and moving on the north end of the compound (which will be the next batrep).
The table is 4' x 4' on a new mat I bought, played out solo in 15mm using Ivan's "5Core Company Command" rules, though with "Five Men at Kursk"-style activation (each team and vehicle gets an activation dice, each team and vehicle can act and react once per turn).
The opposing forces, resplendent in 15mm. The M-113s are Old Glory, the Land Rover and Technical are Peter Pig, the bad guy infantry is Peter Pig, and the good guy infantry is Flashpoint Minis.
Here is the good guy force for fight number one. Three M-113s carrying four rifle teams, the Malaysian command team, and the Cuban team, and a Land Rover with M-2 .50 caliber HMG.
Callsigns are as follows:
Captain Choy's team: Red Dog 6
Rake's Cuban team: Blue Dog 33
Malaysian Rifle Team 1: Cobra 11
Malaysian Rifle Team 2: Cobra 12
Malaysian Rifle Team 3: Cobra 21
Malaysian Rifle Team 4: Cobra 22
M-113 1 (carrying Cobra 11 and 12): Twister 31
M-113 2 (carrying Red Dog 6 and Blue Dog 33): Twister 32
M-113 3 (carrying Cobra 21 and 22): Twister 33
Land Rover w/HMG: Mamba 10
The Malaysians are Flashpoint ARVN troops, the Cubans are Flashpoint Aussies.
The bad guys, or, more appropriately, the potential bad guys. I'm using blinds (with dummies) to figure out enemy troop composition and placement, so I don't know how many bad guys will actually be on the table, but this is how many they could have. Seven rifle teams (two with RPGs), an MG team, a recoiless rifle team, an 82mm mortar team, a command team, and a Technical with .50 cal HMG.
The troops are all Peter Pig NVA/VC.
The table with the troops set; you can see the good guys in their vehicles at bottom right, and the sharp eyed can catch some bad guys at center and across the top. There's plenty of bad guys...
In the southeast corner we have the good guys: the Land Rover, Mamba 10, leading, followed by Twister 31 carrying Cobra 11 and 12, Twister 32 carrying Red Dog 6 and Blue Dog 33, and Twister 33 carrying Cobra 21 and 22. You see all the troops riding on top of the aging M-113s (the rider figures are also from Flashpoint Minis).
It will never be as peaceful again as this picture ;)
In the northwest corner of the table we've got the mortar team (top left) and two rifle teams (center and bottom right).
In the northeast corner we have the Technical (center right), the recoiless rifle (top right), and two rifle teams (top left and bottom left). You can just see the base of one of the enemy command team at far left on the road.
Looking at the center, we've got the enemy command team on the road top center and a rifle tam at center right. The good guys are off camera to bottom right, the bridge is off camera to bottom left, and the bad guys at top left are from the picture of the northwest corner.
With that, it's time to get this party started!!!
The Malaysian/Cuban convoy pushes west on the main road, heading towards the bridge, no sign of the enemy.
I roll to see if the bad guys open the ambush now, but no luck, they hold their fire.
The convoy continues, with Mamba 10 taking the corner to head to the bridge.
I roll the dice to see if the fight starts...
"RPG, take cover!!!"
The rocket slams into the dirt just ahead of Mamba 10, pinning the crew.
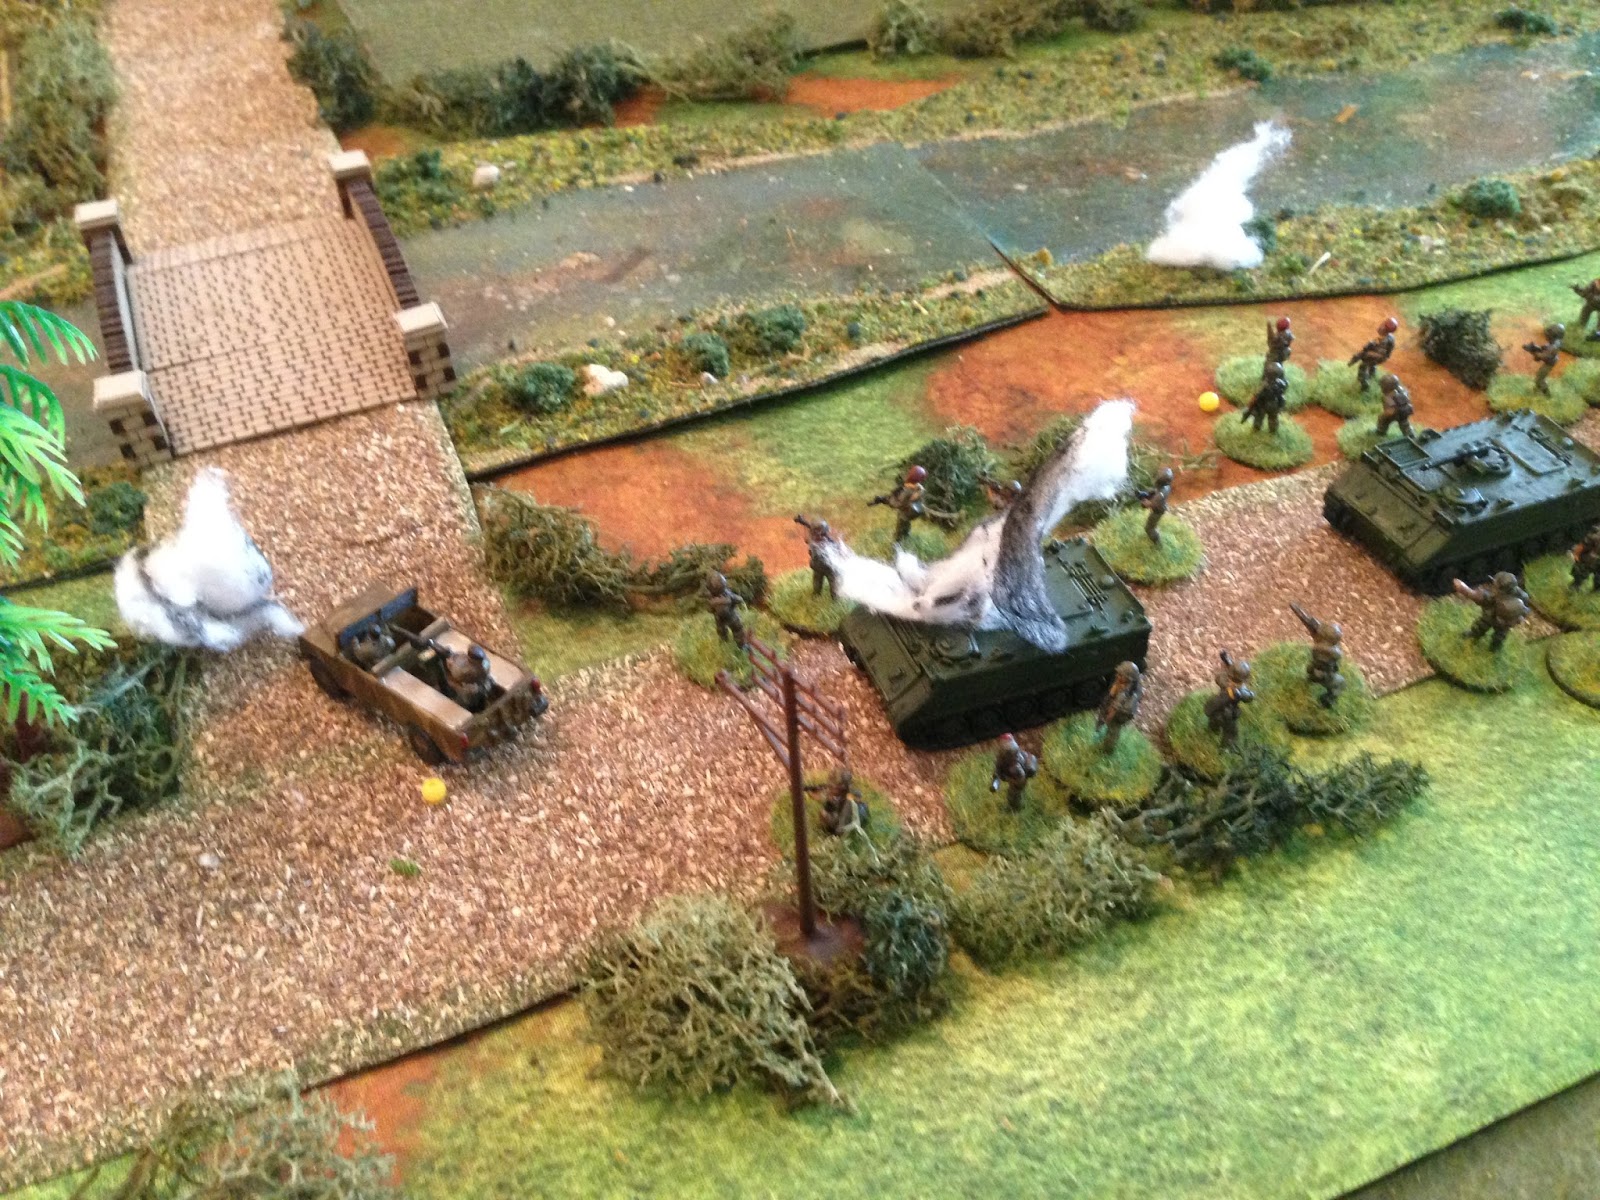
Looking northwest, from behind enemy lines, to southeast at the convoy (top center), another RPG is launched (the team that launched the first RPG is in the field at left center).
This rocket hits the river bank, just short of Twister 32. All the infantry hops off the M-113s, but the Malaysian Commander, Red Dog 6, is pinned (yellow bead at center; Blue Dog 33 is at bottom right, Cobra callsigns at left and right).
Again looking from behind enemy lines, the bad guy mortar (bottom right) gets in the game, hanging and dropping 82mm rounds targeting the head of the column (top left).
Quite incredibly, a mortar round falls directly on the lead M-113, Twister 31, knocking it out (center)!
A third RPG streaks in, slamming into the rear M-113! Twister 33 is immobilized and the crew bail out, while a rifle team, Cobra 21 is suppressed (top center left).
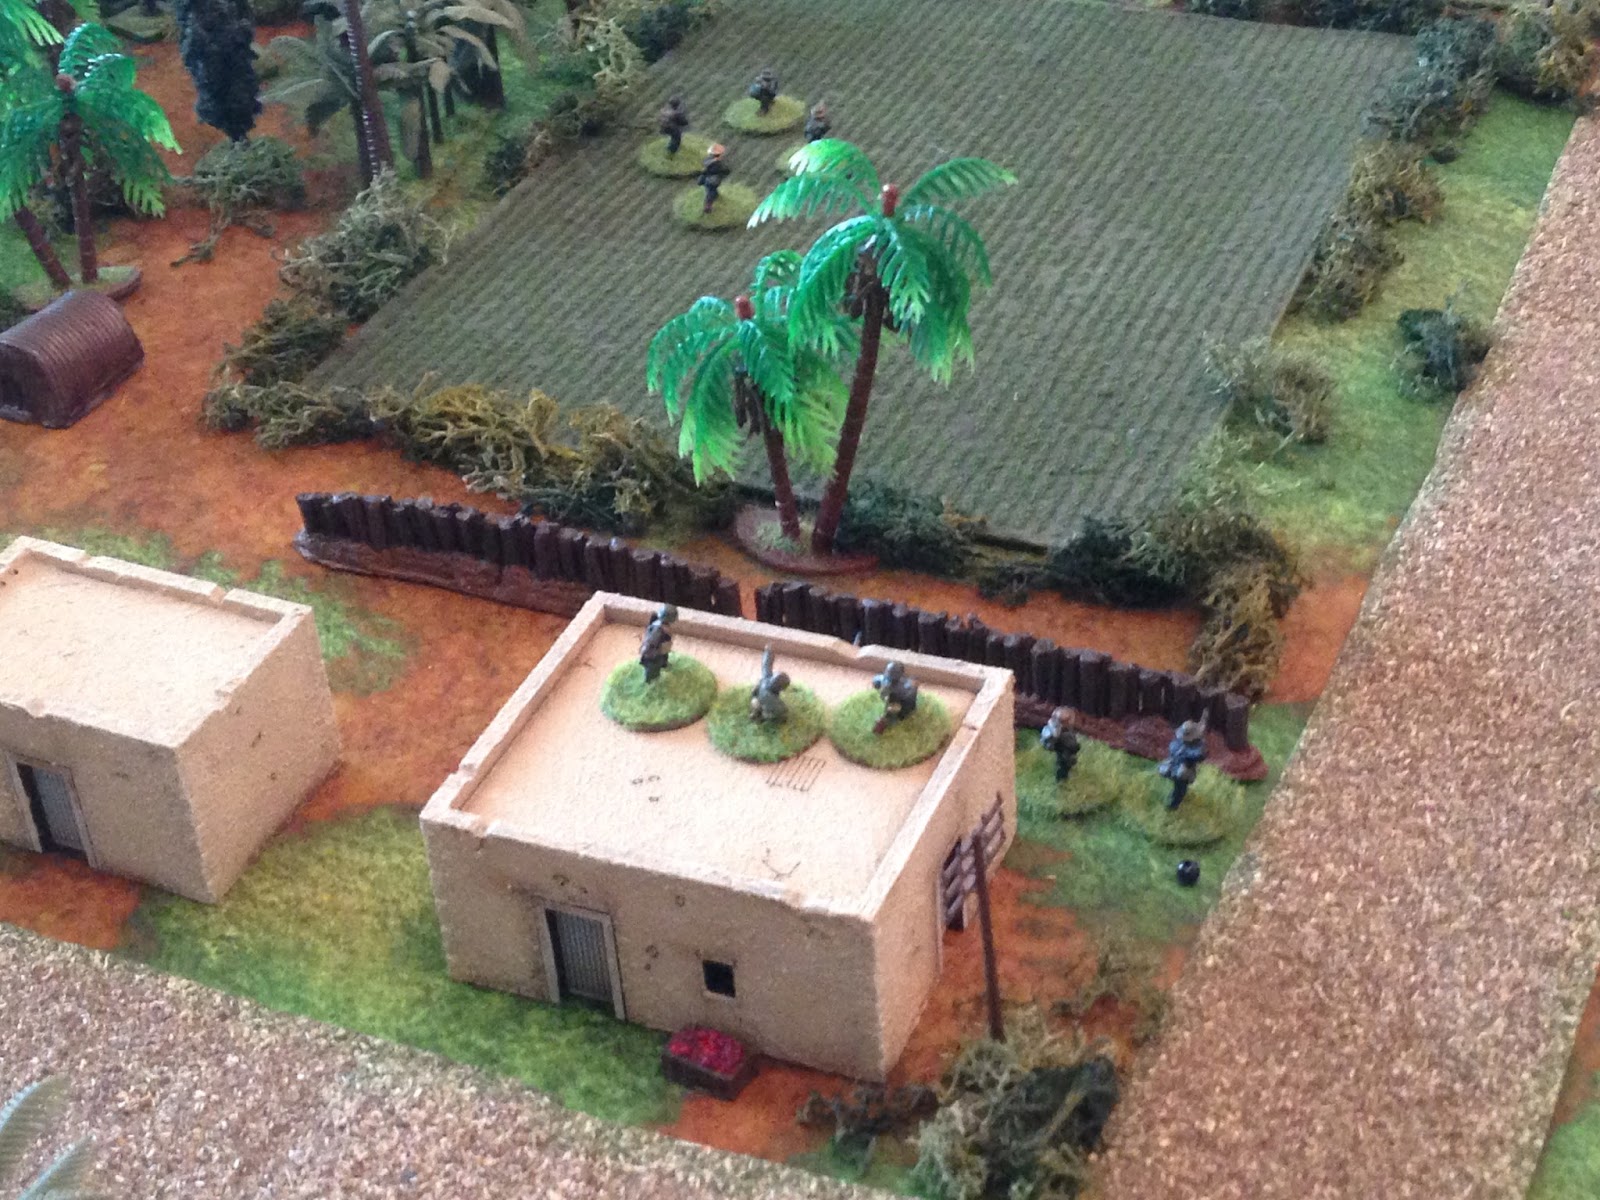
An enemy rifle team on the west side of the compound (bottom center) opens fire on the convoy (top center), to no affect.
While another enemy team, this time behind the retaining wall on the east side of the road (bottom center, with the rifle team that fired the initial RPG at center left), also opens fire. This time the fire is effective, suppressing Cobra 1-1 (top center, you can see two little orange explosions).
The team that just fired then moved right (center) to clear their lane of fire (don't want to hit their buddies at top center). The enemy command team (left) stands by...
Then moves up onto the roof of a nearby house (center).
In the northeast, the enemy Technical moves right (top right, from center left), while the recoiless rifle team moves up (bottom left).
And in the enemy center, their last rifle team moves forward (just below the Technical, from bottom right).
So, all that and the good guys haven't even fired a shot! The Cubans Special Operations troops are the first to get their heads back in the game; Blue Dog 33 moves left (center left, from top right) and sets to rallying the Malaysian lead elements. Mamba 10 (the Land Rover) and Cobra 1-1 (the red bead and two orange explosions at center top) are both back in the fight.
Rake gets on the radio and calls for close air support. He screams "minimize, minimize!" into the handset, but the Malaysians are under too much pressure and traffic calling out statuses, enemy and friendly locations, and casualties overwhelms the net.
I'm rolling to see if the good guys will get through to an on-station gunship. If the call is successful, the helo will show up at the end of the following turn, and must be called up again after successful gun runs, so don't expect the CAS to be all that powerful.
Rallied back into the fight, Mamba 10 (bottom center) immediately sets to work. They've spotted the enemy rifle team at the retaining wall, and the enemy command team atop the building behind them. The Ma Deuce roars and sends thumb-sized rounds careening downrange...
The .50 cal tears up the bad guys behind the wall (you see the explosion at the wall, and two two of the survivors carrying wounded teammates just below it; this is how I'm showing eliminated teams. Each turn they'll work to carry their casualties off the table), and pin the enemy command team (yellow bead).
Then Twister 32, the sole remaining track, gets in on the action (bottom right). They get their .50 cal into action, sweeping the enemy rifle team that initiated the ambush (in the field at top center left), causing casualties.
Twister 32 then moves west, taking up station there (bottom left, from top right), trying to disperse so that damn enemy mortar can't keep tearing the column up.
Cobra 1-1 (bottom center right, with the explosions) opens fire on the enemy rifle team on the west side of the road (top left, west side of the road), pinning them.
They're Sergeant then hustles them forward onto the bridge (that's the Cubans at center, between the Land Rover and burning track, with Cobra 12 at right).
Cobra 12 leaves the cover of the burning track (Twister 31 at top right) and dashes left (center, next to Twister 32 at bottom left).
But enemy troops (the other RPG team) in the northwest (bottom left) spot them (top right) and fire, pinning the Malaysians down.
Captain Choy, the Malaysian commander known as 'Red Dog 6' (center right, with Cobra 21 to their right), looks on as Cobra 22 dashes ahead into the river (top center right).
Red Dog 6 moves right to the suppressed Cobra 21 to rally them.
But they fail and fall back (red bead at bottom right, from center, where Captain Choy is screaming at his 2-2's Sergeant to get his men back up here and into the fight). They don't get moving, but the Sergeant does get his team back in fighting shape.
And thus ends Turn 1.
The enemy's western RPG team (bottom left) sends another rocket at the Malaysians, targeting the remaining M-113, Twister 32.
The rocket misses, but pins the crew (with Cobra 12 pinned nearby).
The RPG team, hoping to avoid return fire, particularly from the Malaysians' two remaining .50 cal HMGs, hops down off its perch (top center), while their mortar team (bottom left) again goes to work.
Luckily the rounds go long (far right).
The knocked out enemy rifle team continues dragging their casualties to safety (bottom center) as their Technical (far left) moves into position to fire on Twister 32 (top center right, just right of the road).
The enemy rifle team in the center dashes across the road (far left), looking to get up to their harried brethren in the field (top center left).
The guys in the field have gotten the 'men down' or 'taking casualties' combat result, so they can only be rallied back into the fight by a friendly team making contact with them. Being trapped out in the open like that is quite the precarious position; we'll see if the bad guys can sneak a rifle team up there to get those guys back into the fight, or if I'll get lucky and manage to whack two for the price of one ;)
As those guys (center right, between the buildings) move up, so does the recoiless rifle team (bottom left).
The enemy command team (atop building at left) and the rifle western rifle team (atop building at right) both manage to self rally and get back into the fight.
On the Malaysian side, again the Cubans, Blue Dog 33, get to work. Once again they move left, looking to rally the M-113, Twister 32, and Cobra 12. The infantry are good to go, but the track crew decides to remain locked up in their little metal box. Again Rake gets on the net to raise CAS, and again he fails...
Despite being pinned, the Cubans point out the imminent threat to Twister 32 (bottom right) posed by the enemy Technical (barely visible behind building at top left) and coaxes the track crew to open up with their .50 cal.
They (top right) miss, and the Technical (bottom left) returns fire, but they miss too!
Mamba 10 (the Land Rover, center left) opens up on the enemy western rifle team (on roof at top right) with its .50 cal HMG, putting them 'men down.'
Mamba 10 then dashes across the bridge (top left).
The enemy command team (top left) opens fire on Mamba 10 (bottom right) with their rifles, to no effect. The Malaysian gunner immediately swings the .50 cal over and returns fire, suppressing the enemy command squad!
Then Cobra 11 dashes across the bridge (top center right), taking up positions opposite Mamba 10.
And Cobra 12, just rallied by Blue Dog 33 (bottom left), follows them (top center right).
With Mamba 10 and Cobra 11 across on the left (top left, with Cobra 12 on the bridge), on the right Cobra 21 gets across the river (top right, with Red Dog 6 behind them), hoping to get at the 'men down' enemy RPG team in the field (just off camera to top center left).
Cobra 22 moves up to the river, helping Red Dog 6 get their stuff together (rally off the pin).
And then Red Dog 6 moves into the river. But that looks like a mighty lucrative mortar target, doesn't it?
As if on cue, Turn 3 starts with the enemy mortar team (bottom right) dropping rounds on Red Dog 6 and Cobra 21 and 22 (top left).
Red Dog 6 is taking casualties (white bead), while Cobra 21 is suppressed (red bead).
The enemy Technical (bottom center) takes another go at Twister 32 (top center right)...
Under a hail of incoming rounds, the Twister 32 driver reverses out of their, almost running over Blue Dog 33 (bottom center), ending up sheltering behind the burning Twister 31, suppressed (red bead at far right).
Enemy casualties continue moving off table (bottom center), as their command team rallies (atop building at top left). The rear RPG team dashes across the street (right), looking to help out the rifle team on the building at top center right.
On the enemy left, their rear rifle team is up to the line, using the jungle as cover (center left) to try and reach their buddies that are 'men down' in the field at top left, as the recoiless rifle team continues picking its way forward to a firing position (bottom left).
On the north side of the bridge, Mamba 10 rolls forward slowly; it's gunner again opens up with the .50 cal...
The enemy command team is 'men down', while the Technical is suppressed by the incoming heavy machine gun fire.
Cobra 11 (right) and 12 (left) move up on either side of Mamba 10, but don't spot the enemy rifle team moving up in the jungle to help their comrades (off camera to top right).
With Cobra 11 moving up at bottom left, Cobra 222 moves up on the right, but they're so focused on the 'men down' bad guys in the field (center left with white bead) that they don't see the enemy team coming to assist them (top center) either!
In the rear, the Cuban Blue Dog 33 moves over to rally Twister 32, and they're good to go. At top right, Cobra 21 tries to self rally...
But they fail and fall back (red bead at bottom right), leaving their commander and his team, Red Dog 6, 'men down' at the river's edge!
Blue Dog 33 hops on Twister 32 and they move up.
Rake still can't get the damn gunship to come up on the net!!!
Turn 4 sees the enemy mortar (bottom right) take Mamba 10 and Cobra 11 under fire (top left).
The Malaysians are pummeled by 82mm high explosive rounds: Mamba 10, the Land Rover, is knocked out, and Cobra 11 is suppressed!
Using the horrific mortar barrage to cover their movement, the enemy rifle team in the jungle darts out to their 'men down' buddies in the field and check them...
But they've taken too many casualties and are out of the fight!!!
Wow, that was classic! All that time the bad guys are 'men down,' laying out there in the field and I can't get to them, and the bad guys actually manage to get another team up there to check on them, and they roll a '6,' out of the fight. Bonkers!
The rear RPG team gets on the roof at bottom right and checks the 'men down' rifle team there; they're good to go, back in the fight.
While the recoiless rifle team finally gets set up (bottom left).
And the crew of the Technical rally themselves back into the fight. But someone needs to go check on the enemy command team (bottom left) as they are 'men down' and can't help themselves.
Blue Dog 33 hops down as Twister 32's .50 cal opens up on the house on the west side of the road (top left)...
The rifle team that just got back in the fight (on roof) is suppressed, while the RPG team is knocked out and begins carrying its casualties to the rear.
Blue Dog 33 then double-times up to Cobra 11 to rally them (top center).
But they fall back (red bead at right, just above river).
Slate calls out to Rake: "Boss, I think we've got the wrong fill (encryption) to talk to air! You'll have to talk in the clear, but roll to the Air Guard channel!"
Rake dials the new frequency into his radio and, voila, he's got comms with the orbiting gunship!!! He immediately runs off a 9-line to the pilot, who replies: "what??? I can't tell what the hell is going on down there, there's fire coming and going from everywhere. Just tell me where you want me to shoot!" Rake directs him onto the enemy mortar position, which he figures is the most dangerous enemy element out there.
The helo will show up at the end of next turn.
On the far right, Cobra 22 moves up and fires on the enemy rifle team in the field.
The enemy rifle team is knocked out and begins dragging their casualties away as Cobra 22's Sergeant presses them forward.
Looking west to east along the river, Cobra 11 (far left) and 21 (top right) both try to self rally.
Cobra 21 is good, but 11 falls back into the damn river (center, with Red Dog 6 'men down' at far right).
Looking from behind enemy lines, Cobra 12 moves up (top right), but the Technical (bottom left) spots them and opens fire, suppressing them!
This is killing me! This fight is teeter-tottering on me, both sides fighting through heavy casualties, and we're about to start Turn 5, which means...
The enemy mortar team (bottom right) pops out more rounds, targeting Twister 32, which is sitting on the bridge (top center). The M-113 is immobilized! The crew stays, but is suppressed.
The Technical moves up between the buildings at the crossroads.
But from the far right, Cobra 22 spots him, busts out a LAW, and fires a 66mm rocket at the enemy pickup truck!
It promptly slams harmlessly into the dirt; the Technical turns its .50 cal on the Cobra 22 (top left) and returns fire, putting them 'men down.'
Well, that didn't work out very well...
The enemy rifle team on the west side of the road rallies.
While the two shot-up enemy teams in the field finally drag their casualties (bottom center) out of the line of fire so the recoiless rifle (bottom left) can fire...
A 75mm HE round slams into Blue Dog 33 (center right, next to the burning Mamba 10), and Cobra 12 is forced to fall back (red bead at bottom right, from top left).
Uh-oh... With Blue Dog 33 and Red Dog 6 both 'men down' there is no one to control the incoming gunship. Not to mention there's no leadership. Not to mention we've got other guys 'men down' and suppressed all over the place.
On the far right, Cobra 21 charges out from its hiding place behind the immobilized Twister 33 (bottom right). They haul ass up to Red Dog 6 (center) and get them back in the fight.
Well, at least that is taken care of, someone can control the incoming gunship. However, as this is a different controller, I'm going to roll to see what target he chooses (Blue Dog 33 wanted the enemy mortar).
Cobra 12 (far left), Twister 32 (the track on the bridge at center), and Cobra 11 (in river at right) all manage to self rally!
That's good news, but here's even better news.
The 'whup-whup-whup' of rotor blades. The OH-6 Cayuse, armed with a minigun, is ready to make its first run, but it can't raise Blue Dog 33 on comms. Luckily, Red Dog 6 is monitoring and steps in. But...
Red Dog 6 does not nominate the enemy mortar position as the target, he nominates the enemy Technical (top right) as the target. The gunship (bottom left) rolls in and starts his run, minigun spewing lead. The Technical is... suppressed.
Sorry, don't mean to sound depressed, but I was hoping for a bit more than one target being suppressed....
Turn 6 begins with the usual refrain, the enemy mortar team (bottom right) firing, this time on Red Dog 6 and Cobra 21 (top left center). But this time the rounds are long and no one is hurt!
The bad guy rifle team on the western side of the road, you know, the ones in the building right next to the Technical that weren't touched by the gun run (bottom right), they open fire on Red Dog 6 and Cobra 21 (top center) left, catching them in the open and suppressing them both.
Next to them, the Technical crew self rallies and is back in the fight, good as new, as if nothing had happened...
The enemy recoiless rifle team re-positions to get a better field of fire (center, with Cobra 22 'men down' at top center).
But Cobra 11, feet wet in the river, spots them (top right) and gets away with firing dangerously close to their 'men down' compadres in Cobra 22, pinning the bad guys.
The enemy has suffered the loss of four rifle/RPG teams; the mortar men look on as their buddies drag their casualties off the field of battle (bottom center, center left, and two at far left).
With their vehicle immobilized on the bridge but still in the fight, the crew of Twister 32 opens up with their .50 cal on the enemy Technical (on road at top left)...
The damn thing explodes, pinning the nearby rifle team!
I was amazed at how many times HMG fire was exchanged ineffectually between the Malaysians and the bad guys.
Cobra 12 (bottom center left) opens fire on the enemy team just pinned next to the exploding Technical, suppressing them!
Cobra 12 then dashes up to Blue Dog 33, and the Cubans are back in the fight!
Rake immediately gets back on comms with the gunship: "you need to hit that damn mortar position!!!"
"Roger, I'm coming back around from the south, standby."
On the right, Cobra 11 moves right to rally Red Dog 6 (red bead at center, with Cobra 21 suppressed to their right), and Capt Choy and his men are good to go.
Red Dog 6 rallies Cobra 21, but they only get up to pinned, then Captain Choy leads both teams forward, back across the river (that's Cobra 11 still in the river).
Turn 7 is here...
And that @#%$ing mortar (bottom left) fires more rounds at the Malaysians (top right)...
Captain Choy's command team, Red Dog 6 (center), is knocked out of the fight and begins moving its casualties to the rear, while Cobra 21 is suppressed (red bead at right).
Poor guy; he and his men have put up a helluva fight!
The pinned recoiless rifle team self rallies and is good (top right), while the suppressed rifle team at far left self rallies but only gets up to pinned. The enemy is having a rough go of it as well.
Enemy casualties nearing their table edge.
Twister 32's .50 cal keeps hammering away, blasting the enemy's western rifle team (top left) and putting them 'men down,' which is pretty much a death sentence as the next closest element is the enemy command team, which is also 'men down.' There simply isn't anyone left to come rally them back into the fight, just the recoiless rifle team and the mortar team.
And, after getting their bells rung by the enemy recoiless rifle (top left), the Cubans got their marbles back and are looking for a little retribution. Blue Dog 33 (bottom center) fires on the enemy recoiless rifle team, pinning them. Cobra 12 (just below Blue Dog 33) looks on...
Before dashing forward (bottom left) then firing on the recoiless rifle team (top center), suppressing them. That's Cobra 22 at far right, still 'men down.' No one has been able to reach and rally them as the enemy mortar keeps pounding us.
Red Dog 6 falls back (bottom left) as Cobra 21 (right) self rallies and Cobra 11 (center left) moves up.
The gunship pulls into a hover to consult with Blue Dog 33.
"Over there, @#$hole!!!"
The gunship (bottom right) lines up the enemy mortar team (top left) and guns them down.
The Malaysian infantry move up, capturing an enemy rifle team and the recoiless rifle team, and securing the southern end of The Persian's compound.
This fight is won, but Rake and Captain Choy immediately set about reorganizing the platoon to push on to the the northern end of the compound. Blue Dog 22, which is Major Villanueva and the five shooters designated for the takedown of The Persian's house, come up in an M-113, leading several more vehicles to carry the Malaysian platoon and Rake and his team.
The Malaysians carried the day in a VERY hard fought battle. The enemy suffered approximately 25 casualties and 15 captured, while the Malaysians suffered one Land Rover destroyed, one M-113 destroyed, two M-113s damaged (though Twister 32 was quickly able to be put back into action), and 12 casualties (including one Cuban lightly wounded).
So, the combined Cuban/Malaysian task force is pushing forward to secure the north end of the compound and then The Persian's house. Which is the next set of fights, working on getting them written up.
V/R,
Jack


Your AARs are reading like Tom Clancy novels!!!! Keep up the backstories!
ReplyDeleteWill do, and stop it, you're embarrassing me! ;)
DeleteI need to figure out a way to get paid like Clancy. "Will wargame for food"?
V/R,
Jack
Holy snapping duckfish ! ,, what a great fight ! One of my all time favourite AAR's. Going to read it again .
ReplyDeleteAll time favorite, eh? Awesome, glad you enjoyed it! This fight and the next one are playtests for this level/size of battle; once everything is tweaked, it's going to get crazy!
DeleteV/R,
Jack
A great report Jack! Once again the good side managed to just seize victory from what could have been something ugly. I know I know, it was just the luck of the dice ;-)
ReplyDelete4'x4'? 25-35 figures a side? What happened? I do note that even though you are using FMaK are doing activation by teams. And your last paragraph hints that this may be a new norm. ???
Shaun,
DeleteHey buddy, how are ya? I was wondering if the dingoes had gotten you! ;) Yeah, yeah, yeah, magic dice. It was definitely a close run thing, and, if anything, the victory was only possible because I probably let the Cuban/Malaysian Task Force fight on past the point they could have broken it off from heavy casualties.
Yeah man, 4' x 4', company level, playing 5Core Company Command with 5MaK activations. In terms of the new norm, I'll still be all over the place with regards to different sized games, from small, special operations skirmishes, up to platoon, company, and battalion-sized fights.
Hope all is well, and you're getting some games in!
V/R,
Jack
Well i glad to see you will be continuing to mix up everything! As for gaming, none in March, not even set up and waiting to play :-( Events (just busy with stuff, no badness) have conspired against me, but I have had quite a few family-type games with the children. Likely to be back into the swing of things for April.
DeleteShaun,
DeleteYep, I'm back in the gaming groove, but need an operational pause in order to get some more painting done, or I'm going to get stuck and not be able to do all the stuff I want.
Glad to hear all is well with you and the family. But, no gaming in March!!?? How do you live with yourself!!?? ;)
V/R,
Jack