All,
It's 22 June 1990, and things are not going well. While the War of Liberation brought about a free Cuba with a democratically-elected government, pro-Castro holdovers have been causing quite a bit of trouble, detonating pipe bombs in markets, sabotaging power transformers and rail lines, indiscriminately firing into crowds, and assassinating government officials. Cuban intelligence was able to trace the activity back to Castro regime holdovers backed by Venezuela, and somehow tied to an unidentified Middle Eastern state. Overtures were made to the Venezuelan government in order to halt the violence,
Upon receipt of this information, President Waraldonez called a National Security Meeting to discuss potential courses of action. It goes without saying that General Estevante recommended war with Venezuela; El Preidente told him to put a cork in it, then turned to his diplomats, who immediately went to work, using political back channels, with the Venezuelan government. El Presidente was informed that Venezuela's bottom line was 'reparations,' payment for upsetting the balance of power and peace amongst the peoples of the Caribbean, and President Waraldonez reluctantly agreed to this scheme.
Major Villanueva and fifteen of his Special Operations troops were dispatched to escort "The Ambassador" to Agadir, Morocco, in order to deliver an astoundingly large amount of money to an individual designated by Venenzuela, in what was now labelled "Operation Pay-Off." But Operation Pay-Off was doomed from the beginning, as Venezuela and its as yet unidentified Middle Eastern co-conspirator never had any intention of honoring the deal. As Major Villanueva and his men led The Ambassador to the exchange point a string of explosive devices detonated, destroying the Cuban vehicles and the building they were headed for. A fierce firefight broke out between the Cubans and unidentified masked gunmen; the Cubans were attempting to fight their way out of the ambush zone, get to a defensible building, and link up with a a local Moroccan Quick Reaction Force (QRF), which was coordinated by Major Villanueva prior to the execution of Operation Pay-Off.

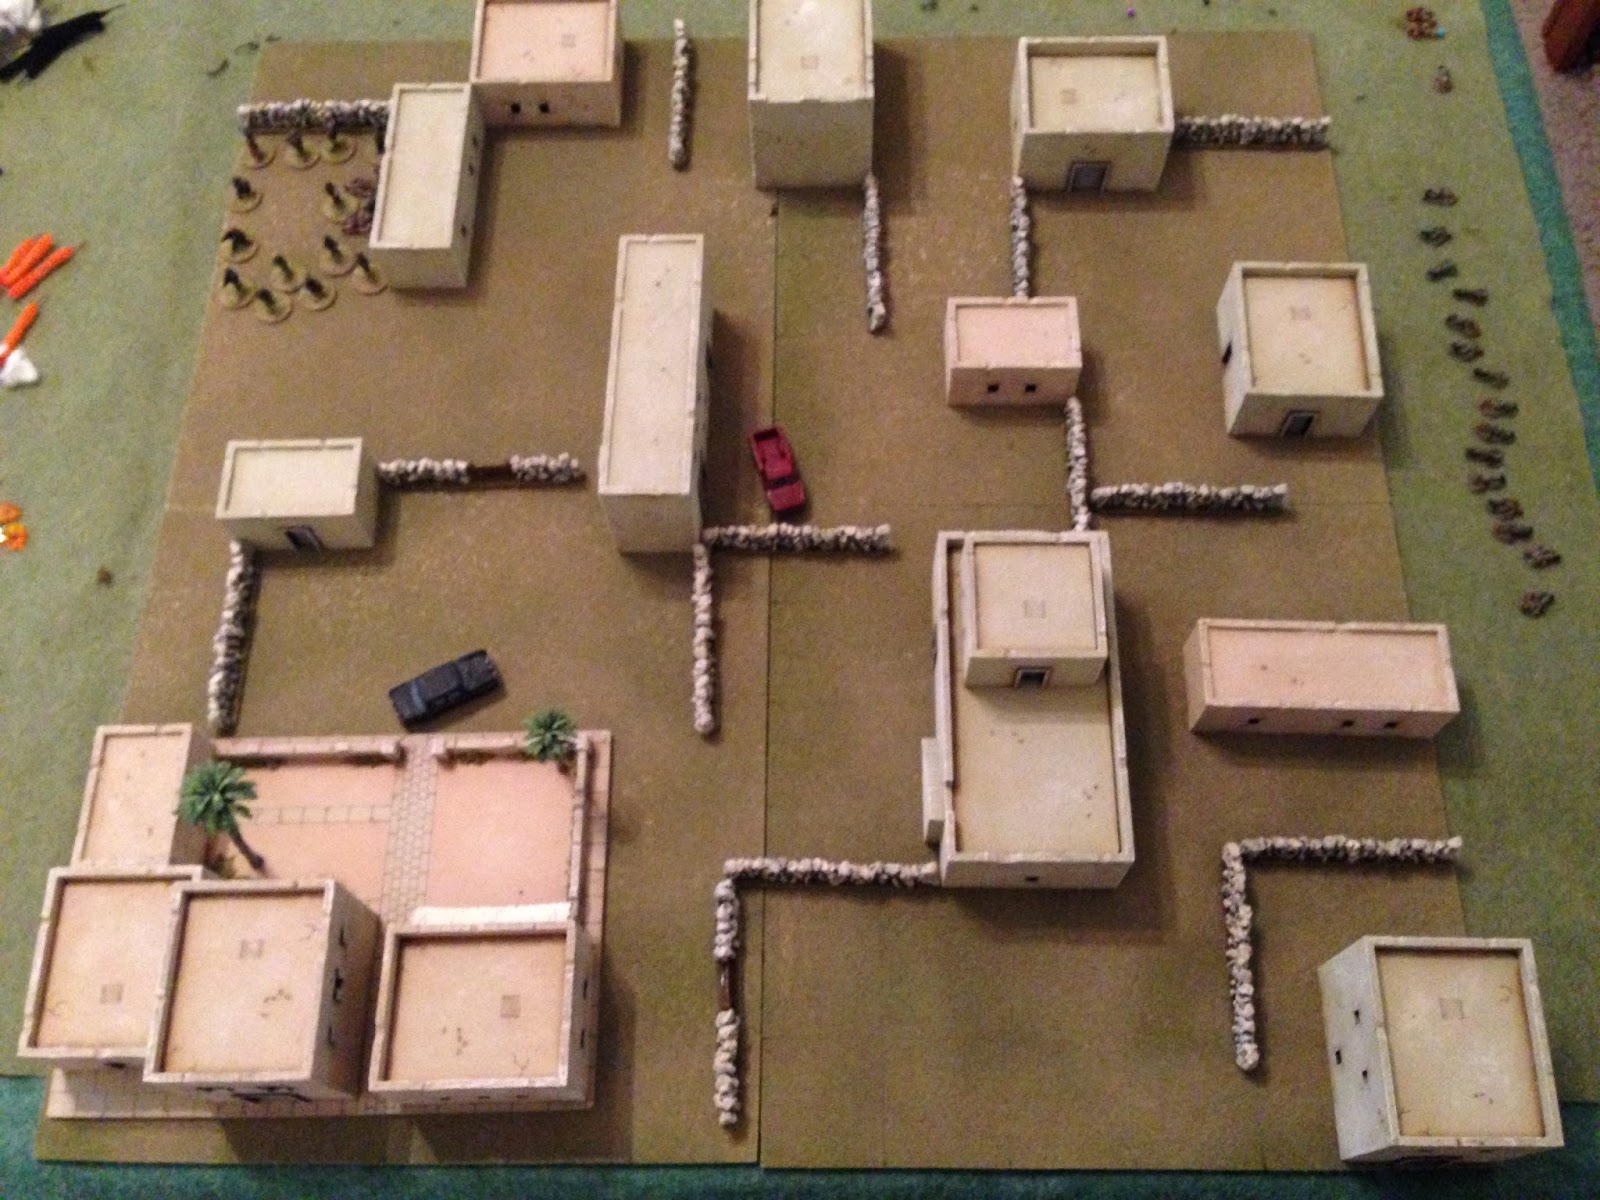
The current situation: north is up, the Cubans are at center. At left you can see the three Cuban vehicles, which are burning from the IEDs detonated, as is the Cafe where the exchange was to take place (top left). Armed assailants are spread across the board, but two teams are concentrated at top center and bottom left. The Cubans have already suffered two casualties.
A closer look, with Cubans spread from top center to bottom center.
At Major Villanueva's direction, the entire Cuban force performs a 'Mad Minute,' tossing smoke grenades and firing every weapon at the cyclic rate, looking to create some space between them and the terrorists so they can reorganize.
Major Villanueva's team backs up into the lees of a building, and the casualties are brought forward. The Ambassador is given body armor from one of the casualties, and put to work performing first aid.
A short lull ensues as the terrorists fall back in the face of the increased volume of fire and smoke. This allows the rest of the Cubans to rally on Major Villanueva's position and to quickly reorganize. The objective is for the Cuban force to move to and occupy the building at bottom right, ideally without taking further casualties. To that end, the force is split in two: the lead element will fight forward to clear a path and secure the building, while the trail element will cover the rear, protect The Ambassador, and transport the casualties forward in trace of the lead element.
A closeup of the current Cuban disposition.
And then I changed my mind, sort of. If you haven't noticed, it's been about six weeks since I've gotten anything wargaming done. A large chunk of this is due to 'real life.' I won't bore you with details, but I haven't had a lot of time for gaming. But I have had some time; the problem there is, I've been in a bit of a rut. I started off with this great idea to play out this mini-campaign, and a follow-up five or six fight mini-campaign, but then my mojo left me. Largely this is due to the fact I planned the games with too many figures for the rules I'm using. And I keep looking at using different rules, but nothing was really inspiring me/seeming like it would work. But finally I came up with a solution: I'll break the game(s) down and play it in my modern, modified 5MAK-style (like I did with the Royal Marines in Afghanistan).
So, that's where we're at.
I took a picture of some bad guys looking at the Cuban position...
Then I took another pic of some more bad guys looking at the Cuban position.
Then I changed the map. Conceptually, the Cubans are in the same spot they were in before, I just shifted the whole map to top left. So the Cuban position was at center, now it's at top left. The building they were moving towards was at bottom right, now it's at center. But it's not the building they're heading for, they're now going beyond it, to the building at bottom right. There are currently no bad guys on the table. I'm going to focus on the fight to get to the building, and kinda sluff off the fight to the rear. The trail element is conducting rear security and handling bad guys to the left and top (off the table), while we focus on the lead element fighting its way from top left to bottom right. Savvy?
So, another look at the Cuban position, which is the same as it was previously, it's just moved on the map.
I placed blinds all over the table (ten 'real' bad guys, five dummies)...
Then flipped them over to reveal the enemy troops standing in the way of the Cubans attempting to get to their destination (bottom right).
A look at the southwest (bottom left).
The southeast (bottom right).
And the east (right). And we are ready to fight, let's get it on!
The lead team consists of six men, and I'll be referring to them by callsign:
Leader: Dozer
Rifleman: Tank
Grenadier: Cypher
Grenadier: Apoc
SAW Gunner: Switch
SAW Gunner: Ratchet
The game starts with the Cubans activating first: Switch leaves the Cuban position (far left) and sprints ahead to the wall at bottom center right, looking to flank the bad guys (this was a 'Scurry').
The nearest bad guy falls back, out of sight (left, from top right) of Switch (top center). There's an enemy RPG gunner at bottom right.
Supporting Switch (bottom right), Cypher sprints across the street (center).
And the RPG gunner falls back (right, from bottom center left).
Ratchet climbs atop the building sheltering the Cuban position (left).
A second enemy RPG gunner was at the wall at bottom left; seeing Ratchet atop the roof (top right), he hops the wall, rushes across the street, and takes cover next to a building.
Yes, I had three scurries (out of six activation dice), but the fight is about to start.
Apoc, still at the Cuban initial position (bottom left), opens fire on an enemy rifleman atop the building at far right, knocking him down.
Apoc moves up (center right, with Ratchet on the building at left and Cypher at bottom right), but an enemy rifleman (top left) spots him and opens fire with his AK...
Forcing Apoc to fall back (red bead, from explosion at right)...
Dozer (center, with Tank at bottom left) tries to rally Apoc...
But fails, so he falls back again (red bead, from bottom right)...
So Dozer creeps around the corner (bottom left, with Ratchet above him), but he draws fire from top right...
The rounds skip around in the dirt at his feet, but Dozer calmly levels his rifle and returns fire, knocking the bad guy down.
Leaving the Cuban position at top left, Tank dashes across the street (center, with Cypher next to him but blocked by the building, and Switch at left), but a Tango (bottom center) spots him and fires...
The bad guy (top center) misses, but Tank (bottom left, with Cypher to his right) returns fire and misses too!
The bad guy fires again, this time pinning Tank (top right). But the terrorist is feeling a little exposed...
That was the 'free' return fire if someone shoots at you and gets no effect at all.
The bad guy is nervous and decides to leave his position (next to the tree at bottom center): he takes off running (just right of the tree). Switch (bottom left) spots him and opens up with his SAW.
Knocking the bad guy (center right, white bead) down and forcing an RPG gunner to fall back (red bead at bottom left).
But the other RPG gunner (right) fires a rocket at Switch!
The rocket slams into the wall, pinning Switch (yellow bead).
The RPG gunner then falls back, hopping over the wall at center. With a couple of his buddies knocked down and needing assistance at bottom left, a bad guy on the roof at right starts moving, but Cypher (top left) spots him and fires.
The terrorist (bottom left) goes down like a sack o'potatoes, and a nearby bad guy is hunkered (red bead).
But very quickly the two hunkered bad guys (red beads at far right and bottom left) self rally themselves back into the fight.
In the east, the same bad guy (top right) that earlier fired and forced Apoc back turns his sights on Ratchet (left, atop building) and fires another burst from his AK...
And Ratchet (left) goes down. Dozer (just below him) returns fire, knocking the Tango down.
Looking at the southeast (bottom right) portion of the board, a bad guy sprints west (center left), past a terrorist that just rallied, looking to go help his knocked down buddies opposite Tank, Switch, and Cypher.
Back in the north east, a bad guy moves up (bottom center) and fires on Dozer.
The bad guy Dozer previously knocked down is hidden by the building at right.
He misses, but Dozer's (bottom center) return fire does too...
Okay, things are already not going well for the lead team. Major Villanueva takes action.
Trinity, a grenadier from the trail team (center, with blue shirt and yellow helmet, Dozer at right) is ordered to join the lead time, while Niobe moves up to pull the casualty, Ratchet, down. Major Villanueva kicks Apoc (red bead) in the ass, tells him to get his @#$% together and get back in the fight.
A bit of cheating: got a replacement for the lead team, had the trail team pull the casualty in, and had the overall boss rally Apoc.
Back in the west, Switch (yellow bead at bottom left) opens fire on the RPG gunner that tried to whack him...
Forcing him to hop a wall and hunker down.
Apoc moves up, taking Ratchet's spot atop the building (left), while Dozer (at bottom right corner of the same building opens fire, pinning the bad guy at top right. You can see Trinity at bottom left and Tank pinned at bottom right.
Dozer then leaves the building at top left, running across the street to rally Tank (top center left), but a bad guy (bottom right) spots him and fires.
The rounds have no effect and Tank is rallied.
Tank (bottom right) returns fire...
The target is pinned, so Tank hops the wall at left and dashes up to the sedan (center). Dozer is at top left and Switch is at bottom left, while the two bad guys visible at right are knocked down.
Cypher moves up, passing Dozer (top center right), to fire on the RPG gunner Tank just pinned (bottom right), but he misses.
Back in the north, with Apoc on overwatch (bottom left) and Dozer at bottom right), Trinity sprints ahead (center).
A terrorist sees Trinity coming (top center) and falls back (yellow bead at center right).
The bad guys have a total of five men knocked down; they are unable to act until checked by a buddy, and easy pickins in close combat, if I can get to them. But I'm a little aggravated: each knock down means I rolled a '1'. I'm knocking them down but not knocking them out...
Oh, and when I do knock out a bad guy, I'm "re-spawning" them. A new terrorist shows up in the south (bottom center left).
He immediately opens fire on Cypher.
Knocking Cypher down and suppressing Dozer (can't really see Cypher, but Dozer is the red bead at center). The RPG gunner at bottom left fires his rifle at Apoc (top right).
Forcing him to fall back off the roof.
A terrorist moves up from the right, intent on getting to his knocked down buddies (you can see the two white beads at bottom center left), but Switch (top left) spots him and fires, pinning him in place (bottom right).
Another bad guy moves left (center), following the guy that just got pinned (yellow bead).
The RPG gunner that Switch pinned self rallies.
In the northeast, a pinned bad guy moves up to help a knocked down Tango there.
But Trinity (bottom left) spots their shenanigans and fires (top right).
Does Trinity get a kill? Nah, just another knockdown.
Once again Major Villanueva has to interrupt his coffee break to go and kick Apoc in the ass, tell him to get his @#$% together, and get back in the fight.
Tank, behind the sedan at bottom left), needs to deal with the group of bad guys intent on coming up to help the two knocked down bad guys at right. Tank sights in and fires...
But he totally misses, and the bad guys return fire, knocking him down (top left)!!!
Apoc (bottom left, with Tank lying next to the car at center) sees this and launches a 40mm grenade at the bad guys (top right).
An enemy rifleman is down (bottom center) and another is forced to fall back and hunker (red bead at top right).
Apoc then leaves the position (left) and sprints up to Dozer (right), though he only manages to rally him up to 'pinned.'
But Dozer (top right) fires on the RPG gunner at bottom left, knocking him down!
With Apoc and Dozer (top left) laying it down, Switch hops the wall and sprints up to Tank. Switch checks him over: he's good to go, back in the fight.
Looking at Cypher and Dozer at center (with Tank and Switch above them at top center), Trinity creeps forward (bottom center left), peers around the corner, and finds an enemy RPG gunner cowering there. He levels his sights...
And drops him.
But two more bad guys come on the table, one in the north (top center), and one in the southeast (bottom right). There are three bad guys that are knocked down in the north: two atop the building at top right, and one just visible to left of the building at top left. Cypher is just visible at left.
From the east, an RPG gunner fires at the sedan Tank and Switch are using for cover (top left).
The rocket misses, but it's close enough to pin Tank (bottom left, next to the pinned Switch). Cypher is knocked down (white bead) at right, and Dozer and Apoc are above him.
The RPG gunner then moves up (bottom left, with Trinity at top right).
Trinity could have react fired at him...
But instead waited on a closer bad guy to pop around the corner.
But somehow Trinity totally misses, and the bad guy (center) opens fire on full auto from point blank range!
And Trinity is put out of the fight.
Which really sucks; not only am I down another man, with not having many to begin with, but Trinity was not supposed to be super aggressive as he was the only one holding down our left flank...
Back in the south, a bad guy creeps up to his buddy to rally him (right).
He doesn't get fully rallied, only up to pinned, but he's then able to turn and fire on Apoc (top left).
The bad guy (top right) misses, and Apoc (bottom left) returns fire, knocking the bad guy down.
And then Switch (bottom left, next to Tank) gets in on the act, firing his SAW.
And dropping a bad guy.
Tank decides it's time to get this situation in the bag, so he leaves Switch (bottom left) and moves into up to start finishing off some of the bad guys lying around (center).
As Switch (yellow bead at left) looks on, Tank knocks out the first bad guy (center), then moves up to take another one (bottom right).
He takes him out (left), then hops down onto another one center).
Tank finishes off a third bad guy (bottom center), then crosses the street and hops the wall, looking to move up and top a fourth bad guy (white bead at right). But a Tango in the north (the one that shot Trinity, top center) spots him (bottom center, right of the wall) and fires...
Forcing Tank to dash forward and hunker at the base of the wall.
With Trinity down in the north, Apoc leaves Dozer (yellow bead) and Cypher (white bead) to cover the left flank (center left), where he fires on the terrorist that knocked out Trinity. Of course, Apoc knocks down the bad guy...
With Apoc at top left, Dozer hops the wall and moves up to check on Cypher.
But he's out of the fight.
How come I only roll 6s when it knocks my guys out!!??
And then four new bad guys come on the table, one at far right, two at bottom center left, and one at bottom left (southeast).
The terrorist in the southeast immediately opens fire on Tank...
Putting him out of the fight.
So, Ratchet went out, was replaced by Trinity. Then Trinity, Cypher, and Tank go down. All I've got left are Dozer, Switch, and Apoc. And more bad guys keep showing up. I think it's about time to cut off the supply of new bad guys...
In the northeast, one of the newly arrived bad guys creeps up the alley to check on one of his knocked down buddies (center). Apoc (top center left) sees this and fires, hoping to take both of them out.
But Apoc totally misses! The bad guy checks his buddy, who's good to go and back on his feet, then they fire on Apoc, but they miss too!
While Apoc is having his fun at one end of the building (top center left), Dozer creeps around the other end (bottom left), where he spots an enemy RPG gunner (bottom right) and fires. Take a guess. Yep, he knocked down the RPG gunner.
Back at the other end, Apoc (bottom center) fires on the two Tangos opposite him. One is pinned and the other... is knocked down.
I've never rolled so many 1s in my life. At least they count for something in these rules!
While Apoc (far left) holds tight, Dozer (yellow bead at center) and Switch (yellow bead at center right) move up.
But the guy Apoc (bottom left) just pinned (top left) spots Dozer (right) and opens fire, to no effect.
It wasn't a miss, he re-pinned him, which doesn't allow him to return fire.
But then another bad guy moves up to check his knocked down buddy (white bead) and fire Dozer (top center).
The knocked down bad guy is back in the fight, while Dozer is forced to fall back (red bead at bottom center left, from explosions at top center).
In the southeast corner (bottom left), a newly arrived bad guy spots Switch (top left, very close to where Tank was KOed) and fires.
But the rounds miss, and Switch (yellow bead at bottom right, with Dozer to his left) returns fire...
Putting him out of his terrible terrorist misery.
Not worried too much, despite the fact a Cubano just gunned down his buddy (bottom right), an enemy RPG gunner climbs up on a roof (center top right)...
Switch (bottom center, with Dozer just above him) looks left (top center) at the guys giving Apoc (top left) so much trouble and cuts loose with his SAW. You better believe it, he knocked down one bad guy.
And then Switch dashed to Dozer to rally him, good to go.
Apoc looks down at Trinity's broken and bloody body (far left) and says hell with it. He sprints forward and hops the wall, into close combat with two roughed up terrorists.
He quickly dispatches those two...
Then climbs up on the roof...
And does it again.
Then he jumps down and takes cover behind a wall (bottom left).
With Switch looking on at far left, Dozer moves up and ends one bad guy (far bottom right).
The benefit to having all these 'man down' bad guys lying around everywhere is that they're pretty easy take care of once you get guys into position.
Dozer then climbs up on the roof, all sneaky like (top left).
Back in the northwest, Major Villanueva is finally satisfied the team may be able to actually reach the destination building, and so he gets the men moving, carrying their casualties with them.
And with more casualties to police up on the way...
A bad guy turns north and launches an RPG at Apoc.
But the round hits the building rather than the wall near Apoc, and he's fine. So fine he decides to return fire.
Which promptly knocks down the RPG gunner (white bead). The Tango's buddy moves over to check on him...
But he's gone!
Having heard some commotion to his left, the other bad guy RPG man moves up (center right), right into Dozer's line of sight. Firing commences...
And the RPG gunner has begun actively searching for his virgins.
The team keeps moving up, policing up Trinity and Cypher.
Apoc fires on the RPG gunner's buddy, knocking him down.
While Switch moves over and grabs Tank (bottom left).
Dozer jumps down, moves left, and knifes the bad guy Apoc just knocked down.
Dozer and Apoc search the destination building, then climb atop the roof to pull security while the rest of the team moves up. Fight's over, the tam takes shelter in the building and begins trying to get back in radio contact with the QRF; comms have been spotty using older VHF in the built-up, urban environment, and the QRF is having a hard time figuring out where they are relative to the Cubans force's location. Probably gonna have more problems, gonna get darker before it gets light.
God bless, just shoot me! First, this finally finishes up the first fight of the series. I figured the first fight would take me about 90 minutes; due to the fact I put too many troops on the table and gave the bad guys never ending reinforcements, the entire game (parts I and II) took me about seven hours! Inconceivable!!!! The other issue is casualties! I started the game with 16 troops and The Amabassador. I lost two 'unnamed' troops in Part I, and then I lost Ratchet, Trinity, Cypher, and Tank in Part II. Now, usually at the end of a batrep I do the casualty rolls to figure out if the guy was lightly, moderately, heavily wounded, or KIA, but I'm not doing that for these games as they all run together and I figure anyone hit right now wouldn't be good enough to get back in the fight. I suppose could try to do something with 'walking wounded,' but in my mind, walking wounded are guys that were knocked down during the fight but ended up getting back up. So, I don't want to do the casualty rolls and allow guys to get back in the fight for the next game, but now I'm down to eleven warm bodies (including The Ambassador), and my combat power is seriously hampered as it takes a man to carry a casualty when we're moving, and I'm not leaving anyone behind. So that leaves me five guys that can fight, and still be able to move with everyone else carrying a casualty. But as soon as I take another casualty I'm down to three combat effectives (losing one to fire and one to carry him).
The games have been fun, just way too long, and my dice rolling has sucked in a truly extraordinary fashion. I've got one more fight to post, then I need to play another one to finish off Operation Pay-Off.
V/R,
Jack


May have taken a long time to play, but it reads fast, and was a blast. Be interesting to see if they can make it out. Looking forward to the next batrep and hope real life takes a turn for the better.
ReplyDeleteIrish,
DeleteHey buddy, thanks man, glad you like it. Things are going pretty rough, I'm starting to wonder if anyone will make it out too. I'm working on the next batrep right now, and played the last fight of the Operation earlier this evening. Nothing is really wrong with real life this time, just super busy. Little League baseball will be over in a couple weeks, so that will help quite a bit, plus the holidays are coming, so work should slow down a bit too.
Hope all is well your way, and looking for more from Uwanda and Mugabia.
V/R,
Jack
Great report! and the fact it took hours, and you changed the rules, did not come through in the report. I know how much you like your gaming, so hoping you get back into it soon. I was in a bit of a rut too, but have gone back to Ancients for a little while. But I expect OI will get another 6mm WW2 game in by January.
ReplyDeleteHey Shaun, glad to hear from you man! I do, indeed, like my gaming, and I'm getting back into it. Hell, I'm back to having too many projects I want to do! But baseball season will be over in a couple weeks, and the holidays are coming, so time to game should be more forthcoming.
DeleteAncients!!!??? I was going to make fun of your infatuation with scantily-clad men in very uncomfortable shoes, but the truth is, every time I look at one of your Ancients batreps I think 'I don't know anything about that stuff, but it's looks cool. I should try it!'
I just don't have time! And don't tell me I have to wait until January to see more Company Command from ya!
V/R,
Jack
You put a lot of effort in your batreps and it pays off; they're really good. Thanks for sharing.
ReplyDeleteBTW, I love your man down figures; many people forget about depicting wounded in the field of battle.
I'm also very busy at the moment and without time to play; so many projects and no time for them :)
Cheers!
Being very busy at the moment as well. anMany
Thanks a lot, I appreciate you reading the batreps and commenting. As you see, 5Core is pretty much all I play now; I miss the 5Core batreps between you and your son, those were great. I hope life slows down soon and you find some time for gaming.
DeleteV/R,
Jack