Current situation: It's 0600 on 4 August 1990 in South Leon, and 1st Lt "Lobo" Gouveia has solicited the support of local South Leon Army (SLA) units to divert precious resources to carry out an operation to take Hill 114, following which Lt Gouveia's ODA-313, AKA "Task Force Black," will establish an Observation Post (OP) overlooking Route 1 (the major north-south artery which enemy troops are using to reinforce Pendrakenville and Diwala) and call in air strikes to halt the flow of enemy forces, which was the original plan. Lt Gouveia's team spent the past week engaging enemy forces in vicinity of Hill 114, both inflicting and taking heavy casualties, and on the night the Cuban commandos were set to infiltrate Hill 114 and establish their OP they were ambushed on Bridge #1. Not only did the Cubans not accomplish their mission, thereby forcing the delay of the coming offensive to re-take Pendrakenville and Diwala, but they also allowed an enemy logistical column to sneak "special munitions" out of the area.
Lt Gouveia has been promised a SLA mechanized battalion, and he has secured (limited amounts of) Cuban air support. The desired end-state is joint Cuban/SLA possession of Hill 114; to that end, the SLA battalion scheme of maneuver is to probe to the northeast of Hill 114 (this fight, which is taking place directly north of the map used for Operation Chunky Bandit fights 1-8), seeking to find an opening in the enemy defenses and exploit it with a hasty attack on the objective, or go firm and secure the right flank of the attack. While this is occurring, Cuban air support will pound Hill 30 (at center right of the Op CB fights 1-8), and then SLA forces will assault and hold Hill 30 (will be Op CB #10) to secure a position to support the Hill 114 assault by fire and secure the left flank of the attack. The SLA command, of course, expects the enemy to vigorously counterattack Hill 30 (will be Op CB #11). Then SLA forces will conduct an air assault to the northwest of Hill 114 (off the map for Op CB fights 1-8 to top left) to isolate the objective, preventing withdrawal and reinforcement (this will be Op CB #12), and then the assault on Hill 114 will commence (will be Op CB #13). Again, SLA leadership presumes the enemy will vigorously counterattack if Hill 114 falls (will hopefully be Op CB #14, assuming the attack on Hill 114 succeeds, but that applies pretty much to all of these).
Thirty minutes ago Staff Sergeant "Tahoe" Gallarraga accompanied the SLA mechanized battalion's A Company on a probe northeast of Hill 114, where they discovered the enemy had prepared defenses in that zone, though they were able to secure Hill 27 and thus fulfill their mission of anchoring the right (northern) flank of the upcoming attack on Hill 114. Tahoe was awarded the Bronze Star for his actions taking Hill 27.
Now we join Staff Sergeant "Gundog" Baerga, set to accompany the mechanized battalion's B Company in the assault on Hill 45, which will secure both the left (southern) flank of the Hill 114 assault, as well as a position to support by fire. The airstrikes by Cuban F-4 Phantoms lift as they command group splits up and moves out to join their units, the sounds of 750-pound bombs exploding still echoing through the valley.

Overview, north is up. Hill 45, with evidence of its pounding at the hands of those hotshot Cuban fighter jocks visible, is at top left. This area is essentially just the bottom right portion of the map used for Op Chunky Bandit fights 1-8. At bottom left is Bridge #2, and the bottom right corner was TF Black's entry point each game. At center left is the abandoned truck and weapons cache, off camera at top right is The Garage, and off camera at bottom left is Hill 30 and The Church.

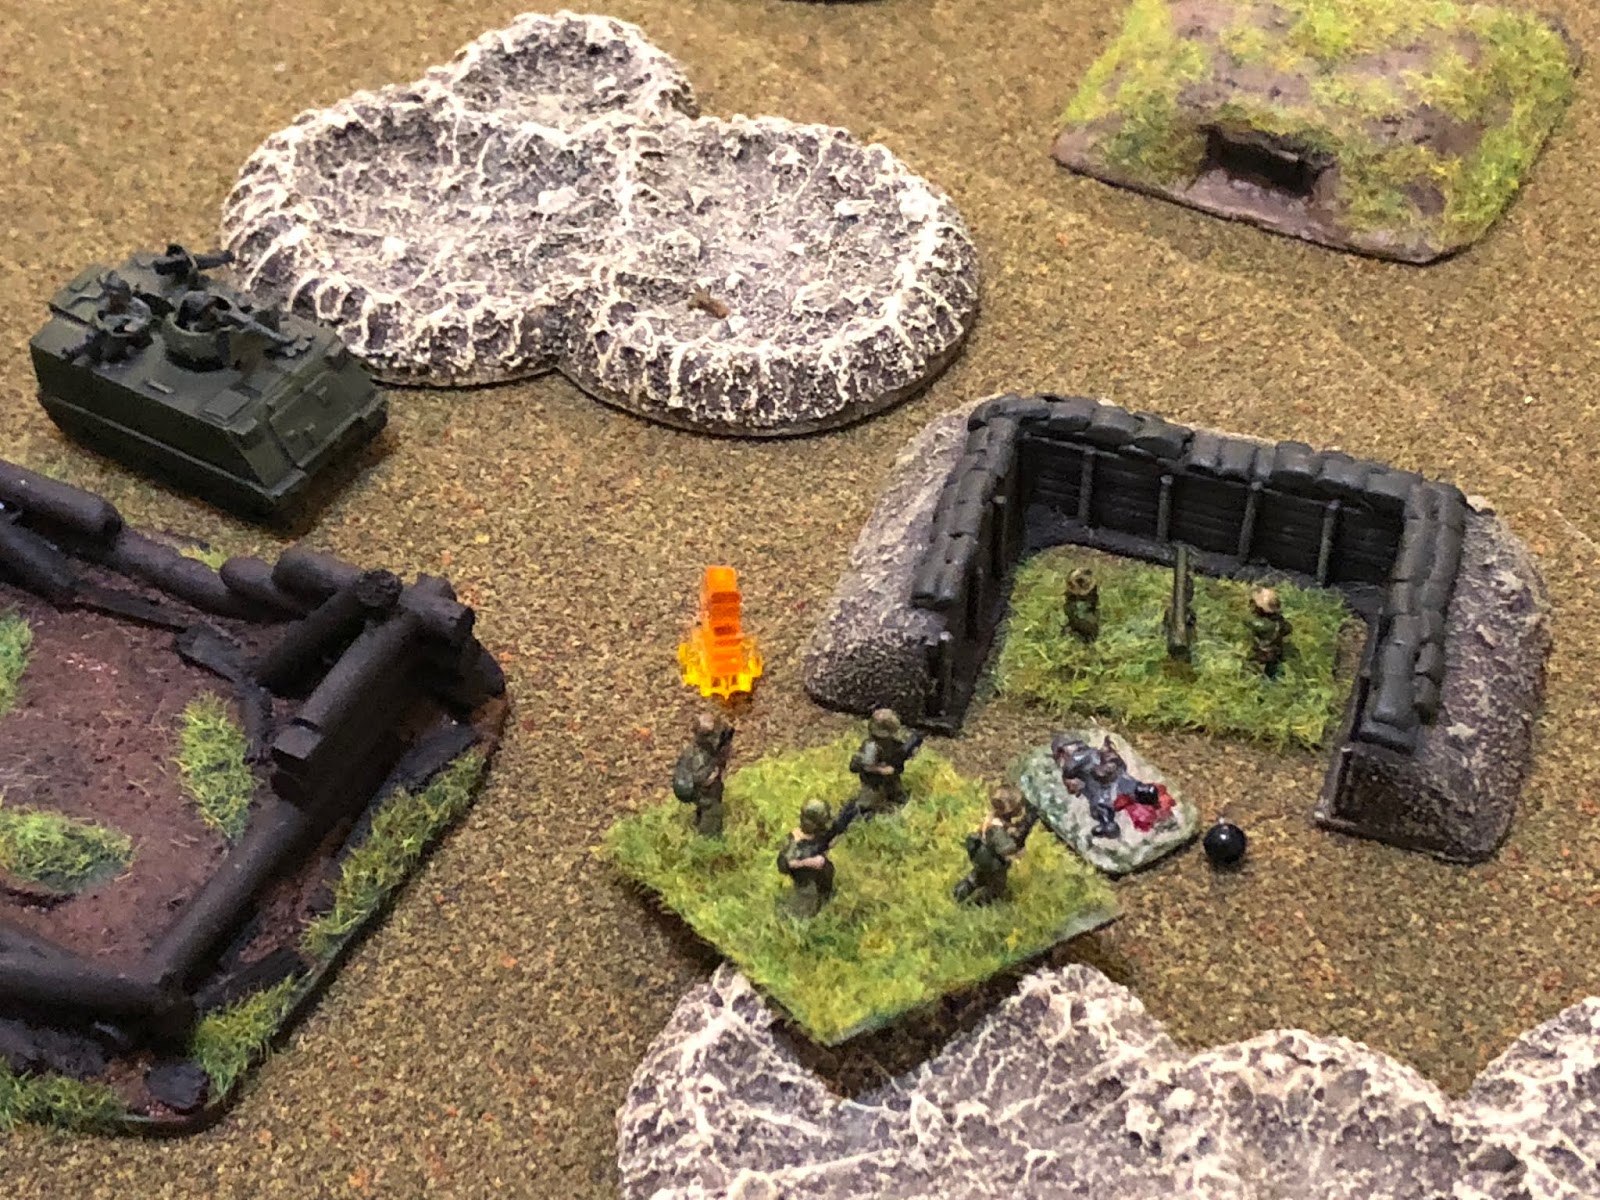
The opposing forces, with SLA on the right and FSNL (communist neighbors to the north) at left. The troops are all Pendraken 10mm, except the Cuban (singly-based dude at bottom center right), which is Minifigs UK. The M-113 ACAVs are also Pendraken, though the M-48 is plastic from Takara. The two bunkers at bottom left are from Flashpoint Miniatures, and the sandbagged position is from Miniature Building Authority. I'm playing this series of fights (the SLA operation to take Hill 114) using Ivan Sorensen's "Squad Hammer" rules, modified a bit.
Company B has its CO, Gundog, and 1st Platoon in three M-113 ACAVs, with a tank attached. 2nd Platoon is on foot and is being held in reserve. The ACAVs are Rhino 11, 12, and 13, respectively, while the tank is Zuma 22.
The enemy had considerable forces atop Hill 45, waiting on the SLA assault, but, as you can see, they were pounded into dust. The enemy commander has done a valiant job of quickly reorganizing the defense, which is only enough to man two bunkers and a sandbagged emplacement with a 106mm recoiless rifle. A rifle platoon on Hill 30 has been dispatched to assist the defense.
Overview, this time with troops. The enemy bunkers and recoilless rifle are on Hill 45 (top left), their rifle platoon has just come down from Hill 30 (off camera) and is approaching Bridge #2 (bottom left), while the SLA company has just entered the battlespace in the southeast (bottom right).
Closeup of Hill 45's defenses: the two bunkers (far right, bottom center), and the recoiless rifle in the sandbagged position (left). No overhead cover for the sandbagged position, but no SLA mortar, either ;) You can see how bad the hill's been beat to hell by the airstrikes (sorry, just wanted to get my new stuff on the table).
The enemy rifle platoon coming down from Hill 30, approaching Bridge #2, which could place them directly in the flank of the SLA mechanized attack.
And the SLA armored juggernaut, each ACAV holding a rifle squad from 1st Platoon, with the CO and Gundog fitting in where they can. Time to fight!
As the SLA AFVs are cruising in (bottom right), the CO directs Rhino 13 to flank right. The vehicle commander guns the engine and they take off (top right, Hill 45 at top left).
The recoiless rifle team is shocked out of their bomb-induced stupor by the blur of movement (top center), and they (bottom left) fire a 106mm round, watching the tracer as it skies out...
And hits directly behind the SLA track!
Rhino 12 follows, but turns slightly left near where the enemy round hit (top center). The crew scans for enemy positions, but can't make them out.
Zuma moves north, then cuts west across the fields (far left, with Rhino 12 and 13 to his right), but the tank crew can't find the enemy, either.
In the southwest, the enemy rifle platoon hears the sounds of enemy vehicles in front of them, moving south to north (top right to top left). The platoon leader sends his 1st Squad ahead (center, from bottom center) to scout the crossing.
While back in the east, Rhino 11 moves up next to Zuma (center top left, from bottom right.
Rhino 11 (bottom center) is actively searching for that recoiless rifle (top left), but can't find it. They do, however, spot the eastern bunker (top center, western bunker at far left) and open fire with their machine guns, causing one hit.
*Wow, rolled 10 on 2D6 twice in a row, once to spot and once to hit, but only rolled a 2 for damage, using D3 against the bunkers, which also have 8 strength points.
With Rhino 11 laying down fire, Gundog and 1st Squad, 1st Platoon (1/1) pop out.
While on the SLA right, the CO and 2/1 pop out of Rhino 12, though 3/1 remains mounted in Rhino 13 (top right) for rapid exploitation.
2/1 (bottom right, with the CO and Rhino 12) is able to spot the east bunker (top center) and opens fire, to no effect.
Having not spotted any targets yet, Zuma's commander decides, why not charge? The tank shoots forth towards Hill 45 (left, from center, with Rhino 11, Gundog, and 1/1 below him, Rhino 12, the CO, and 2/1 at right, and Rhino 13, with 3/1 embarked, at far right. The enemy rifle platoon is off camera to bottom left.
Zuma spots the recoilless rifle position (top left, above the west bunker, east bunker at far right) and lurches to a halt, then fires its 90mm cannon!
The crew is rocked by the detonation (4 hits), a direct hit!
With things going well against the recoiless rifle, Rhino 12 moves up, joining Zuma in the center (center left, from right).
Rhino 12 (bottom right) wants to finish off the recoilless rifle position (top left), but can't spot it due to all the smoke and debris in the air. Instead, they acquire and engage the east bunker (top center) with their machine guns.
And the .50-cal HMG tells, putting a hurtin' on the bunker crew (three more hits, for a total of four)!
Then Rhino 11 gets antsy and pushes up between Zuma and Rhino 12, firing its .50-cal into the east bunker (top left)…
And Rhino 11's fire puts two more hits on the east bunker, for a total of six, almost putting them out of the fight!
With the east bunker on the ropes (top center), Rhino 13 loops around on the right flank (bottom center, with Zuma at top left, Rhinos 11 and 12 just off camera to left), firing its .50-cal as it goes...
Putting the east bunker (bottom left) out of the fight!!!
*Wow, I did not expect that, I figured I'd have to close assault the bunkers. Sure, I had some pretty good dice, both for shooting and damage (remember, I'm rolling D3 for damage, even with the .50-cals), but damn. I wonder if direct fire is too strong, if this was an outlier. I dunno, maybe not an issue. I mean, I had a total of four .50-cal hits on the bunker, averaging two damage points each time.
But just as the east bunker (top left) begins belching smoke, the recoilless rifle team (bottom left, with west bunker just right of them) gets back into action. The team commander is screaming at the gunner to engage one of the M-113s, afraid the weapon won't penetrate the frontal armor of the SLA tank, but the gunner is panicked and, deathly afraid of the monstrous beast, he lays the sights on Zuma and fires...
The 106mm round skips off the front glacis of the M48 (center, 1 hit), and the gunners in the west bunker (bottom center) are similarly locked on to the SLA tank. Rather than concentrate fire on 1/1 and Gundog (top right), 2/1 and the CO (top center left), or Rhino 11 or 12 (center top), the machine gun rattles scores of green tracers off Zuma's thick, steel skin.
However, the fire is pointblank, the enemy gunner aiming directly at periscopes and vision slits, shaking the crew up (2 more hits, total of 3)!
With the firefight raging just east of them, the enemy platoon leader orders his three rifle squads to follow him across Bridge #2, towards the sound of gunfire (center, from bottom right)!
The crew of Zuma is shaken by the recoiless rifle fire and the close range machine gun fire that suggested enemy infantry, the kind that carry RPGs, might be lose, so they back up (bottom right, from center, getting back a damage point). On the other side of the treeline (bottom center), the enemy rifle platoon leader is drawing up a plan for aggressive action...
He (center left) orders his 2nd Squad to the right flank (far right, from left center)…
Where they spot Zuma chilling out. They quickly get the RPG into action and fire...
But they miss!!! Gundog and 1/1 (top left)…
Face about (right) and open fire on the enemy rifle squad (top left), but it's ineffectual!
While on the right, with the east bunker knocked out (center, west bunker further left, recoiless rifle at top center), Rhino 13 pushes ahead, up Hill 45 (right, from bottom center), but it's slow going due to all the craters, and with all the jostling, they can't get their weapons to bear on any of the enemy positions...
While Rhino 12, unaware of the enemy infantry to the southwest (left/bottom left), dashes ahead (center, from bottom right) to the base of Hill 45, but they can't spot the west bunker, directly in front of them. Instead they engage the recoilless rifle position (top center, Rhino 13 is just off camera to right), but their rounds slam harmlessly into the sandbags.
And the recoilless rifle team returns fire!
Putting a serious hurt on the M-113! The crew and vehicle is technically still in the fight, but they're hanging by a thread (4 hits)!
And then the enemy 1st Squad moves up to snap that thread, firing an RPG at Rhino 12's flank!!!
And scoring a direct hit, busting the thinly armored track wide open!
The enemy 1st Squad (far left) does a little victory dance as their leader just kinda hangs out in the center, while their 3rd Squad moves right, joining 2nd Squad (far right).
3rd Squad immediately busts out their RPG and fires at Zuma's flank...
And where their bretheren in 2nd Squad failed, they succeed, knocking out the massive beast!
*Holy @#$%, things sure went to crap quick! Just a second ago I was looking at easily overrunning the Hill 45 defenses and watching the enemy infantry withdraw back over Bridge #2, and now, all of a sudden, I've got a dead tank and a dead track, with strong enemy defenses still on the hill and a reasonably strong infantry force stuck in my flank...
Caught in a crossfire between the enemy recoilless rifle position and west bunker (left), and RPG-armed infantry (bottom center left), Rhino 11 pushes up Hill 45, next to the knocked out east bunker (center top, with Rhino 13 above them)…
Rhino 11 (center bottom left, Rhino 13 at bottom right) keeps its guns on the recoilless rifle position (top center left, west bunker at left) and keeps hammering away, but the thick sandbagged position just shrugs it off.
But the west bunker (bottom center) has spotted Gundog and 1/1 (top center), and now they are caught in a crossfire between the bunker's machine gun and the enemy rifle squads in the southwest (top right). The machine gun barks...
And Gundog and 1/1 are out of the fight!
*What the hell is going on here???
The SLA left flank has totally caved in, but the two remaining tracks continue to act audaciously: Rhino 11 (right) looks on as Rhino 13 pushes west (center, from top right), closing in on the recoilless rifle position (far left) and the west bunker (bottom center left, with Rhino 112 burning at bottom right).
Rhino 13's machine guns pump rounds into the recoilless rifle position, again to no effect!!!
And then 3/1 finally pops out, on the objective, just like they planned!
3/1 immediately close assaults the recoilless rifle position!
But it's a hard fight to knock out the dogged defenders, both sides are locked in combat!
*Neither side managed to score a hit!!!
But another round of combat sees the SLA rifleman of 3/1 dig out the enemy troops!
As Rhino 13 and 3/1 are working over the recoilless rifle position (top left), the enemy platoon leader and 1st Squad dashes ahead, up to the burning Rhino 12 (center top, from the truck at center, with Rhino 11 above them).
*Sorry, I'm not sure why I took this photo from so far away. You can see the enemy 2nd and 3rd Squads at bottom right, and the SLA CO and 2/1 at top right.
The enemy 1st Squad fires their RPG, hoping to knock out a second track!
But it's just a near miss, shaking the crew up a bit (2 hits)!
With that drama going on at the base of Hill 45 (top left), the enemy 2nd Squad (bottom right) covers their 3rd Squad as they move up (center right), but they get up there and can't see anything due to the smoke and flames from Zuma.
Back on Hill 45, Rhino 11 shakes off the RPG near miss and charges straight at the encroaching enemy infantry, guns blazing!
Putting the enemy 1st Squad and platoon leader out of the fight!
And as Rhino 12 wins its fight (top left), 2nd Platoon, the reserve, enters the battlespace (bottom right, with the CO and 2/1 at top right, enemy 3rd Squad at center left, 2nd Squad at far left).
The two enemy rifle squads decide discretion is the better part of valor and fall back towards Bridge #2 (center bottom left, bridge at bottom left, Hill 45 at top left)...
While the enemy troops in the west bunker have figured out the score and come out with their hands up, ending the fight.
Wow, that went from a walkover to an oh-@#$% real fast, and while it was a win, it got really ugly, ugly enough for me to begin doubting my skills ;) You might be wondering why I didn't confront the enemy infantry platoon - the infantry platoon that knocked out a tank and a track and almost knocked out another track - a bit more directly, but please keep in mind that I try to play these 'in role,' meaning there's no way the little guys on the table could have known there were bad guys crossing Bridge #2, so I'm going to act like there are no bad guys crossing Bridge #2, unless and until something happens that makes it apparent my guys should now be aware of said bad guys.
In any case, the fight was rough: SSgt "Gundog" Baerga went down in the fight, but he'll be okay, should return in about a week, but the SLA forces suffered a knocked out tank, a knocked out track, and 22 casualties, while the enemy suffered 30 KIA, 8 captured, and the loss of a recoilless rifle. As well as the real estate: the SLA's B Company quickly occupies defensive positions on Hill 45, awaiting the inevitable counterattack. 1st Lt "Lobo" Gouveia, quickly grabbed Sergeant "Racer" Palmeiro and gave him orders: "grab this machine gun team and get up there, now! And make sure and find Gundog and get him evac'ed!"
The Team Chief, Master Sergeant "Faceman" Soriano looked quizzically at his Boss, Lobo. "You're sending him up there? Boss, you've had better ideas." Reflecting on Racer's recent problems with the yellow steak on his back, Lobo replied, "I know, I know, but we're short and I need you for the air assault, so get your ass over to the birds!" Next up, the FSNL counterattack.
V/R,
Jack


Another great game report. The casualties racked up there.
ReplyDeleteCheers,
Pete.
Pete,
DeleteThanks man, and yeah, it got awful physical up in here, real quick too ;)
V/R,
Jack