Thursday, April 20, 2017

Phantoms Over Havana, Fight #1

All,

Okay, standby for something a little bit different, something I've been meaning to get to for quite some time, and something we're going to have to step back in time for.  Here's the deal: my intent for this massive Imagi-Nation-type alternate history was always to have a bunch of ground fights, but also some air to air fighting, and perhaps even some naval fighting.  If you're reading this I'm sure you're aware of the eighty-four (84) battle reports for ground fights I've posted for Cuba Libre.  Now it's time for some air fights.

If you're not aware, the Cuban Liberation Army (or CLA, as it was known prior to and during the War of Liberation) has a small Air Force.  There are a few different kinds of aircraft, from fighters and fighter-bombers to reconnaissance, utility, and transport aircraft (C-130s for the paratroopers), to transport and gunship helos.  My desire is to create a fighter squadron or two and follow them throughout the various campaigns, just like I do for the CLA and the Cuban Liberation Expeditionary Force (or CLEF, as it is now known, post War of Liberation).

So, to do that, I've got to go back in time.  It's D-Day, 1 February 1990, and the CLA is storming Cuba to overthrow the Castro regime.  The War of Liberation ran from 0300 on 1 Feb 1990, when the first CLA SOF elements assaulted their objectives, until 2030 on 5 Feb 1990, when CLA SOF elements captured Fidel Castro (a total of 32 batreps, very impressive!).  Unbeknownst to you, Dear Reader, as CLA ground forces were pushing back the Castro regime on the island, F-4 Phantoms of the CLA's Air Force were busy dueling with MiGs of Castro's Air Force over the island.

I just bought a new set of air rules called "Lacquered Coffins," a set of WWII rules that (as always) I've modified a bit to suit my purposes in order to use for 'modern' aircraft (can you still call F-4s and MiG-21s modern?).  My changes are thus:

-I play solo, so I need to mix it up.  Rather than IGO-UGO, I'm using cards (one card per aircraft, with the aircraft tied to a particular card) for activation.  So I do the mandatory move for every aircraft, then move to cards.
-I shortened the range for guns (6, Long Range 8), gave them 2D6.
-I made missiles minimum range 5, good out to 12, Long range 16, 4D6.  I gave each aircraft four missiles. I know F-4s can carry more than four missiles, so if you like it better, think of it as four shots of two missiles ;)  I also am not currently differentiating between IR and radar missiles, I'm just getting into some new rules and want some quick, fun games.
-I added deflection as modifiers, side and front quarter -2 (the game already has head-on and tail, which is assumed).
-I can't remember if this is in the book or not, but when a plane is going down I have the pilot make a test to bail out.
-I'm using a hexboard with 1/600 minis, so 1" in the rules equals one hex.

Everything else is as written.

So it's 0615 on 1 Feb 1990, and CLA aircraft are winging towards Castro's Cuba from secret airfields in *REDACTED*, in support of CLA troops that parachuted earlier and others preparing for an amphibious assault.  The CLA Air Force had a squadron of F-4 Phantoms laden with bombs, winging their way towards various target locations in Cuba.  Priority targets included command and control centers, radar sites, grounded aircraft and their support facilities, moored ships and their port facilities, artillery and tank parks, ammunition and fuel storage, anti-aircraft sites, etc...

But the best pilots, twelve of them, were selected to fly as fighter pilots.  Also manning F-4 Phantoms, their job was to engage any of Castro's Air Force that made it into the air and destroy it.  The Cuban fighter squadron was broken down into three four-ship flights: Boxcar, Blackjack, and Bruiser, all 01-04.  As of 0615, Castro had four MiG-21s flying a Combat Air Patrol (CAP), scrambled due to growing reports of gunfire and fighting on the west end of the island.  CLA ground control was busy vectoring Boxcar flight into an intercept of the Cuban CAP over Havana.

This is an even up, 4 vs 4 matchup, which I plan to do a few times while I learn these new rules, before getting into various force sizes and initial deployments.  All of these will be straight up fighter duels; perhaps someday I'll branch out into other stuff, but that's what interests me right now.  I'm not sure how many fights I'll play out for the War of Liberation; I'm hoping for around ten, but it could be more (if I'm really enjoying myself) or less (if I run out of planes/pilots).  Right now I'll be simply referring to these guys by callsign, i.e., Boxcar 01.  As they prove themselves (by surviving!) I'll become more invested and begin to actually start naming them and getting into personalia.

In any case, let's get to work!

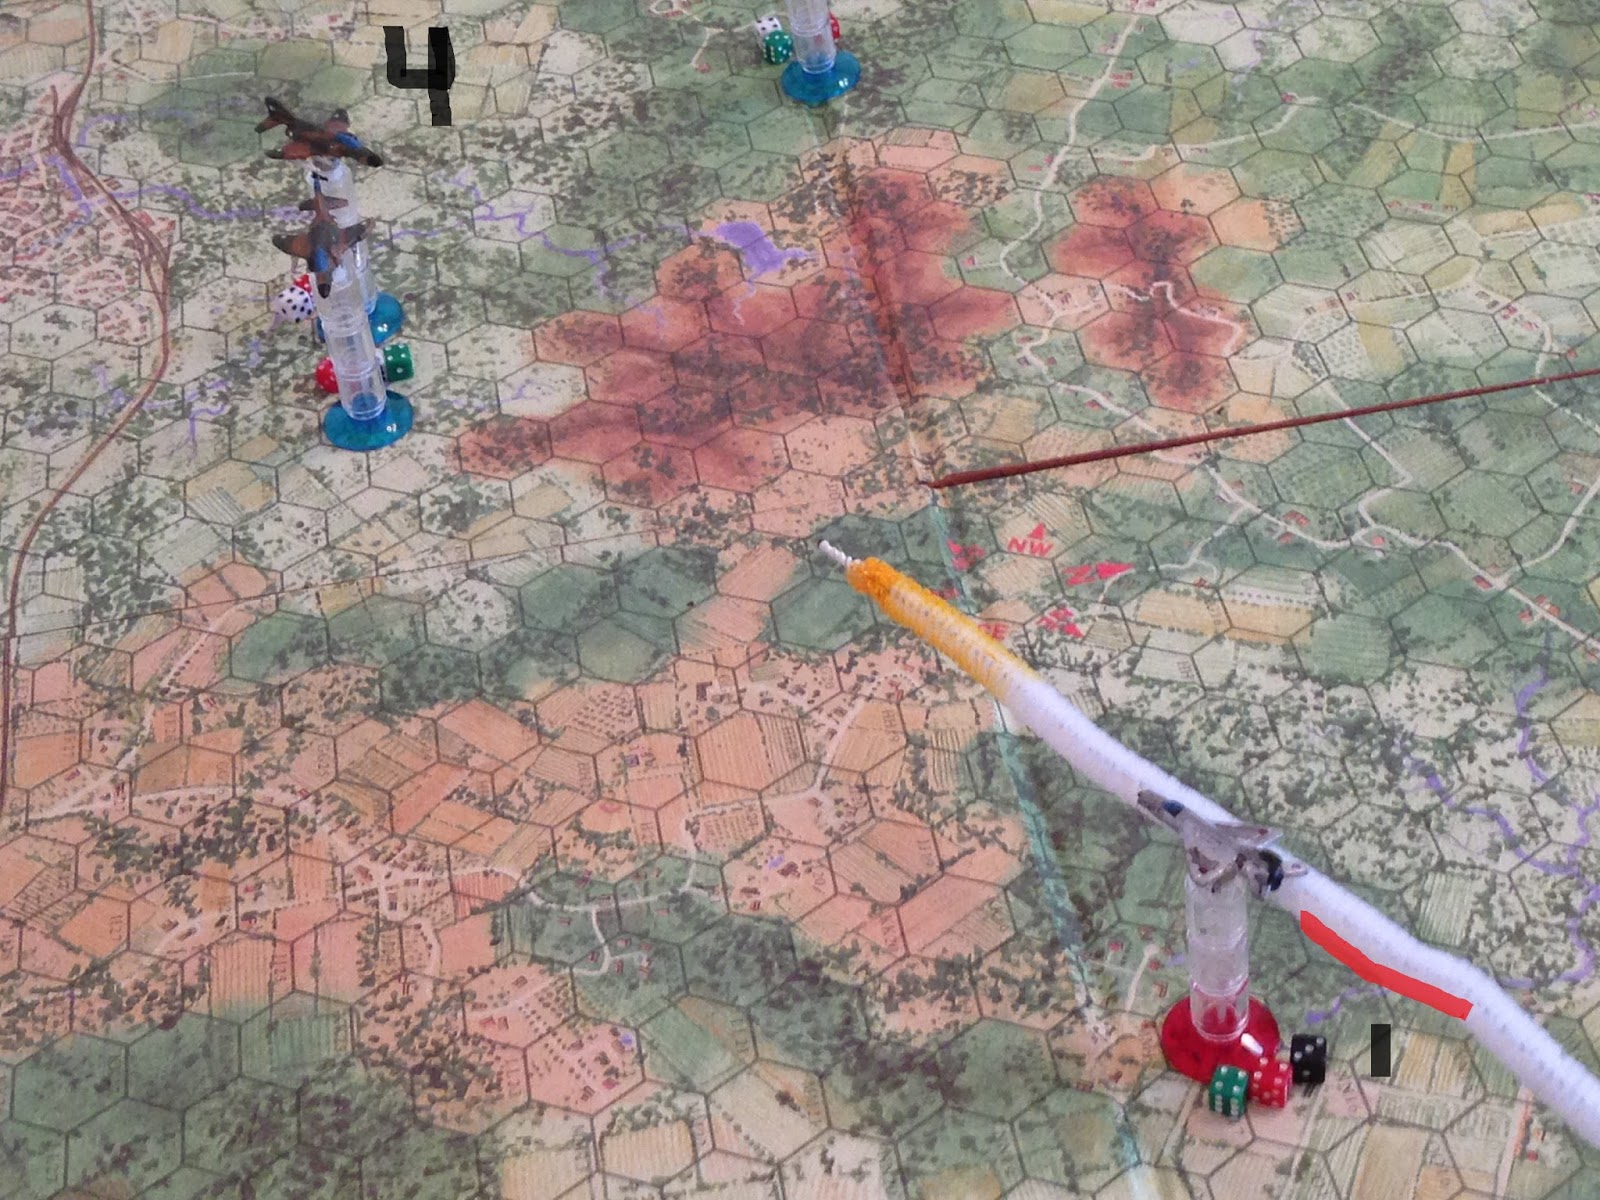
The board, north is up.  I'm using a hexboard from the old game "Flight Leader" (you can actually see the name in the bottom right corner).  CLA Air Force in the southwest (bottom left) corner, Castro Air Force in the northeast (top right).  I'm using the relatively new set, "Lacquered Coffins," modified slightly.  The airplanes are 1/600; the CLA flight consists of F-4 Phantoms from PicoArmor, the Castro flight consists of MiG-21s from Tumbling Dice.

The good guys, from left to right: Boxcar 01, 02, 03, and 04.  The green dice shows altitude, the red dice speed, and the white dice shows missiles remaining.  Boxcar 01 and 02 are at altitude 5/speed 2, while Boxcar 03 and 04 at altitude 5/speed 6.

The bad guys, from left to right, are Red 01 to Red 04.  Red 01 and 02 are at alt3/spd5, while Red 03 and 04 are at alt3/spd3.

The fight is on!  It's Turn 1; I carry out the mandatory move for every aircraft, and then I go to the card deck for individual activation.  As you'll see, I'm also trying out a new method for my aerial batreps.  I'm not going to take a picture every single time something happens, I'll take one or a few pics per turn, explaining what happened in the narrative while graphically depicting what happened on the picture itself.  It's kind of ugly, but I think it's effective and I hope you don't mind.  Please let me know what you think.

Turn 1: in the bottom left corner, Boxcar 01 and 02 are straight and level while they increase speed by two (up to four), and Boxcar 03 and 04 are straight and level while they kill throttle a bit, back to speed 5.  Meanwhile, in the top right corner, Red 01 and 02 hold their bearing while climbing to alt4 and dropping to spd4, while Red 03 and 04 continue on their current heading and stay down at alt2 while muscling up to spd4.

The game is pretty cool in how the mandatory move works, and how you must think of power in relation to altitude.  I've played plenty of games with six levels of power and six bands of altitude; normally it's fashionable for everyone to be as high and fast as possible.  This set of rules really makes you ponder your speed, holding less then max.  I've played two games so far and it's constantly a battle to keep speed up above stalling, with some cushion to climb, without over-stressing the aircraft.  It also factors in with loss of alt/spd when you bung a roll and fail to carry out a tough maneuver.  I'm not taking a shot at other rules; as a matter of fact, I'm sorta just now realizing that another set I've played a lot of has the same sort of framework; I'm not sure why this set is really making me worry more about speed than any others I've played.

Also, I end up frequently taking pilot tests (to maneuver and fire, and to go evasive), and I am failing a lot!!!  I can't recall ever having such a hard time rolling a '6' on 2D6!

Boxcar 03 holds straight and level for several seconds, then kicks it right, dropping to alt4, but coming up to spd6.  Boxcar 01 holds straight, dropping to atl3 and up to spd6.  Red 04 makes a positive climb, up to alt3/spd5.  Boxcar 04 wants to make something happen; he wants to positive climb to alt4/spd6, then take a head-on missile shot on Red 01 (second aircraft from right).  He takes the pilot test and bungs it, which causes him to head straight and lose an alt and spd level!  This sets the table for...

Red 01 to push in, straight and level, and launch a missile at Boxcar 04!!!  Boxcar 04 has missile warning lights going off in his headphones; he punches out chaff and flares, and wants to go evasive, but the sun is in his eyes and he can't locate the missile!

*Boxcar 04 bunged the evasive roll, too...  He's now down to alt3/spd3, assuming he doesn't get whacked by the incoming missile.  I'm not sure if I'm playing that right; I know if you fail a pilot test you drop an alt and spd, but do you do you drop if you fail the evasive test, too?  Need to look it up.

The missile can't lock and sails on by Boxcar 04 (bottom center left, the one pointing to top right).  Boxcar 02 drops to alt 4, picking up speed, while Red 03 power climbs to alt3/spd4.  Red 02's pilot is patient; he sees everyone charging into the merge, but he wants to hang back a bit and see how this develops, so he hangs at alt4/spd4.

On to Turn 3.

Red 03 banks left and takes a horrible shot at Boxcar 03, who doesn't even see the missile until it's already sailing by, which jars him enough that he drops down to alt3 and bleeds power to take a look around (spd5).  Which is cool; Red 03 didn't really figure he'd score, but he wanted to break the F-4s up and get them a bit discombobulated.

*Boxcar 03 failed his evasive roll...
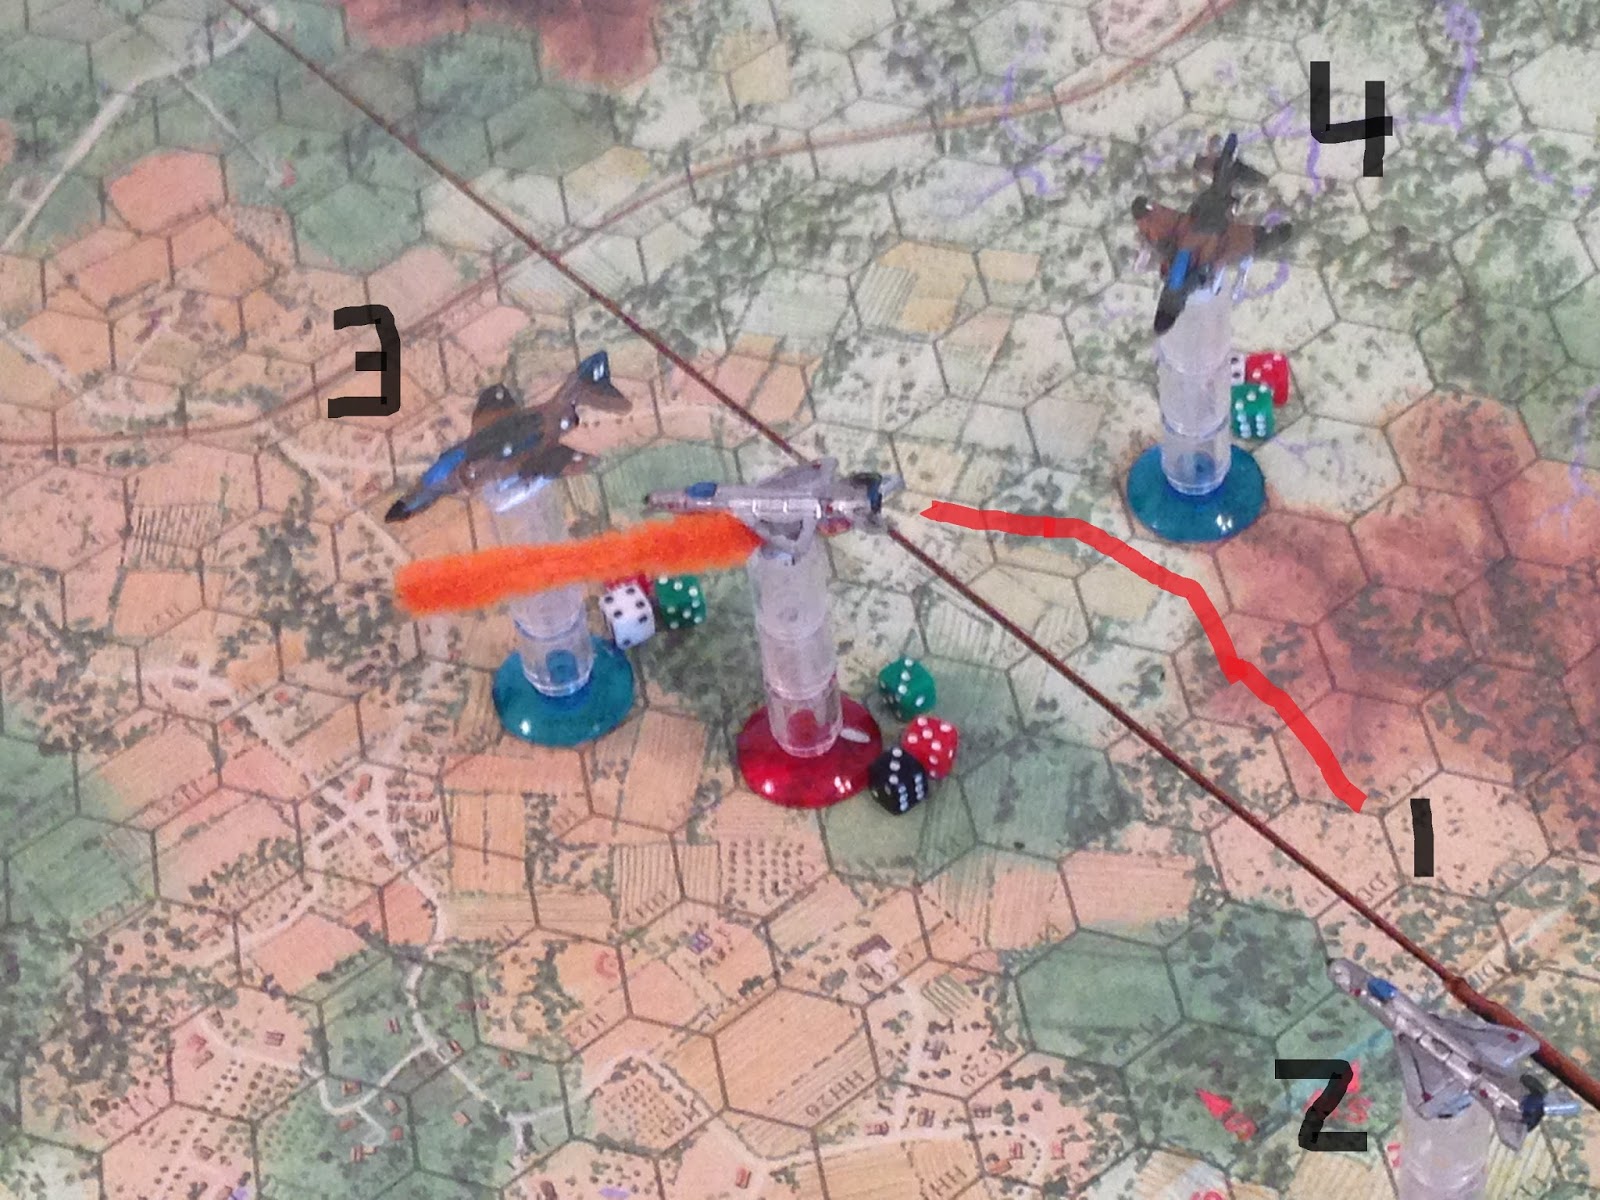
Boxcar 03 is still looking around for missiles when Red 01 cuts in and goes to guns at point blank range!!!  Boxcar 03 sees him and takes evasive maneuvers, but several 23mm tracers crash into the F-4 Phantom, and the pilot of Boxcar 03 is wounded!!!

Stunned and worried about going into shock, Boxcar 03 makes a positive climb to try and get above and away from the developing furball.  Looking to help him out, Boxcar 01 rolls in on Red 01's tail and looses a missile at close range; the enemy pilot tries to shake him but can't, and the missile detonates nearby, damaging his aircraft and wounding the pilot!

Perhaps admiring his handiwork a bit too much, probably even pondering finishing Red 01 off, Boxcar 01 fails to see Red 04 bank right, cut throttle, and drop down behind him.  His first clue there's a problem is when tracers begin zipping by, and that's cool and all, until his fighter shakes and shimmies with the impact of several of them damaging his aircraft.  Boxcar 01 maintains speed (4), but is forced down to the deck (alt1), a dangerous place to be as one mistake can lead to planting his supersonic fighter in the Cuban countryside...

Boxcar 04 wants to dash northeast (top right), kick it hard left, and line up a missile shot on Red 02.  But there's a lot of jets zooming to and fro, lots of chatter on the radio, and he finds himself a bit disoriented, losing a bit more altitude and speed (alt2/spd2) while he figures things out (yep, he failed his third consecutive pilot test; this means he needs to take it easy next turn in order to plus up some altitude and speed).  But Boxcar 02 picks up the slack; he thunders in, hooks right, and takes a nasty deflection shot, just trying to break things up.  Red 02's pilot sees the launch but panics (fails the evasive roll)...

Red 02's pilot has plenty of time to ponder his freak-out as he drifts down below his parachute canopy, watching his MiG turn over and burn itself into a nearby village...

Score one for the good guys!

In a bad way because of his failed pilot tests, Boxcar 04 power climbs to pick up alt and speed (3/3).  I think the Communist pilots have figured out they needn't worry themselves with the rookie in Boxcar 04 ;)

But Boxcar 03 is in big trouble: Red 03 swings around Boxcar 04, lines up a shot, and launches a missile at Boxcar 03, who can't go evasive because the pilot is wounded...

The missile flies straight and true, and Boxcar 03's pilot goes down with the ship...

Hurt and with a damaged aircraft, Red 01 pushes his MiG over, heading for safety.  Boxcar 01, also damaged (the black smoke marker) has the same idea.  Boxcar 02 wants to circle tight left, bleeding off speed, and line up a missile on Red 04, but he bungs the maneuver and holds straight, dropping to alt3/spd4.  Red 04 doesn't even notice, he's got his own plans.  Red 04 wants to come left and go to guns on Boxcar 04, but he bungs it and drops to alt2/spd3!!!

Turn 4 sees Boxcar 01 and Red 01 both getting close to nursing their damaged aircraft off the map.  Boxcar 04 hasn't accomplished @#$% this whole fight, so he decides to chance a risky maneuver to get back in the fight, and he does it, perfectly executing a 'Split S' to come around on Red 04, dropping to alt1 and picking up to spd5!  Boxcar again wants to come around for a missile shot, this time on Red 03, but he fails and holds straight while dropping to alt2/spd3.  Red 04 takes the opportunity to gain a little altitude and power, holding straight and coming up to alt3/spd4, while Red 03 drops and picks up speed, then makes a hard left to line up on Boxcar 02.

Red 03 launches a missile at Boxcar 02; his missile warning lights are going off, but he can't spot the incoming missile!

Damn, shoulda looked over my left shoulder, Boxcar 02's pilot thinks to himself as he slowly drifts to earth, watching the flaming wreckage of his aircraft.  Luckily, he was picked up by CLA paratroopers.

Moving on to Turn 6, potentially the final turn of the game (you roll a dice at the end of each turn from 6 on to see if the fight continues).

Having just seen Boxcar 04 pull off a marvelous Split S, and worried about Boxcar 04 getting on his tail, Red 04 takes a quick look around in preparation to pull off an Immelman in order to face his attacker.  But he blows it and keeps moving south, dropping to alt2/spd3.  Red 01 and Boxcar 01 both make it to the safety of the table edge, looking to return their damaged aircraft to base.  With Red 04 having blown his maneuver, he's meat on the table; Boxcar 04 calmly sticks left, lines up his shot, and launches a missile.

The missile warning indicators go off, and Red 04's pilot has just turned his head to peer aft in search of the incoming missile, when it slams into his MiG-21 its flaming degree over a two-mile strip of the Cuban jungle!

I didn't take a picture, but Red 03 actually pulled off a Split S of his own, right before the end of turn 6.  But I rolled a dice and it turns out the CLA Air Force F-4s were bingo fuel. They both executed wingovers and headed for the barn, game over!  A quick rundown:

-Boxcar 02 shot down one MiG, but then was himself shot down.  He parachuted to safety and was picked up by friendly forces.
-The enemy aircraft Red 03 not only shot down Boxcar 02, he also shot down Boxcar 03, killing its pilot.
-Boxcar 04 shot down a single MiG, killing its pilot.
-Both sides returned home one damaged aircraft (Boxcar 01 and Red 01, who's pilot was also WIA), and one aircraft in good condition (Boxcar 04 and Red 03).
-Having picked up two kills in one sortie, Red 03 has been bumped up from "Average" to "Veteran" (the book calls it "Good," but I like the term 'Veteran' better).

The fight was a lot of fun; it flows well, mixing things up with the cards for activation worked like a champ, and everything made sense.  It took a bit longer than I'd like; yeah, that's always the case with new rules, but I gotta tell ya, I don't think that factored in a lot, as the mechanisms were very familiar.  I think more of the time is spent with the maneuvering, then manipulating the dice for altitude, speed, and missiles, which is a little bit of a pain in the butt, but worth it.  Let me know what you think of me doing the batreps with the blue and red trails and black numbers (I'm already writing the next fight up the same way).

Next fight up in this series is the second flight, Blackjack 01-04, on another vanilla fighter sweep, taking on four Castro-regime MiG-21s, though I should be posting batrep number five of Operation Rush Delivery first.

V/R,
Jack

Monday, April 17, 2017

Operation Rush Delivery, Fight #4

All,

AKA, the 13th fight of Operation Payback

It's 0533 on 20 July 1990, and the invasion of Avalor, a small Caribbean island-nation near Cuba, upon which Castro-regime holdovers have been organizing, training, and launching attacks on the homeland, is underway.  Previously three Reconnaissance and Surveillance teams from 10th Special Forces Group were inserted to support the invasion; one is in position in OP India, but the second team was compromised and extracted, and the third team (Rebel 33) was ambushed and wiped out.  Now 1st Lieutenant Huerta's 18th Grenadier Guards of the 6th Parachute Battalion are jumping from C-130s onto three separate Drop Zones (DZs) in the pre-dawn darkness.  They will immediately form up and march on their objectives, the terrorist training areas and barracks on Avalor, manned by terrorist trainees and their Venezuelan and Iranian trainers.

In the last fight we saw Lt Jaramiho's 1st Platoon successfully seized DZ Crow.  Here we pick up the action at DZ Bluebird, where bad guys alerted by the earlier firefights with Cuban R&S teams are watching paratroopers of 2nd Lieutenant Escobedo's 3rd Platoon descend and crash to the earth.

Overview, north is up.  We've got a small village spread across the map, a dirt road running east-west, several crop fields, and scattered jungle.  The table is 3' x 2' and I'm playing these fights solo using Ivan's "Five Men at Kursk," slightly modified to get a more modern (and deadly) feel.

The opposing forces, with bad guys on the left and good guys on the right, all in 15mm.  The bad guys are Eureka Miniatures' Modern Chechens, while the good guys are Battlefront Vietnam-era US Infantry.

The good guys, but it's not that simple!  This is a para-drop, so who knows who and how many are actually going to show up on the DZ for the fight.  I will have a maximum of ten men and a minimum of five, decided by fate, which is also how their locations on the map will be determined.

The bad guys.  There are ten of them present here, comprising an RPG, a PK machine gun, a sniper, and seven riflemen.  I don't know the composition or quantity of what I'll face on the tabletop though.  I have a marker for each of these guys, and I have five 'dummy' markers.  I mix them together, count out ten of them, and place them on the board.  Then I flip them over and see what I've got.  At minimum there will be five bad guys, with the marker determining the mix of rifles and RPG, PK, and sniper; at max will be all ten men shown.  These guys represent the Cuban hardliners (and other mercenaries/terrorists) being trained by the Venezuelans and Iranians.

Overview of the table, this time with troops present, and it's gonna be a real hoot!  The Cuban paratroopers and bad guys are both spread across the entire map, intermingled, and the Cubans have a 7-man vs 6-man advantage.

The northwest corner of the table shows an enemy machine gunner (with PK MG) at top left and two Cubans: Tex at center top, and the M-60 gunner at bottom center.

A shot of the northeast corner shows a blur of activity: Tex is at top left and the M-60 gunner at far left, while there are three more Cubans: one at center top, one at bottom right, and one at bottom center.    There are two bad guys: one at center right bottom, and one at center right top (above and below the goat pen).

Looking at the southeast corner shows us only two new guys: the Cuban Lieutenant (bottom left) and the bad guy RPG gunner (bottom right).  The M-60 gunner is at far left, Tex at top left, more Cubans at center bottom and far right, bad guys above and below the goat pen.

In the southwest we've got three new guys: two bad guys at bottom left, and Big Sal at bottom center.  The Cuban LT is at bottom right, the M-60 gunner at center right, Tex at top center, a Cuban rifleman at top right, and the bad guy PK gunner hidden at top left behind the trees.

The table is set and the troops are rearing to go; let's get it on!  Get ready for some rip-roarin' fun!

The fight starts in the southeast, where the enemy RPG gunner (bottom right, with a buddy at top left) spots a Cuban paratrooper struggling to get out of his harness (top right) and opens fires with his AK.  The rounds sail high in the murky dawn light...

But the buddy at top left also fires on the isolated Cuban, knocking him down.  A very precarious position as he can only be rallied back into the fight by a friendly moving into base contact, and no Cubans are nearby to help, not to mention there are three bad guys with interlocking fields of fire which would make reaching him quite a feat.  Lastly, he's very vulnerable to being close assaulted into oblivion (yeah, only the bad guys seem to win those kind of close combats!).

While the bad guy at center is ringing up the Cuban at bottom right, the bad guy in the northeast (top center) opens fire on the Cuban Sergeant at bottom left.

And Sarge goes down!

The guy that shot Sarge hops onto a nearby building, not realizing there's a Cuban paratrooper just on the other side.  While both are a bit shocked to see an enemy soldier materialize so close, the Cuban is quicker to the draw and opens fire with his M-16, missing!

With the fight raging in the east (top), the enemy PK gunner in the northwest (bottom right) opens fire on Tex (center left), missing.

With Tex dodging bullets at top center, two bad guys move up in the southwest (far left, next to the dumpster, and bottom center, on the roof, with Big Sal just below him).

The M-60 gunner (far left) seems a bit confused, just kinda chillin', but Tex (bottom right) spots the bad guy in the southwest next to the dumpster (top center, with Big Sal and the other bad guy at top left) and fires...

The bad guy is knocked down (top left)!  Tex (bottom right, with M-60 gunner at bottom left) then pivots and fires on the enemy PK gunner (top right), knocking him down too!

In the southwest, Big Sal fires on the bad guy on the roof.

The bad guy flinches, pinned.  Big Sal immediately climbs onto the roof and into close combat!

Big Sal offs the bad guy, then hops down (center), looking to close with the bad guy Tex just knocked down (top left).

But as Big Sal moves up (top left, with M-60 gunner below him, Tex at top right, and a Cuban rifleman at bottom right), the bad guy on the building in the northeast (bottom center) spots him and fires.

Big Sal dashes through the AK fire and into another close combat!

Big Sal knocks out another bad guy (bottom left), then moves up (center top), moving on the enemy PK gunner (top right) that Tex knocked down.

Things are going great, right?  Sure the Sarge went down and a riflemen is knocked down (with little hope of getting to him) in the southeast, but there's a good group of Cubans in the center/center left, and the LT is in the bottom, unengaged.

Back in the northeast, the Cuban rifleman below the guy that just shot at Big Sal opens fire...

The bad guy goes down (far right, atop building), but a nearby enemy rifleman (bottom left) returns fire...

The Cuban takes shelter behind the building, suppressed (top left).  The M-60 gunner (bottom left) hears the gunfire, and while he doesn't have a great shot, he opens up on the bad guy (in trees at top right)...

The M-60 gunner (top center) misses, and the bad guy (bottom left) pivots and returns fire...

The M-60 gunner (top left) is knocked down, and the LT comes rushing forward (far right, from bottom center).

With the M-60 gunner knocked down (top left), the enemy rifleman (bottom left) reloads, takes aim, then fires on Tex (top right).

Clearly the rounds impact close to Tex (bottom center), which is why this photo is so shaky, but he hangs in there and returns fire (top left, with the sorta visible at top right).

Tex misses the bad guy (top left).  The enemy RPG gunner moves up (bottom left), looking to get into the fight, but he has a decision to make: does he go right, to finish off the knocked down Cuban, or left, to get into the firefight?  Actually, there's a Cuban in the northeast, too (off camera to top),  though he's suppressed right now.

But the RPG gunner (top center) has more immediate problems: the Cuban Lieutenant (bottom center) spots him and fires...

The Cuban's (top center) rounds are high, and are answered by a damn rocket!!!

Quite incredibly, the enemy RPG gunner's snapshot lands a perfect blow, killing the Lieutenant and the knocked down M-60 gunner!!!

As the rocket explodes at bottom left, Tex (top left) opens fire on the the RPG gunner's AK-wielding buddy (far right)...

After firing twice and knocking down two men, Tex (top right) has now fired at the same guy and missed twice.  The bad guy (bottom left) returns fire...

But Tex's luck holds (bottom left) and the rounds miss.  The Cuban rifleman suppressed at top left tries to self rally, but only gets up to pinned.

Meanwhile, Big Sal comes dashing in from the west (center), looking to link up with Tex (top right).

There are now three Cubans left: the pinned rifleman at top left, Tex (behind trees at left), and Big Sal (bottom center), who is firing on the bad guy (top center) giving Tex such a hard time, pinning him.

But despite Big Sal's rounds pinning him (bottom left), he hangs in there and fires on Tex (top right, with Big Sal at top center) again...

Finally Tex is forced to relent: he falls back, suppressed (top center), as Big Sal looks on.

The bad guys are down to two men still in the fight: the RPG gunner dashes forward to rally his pinned buddy (top left), figuring the knocked down Cuban rifleman at far right ain't going anywhere.  Similarly, the bad guys have a knocked down guy in the northwest corner of the table (the PK gunner), with no hope of getting past the Cubans to rally him.

But Big Sal (bottom center) spots the RPG gunner bunched up with the pinned rifleman (top center).  Big Sal sights in and squeezes off a long burst.

On full auto, Big Sal's muzzle climbs and the rounds go high!  The RPG gunner (bottom left) successfully rallies his buddy, then returns fire...

"Damn that was close!"  Big Sal dashes forward and dives behind a clump of trees, suppressed (bottom right, with Tex suppressed at top center).

The Cubans immediately self rally: Big Sal (far right) is good to go, but Tex (bottom center) only gets up to pinned.  Their third man, the rifleman in the northeast, moves up, following the building's wall east (top left), looking to get in behind the bad guys (top center).

But the bad guys aren't impressed: the RPG gunner fires another rocket, this time in Tex's direction.

Tex watches as the rocket sails over his left shoulder and explodes harmlessly.

The enemy rifleman (center) fires for the umpteenth time on Tex (top right)...

The rounds miss, but buy enough time for the bad guy to hop the fence and rush over to the knocked down Cuban rifleman in the southeast (far right, with RPG gunner at left).

The bad guy finishes off the Cuban (bottom right) then moves up (center), worried about the third Cuban popping out from around the corner at top center.

Tex (bottom left, with Big Sal at bottom center right) fires on the enemy rifleman)...

Suppressing him (bottom right), but the RPG gunner (bottom center) returns fire with his AK (top left).

Tex (top left) keeps laying down fire as Big Sal moves up (far right).

Big Sal (bottom left) doesn't have a great look at the RPG gunner (top right), but he knows about where he's at and empties a full magazine into the brush...

Suppressing the RPG gunner (bottom center)!!!  With both enemy troops suppressed, the northeast Cuban rifleman decides to move up (top center right, just above the suppressed enemy rifleman).

The Cuban (bottom left) opens fire at point blank range, knocking the enemy rifleman down!

The enemy RPG gunner rallies himself (top center right), but Tex (bottom left) keeps pouring fire into his position

Pinning the RPG gunner (center).  Big Sal dashes up (far left), firing as he goes...

Knocking the RPG gunner down (bottom left)!!!  It's all over but the crying, both bad guys are knocked down.  The northeast Cuban rifleman moves up into contact with the knocked down bad guy (top center)...

And the bad guy pulls a pistol and shoots him in the face!!!  Inconceivable!!!

Having whacked the Cuban on top of him, the bad guy rifleman (bottom left) turns and fires on Big Sal (top right), trying to save his buddy, the RPG gunner (top left)...

Big Sal is knocked down (far left) by the enemy gunfire!!!  The bad guy sprints to the RPG gunner and checks him (far right)...

Tex (bottom left) lets out a howl as he sees his buddy, Big Sal (center top) knocked down!  He stands and empties a magazine at the enemy position (top center)...

The enemy rifleman is forced to fall back, suppressed (bottom center), leaving the RPG gunner still lying out there!

Tex (top left) begins legging it up to Big Sal (center left).  The enemy rifleman (bottom right) self rallies, but only gets up to pinned.

Tex makes it up to Big Sal and rolls him over...  He's okay, back in the fight!

The enemy rifleman moves up to the fence, looking to hop it and get up to the knocked down RPG gunner.

But Big Sal (far left, Tex is the one with the yellow bead) spots him (far right) and cuts loose...

But apparently being knocked down threw off Big Sal's aim, as the rounds are 'no impact, no idea.'  The enemy rifleman reaches his buddy and checks him...

The damn RPG gunner is back in the fight too (right)!!!  The Cubans had an advantage for a second there, but now both bad guys are back in the fight, and while both Cubans are in the fight, they're in the open and the bad guys are using the trees for cover.

Tex opens fire...

Tex's rounds pin the enemy RPG gunner (left, meaning the rifleman AND the RPG gunner are both pinned).  "Tex, cover me!"  Big Sal rips off another burst from his M-16...

Then charges in!!!

But the bad guys make quick work of the young Cuban....  Damn man, didn't even get one of them?

Tex slinks off into the jungle.  His Lieutenant is dead, the platoon scattered, and DZ Bluebird in enemy hands.

Holy @#$%, what a damn fight!!!  Not sure if you could feel it, but that whole damn thing was intense, and only ramped up once the RPG got the LT and M-60 gunner.  After that it was a couple guys versus a couple guys, and the back and forth was absolutely incredible.  I can't believe I lost!!!  But damn that was fun!

Now we move to the final DZ to see how 3rd Platoon does.  I really need this to go well, as if they are unable to secure their DZ and form up I'm not sure how the hell I'm going to have the manpower to fulfill the mission objectives of taking the enemy training areas and barracks.  Operation Rush Delivery is showing the cracks of a plan hastily put together!  I hope you're having as good a time as I am.

V/R,
Jack