Friday, May 26, 2017

Prelude - Angola 1980 Fight #2

All,

It's 1115 on 4 May 1981.  The members of 2nd Platoon, 1st Company, 33rd People's Revolutionary Battalion arrived in Luanda, Angola a week ago and are now embroiled in a fight to liberate the village of Mutanga.  Previously, 1st Squad assaulted across the Bulungtani River, seizing the bridge and neutralizing UNITA (The National Union for the Total Independence of Angola, backed by the US and South Africa) forces manning a watch tower and sandbagged mortar position.  Now 2nd Squad is skirting to the left, crossing a foot bridge to assault a UNITA bunker atop Hill 29 on the northern end of the village.  This will serve to eliminate the bunker and any UNITA forces there as a threat, to prevent UNITA reinforcements reaching Mutanga, to prevent UNITA troops in Mutanga from escaping, and to allow 2nd Squad to support by fire 3rd Squad's assault on the village.  

1st and 3rd Platoons pushed east and south, cutting off the enemy troops in the (fictional) village of Mutanga.  2nd Platoon followed in trace, then turned north to re-take the village.  Here is the plan for the overall operation to retake Mutanga:

North is up.  Here is my ConOps for the games; as in real life, this will get thrown off if (when) things go wrong.

1.  1st Squad assaults the tower and mortar position, taking the bridge over the Bulungtani River.
2.  2nd Squad crosses the foot bridge and assaults the bunker on Hill 29.
3.  3rd Squad begins crossing the open ground from the mortar position to the village, but is pinned by enemy fire from the palm grove.  1st Squad reorganizes and assaults the palm grove to clear it of enemy forces.
4.  3rd Squad continues its assault, securing the village of Mutanga.
5.  UNITA forces to the northeast counterattack the village, defended by 3rd Squad.
6.  2nd Squad leaves Hill 29 to mop up the enemy counterattack.

Well, that's the plan for Operation Lionheart, the counteroffensive to cut off and destroy UNITA forces north of the Bulungtani River and liberate the village of Mutanga. 

Overview, north is up, with the bunker sitting atop Hill 29 at top left, some huts from the village of Mutanga at top right, and the Bulungtani River and its foot bridge visible at bottom right.  The Cubans will cross the foot bridge, and disperse into the tall grass at center, where Team 2 will establish a base of fire on the right and Team 1 will close assault the bunker from the left.

The game is being played out solo on a 2' x 2' board using Ivan's "Five Men at Kursk," modified to make it a bit more modern (more firing dice, each troop in good fighting condition can act AND react in each turn, missed shots on troops in good fighting condition draws 'free' reaction fire), and I'm trying out the new "keep'em pinned" concept Ivan and I were discussing.

The Cuban forces consists of a single squad of ten men, broken down into a squad leader, an assistant squad leader, two RPG men, two light machine gunners (with RPKs), and four riflemen with AK-74s.  The figures are Battlefront Team Yankee 15mm East German Mechanized Infantry.

The squad is broken into two teams:
Bottom is Team 1, from left to right: Sgt Andrade (Sqd Ldr), PFC Habanera (RPG), PFC Ermera (RPK), Pvt Olejandro, and Pvt Elias.
Top is Team 2, from left to right: Cpl Galban (Asst Sqd Ldr), PFC Perez (RPG), PFC Fordesante (RPK), Pvt DeNostro, and Pvt Carreno.

The UNITA rebels, consisting of a boss (center, yellow shirt) and four rifleman with AKs of various type and manufacture.  The figures are Rebel Minis' 15mm African Rebels.

Overview, this time with troops.  You can see the Cubans spread from bottom left to center, while the UNITA rebels occupy the bunker at top left and have three men in the village at top right.

Here you get a look at 2nd Squad rushing towards the bunker (off camera to left), with Sgt Andrade leading Team 1 at bottom left, and Cpl Galban leading Team 2 at center.

Team 2's order of march, from right to left: Pvt DeNostro, Cpl Galban, PFC Fordesante, PFC Perez, and Pvt Carreno.

Team 1's order of march, from bottom right to top center (that's Team 2 at top left): Pvt Olejandro, Sgt Andrade, PFC Ermera, PFC Habanera, and Pvt Elias.

In the top right corner of the board, the bad guys have their Boss and two riflemen in the village.

While the bunker...

Is occupied by two UNITA riflemen.  It's a small firing port, but I will allow both to fire simultaneously for game purposes.

And it's game time!  I've already rolled to see how far the Cubans will get before contact begins (as per the pictures already shown), now I roll to see who starts the fight; the brother Dengue and Tengue are busy fighting over their last cigarette, when Dengue notices movement to their south.  He leans forward and peers, straining his eyes to make out what exactly is going on.  Slowly camouflaged helmets and uniforms begin to come into focus: "T-T-T-Tengue, I think we have a problem, brother.  I think that's the Cubans."  Tengue leans forward and takes a gander; the cigarette falls from his mouth: "Dengue, shoot!"

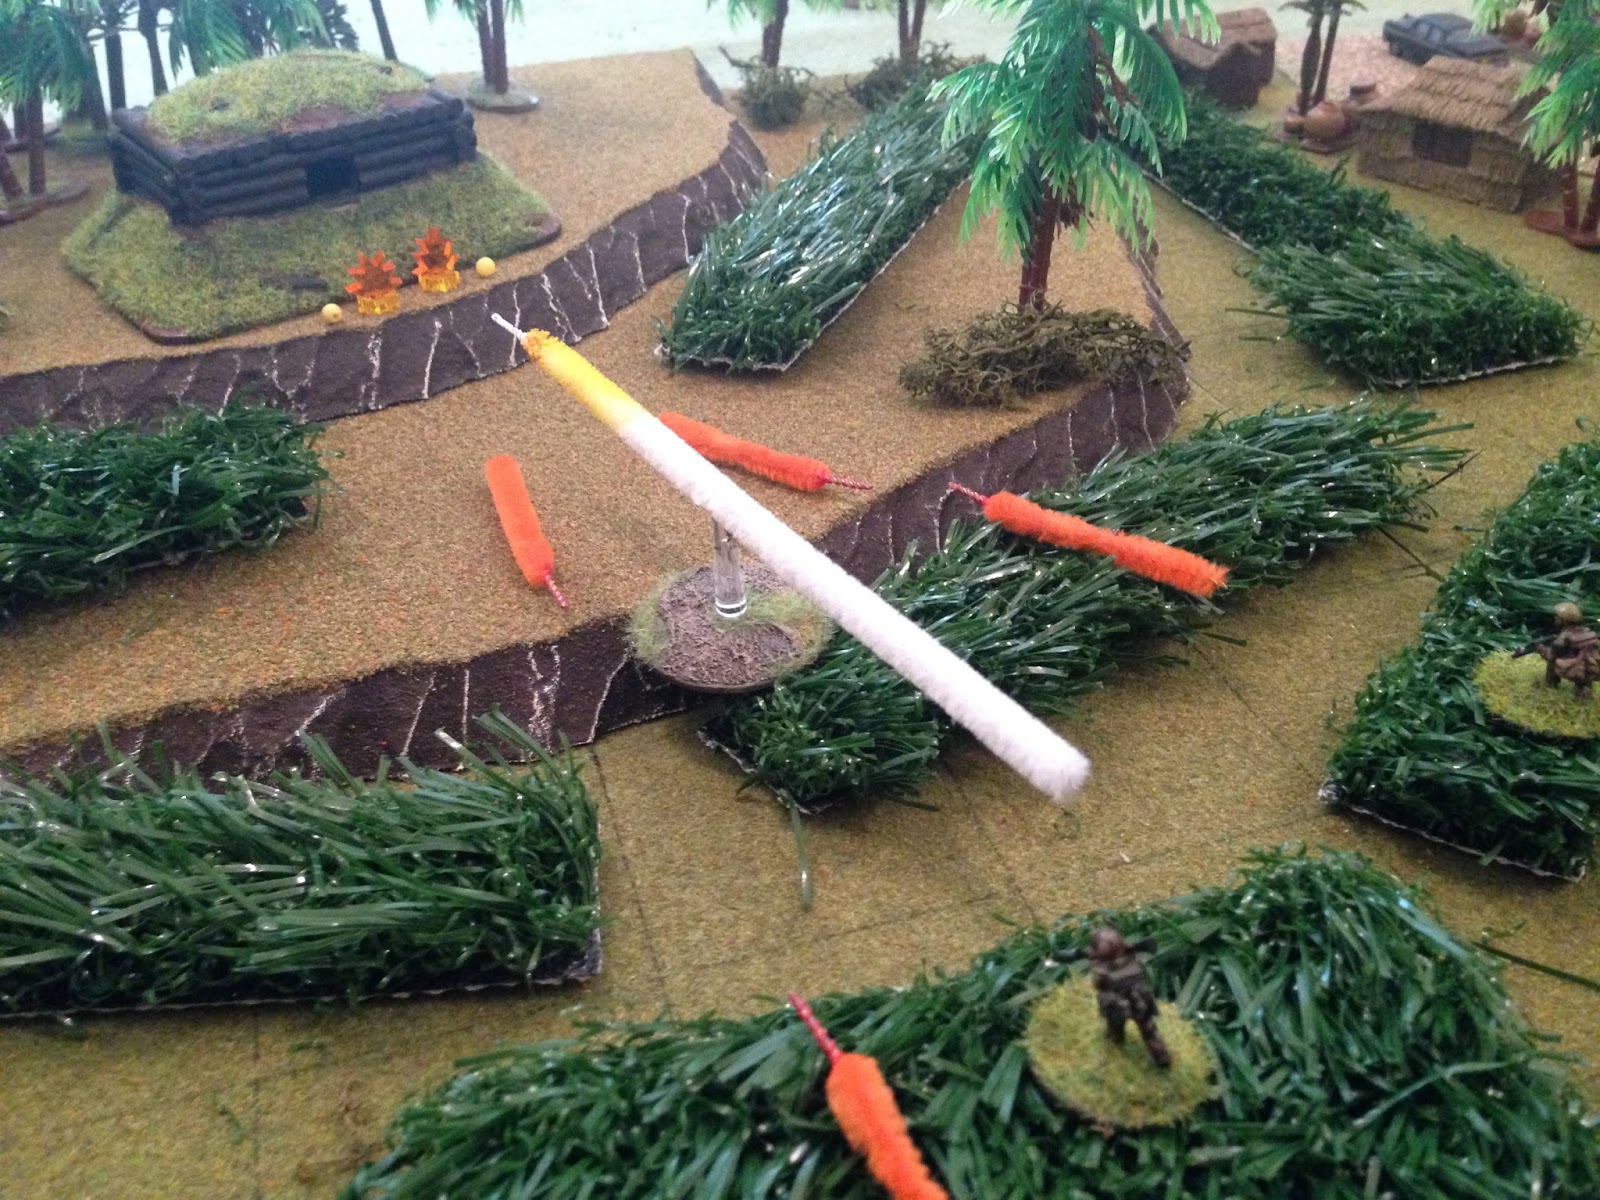
The still morning air is ripped by the rattle of two AK-47s on full automatic.  Dengue and Tengue (in bunker, bottom left) open fire on Team 2, still crossing the foot bridge...

But he's ill trained and ill prepared, and all his rounds do is pin PFC Perez, Team 2's RPG gunner (yellow bead).

Cpl Galban (bottom center) and Pvt DeNTostro (above him) return fire on the bunker, pinning Dengue.

In the village, the Boss and his two cronies move south, up to the edge of the village (far left, from center; the Cubans are at top left and the bunker is at top right).

Pvt DeNostro (center, with Cpl Galban at bottom left) continues pouring fire on the bunker (top right) as PFC Fordesante dashes forward (far left), drawing fire from Tengue.

Fordesante (far left, partially masked by tree) is suppressed by Tengue; Cpl Galban (bottom center left) returns fire ineffectually.  The two Cubans in bad shape (Fordesante suppressed at left, Perez pinned off camera to bottom center) are close enough in Dengue's field of fire to remain pinned/suppressed by him alone, keeping Tengure free to continue engaging other targets.

Pvt DeNostro (center) continues hammering away at the bunker (top left) as Carreno moves up (center right, with Fordesante suppressed just below DeNostro, Cpl Galban hidden by the trees just to Fordesante's right, and Perez is pinned at bottom right) and begins firing, but the rifle fire is having little to no effect on the heavily timbered bunker.
On the Cuban left, Sgt Andrade leads Olejandro (left) and Elias (bottom center) around the left flank while Habanera and Ermera (the RPG gunner and RPK gunner, respectively) push forward through the thick grass (center bottom).

Tengue and Dengue's AKs again rake Team 2, suppressing Cpl Galban (center) and Carreno (just above him), and keeping Fordesante (center bottom left) suppressed and Perez (far right) pinned.  Pvt DeNostro is the only one still retuning fire in Team 2 (far left).

Dengue keeps firing on Team 2 (right), while Tengue turns his rifle on Team 1 (bottom/left) pinning Ermera (yellow bead at center bottom) and suppressing Elias (red bead at bottom center).  Only Sgt Andrade and Pvt Olejandro (far left), and PFC Habanera (RPG gunner at center bottom, next to Ermera) of Team 1, and Pvt DeNostro (center right) are still in the fight for the Cubans!

And the three bad guys, still unseen by the Cubans, are creeping west (at center, towards top, where you can see the Cubans at top and far left).

Though pinned, PFC Ermera (yellow bead at bottom center) is able to get his RPK into action, adding its weight of fire to Pvt DeNostro's (center right).  They lay down fire at the cyclic rate, and manage to pin Tengue (meaning the two UNITA rebels can continue to fire during their phase, but cannot react fire)!

We're in business!!!

PFC Habanera dashes forward (bottom center right, with DeNostro at far right) and launches a rocket at the bunker...

BAM!!! Both UNITA rebels in the bunker are suppressed, ripe to be close assaulted off the face of the earth!  This also frees up Cpl Galban, PFC Perez, PFC Fordesante, Pvt Carreno, PFC Ermera, and Pvt Elias (all either pinned or suppressed) to attempt self rally at the end of the phase, due to the fact the UNITA troops in the bunker are no longer keeping them under fire.

PFC Habanera unslings his AK-74 (bottom center) and begins firing at the bunker to keep Dengue and Tengue suppressed, while Sgt Andrade attempts to seize the initiative by leading Pvt Olejandro forward to close assault the bunker (far left).

*As Dengue and Tengue are in a bunker, presumably lying on their faces and therefore pretty much invulnerable to Cuban fire, I have decided I will allow them to attempt to self rally at the end of the bad guy phase.  However, in order to begin firing on the Cubans they will have to stand up and present themselves as targets via the firing port, and will be subject to Cuban react fire.

Anyway, just as things are looking up for the Cubans (classic fire and maneuver there, bust the bunker with an RPG then close assault), it stops...

Looking east to west, we see the bad guy Boss and his two cronies at bottom center.  They hear the explosion at the bunker, which draws their eyes to the area, just in time to see Sgt Andrade and Olejandro (top center) dashing up the hill.  The bad guys open fire.

Olejandro is suppressed and Sgt Andrade is pinned!

The Cubans previously pinned/suppressed by the bunker attempt self rally: Cpl Galban, PFC Perez, PFC Ermera, and PFC Fordesante are all good, but Elias (red bead at bottom left) and Carreno (red bead at far right) remain suppressed.

The Cubans pour fire into the bunker, but Dengue and Tengue both manage to self rally back into the fight, though they will be subject to quite a bit of fire when they decide to stand back up.


The bad guys on the Cuban right flank (bottom center) keep firing at Sgt Andrade and Pvt Olejandro (top center), and they manage to suppress Sgt Andrade this time.  The last rifleman targets PFC Fordesante (look at the rifleman with the white hat at bottom center left, then trace up at 11 o'clock.  You should see the orange tracer on the stand, then an explosion just above it, with a Cuban RPK gunner standing in the tall grass; that's Fordesante).

The rounds zip and snap past him, but Fordesante (bottom left, with DeNostro to his left and Cpl Galban to his right) turns and rips off a burst at the UNITA soldier (top center).

But Fordesante (top left) misses his target as well (explosion at far right), and the enemy soldier darts through the undergrowth (center bottom, you can see his white hat below the twin palm trees). 

PFC Perez (just visible at far left, next to foot bridge) spots the UNITA rebel at the same time he is spotted; both men quickly fumble for fresh magazines.  Perez wins, but...

The UNITA Boss dashes forward (center); Perez (bottom center, with Carreno suppressed at far left) spots him and fires.

Perez (top center) misses, and the Boss (bottom left) unleashes a hellacious burst of fire from his AK...

Perez goes down (bottom center), while Carreno falls back and huddles next to Cpl Galban (left), who is now also  suppressed.

PFC Fordesante (bottom left) stands alone against the three bad guys on the right flank.  He can't see any targets clearly due to the dense foliage, but he shoulders his RPK and stands on the trigger, tracers flashing over Cpl Galban and Pvt Carreno, suppressing the enemy rifleman at top center right (you can just see his white hat to the right of the palm fronds).

Pvt DeNostro (dead center, with Fordesante just below him) faces a dilemma: the bad guys at far right have Cpl Galban and Pvt Carreno (at DeNostro's 4 o'clock) suppressed, and the bad guy at top right has Sgt Andrade and Pvt Olejandro (far left) suppressed.  DeNostro is going to stop firing at the bunker (which is okay, as Ermera and Habanera (in grass at center left) are still maintaining fire on it) to engage one of the right flank bad guys, but which one should he choose? 

I check LOS and figure he can't really see the guy at top right for all the grass...

So DeNostro (bottom left) pivots right and fires on the UNITA Boss (center top, with a suppressed rifleman at top right), knocking him out of the fight!

Cpl Galban (bottom center, next to Pvt Carreno) and Pvt Elias (off camera to bottom left) mange to self rally, but Carreno is still digging for worms.

Dengue and Tengue (in bunker, bottom left) decide it's time to pop up, so they do, and they receive quite a bit of fire from Habanera, Ermera, and Elias (top right), but it all misses, no effect!!!  The two UNITA brothers open up with a vengeance: first, Tengue fires on Team 1.  No one is hit, but Habanera is pinned and Ermera and Elias are suppressed again!

Then Dengue (in bunker, bottom left) fires on Team 2 (center top), pinning DeNostro (center left).

Dammit!!!  I had the Cubans in great shape, both bad guys in the bunker suppressed, pushed up, then get the enveloping element suppressed, Team 2 in a knife fight in the grass/trees on the right, and the base of fire is now suppressed by the bunker, who's back in good shape!

Back on the Cuban right, Cpl Galban screams out "cover me!"  Fordesante (bottom left) again lets rip with his RPK, as Cpl Galban dashes forward (center top, with bad guy's white hat visible at his 11 o'clock, and Carreno still cowering just above Fordesante).

Cpl Galban slams bodily into the suppressed UNITA fighter...

Putting him out of the fight!

Cpl Galban then slips around the back of the remaining right flank bad guy (top center, from bottom right, with the last bad guy at top left).

Fordesante (bottom center right) shifts his fire to the remaining bad guy on the right flank (top left, with Cpl Galban above him) and opens up, but the fire is ineffective due to all the trees and tall grass.  While things are shaping up on the right flank, the center is still under pressure from the bunker.

Though pinned by fire from the bunker, PFC Habanera quickly pops up (bottom right) and launches his second RPG at the bunker...

But it's not as accurate as the first, hitting a bit to the left, pinning Tengue.

Dengue and Tengue keep firing, managing to suppress DeNostro (red bead at right).  Fordesante (bottom right) stands tall and lets rip on the bunker, suppressing Dengue!!!

Back on the right, Cpl Galban creeps up behind the last bad guy on the right (who's still firing to keep Sgt Andrade and Olejandro suppressed, off camera to top left) and opens fire, dropping him.

Cpl Galban moves up (bottom center right).  Sgt Andrade and Pvt Olejandro (top left) are now no longer under fire and attempt to self rally...

But apparently they're both still a bit shaken up...

In the bunker (top left), Dengue is suppressed, but Tengue is only pinned, and he fires on that pesky RPG gunner, Habanera (bottom right), suppressing him.  No longer under fire, DeNostro and Carreno of Team 2 both self rally.

Dengue has Habanera and Ermera (red beads at bottom left) suppressed, but Fordesante, DeNostro, and Carreno come on line (bottom center/right) and pour fire into the bunker (top left).

As they (bottom left) do, Cpl Galban dashes up the right side (top right).

And Sgt Andrade gets himself back into the fight, though Olejandro remains suppressed.

Dengue is still firing from the bunker, keeping Ermera and Habanera suppressed (red beads at bottom center).  It's a hair outside the arc, but I let Dengue try to add Fordesante (bottom right) to the mix.  Dengue fires...

And my poor Fordesante, who's been so valiant, hammering away with his RPK, goes down (bottom center).

Olejandro (bottom left) finally self rallies, while Sgt Andrade (top left) and Cpl Galban (top center) cautiously close in on the enemy bunker.

Tengue can't seem to self rally in the bunker, while Dengue makes the decision to stop firing to keep Habanera and Ermera (far right) in order to engage DeNostro and Carreno (top right), but his fire has no effect.

The Cubans self rally and pour fire into the bunker, keeping Tengue suppressed and wounding Dengue!

Sgt Andrade signals his men to shift fire, then climbs atop the bunker and drops a hand grenade into the bunker...

Dengue and Tengue see the frag and sprint out the back door...

Only to be gunned down by Cpl Galban!

The Cubans close in on the bunker, securing the area and consolidating their position.

Cpl Galban moves back to check on the casualties, and it's not good.  PFC Perez, Team 2's RPG gunner, is KIA, and Team 2's machine gunner, PFC Fordesante, is severely wounded, so much so that he requires evacuation back to Cuba.  For him, the war is over!  The squad administers first aid to Fordesante, then loads him on a truck for the hospital in Luanda, then a boat ride back to Havana.

Well, that fight was brutal, and just when it looked like everything was going to plan, the bad guys showed up on the right flank and ruined it.  The Cubans quickly ended up in a very bad way, and if I'm honest I'll admit that for a moment there I quit thinking about how the Cubans might accomplish their mission and began thinking about how the Cubans might break contact to save the rest of the squad.  But the gambit on the right flank, with Fordesante laying down covering fire and Cpl Galban rushing ahead to roll up the right flank, worked like a charm, saving the day.

The Cubans lost one man KIA and one WIA, never to return during their tour in Angola (they may receive replacements, we'll see how it goes), while killing five UNITA rebels, capturing five AK-series rifles, and accomplishing their objective of seizing the bunker on Hill 29.  This fight saw a considerable amount of personal heroism from the members of 2nd Squad, and three were singled out for decoration:

Cpl Galban was awarded the Revolutionary Star, 2nd Class, for valor in establishing a base of fire, then charging two enemy soldiers to break the right flank of the enemy attack, then charging the enemy bunker and eliminating the remaining rebels.

PFC Fordesante was awarded the People's Cross of Gallantry, for demonstrating personal bravery by fearlessly exposing himself to the intense enemy fire from two directions, fighting the enemy's incursion on the right flank to a standstill, then working to subdue the enemy bunker by fire until he himself was stricken down.

PFC Hermera was awarded the Revolutionary Star, 1st Class, for gallantry demonstrated in charging through enemy fire to deliver two rocket propelled grenades into the enemy bunker.

Having said that, there were three soldiers that didn't exactly cover themselves in glory, remaining shaken for far too long after enemy fire was diverted off them by the heroic actions of their comrades: Private Elias, Private Olejandro, and Private Carreno, who will see an increased chance of them continuing on their cowardly paths in future fights.

Well, I'm having a great time, hope you are too!  Next up, 3rd Squad begins moving to assault the village, but ends up taking fire from the right flank, in the vicinity of the palm grove.  1st Squad, holding reserve at the bridge over the Bulungtani River, quickly mount up and move to assault the palm grove.

V/R,
Jack

Prelude - Angola 1980 Fight #1

All,

It's 1045 on 4 May 1981.  The members of 2nd Platoon, 1st Company, 33rd People's Revolutionary Battalion arrived in Luanda, Angola a week ago.  They met with their outgoing counterparts, and were in turn introduced to their FAPLA (People's Armed Forces of Liberation of Angola, i.e., the Angolan Communists) brethren.  They conducted several patrols in the local area, but then were given word of a UNITA (The National Union for the Total Independence of Angola, backed by the US and South Africa) offensives coming out of Southwest Africa (on the southern border of Angola, now known as Namibia).  The UNITA forces broke through the FAPLA lines at the frontier; 1st Company was swiftly loaded up and trucked south to head off the enemy spearhead.  As they arrived on scene, the Cuban/FAPLA counterattack was already occurring.  1st and 3rd Platoons pushed east and south, cutting off the enemy troops in the (fictional) village of Mutanga.  2nd Platoon followed in trace, then turned north to re-take the village.  Here is the plan for the operation to retake Mutanga:

North is up.  Here is my ConOps for the games; as in real life, this will get thrown off if (when) things go wrong.

1.  1st Squad assaults the tower and mortar position, taking the bridge over the Bulungtani River.
2.  2nd Squad crosses the foot bridge and assaults the bunker on Hill 29.
3.  3rd Squad begins crossing the open ground from the mortar position to the village, but is pinned by enemy fire from the palm grove.  1st Squad reorganizes and assaults the palm grove to clear it of enemy forces.
4.  3rd Squad continues its assault, securing the village of Mutanga.
5.  UNITA forces to the northeast counterattack the village, defended by 3rd Squad.
6.  2nd Squad leaves Hill 29 to mop up the enemy counterattack.

Well, that's the plan for Operation Lionheart, the counteroffensive to cut off and destroy UNITA forces north of the Bulungtani River and liberate the village of Mutanga.  Let's get to the first fight, where 1st Squad has crossed the line of departure and is closing in on the bridge/tower/mortar position.

Overview of map, with north being to top left.  The Cubans will enter from the southwest (bottom), moving up on either side of the road to the village of Mutanga (off camera to top).  At center is the bridge over the Bulungtani River, with UNITA forces entrenched on the opposite bank, where they have a watch tower at top center left and a sandbagged mortar position at top center right.  At top right is a civilian hut, one of several on the outskirts of the village.  The countryside is relatively flat grasslands, with intermittent patches of dense forest and long elephant grass (which blocks line of sight and slows down movement), and the river is fordable by men on foot.

The game is being played out solo on a 2' x 2' board using Ivan's "Five Men at Kursk," modified to make it a bit more modern (more firing dice, each troop in good fighting condition can act AND react in each turn, missed shots on troops in good fighting condition draws 'free' reaction fire), and I'm trying out the new "keep'em pinned" concept Ivan and I were discussing.

The opposing forces, with Cubans on the left and UNITA rebels on the right, ten verses six.  I was going to say good guys and bad guys, but...

The Cuban forces consists of a single squad of ten men, broken down into a squad leader, an assistant squad leader, two RPG men, two light machine gunners (with RPKs), and four riflemen with AK-74s.  The figures are Battlefront Team Yankee 15mm East German Mechanized Infantry.

The squad is broken into two teams:
Bottom is Team 1, from left to right: Sgt Colvasquez (Sqd Ldr), PFC Barnejesus (RPG), PFC Bronchovio (RPK), Pvt Cannastria, and Pvt Rolando.
Top is Team 2, from left to right: Cpl Lucastro (Asst Sqd Ldr), PFC Calderon (RPG), PFC Solar (RPK), Pvt Guerrerro, and Pvt Bustamante.

The UNITA rebels, consisting of a boss (center, yellow shirt), an RPG gunner, and four rifleman with AKs of various type and manufacture.  The figures are Rebel Minis' 15mm African Rebels.

Another look at the map, this time with all troops present.  The UNITA rebels have a guy in the tower at top left, three in the mortar position at top center right, and two more screwing around near the civilian hut at top right.  The Cubans have Team 2 at bottom left and Team 1 at bottom right. 

On the Cuban left, Cpl Lucastro is moving his team aggressively forward to the river.  The order of march is (from top): Pvt Guerrerro, Cpl Lucastro, PFC Solar (RPK), PFC Calderon (RPG), and Pvt Bustamante.  The road is barely visible at bottom right.

On the Cuban right, Sgt Colvasquez is a bit more cautious.  His team is moving up and around a large patch of grass, so that the front of his column is at far left, and the rear is at far right.  The order of march is: Pvt Cannastria, PFC Bronchovio (RPK), Sgt Colvasquez, PFC Barnejesus (RPG), and Pvt Rolando.

Another look at the Cuban starting positions, with Team 2 at bottom left and Team 1 at top right.  The Cubans would like to get Team 1 into position in the grass at top center/right, just below the river, to serve as a base of fire as Team 2 takes care of the tower (off camera to top left), fords the river (using the bridge as cover), then hooks around into the mortar position (off camera to top center).

A look at the UNITA line, from tower to mortar position to civvie hootch.

One AK-47 armed lunatic in the tower.

Three more, including the RPG gunner, chilling in the mortar emplacement.

While the Boss and another rifleman are up next to the civvie hootch, tossin' the mack at a local hottie (sure she's got a baby on her hip, but what of it?).

I've already rolled to see how far the Cubans get without being spotted; this occurred before the pictures, so what you're seeing are the results of those rolls.  Now I roll to see who gets the drop on who...

On the Cuban left, Pvt Guerrerro (bottom right) is creeping forward through the tall grass, eyes fixed on the UNITA rebel in the watch tower (top left).  The UNITA soldier is looking quite bored, taking a long drag on a cigarette, when his demeanor suddenly changes.  He opens his mouth to shout a warning to his compatriots, but Guerrerro has already shouldered his AK-74 and he cuts loose a long burst.

The enemy sentry is hit and, in true Hollywood fashion, falls forward out of the tower, landing at the base.

Well, that was easy.

Pvt Guerrerro (center right) lays down fire as Cpl Lucastro (center left) yells orders out to his team!

Cpl Lucastro (bottom center, with Guerrerro to his top left) points and the machine gunner, PFC Solar, takes off running to the right, looking to get his weapon into position at the road (far top right) in order to fire on the enemy mortar position.

You can see Solar at far right, as Cpl Lucastro dashes ahead (center), followed by Calderon and Bustamante (left, with Guerrerro firing).

On the right, Sgt Colvasquez (bottom right) orders his machine gunner, PFC Bronchovio (bottom center, with Pvt Cannastria at bottom left) to open fire on the enemy mortar position (top center, across the river).

Bronchovio's rounds slam into the sandbags (bottom right), but the UNITA troops are undeterred.  They scramble for their weapons, and even manage to return fire, though it's ineffective.  Cannastria, right next to Bronchovio (top left) adds his AK to the mix, and ends up trading ineffective fire with another bad guy in the mortar position.

While Cannastria and Bronchovio (bottom left) blaze away, Rolando moves up (right) and Sgt Colvasquez and Barnejesus pop through to the other side of the patch of crass (center top).

Across the river, the UNITA troops have recovered from the initial shock of gunfire.  The two rifleman in the mortar position (bottom center, with RPG gunner there as well) slap fresh magazines in their weapons and go cyclic, dramatically increasing their weight of fire on Team 1 (top center).

And the effects are telling: Bronchovio is hit and goes down, while Rolando is pinned (yellow bead) and Cannastria is suppressed (red bead).

FOR IVAN: So, here's what I've come up with.  I place a marker down (the orange 'tracer' at center, which is just laid on the table, not on the little platform I usually use).  I choose one bad guy in the mortar position (top left); if he keeps firing at Cannastria and Rolando each turn, they will remain suppressed/pinned.  Now, the bad guy can choose to NOT fire at them, but then in their phase they will use their activation to attempt self rally as per normal rules.  While they are pinned/suppressed they don't roll for activation; a suppressed guy can't do anything, while a pinned guy automatically gets to fire (during his phase, cannot react), though I'm only giving them shock dice (a rifle is 1S, an LMG 2S, etc...).   

The bad guy doesn't roll for activation unless he changes his mind and decides to do something other than shoot at the guys he has pinned/suppressed.  If he was shooting only at suppressed enemies, I'd say he doesn't need to roll anything, unless I thought there was a chance they could be forced to run, then I'd roll 1S per suppressed target, and they run if you roll a 1 or 6 (and you should let people shoot at them if they don't have a covered means of escape, though I would be very judicious with this as most guys without a covered route of escape would simply go prone).  If the bad guy is shooting at pinned troops, or troops within his field of fire not yet affected, he should get normal firing dice, probably bumped up for targets being grouped.  It's not possible to hit a suppressed guy (unless you're right on top of him), but guys not affected but in the field of fire, and pinned guys can be hit. 

You can use more than one troop to 'keep' an enemy pinned/suppressed.  This does three things:
1) if enemy troops in the target zone are unaffected or only pinned, it adds more shooting dice to the auto-fire during your phase.
2) this adds more shooting dice to react fire if a leader/buddy tries to move into the field of fire to rally folks.
3) this keeps more guns on target in case the enemy manages effective return fire, or to bring other troops into the fight, to hit/pin/suppress the guy(s) you had keeping someone pinned/suppressed.

I think pinned and suppressed troops can be rallied, not sure if it should be leader only, or a buddy, but they have to move into base contact.  When they do so they are subject to react fire by every enemy soldier that is firing in that field of fire.  For example, if the Cubans had suppressed all three bad guys in the mortar position, they could have one rifleman keeping the three UNITA guys suppressed.  The enemy Boss moves into the mortar position to rally his troops; he is subjected to 1K 1S from the Cuban rifleman keeping the UNITA guys suppressed.  But let's say the Cubans have two rifleman and an RPK keeping the mortar position suppressed; I don't have exact numbers figure out (that's your job!!!), but I'd probably give the Cubans 1K 3S to fire at the Boss when he moves into the mortar position (assuming they've got LOS to him before he reaches the cover of the mortar position itself).  If the Boss makes it, he can roll to rally all three of his suppressed dudes.

So, back on track with how keeping pinned/suppressed guys pinned/suppressed, above I've got one pinned and one suppressed.  I'm not worried about the suppressed guy as he's not going anywhere, so no shooting dice at him, but the pinned guy gets 1K 2S (one kill because the pinned guy is still presenting himself as a target in order to return fire, and two shock because the shooter is kind of already zeroed in on the pinned guy, and because it should be easier to push the pinned guy to suppressed than a guy so far unaffected by fire).  If there were unaffected targets in the field of fire, I'd add 1K 1S for them, too.  If you look at the pic, you can see Sgt Colvasquez and PFC Barnejesus are just to the right of the field of fire; you've got to figure out how wide the field of fire can be for various weapons (I ruled they were outside a single UNITA rifleman's capability), but if I thought they were in I'd make it very deadly, adding 1 or 2 more Kill dice and definitely two more Shock.  So, during his next phased fire, the single bad guy rifleman would get either 2K 4S or 3K 4S by those calculations.  Being that it's a rifle (AK), I can tell you I'd probably give him 2K 3S, or 2K 4S if it's a really good shot (targets easily seen, really bunched up).

I'm trying to figure out if 'man down' is still relevant; in this game I just treated it as suppressed, until the very end when I decided to create a couple wounded guys, just for fun.  And I didn't do it, but I was thinking about a pinned guy getting pinned again becoming suppressed.

Sorry if my explanation is all over the place, hope that makes sense.  This is exactly what I was describing in the "suppression" thread on TMP.  For what it's worth, the modes added some time to the game, but it felt pretty damn good, and should port straight over to 5Core Company Command.

The two UNITA rifleman in the mortar position lay down fire as the RPG gunner dashes right (top right), across the road.

Meanwhile, the enemy Boss dashes to the mortar position, while his debonair rifleman sneaks forward through the brush, getting into a firing position unseen (far right, between grass and trees).  The target of their romancin' talk (top right) dashes away from the gunfire, into her hut.

Back on the Cuban left, Cpl Lucastro (bottom center) spots the enemy RPG gunner (top left) in the grass and opens fire, suppressing him!

On the far right, Team 1's RPG gunner, PFC Barnejesus, pops through the brush (far right, with Sgt Colvasquez at bottom right).  The enemy rifleman across the river spots him, and the two trade ineffectual fire.

Things don't sound like they're going the way they were supposed to, so Sgt Colvasquez himself pops through the brush, next to Barnejesus.  An enemy rifleman in the mortar position shifts his fire onto them, but the rounds go high.

Sgt Colvasquez involuntarily flinches, but then immediately shoulders his weapon and returns fire, suppressing one of the UNITA riflemen in the mortar position.

On the left, Cpl Lucastro (center) continues laying down fire to keep the enemy RPG gunner pinned, as Calderon, Guerrerro, and Bustamante move up into the bush on the far left.  Solar (bottom right) is still moving right, trying to get into the fight.

And he does.  He reaches the road (bottom center) and immediately cuts loose with his RPK on the enemy mortar position (top center).  But he totally misses (I gave him 3S; the Cubans are only getting Shock dice when firing at the sandbagged mortar position, but I bumped him up 1S as I figured the UNITA guys had their attention focused elsewhere)...

The enemy Boss (yellow shirt in the mortar position, bottom left) spots Cannastria, Bustamante, and Calderon (top right) and fires, but he misses.

While the rifleman on the UNITA far left (bottom left) continues pouring fire at Sgt Colvasquez and PFC Barnejesus, though Barnejesus is suppressed this time.

A quick look at what's going on from the perspective of the new mods: at left center I've got Cpl Lucastro marked to keep firing on the suppressed enemy RPG gunner at top center left.  I've got one UNITA rifleman in the mortar position marked to keep firing to keep Cannastria suppressed and Rolando pinned (bottom center right).  On the right I've got Sgt Colvasquez marked to keep firing to keep a UNITA rifleman in the mortar position suppressed, and I've got a UNITA rifleman in the trees (top right) marked to keep firing to keep Barnejesus suppressed.  As with real life, the outnumbered defenders are quickly running out of people to maneuver, though they can keep up a deadly effective fire from their covered positions, and the Cuban attackers have their right tied down in the gunfight and their unengaged left able to maneuver.  Pretty cool.

Speaking of the unengaged guys on their far left, the Cubans have an ace up their sleeve...

Being unengaged means PFC Calderon (bottom left) can pop up and launch a rocket at the enemy mortar position...

The RPG slams into the sandbagged emplacement!  The enemy Boss and a rifleman are suppressed, while the previously suppressed rifleman bolts for safety (red bead at top right.  I didn't let Sgt Colvasquez take a react shot at him as I figured 1) he would probably have been a bit surprised by the explosion, and 2) he doesn't really have much of a look at the runner's route of escape).

The enemy mortar position (top right) abruptly goes silent (this means Canastria and Rolando, on the right, can self rally during their phase).  Guerrerro (bottom left) begins firing on the enemy RPG gunner (top center), keeping him suppressed, and Calderon (next to Guerrerro) fires his rifle at the mortar position to keep it suppressed, while Cpl Lucastro and Bustamante move up to the river at the bridge (center).

I allowed Cpl Lucastro to order Guerrerro to take over firing on his suppressed target in order to free Cpl Lucastro up to begin maneuvering again.  It made sense to me as he's the team leader.

Off camera on the Cuban right, Cannastria and Rolando both successfully self rally and are back in the fight.

On the UNITA far left, the rifleman in the bush (center left) continues firing across the river.  He's unable to affect Sgt Colvasquez, but he keeps the other RPG gunner, PFC Barnejesus, suppressed.  The enemy runner (red bead at bottom left) finds himself finally out of the Cuban line of fire and is able to rally himself back into the fight.

Calderon (next to Guerrerro at bottom left) has to cease firing at the enemy mortar position (top right) as Bustamante moves up to the corner of the bridge (center right, with Cpl Lucastro right behind him) and peers around.

The just-rallied runner (bottom center) spots Bustamante (top center) and the two exchange fire harmlessly.

Calderon (bottom left) takes over keeping the enemy RPG gunner (top center) suppressed, while Guerrerro goes splashing across the shallow river (far left).

With Calderon (bottom left) keeping him suppressed, Cpl Lucastro dashes forward (center top, just above Bustamante, at far right), looking to get at the suppressed enemy RPG gunner.

Cpl Lucastro cautiously peers through the grass, spotting the prone enemy soldier.  He rattles off a long burst from his AK, wounding him.

FOR IVAN: I rolled another man down; it didn't make sense to me just have him stay suppressed, but I didn't roll a kill, so I counted him as wounded.  During his next phase he can roll to try and get back in the fight.  But if he did, wouldn't he just remain suppressed?  Or would the reaction of an enemy so close trigger him to act?  I dunno, it's getting squirrelly now...

So, when the RPG hit the mortar position earlier, I actually rolled one suppression and two 'man down' results, but counted the two 'man down' results as suppressions, where the enemy Boss and a rifleman were suppressed, and a previously suppressed rifleman fled the emplacement.  At this point I decided to leave the Boss suppressed, but retroactively made the rifleman in the mortar position wounded.

In any case, the Cubans on the right were finally able to make the plan work: they built up a base of fire on the right side, to allow Team 2 to maneuver on the left.

And with that, the writing was on the wall.  The enemy Boss fled the scene with two of his riflemen.

Allowing the Cubans to seize their objective, capturing the wounded RPG gunner (top left), a wounded rifleman (in the mortar position), the body of the KIA watch tower sentry three AKs, a 60mm mortar, and a number of 60mm mortar rounds.

Sgt Colvasquez personally checked on PFC Bronchovio: the lad was hit in the shoulder and would be out for a bit.  The squad provided first aid, then loaded him on a truck for the hospital in Luanda, expecting him back sometime around 2 June 1981.  Corporal Lucastro was awarded the Revolutionary Star, 1st Class, for leading the envelopment of the enemy's right flank.

FOR IVAN: So, a pretty fun fight, relatively quick (though longer than my normal 5MAK fights), and very successful as a playtest.  Everything worked out very well, and I was able to figure out some things I was previously unsure of, though I'm still not sure how to handle the 'man down' result.  Another question would be, do you allow a suppressed individual to make a 'free' retreat move if he has a covered avenue of escape?  I don't mind a compulsory retreat, even if it's an uncovered avenue of escape, so long as there is a very large perceived threat forcing it (something to overcome his fear of running out into enemy fire in order to get some distance between it and himself).

Next up we have 2nd Squad creeping across the foot bridge and assaulting the enemy bunker on Hill 29 so that 3rd Squad can assault the village, so stay tuned.

V/R,
Jack