Current situation: It's 0700 on 4 August 1990 in South Leon. Lt Gouveia has been promised a SLA mechanized battalion, and he has secured (limited amounts of) Cuban air support. The desired end-state is joint Cuban/SLA possession of Hill 114; to that end, the SLA battalion scheme of maneuver is to probe to the northeast of Hill 114 (this fight, which is taking place directly north of the map used for Operation Chunky Bandit fights 1-8), seeking to find an opening in the enemy defenses and exploit it with a hasty attack on the objective, or go firm and secure the right flank of the attack. While this is occurring, Cuban air support will pound Hill 30 (at center right of the Op CB fights 1-8), and then SLA forces will assault and hold Hill 30 (will be Op CB #10) to secure a position to support the Hill 114 assault by fire and secure the left flank of the attack. The SLA command, of course, expects the enemy to vigorously counterattack Hill 30 (will be Op CB #11). Then SLA forces will conduct an air assault to the northwest of Hill 114 (off the map for Op CB fights 1-8 to top left) to isolate the objective, preventing withdrawal and reinforcement (this will be Op CB #12), and then the assault on Hill 114 will commence (will be Op CB #13). Again, SLA leadership presumes the enemy will vigorously counterattack if Hill 114 falls (will hopefully be Op CB #14, assuming the attack on Hill 114 succeeds, but that applies pretty much to all of these).
Ninety minutes ago (0530 local time) Staff Sergeant "Tahoe" Gallarraga accompanied the SLA mechanized battalion's A Company on a probe northeast of Hill 114, where they discovered the enemy had prepared defenses in that zone, though they were able to secure Hill 27 and thus fulfill their mission of anchoring the right (northern) flank of the upcoming attack on Hill 114. Tahoe was awarded the Bronze Star for his actions taking Hill 27.
Sixty minutes ago (0600 local time) Staff Sergeant "Gundog" Baerga accompanied the SLA mechanized battalion's B Company in the assault on Hill 45, which succeeded, but with heavy casualties, including SSgt Baerga himself, lightly wounded and evacuated. The remaining SLA elements quickly established defensive positions atop Hill 45.
Overview, north is up, Along the left (west) edge of the map is Route 1, the major route leading south from the border/DMZ the enemy is using to reinforce their forces in the South Leon capital of Pendrakenville and the regional capital, Diwala, further east. At bottom right is the northwest end of Hill 114, the ultimate objective of this phase of the operation. Scattered rice paddies dot the countryside, and there are three small hamlets, from bottom left to top right, villages 1 through 3. There is a river running northeast to south, fordable along its length at penalty, though there are two actual fords (center top right and center bottom left) that vehicles could cross and are essentially no hindrance to foot movement.

The opposing forces, with SLA on the right and FSNL (communist neighbors to the north) at left. The troops are all Pendraken 10mm, except the Cuban (singly-based dude at bottom center right), which is Minifigs UK. The two bunkers at far left are from Flashpoint Miniatures, and the sandbagged position is from Miniature Building Authority. I'm playing this series of fights (the SLA operation to take Hill 114) using Ivan Sorensen's "Squad Hammer" rules, modified a bit.
I'm really not much on rules reviews, but my buddy "Whirlwind John" asked me to make some comments, so here we are. Squad Hammer is a pretty simple, straight-forward game, which, being a simple, straight-forward kinda guy, is right up my alley. It's an IGO-UGO game that uses DBA-style command points to toss some friction into the mix; that is, at the start of each turn both player's throw a D6 and high roll has initiative first, low second. When it's your initiative you roll 2D6 and take the higher, that's how many units you can activate. Then you start picking units and activating them, one at a time, and it's the regular stuff: move, shoot, move and shoot (but not shoot and move), rally (it's called "regroup" here), fall back (move and rally a little bit). I don't really like IGO-UGO in general, and particularly not for solo games, so each turn I have the two sides roll for command points, then put that many cards (per side) into a deck, shuffle them, and activate units when their side's card is drawn.
Movement is very conventional, pretty standard movement distances modified by terrain, as is shooting. Shooting is a 2D6 roll to hit, then a roll to see how much damage is inflicted. The to hit number is determined by the tactical situation: let's say the 'normal,' decent shot is a 7+ on 2D6. That's a stationary shooter firing on a stationary target at medium range with no significant cover/concealment. Changes to that equation move the target number down and up, making it easier or harder to hit the target. Each unit in the game has a damage capacity, i.e., how many hits it can take (the norm is six), and each unit has a damage capability, i.e., how many hits it can inflict. So the norm would be a rifle squad firing at a rifle squad at medium range without significant cover, the shooter, if he 'hit' the target, would then roll 1D6 and inflict that many damage points. A tank firing at infantry in the open might roll damage with 2D6, or roll 2D6 and pick the higher one. As an example, in the past few fights I've had enemy bunkers that fire like a machine gun, but have a whopping eight strength points, AND I make them harder to hit, AND I only allow units to roll a D3 in damage if they hit.
So, there you go, my first ever rules review. Sorry, it's not much, but there are the basic mechanics and description of how units are composed, which is all I really care about ;)
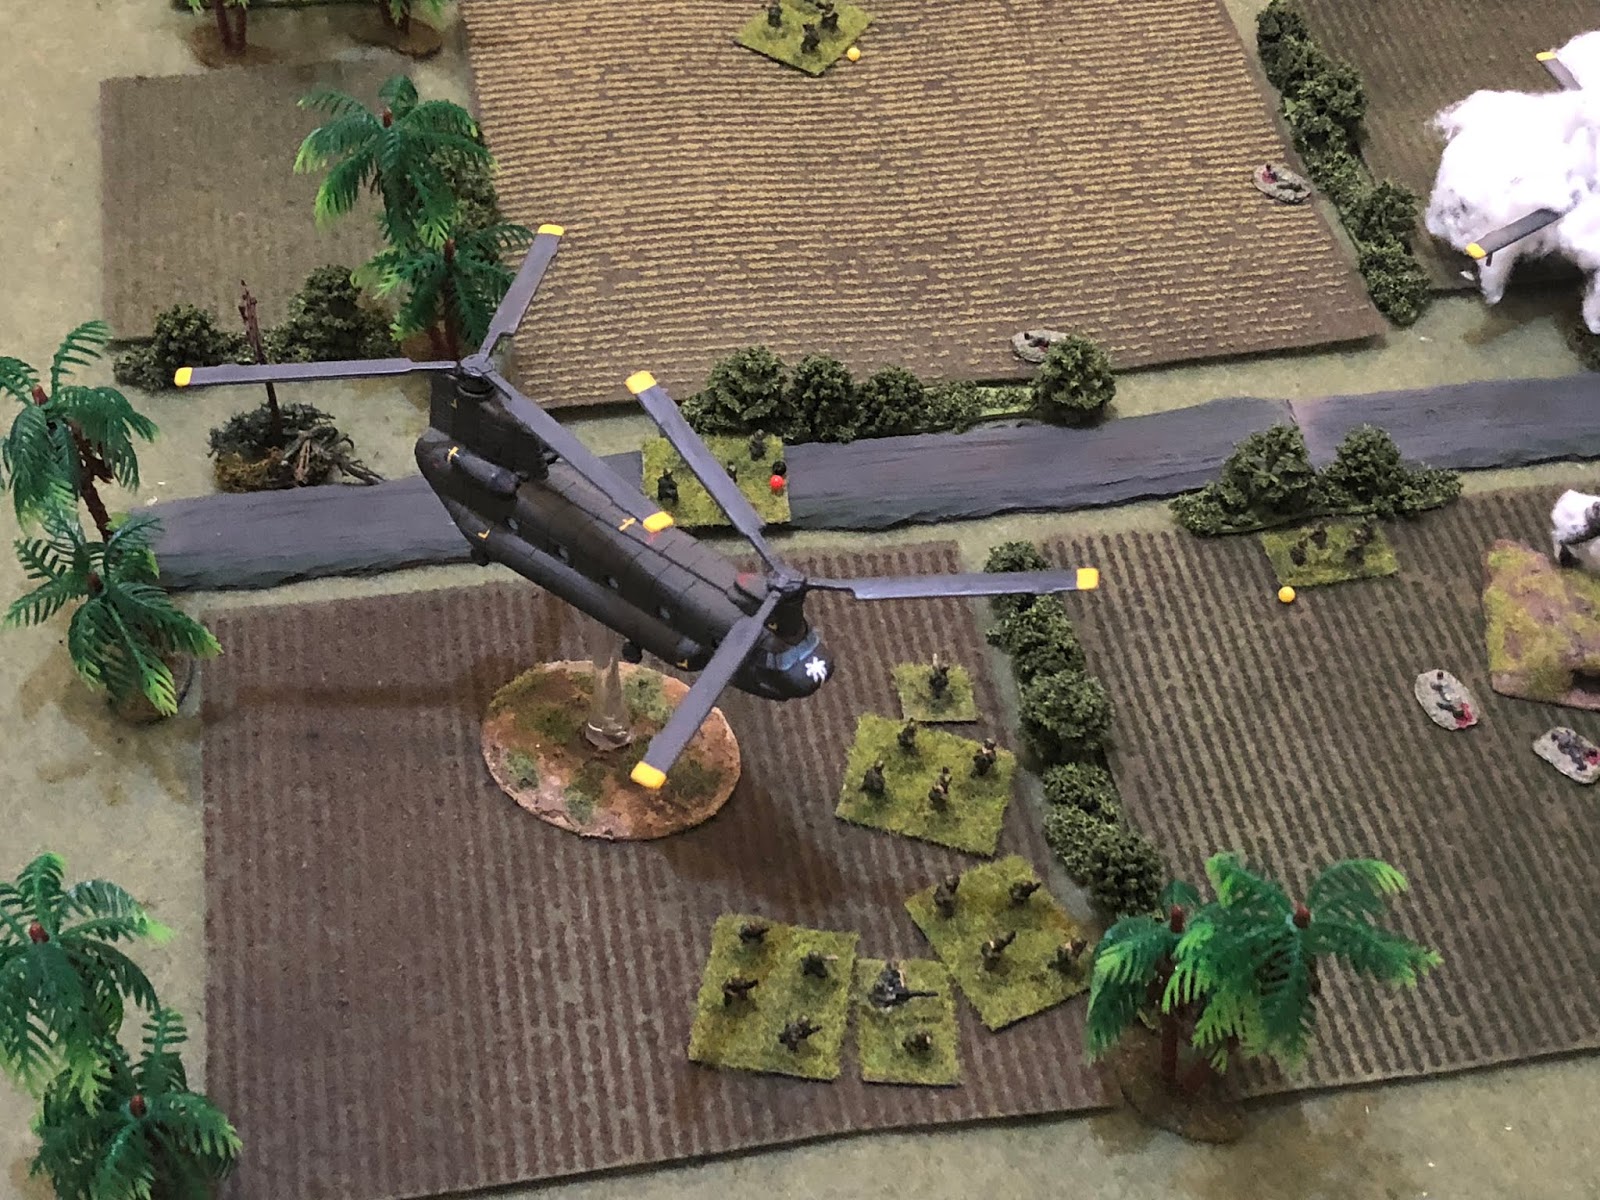
The South Leon Army mechanized battalion's D Company, broken into chalks for airlift. Cuba is providing the lift, but there are not enough birds to move the entire company in at once, it will take two lifts. In one CH-47 Chinook will be the SLA Commanding Officer (bottom right) and 1st Platoon, along with the 81mm mortar team from Weapons Platoon, and the second Chinook will carry Faceman (far right) and 2nd Platoon, plus the Browning .30-cal MG team from Wpns Plt. The third lift will bring in the Company Executive Officer (XO, top center right), 3rd Platoon, and the M2 .50-cal HMG team from Wpns Plt.

Enemy defenses in the area consist of an anti-aircraft position atop Hill 114 (top left), which is a 12.7mm Dshk HMG, and two machine gun bunkers (bottom right). Additionally there is a company-grade officer running around the local area (bottom left), a rifle team moving south on Route 1, towards Pendrakenville, and another rifle platoon moving east to probe B Company's position northeast of Hill 114 (from fight #9).
Suddenly, the sound of helicopter blades reverberates throughout the valley as two CH-47D Chinooks, packed with South Leon Army troops, thunder in from the southwest, hoping to catch the enemy unawares.
The two Cuban birds descend for nap-of the earth flight, closing on their LZs. Hill 114 is at top right.
The helos press northeast, pitching left, right, up, and down, to avoid trees and power lines.
The two CH-47 pilots flare their aircraft, pitching the nose up...
And setting the aircraft down!
In the north LZ, the SLA company commander and 1st Platoon deplane (top left), while Faceman and 2nd Platoon do the same on the south LZ (right).
The two Cuban pilots pull pitch and lift off, their suddenly much lighter aircraft easily rising.
The lead pilot comes on the radio to inform higher headquarters: "Boxcar flight is mission complete on LZ, returning to base, tell 3rd Platoon to be standing by." The aircraft lift off, noses still north (left)...
The two CH-47s pivot their noses to the west (left), looking to zoom back out of the area...
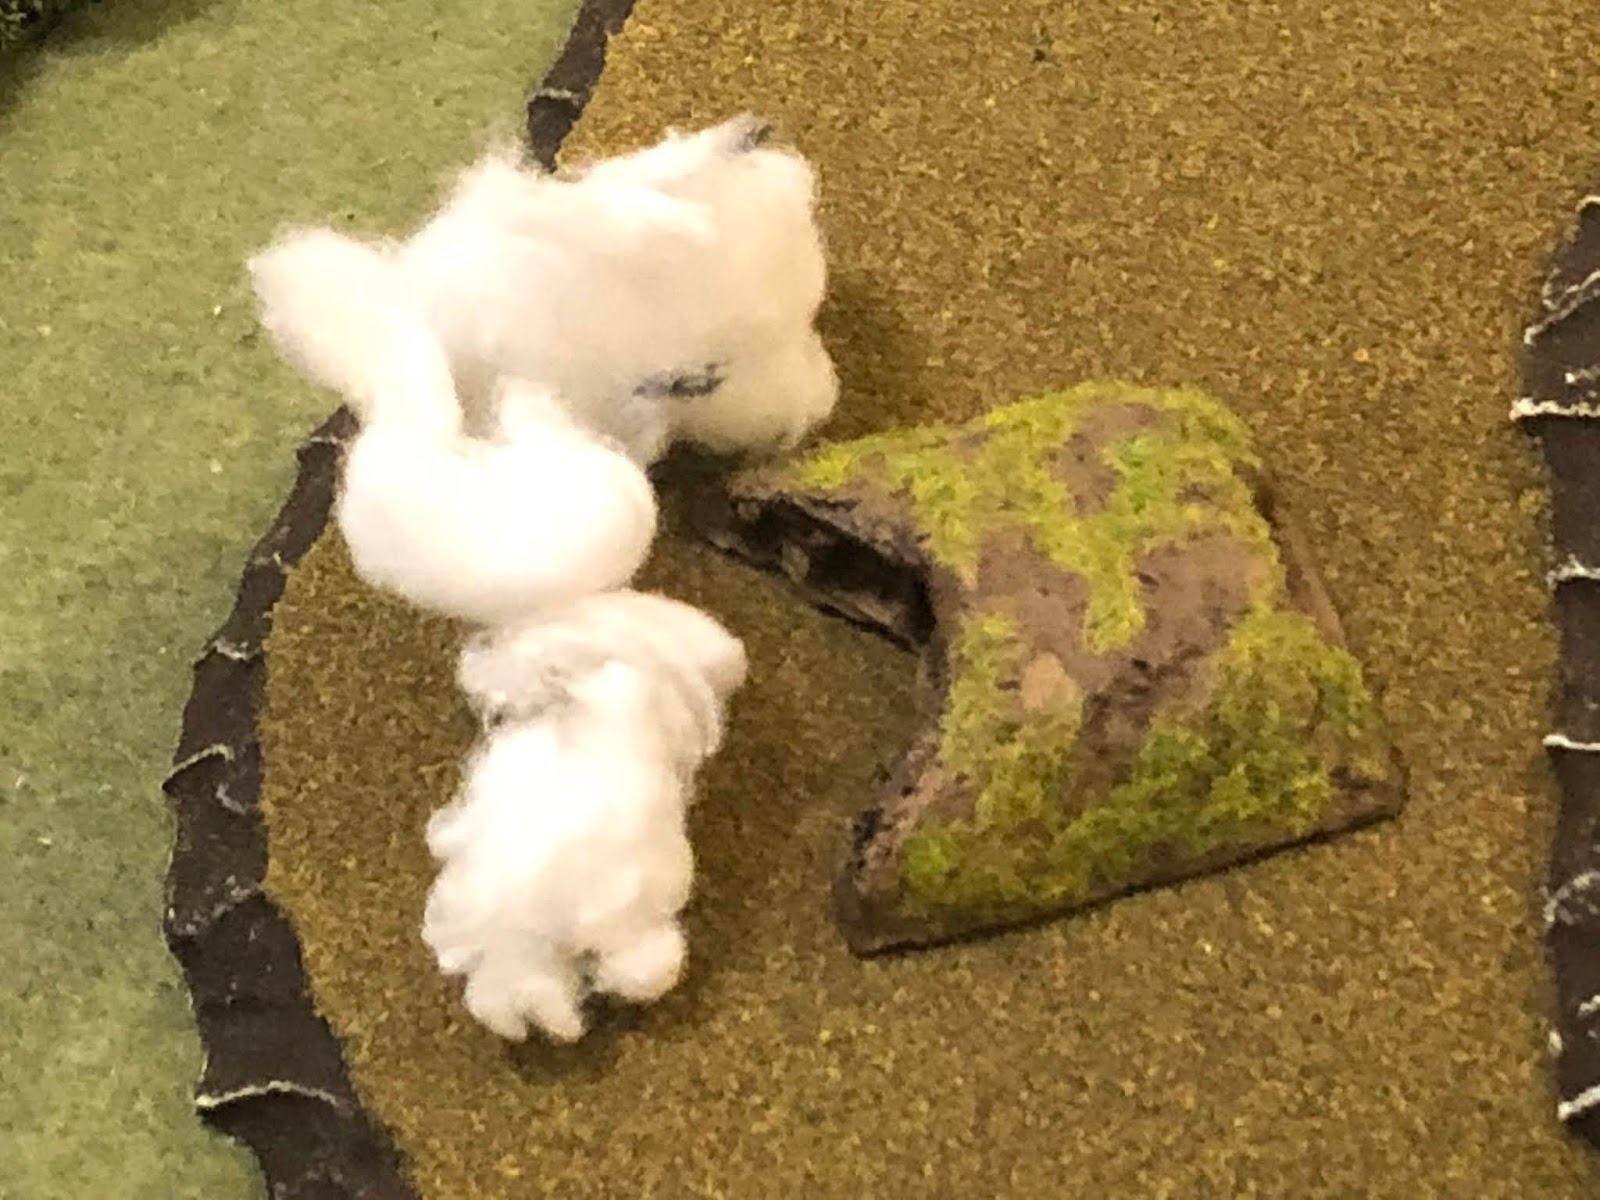
But as they lift off, Boxcar 01 (top left, with Boxcar 02 just below him) begins taking fire from the enemy Dshk AA position (bottom right)! 12.7mm rounds begin punching holes in the airplane's fuselage...
But as Boxcar 01 (left) is slowly becoming air conditioned, Boxcar 02 (top right) has a much bigger problem: a previously unseen bunker (bottom right), positioned near Route 1 specifically for the purpose of defending against enemy vertical envelopment, opens fire with its PK machine gun, directly into the nose of Boxcar 02. 7.62mm rounds shatter the cockpit and tear into the pilots and crew...
Boxcar 02's nose pitches up briefly, and then the whole aircraft slams back to earth as if tossed by a giant hand!
The pilot of Boxcar 01 has his aircraft moving west, past the enemy bunker. "Break, break, break, Boxcar 02 is down, Boxcar 02 is down by enemy gunfire on south LZ!!!"
Boxcar 01 noses down and departs the area, hurrying to return to base and pick up the SLA 3rd Platoon, B Company, and bring them back.
And so here is the overview, where the actual fight will start. The SLA's B Company (-) is at center left, with an enemy bunker just left of them. The other enemy bunker is at bottom center right, on Hill 114, as is the enemy AA position (bottom right). One enemy rifle platoon is in Village #1, moving south on Route 1, to reinforce Pendrakenville. The other enemy rifle platoon is in Village #3 (top right), moving to probe B Company's position northeast of Hill 114 (off camera about one kilometer to right top right).
Looking west to east at the Cuban position on the north (left) and south (right) LZs, with the enemy west bunker at bottom left, still pumping rounds into the downed Boxcar 02. At top left is the SLA company commander, 81mm mortar team, and 1st Platoon, at right is Faceman, the MG team, and 2nd Platoon.
In the northeast, an enemy rifle platoon was in Village #3, stepping off to recon B Company's position, but now, of course, they will face about and join this fight.
In the southeast we have the northwest slope of Hill 114, which has the west bunker (center) and the AA position (bottom right). Village #2 is visible at top left.
And in the southwest, an enemy rifle platoon (bottom center) was marching south as reinforcements, but they will, of course, face about and join the fight. They are in Village #1, and the SLA 2nd Platoon is visible at top center right.
The aircrew of Boxcar 02 comes piling out of the stricken aircraft as 1st Platoon looks on, stunned.
And they're caught gawking by the West Bunker (the one that shot down the Chinook); the Communist soldiers in the bunker turn their machine gun on 1st Platoon and
2nd Squad, 1st Platoon (2/1, bottom center, with 1/1 at bottom left, 3/1 at top right, and the company commander, or CO, at top left) bears the brunt of it, taking serious casualties (5 hits, one more will put them out of the fight). With a helo down and burning, enemy seemingly everywhere, his men disorganized and under fire, the South Leon Army (SLA) commander knows something needs to be done, and done quick...
As the West Bunker (top center) continues to pump rounds into 2/1 (left, with 3/1 at bottom left and the 81mm mortar team at bottom center), the SLA CO grabs 1/1 and yells "Follow me!" and leads the men in a charge to the flank of the enemy bunker.
A ferocious melee ensues, with both sides getting the stuffing beat out of them (1/1 takes 5 hits, as does the enemy bunker, though the SLA squad can only take one more hit and the bunker can take three more)!
As 1st Platoon is bearing its crisis (West Bunker at bottom left, rest of 1st Platoon at far left), 2nd Platoon (top center) gets moving, with 1/2 move right (center right) across Route 1, spotting the enemy 2nd Platoon (top right).
The SLA rifle squad (bottom right) gets into position and opens fire, though it's not tremendously accurate (only 2 hits).
MSgt 'Faceman' Soriano grabs 2/2 (with the MG team at far left, and 3/2 above them, enemy 2nd Platoon just visible at far right) and moves right, joining 1/2 (left).
But Face and 2/2 (top left) get hung up crossing the hedge and can't engage the enemy troops on the road (bottom right)!!! Taking fire, the enemy's 3rd Squad faces about and moves north (center, from bottom right), but they also can't get organized to engage!
*Both of them failed the damn spotting roll!!!
With the fighting flaring between 1st Platoon and the West Bunker (top center right) and 2nd Platoon and the enemy 2nd Platoon (top left), the bad guy's East Bunker, on Hill 114 (bottom center), searches for targets...
The enemy gunners spot Face and 2/2 (top left) and open fire...
Scoring three hits on the SLA rifle squad!
It's a new turn, Turn 2, and the bad guys get 6 command points to the SLA's 3. Life's gonna get a bit rough...
The East Bunker (bottom center), having lit into 2/2 (top left), looks for new targets. He's seen movement nearer to him; he really wants some of 3/2 (center top, between the tree and hedge, with the MG team just above it)…
And he's got'em. The machine gun again roars to life...
Seriously roughing up 3/2 (bottom right, 4 hits!).
Back in the southeast things are heating up: the enemy 3/2 (bottom left, good guy 3/2 and MG at top right) gets itself back into shape, spotting 2/2 (on road at center top, with 1/2 left of them). The Communists open fire, but fail to impact the stout SLA troopers!
And while the bad guy 3/2 (center bottom, with their 1/2 at bottom right) lays down fire on 1/2 and 2/2 (left), the Communist 2/2 moves right (center top), spotting 3/2 (top center left, with the SLA MG team at center top left)…
The Communist rifle squad pulls up and opens fire on 3/2...
Knocking the SLA squad out!
Further north, the epic fight between the SLA CO and 1/1 and the enemy's West Bunker rages to a conclusion...
The enemy bunker is silenced as the SLA riflemen jam rifle muzzles and hand grenades into the firing ports. The SLA CO lets out a sigh, then works to rally 1/1, but they're pretty worn out (only removes one hit, down to 4 total).
Back in the south, as the Communist 2/2 far left) guns down 3/2 (bottom left), the SLA MG team (center bottom) spots the enemy 3/2 (center top, with their 1/2 at top left) and gets the gun into action.
Putting the enemy squad out of the fight (bottom left, with SLA 1/2, 2/2, and Face at top right)!
Face rallies 2/2 (-1 hit, 2 total) and moves them right, off the road (right, from center, with 1/2 at center bottom and MG team at far left). They were looking to move to the right flank (top right), but spot the enemy 2/2 (top left). Face signals hasty ambush left...
The SLA riflemen (bottom center left, with 1/2 left of them) move into position and then open fire on the enemy 2/2 (top right)…
And catching the Communists in the flank, it's devastating (4 hits).
While Face and the 2/2 (top center left) is firing on the enemy 2/2 (right top, with SLA MG team at top center right), the bad guy 1/2 dashes left (far left, from bottom center), undetected.
With the fight raging in the west, along Route 1 (across the top, SLA 2nd Platoon at top left and 1st Platoon at top center, Hill 114 just visible at bottom left), the enemy1st Platoon finally decides to get in on the action, or at least start moving that way. They group move up to the north ford (center right, from bottom center).
While the enemy 1st Platoon gets to the north ford (just visible in the trees to top right), further up Hill 114 the enemy AA position (bottom center, with the East Bunker below them, at center, SLA 2nd Platoon at top left and 1st Platoon at top center left) scans for targets...
Despite the obscured view due to the smoke and scattered trees, the Dshk (bottom right) somehow spots the SLA 81mm mortar team (top left) and opens fire, but it's ineffective.
Further down slope, the East Bunker (bottom right) scans for targets: he knows the Communist 2nd Platoon is maneuvering on the SLA 2nd Platoon (top left), so they begin there...
And they spot Face and 2/2 (top center). The machine gun looses a long burst, tracer zipping perilously near their own troops (enemy 2/2 at center top left, 1/2 at top left), though absolutely no one is harmed by the fire.
On the SLA side, Faceman knows two things: he wants to get at the enemy 2/2 (top left) and finish them off, and he wants to get out of his current position since the enemy MG in the East Bunker is giving them its undivided attention. So he wants to move, but what he doesn't know is that the enemy 1/2 has crept up onto their right flank (top right). Blissfully unaware, and focused on his own priorities, Face grabs 2/2 and they dash forward into Village #1 (top center, from explosion at center, with 1/2 just below that and the MG team at far left).
*Failed to spot the enemy 1/2.
Face and 2/2 get in behind the enemy 2/2 and light'em up...
Quite amazingly, the enemy rifle squad, under fire, turns 180 degrees and charges their attackers (center, from bottom right)!!!
*The SLA fire failed to hit...
In an extraordinarily ferociously close combat, MSgt 'Faceman' Soriano, the SLA 2nd Squad, 2nd Platoon, and the enemy 2nd Squad, 2nd Platoon, are all wiped out!!!
*I think I played that right, where units in close combat can wipe each other out? Probably not...
Hearing the fracas (top center), 1/2 moves up the road to see what the hell is going on (right, from bottom left), but as they move up the road they spot movement to their right (bottom right)…
The SLA 1/2 (bottom center) finally spotted the enemy 1/2 creeping around on the flank (top center). The South Leon riflemen got to skirmish line and open fire...
Catching the Communist troops in the open, the SLA rifle squad makes quick work of them. With that, the enemy has been cleaned out of Village #1 in the southwest.
With Village #1 in SLA hands (bottom left), the enemy Dshk team (bottom right) scans for targets. He's looking to help their 1st Platoon's (top center right) advance, so he's hoping to engage the SLA 1st Platoon (top center left).
The enemy anti-aircraft gunners spot the SLA 3/1 (top center, enemy 1st Platoon at top right) and opens fire, but again they don't hit anything! They're apparently VERY good at seeing, not so good at shooting.
The 12.7mm rounds slam harmlessly into the rice paddy around the SLA 3/1, 2/1, and 81mm mortar team (center) as the enemy 1st Platoon clears the north ford (bottom center) and moves up, using the treeline for concealment (right). The SLA troops have no idea there is an enemy platoon up there.
In the SLA 1st Platoon area, they set about reorganizing. The SLA Company Commander moves east, back across Route 1 (center top, with 1/1 still west of the road at bottom center), where he rallies 2/1 (only -1 hit, again). They also spend some time regrouping (another -1, down to 2 hits total). Meanwhile the SLA 81mm mortar team (left) is set up and scanning for targets...
They (bottom left) can't spot the enemy 1st Platoon (far left) or the enemy anti-aircraft position (top right), finally spotting the enemy's East Bunker (center top right, near the bottom of Hill 114).
The 81mm tube (bottom left) begins pumping out rounds.
*You're probably wondering why we're firing a mortar at a bunker...
And the rounds impact on target, chemical smoke billowing out and obscuring the East Bunker's field of fire, taking them out of the fight for a bit.
In the north, the local enemy commander joins the 1st Platoon. He immediately establishes command and begins making things happen.
*It's the beginning of Turn 4, the SLA can start testing to see when 3rd Platoon will arrive in Boxcar 01, the remaining CH-47 Chinook.
Staying in the north, the enemy CO (bottom right) issues commands to the Communist 1st Platoon, which is about to initiate a hellacious chain of events. The enemy 3/1 moves up (center right, from bottom center).
They (bottom center) spot the SLA 81mm mortar team and open fire.
The mortar team (top left, with the CO at right and 2/1 at bottom right, 3/1 just off camera to top right) is taking heavy fire, nearly knocking it out of the fight (3 hits, it can only take 4)! Reacting quickly and coolly under fire, the SLA Commander orders 2/1 into the fight...
With the enemy3/1 (top left) firing on the mortar team (bottom center), 2/1 dashes forward, entering the fray (center top)…
2/1 spots the enemy 3/1 and opens fire at point blank range, but they're a bit distracted when they notice the rest of the enemy 1st Platoon (top center) and don't do much damage to their target (2 hits).
With 2/1 engaged (center top), 1/1 dashes left to support (far left, from center bottom)…
1/1 spots the enemy and fires past 2/1 (center top), lighting into the enemy's 1/1..
But 1/1s (far left) fire treats the enemy lightly (scoring only one hit), as the SLA CO grabs 3/1 and dashes right, past 2/1 (center right, in the trees).
*The SLA have gotten incredibly lucky here: the bad guys had the initiative, moving up and engaging from an unexpected direction, but then a string of SLA cards came out, allowing the good guys to seize the initiative.
1/1 jumps into position and opens fire at point blank range, into the flank of the enemy's 1/1...
Shattering them, as the enemy's CO (bottom right) and 2/1 (bottom left) look on in horror (bad guy 3/1 is at top right)!
*Now it's time to roll to see if the SLA reinforcements arrive; the target number is 10.
BAM!
The 'whoop-whoop-whoop' of helicopter blades again reverberates throughout the valley. Boxcar 01, carrying the SLA company's Executive Officer, 3rd Platoon, and heavy machine gun team, zooms in from the southwest.
The pilot expertly maneuvers the big airplane into position above the LZ. It's gonna be tight.
The helo flares, nose up, preparing to settle into the LZ.
*And then something very interesting happens. An enemy card comes out, and...
T
he enemy Dshk activates (bottom right, Boxcar 01 at top left, SLA 1st Platoon at top center, whooping the enemy 1st Platoon's ass). The question becomes, does the Dshk engage the SLA 1st Platoon, hoping to save their 1st Platoon, or does the Dshk fire on the Cuban helicopter, hoping to send it down in flames, destroying the SLA platoon(+) aboard? I roll to see if both options are available: the Dshk team rolls well and spots both targets, the helo and the SLA CO and 3/1.
I roll to see which target the enemy heavy machine will engage, leaving it a straight 50/50 roll.
The bad guy HMG can't help themselves, with that big helo just hanging there in the sky they just have to take a shot. They pump big, thumb-sized rounds at the Cuban helicopter...
B
ut other than punching a few holes in the fuselage, the effort is wasted! The Cuban pilot sits the bird down gently, next to 1/1.
*For a third straight time, the Dshk team manages to spot the enemy, fire, and totally miss with some absolutely horrendous firing dice!
As Boxcar 01 sets down in the northwest (top right), the enemy CO grabs his nearest rifle squad, 2/1, and charges through the brush, directly into close combat with the SLA commander and 3/1 (bottom center left, from bottom center right)!
But the fight does not go well for them. Apparently they were disheartened by new their 2nd Platoon had been wiped out in the southwest, by the heavy casualties they were taking, and by the appearance of SLA reinforcements, and they were giving up the ghost. The SLA forces take heavy casualties (5 hits on 3/1 and 3 hits on the command group), but they stand their ground and pay every bit of it back, wiping out the Communist 2nd Squad and badly hurting the enemy command group.
*4 hits, which was really enough to put them out of the fight, but I let them hang around a bit as I figured it would be appear unseemly if both enemy stands were wiped out in a single round of close combat.
The CO, 3/1 (top center right), 2/1 (center top), and 1/1 (far left, with Boxar 01's rotors just visible) are winning the fight, with the enemy commander (top center right) and 3/1 (top left) barely hanging on. Nevertheless, the 81mm mortar team withdraws (saving a hit, bottom center, from explosion at center).
And as they get the tube set back up (far right), the XO leads 3rd Platoon and the HMG team off the chopper.
The smoke covering the East Bunker on Hill 114 begins to dissipate.
*This is part of the end of turn sequence.
As Boxcar 01 lifts off...
Spins its nose southwest again...
And heads for the barn.
The mortar team gets back to work...
Smothering the East Bunker in smoke.
With the East Bunker still out of the fight (obscured by smoke at center), the Dshk team (bottom right) lays down fire on the SLA 1st Platoon (top left). As usual, they hit nothing...
But the fire allows the enemy commander and the remains of their 1st Platoon to break contact and retreat, heading north (top center right, from center).
And with the enemy falling back (top left), the SLA commander orders 1st Platoon to fall back (center, from center top, with 3rd Platoon at bottom left).
The SLA company moves south on Route 1 and occupies Village #1, digging in to block enemy reinforcements moving south on Route 1, as well as Communists looking to fall back off of Hill 114. The SLA commander lit a cigar and smiled: "Don't get comfortable, boys. If our comrades don't get on top of that hill very quickly, and get that Cuban air support working, our stay here might be rather short. Speaking of the Cubans, where is my friend, the one they call the Faceman?"
The SLA troops were quickly organizing the defense of Village #1, digging in, redistributing ammo, water, and chow, checking comms, establishing/clearing fields of fire, and treating casualties. As the SLA company commander made his query, one of the medical orderlies approached, informing him Face was badly wounded. He was stabilized and would live if they could get him to a hospital soon, but he'd likely be out of action for the next couple months.
But they (bottom left) had done their job: they'd cut Route 1 (looking north up the road)...
And they'd (bottom right) cut off the backside of Hill 114 (top right). Just need everyone to realize they can't hold out forever. But just as they were discussing that fact amongst themselves, the roar of battle floated down from the east, letting them know that C Company's assault on Hill 114 had begun.
So another successful, hard fought battle. The SLA forces lost 30 men as casualties, while the Cubans lost a CH-47 totally destroyed and MSgt 'Faceman' Soriano badly wounded, and the enemy lost 65 men and now had the better part of a SLA company stuck in their rear ;)
Additionally, the SLA Company Commander was awarded his country's version of the Silver Star, and the squad leader for 1st Squad, 1st Platoon, was awarded the Bronze Star.
Next up is the point of this entire exercise, the assault by the South Leon Army's C Company, with 1st Lt 'Lobo' Gouveia tagging along for the ride. Which is a bit worrisome for me, as bad as the Cubans have been fairing in these SLA assaults.
V/R,
Jack


Very nice- good job the chinook got the men out first.
ReplyDeleteCheers,
Pete.
Thanks Pete, and yeah, it was a bit hairy, lotsa fun!
DeleteV/R,
Jack
Thanks Andy!
ReplyDeleteV/R,
Jack
You are welcome
ReplyDeleteGreat report, many thanks Jack. And thanks for the notes on the rules, it makes it easier for me to follow the ins-and-outs of the action.
ReplyDeleteBTW, was the heli going down part of the game or was it part of your scenario design?
Plus I knew that your rigged killing of Racer in the last mission would lead to the next Cuban paying the price. It just had to happen!
John,
DeleteThank you, and no problem on my ‘pseudo-review,’ happy to help. The Chinook going down was kind of a hybrid; I hadn’t really considered it until it happened. I knew I was going to land the helos, and then figure out where those two enemy bunkers were going to go, so I rolled to see and it turned out Boxcar 02 had pretty much landed on one of them! I considered myself pretty lucky that the other bunker was actually on Hill 114, lest the SLA troops have found themselves pinned on the LZ by a crossfire from the two bunkers, maybe even both helos getting shot down, which would have meant no ability to get 3rd Platoon into the fight!
And yeah, Faceman getting hit bad was pretty much inevitable. He’s out until November, so we’ve seen the last of him in South Leon.
V/R,
Jack