TF Redleg vs FSNL 5th Company
War of Liberation and South Leon campaigns
Navy Cross, Bronze Star w/V, Purple Heart, War of Liberation and South Leon campaigns
1st Lt Ordonez is leading his TF Redleg west, attempting to breakthrough the Communist lines in order for TF Redleg and TF Razor to reunite with their Cuban comrades advancing from that direction. This morning they assaulted the rear of the FSNL's 5th Company's positions, tossing them a beatdown and forcing them to fall back to re-group, but the Cubans weren't able to capitalize, having to move cautiously in the densely jungled hilly terrain, which allowed FSNL5 time to regroup. Not only did the Communists regroup, they have actually staged a counterattack, so Lt Ordonez quickly shakes his men out into a hasty defense (ambush mentality!) in order to throw back their assailants. This is a simple attack/defend scenario; the Cuban goal is to repel the enemy attack, the Communist goal is to destroy the Cuban force.
Lt Ordonez has the assistance of his Task Group Commander, Major Fulgencio, who has attached himself to the Task Force. Major Fulgencio is leaving Lt Ordonez in overall command of his Task Force but will assist as necessary, essentially performing as a second command stand in the game. This proved a winning combination as Major Fulgencio was key in breaking the enemy's defense in the last fight, leading several close assaults that saw him awarded the Bronze Star w/V.

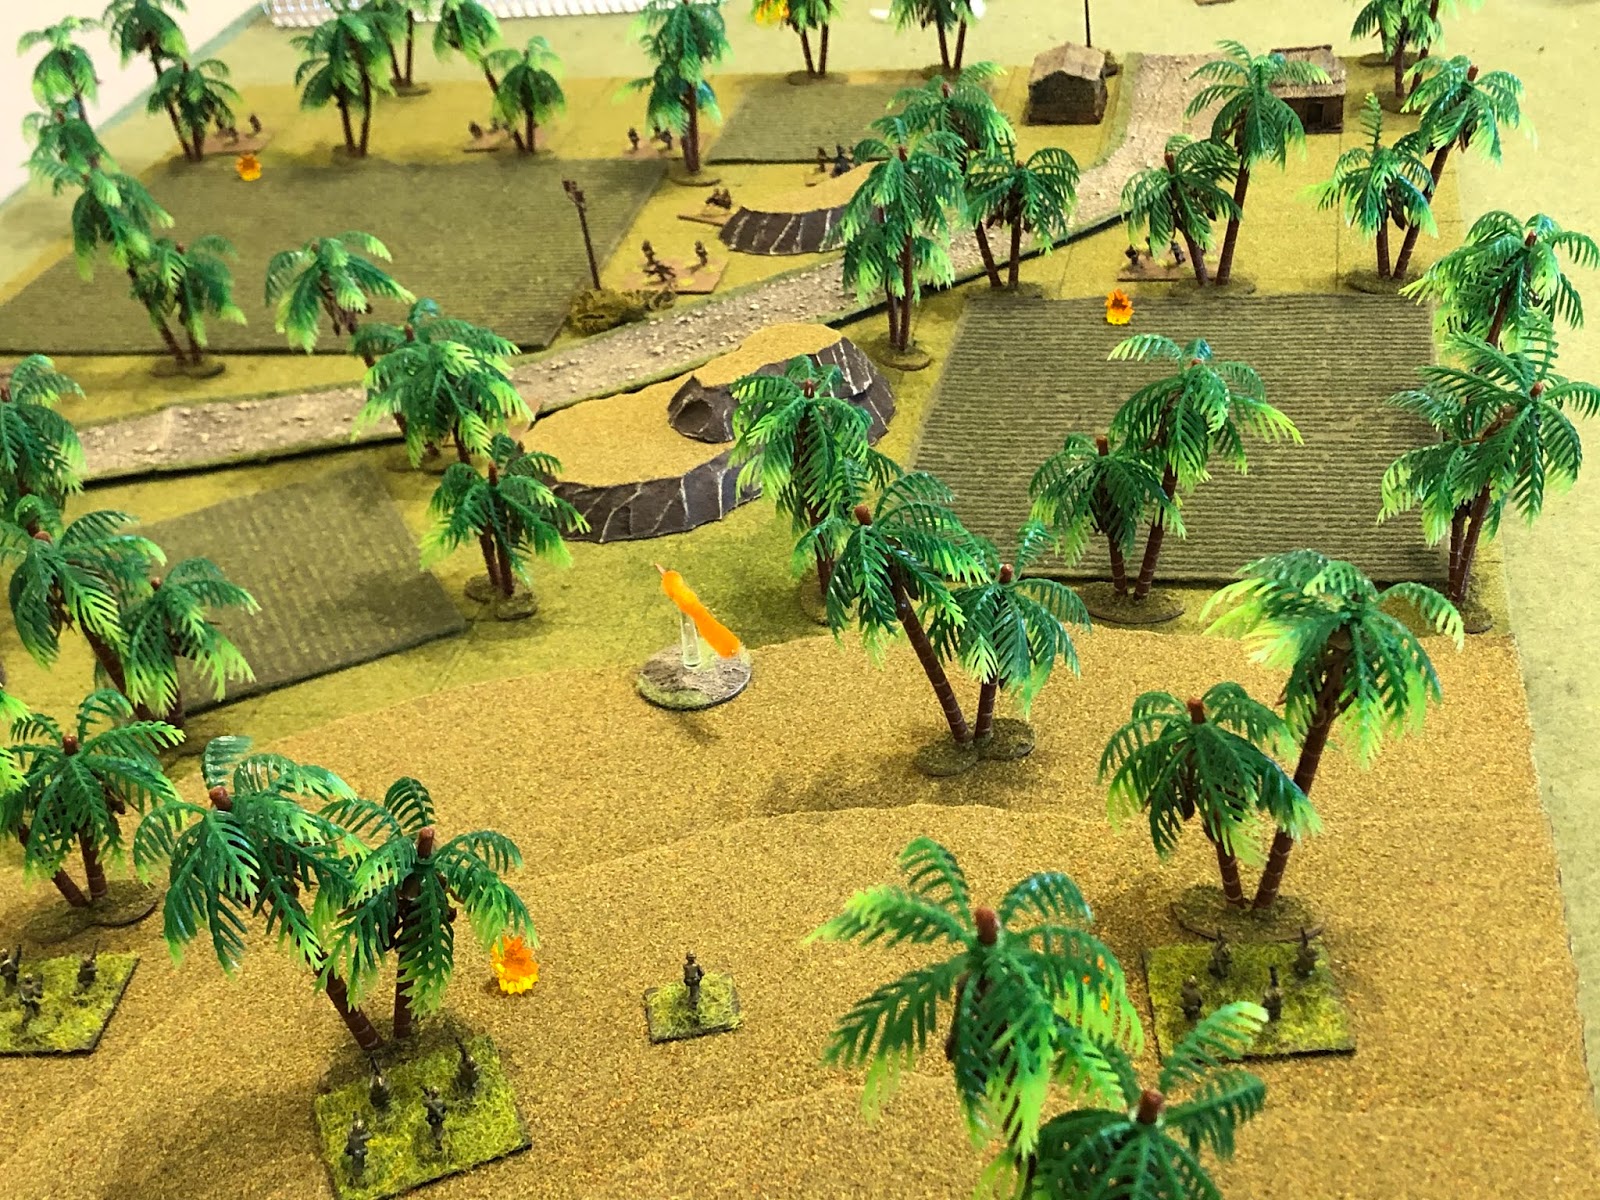
Overview, north is up. There is a hardball road running from the south to northwest, with hamlets at top left and bottom center, as well as several knolls/hillocks. Other than that we've got several cultivated fields and scattered jungle. Oh, and that giant elevation, Hill 261. I'm pretty much treating this like a meeting engagement, though I gave the Communists much more room in deployment than I did the Cuban Marines, for some reason...
The opposing forces, allies on left and Communists on right.
The figures are all 10mm from Pendraken, Minifigs UK, and Butler's Printed Models. I'm using Ivan's "5Core Company Command," playing on a 3' x 2' surface with simple terrain to speed up the process. The hootches are from Jimmi at Flashpoint Minis, the roads are from Fat Frank, the hills are from Warzone, the fences are from Sarissa, the fields are from Hotzmats, the trees are cake toppers, and when you see the rivers, they're from Wargamers Terrain. I'm playing solo and will randomize enemy deployment using a system of blinds borrowed from Joe Legan's "Platoon Forward."
In terms of caliber of forces, the SLA, FSNL, and FLA troops will all be treated equally, except for the fact the FLA troops will be treated as fanatics, in terms of their willingness to advance into close combat. The Cubans are more tactically and technically proficient, and so they will receive extra firing dice, better rallying capability, bonus in close combat, and sometimes will have a second command stand on the table.
1st Lt Ordonez' force consists of: a command stand, six rifle teams, a machine gun team, and a mortar team. They are also accompanied by Major Fulgencio (lone figure at top left). These troops are Minifigs' Marines from their Vietnam range, with heavy weapons from the Modern British (MG) and Modern US (mortar) ranges.
TF Redleg has some heroes amongst its ranks, as well:
Major Fulgencio was awarded the Navy Cross
Redleg 02's team leader was awarded the Silver Star
Redleg 05's team leader was awarded the Bronze Star w/V
The dashing Task Group Commander, Major Fulgencio by himself...
Overview, with troops, where you can see the Cubans stacked on the right table edge and the Communists randomly deployed up to the center-line of the table.
The Cuban deployment, from left: Redleg 01, 02, 03, Lt Ordonez' command team, Redleg 04, the mortar team, Redleg 05, Major Fulgencio, Redleg 06, and the MG team (top right).
The Communists have three rifle teams manning the treeline at left (bottom left and two at left), one at top center, and one at center right (in the trees, on the road, below the knoll). Their MG team is located near the small rise at center left (just above the large, cultivated field), with their commander just right of them. And I screwed up so you can't see them, but the Communist mortar team is hidden by the trees just left of their MG team (look at the treeline defended at left; the mortar team is behind the trees between the top rifle team and the MG team).
We must now fight! The game begins with Major Fulgencio and Redleg 05 and 06 group moving downslope.
*It's just occurred to me that this was supposed to be a Communist attack/Cuban hasty defense, but I've somehow turned it into a Cuban attack/Communist hasty defense. No matter, it still works, the Cubans are trying to break out of their encirclement, get back to friendly lines, so even though the Communists were driven away and came back, it still makes sense for the Cubans to keep moving.
An enemy rifle team in the treeline (bottom left) spots them (top right) and opens fire, missing.
As does a rifle team (bottom left) on the Communists' far left (defended treeline is at bottom right).
*Kinda screwed up there, only one team should have been allowed to react fire on the Cuban group move, not two.
On the Cuban left, despite seeing Redleg 05 (top center) come under fire, Lt Ordonez pushes the rest of the rifle teams ahead (center, bottom center).
The furthest forward enemy rifle team (bottom left) spots them (top right) and opens fire, pinning Redleg 03.
Then all hell breaks loose (bad guys rolled a 'Firefight!'): the far left enemy rifle team (bottom left) continues firing on Redleg 05 (top center)...
But they miss again and Redleg 05 (bottom right) returns fire, pinning them (top left)!
The Communist far-right rifle team (bottom left) again fires on Redleg 06 (top right)...
Again they (top left) miss, and Redleg 06 (bottom right) returns fire, pinning them too!
The furthest forward enemy rifle team (bottom left) again engages the Cuban main axis of advance (top right)...
But he (top left) misses this time and Redleg 03 (bottom right) returns fire, but he misses, too.
The enemy AGL (bottom left) opens fire on Redleg 05 (top right, with Major Fulgencio next to them), suppressing the Cuban Marines.
The second rifle team in the defended treeline (bottom left) engages the Cuban MG team (top right) atop Hill 261...
The Cuban machine gunners (bottom right) are unfazed and return fire, pinning the Communist rifle team (top center left).
And then the Communist mortar team (bottom left) fires on the Cuban main axis of advance (top right).
The rounds are just a hair long, suppressing Lt Ordonez and his command team and pinning Redleg 01 and 02!
The Cuban mortar team (top right) gets in on the action, engaging the nearest enemy rifle team (far left).
The rounds are a little off and only manage to pin the Communist team.
The Cubans roll up a 'scurry,' so Lt Ordonez self rallies his command team (red bead at bottom center) while Major Fulgencio rallies Redleg 05 and 06 (top right).
Lt Ordonez then leads Redleg 01, 02, and 03 up onto/around the hill on the left flank (bottom center left), while Major Fulgencio leads the MG team and Redleg 05 and 06 down the slope (top center), and Redleg 04 pushes forward alone (center left).
The enemy CO dashes forward to rally his front-line rifle team (far right, from center left, with another pinned rifle team at top left and the AGL at far left), but they refuse to budge and stay pinned!
The enemy CO gives them (center) another kick in the ass and they're good, so he falls back (bottom left) while they open fire on the advancing Cubans (top right).
But Redleg 04 (bottom right) shakes off the enemy fire and returns serve, suppressing the Communist team (top left)!
The enemy mortar team (bottom left) engages Lt Ordonez and Redleg 01, 02, and 03 creeping up the right flank (top right)...
But the rounds go long and have no effect!
Lt Ordonez rallies the troops: Redleg 01 and 03 are good, but 02 stays pinned, and then he pushes everybody forward (bottom/center left, from bottom right).
The third Communist rifle team in the defended treeline (bottom left) spots them (top right) and opens fire, to no effect.
As Major Fulgencio continues pushing the MG team and Redleg 05 and 06 forward (center/top center and top right), and they're in luck as there are no enemy teams that can see them and react fire that are not already pinned or suppressed! Meanwhile, Redleg 04 (just visible in the trees with explosion at bottom right) is feeling a bit froggy...
So they jump, charging in to close assault the lead enemy rifle team!
They easily knock the Communist rifle team out, then move up, crossing the road to get at the enemy commander, who stands firm with his command team and opens fire on the charging Cuban Marines!
And the Marines are gunned down in the street!!!
*Kinda interesting there, I don't usually allow command teams to fire, but this situation seemed to merit it, so I gave them Guard Fire with one Kill dice and, of course, they rolled a '6' to knock out the charging Cuban team. Which was quite fortuitous for them, as the Cubans almost assuredly would have knocked out the command team in close combat, then moved on the enemy AGL team. There it would have been interesting as the un-pinned/un-suppressed AGL team would have gotten two Kill dice in Guard Fire, but if the Cubans would have made it through that they would almost certainly have knocked the AGL team out in close combat, and it's all downhill from there, with the mortar team and pinned/suppressed rifle teams in the enemy rear. That would have been Medal of Honor time for Redleg 04...
On the Communist far left, their rifle team opens fire on Major Fulgencio and Redleg 06...
The enemy (top center) misses and Redleg 06 (far right) returns fire, suppressing them!
The enemy CO recovers his wits and immediately dashes left to rally his suppressed rifle team, but they only get 'up' to pinned.
The bad guys are really feeling the pressure, with a strong center (bottom center) but with both flanks being pressured and flagging. The Communist mortar team (bottom center left) again fires on Lt Ordonez and Redleg 01, 02, and 03 (top right).
The 82mm HE rounds suppress Redleg 03 (red bead) and pin Lt Ordonez (left-most yellow bead; bottom right yellow bead is Redleg 02, which was already pinned).
Lt Ordonez rallies his command team (bottom left) as the Cuban mortar crew goes to work (far right), firing on the enemy AGL team (far left, with the Communist mortar team right next to them).
The 81mm rounds are just a bit short, but still manage to suppress the AGL team (red bead).
On the Cuban left, Redleg 01 moves up, across the road (bottom left), but they're spotted by an enemy rifle team in the defended treeline (top left), and the bad guys open fire, pinning them.
So on the far right, Major Fulgencio grabs Redleg 06 and charges the Communists' left-flank rifle team, which is bolstered by their commanding officer!
Major Fulgencio and Redleg 06 knock out the enemy rifle team and commander (far left) and move to cross the road, flanking the enemy position, though they (center) can't quite reach the mortar team and suppressed AGL team (far right).
The Communists (left) spot the advancing Cubans (top right) and take action: the AGL team self rallies as the Mortar team leaves the tube, picking up their rifles (left)...
And the Mortar team-cum rifle team charges Major Fulgencio and Redleg 06 (top left), with the far left rifle team from the defended treeline following them in support!
Major Fulgencio and Redleg 06 defeat the charging Communist Mortar team and set upon the supporting rifle team...
The enemy riflemen go down in a hail of point-blank range gunfire and grenades, then Major Fulgencio and Redleg 06 charge the enemy AGL team from the rear...
But somehow the Communist gunners (bottom right) somehow manage to turn their gun and get into action, driving off the Cubans! Major Fulgencio and Redleg 06 fall back (top left), suppressed!
The two remaining rifle teams in the defended treeline (left/bottom left) self rally. All they have left is those two rifle teams and the AGL team (center top left, between the trees and small rise), with Major Fulgencio and Redleg 06 cowering on the other side (top center), Redleg 05 at top right, and Redleg 01 pinned at bottom right.
On the Cuban left, Lt Ordonez rallies Redleg 02 and 03 (right, 02 has yellow bead, 03 has red bead).
Redleg 03 is good but 02 stays pinned again! Lt Ordonez grabs the two teams and moves up, across the street, where he rallies Redleg 01 (yellow bead at far left).
The northern of the two remaining Communist rifle teams in the defended treeline (far left, the other is at bottom center) spots the Cuban advance (top right) and opens fire...
Redleg 03 goes down in a hail of gunfire (casualty figures at center right bottom, between the trees and the hootch) as Redleg 01 (center bottom, with 02 to their right and Lt Ordonez behind them) fires on the enemy AGL team (top center).
Redleg 01's (top right) is ineffective and the AGL team (bottom left) returns fire! The 30mm grenades rain down, suppressing Redleg 01 and pinning Lt Ordonez and his command team!
*What the hell is going on here? We were on the cusp of winning when Major Fulgencio and Redleg 06 get thrown back, I can't get them rallied because I'm pushing the left flank forward, and now they're beat to crap...
The Cuban mortar team, still up on Hill 261 (far right, as is the MG team that I haven' made much use of, center top right, under the trees), fires on the defended treeline (bottom left).
*Sorry to keep saying 'the defended treeline,' but I'm using it over and over to give you a terrain reference so you'll have an easier time following the action.
The 81mm HE rounds come in, pinning both enemy rifle teams there.
But they (left and bottom center) both manage to self rally as the AGL team falls back to cover (top left, from top center).
*The bad guys rolled a 'scurry,' which was helpful, but probably would have been better off with a normal activation or 'Firefight!' as now they can only move, not fire, and I believe another round of fire by the AGL team, raining down grenades on the bunched-up Cubans in the south, would have been catastrophic.
The lull in the fighting allows Lt Ordonez to get his command team and Redleg 01 and 02 back in fighting shape.
*The Cubans roll a 'scurry,' too!
Redleg 05 and the MG team advance (bottom left and center, respectively), as Major Fulgencio and Redleg 06 (top left) rally. The Major is good but Redleg 06 only gets 'up' to pinned.
The enemy reacts by pushing one rifle team south (left, from left top) and the other forward (right bottom, from bottom center), towards the Cubans (far right). They really wanted to move their AGL team (far left) up to the treeline (center left) to support the assault, but had to stay in place to counter the Cubans threatening their left flank (top center left and top right).
Nevertheless, they've still got a shot. Not a great shot, but a shot; the AGL team (bottom left) opens fire on Lt Ordonez and Redleg 01 and 02 (top right)...
And Redleg 01 (casualty figures at far left) is chopped to pieces, while Redleg 02 is pinned again (yellow bead at center, with Redleg 05 at top right)!!!
The nearest enemy rifle team surges forward, looking to advance into close combat! Lt Ordonez and his command team open fire!
It's not enough to stop the charging Communists and the two exchange fire and grenades at point-blank range!
Lt Ordonez and his command team emerge victorious (bottom center), holding their ground and knocking out the enemy rifle team!
*That was accomplished with the Cubans being -1 and the Commies being +1, and if the bad guys won they almost certainly would have knocked out the pinned Redleg 02 (right), also!
The Cuban mortar team (far right) adjusts fire and engages the Communist AGL team (top left)...
Suppressing them!
Redleg 05 (bottom right, with Major Fulgencio and Redleg 06 at top right and Lt Ordonez and Redleg 02 at bottom left) opens fire on the last remaining enemy rifle team (top left), suppressing them!
Major Fulgencio leads Redleg 06 forward, into the enemy's last line of defense!
The AGL team (left) and rifle team (right) surrender!
TF Redleg's counter-counterattack was successful, with the Cubans eliminating FSNL5 and thus able to advance to the west (F3, from F4). It looks like nothing can stop TF Redleg now from reuniting with Task Group Halabrio and replenishing.
Goodness, I'm exhausted! I wasn't sure what to expect from that fight, but that turned into a damn bloodbath, both sides fighting to practically the last man! Man, too much happened in that fight to really nail it down, with both sides getting more than their fair share of lucky and unlucky breaks. The big moment that turned this from a 'normal' fight that sees the superior Cuban forces bend then break their opponent's defense was when the decision was made for the Communist mortar team to abandon their tube, grab their personal weapons, and charge into close combat. Sure, most of the time the bad guys are going to be at a disadvantage in close combat (which is an opposed die roll with modifiers for troop quality, morale, and tactical situation) due to the Cubans being better troops and the Cubans generally only closing with Communist troops that pinned or suppressed, but if you give the dice enough tries they will eventually bite you. So the bad guys threw the mortarmen in to stop Major Fulgencio and Redleg 06 and failed, then threw in a rifle team and failed, and then the damn AGL team rose up and fought them off (a draw that forced the Cubans to fall back, suppressed) which changed the entire complexion of the fight. Hell, having said that, don't forget about Redleg 04 beating a Communist rifle team in close combat and advancing on the exposed and alone enemy commander, and getting gunned down by reactive fire! That was a heckuva fight, lotsa fun!
Communist: ~30 men, with ~10 more captured
1st Lt Ordonez was awarded the Bronze Star w/V for exposing himself to enemy mortar, automatic grenade launcher, and small arms fire countless times to rally his men and for repelling the enemy's assault to save the left flank of the Cuban line.
Redleg 04 Team Leader was awarded the Bronze Star w/V posthumously for leading a close assault on the enemy's centeral defensive position, eliminating a Communist rifle team and forcing the enemy commander to retreat.
Redleg 06 Team Leader was awarded the Bronze Star w/V for leading the assault that destroyed the enemy command team, mortar team, and two rifle teams, and captured an enemy AGL team and rifle team.*
*This certainly reads like more than a Bronze Star, but I'm not giving anything to Major Fulgencio (who was with Redleg 06 the whole time) and I'm not going past Bronze Star for Redleg 06 because it wasn't as sexy as it sounds. Don't forget that they were repulsed by the AGL team, which stalled the entire Cuban attack, and the "...captured an enemy AGL team and rifle team" part occurred after other Cuban teams had already done the heavy lifting. But I wanted to do something to recognize the young NCO in charge of Redleg 06, so there you go.
Next up we have Captain Soares' Task Force Razor fighting a rear-guard action against the Free Leon Army's 3rd Company. TF Razor is the other part of Task Group Fulgencio, which was cut off from friendly forces and is now fighting to break out and return to friendly lines. Unfortunately the withdrawal was halted when FSNL5 decided to counterattack TF Redleg on Hill 261, which allowed the pursuing FLA3 to catch them.


That was a real slogging match!
ReplyDeleteT'was, indeed, lots of fun! Glad you liked it, Jim.
DeleteV/R,
Jack