All,
AKA, Ambush Alley in South Leon #4
It is now 0730 on 8 July 1990, and Task Force Soares is preparing to clear the Mulan District of the city of Diwala, a particularly troublesome neighborhood known for its hostility to the government of South Leon. Earlier this week, militia members of the Free Leon Army (FLA, the bad guys) ambushed a South Leon National Police (SNLP) patrol. Task Force Razor, a Cuban paratrooper company led by Captain Soares and his trusty sidekick, Lt Hinajosa, moved out smartly, rescuing the SNLP officers, but at a cost of 1 KIA and 4 WIA to themselves. Everyone on the Cuban Liberation Expeditionary Force (CLEF) and South Leon government side were shocked; the FLA insurgency had been but a rumor of war for years, with various low-level bombings, assassinations, and sniper fire, but nothing anywhere near the size and ferocity of the attacks on 2 July.
The following day the FLA attacked an SNLP police station, then ambushed the SLA Quick Reaction Force (QRF) sent to aid them. Task Force Razor was called in to support; Captain Soares and his men were able to save the SNLP and QRF, then return to base, though it cost them: one paratrooper was killed and another seriously wounded. But not long after Task Force Razor returned to base, they received word the few remaining SNLP officers and SLA soldiers had abandoned the police station.
Task Force Razor immediately mounted up, humped to the police station, and occupied it. Several hours later the insurgents struck in strength, but the paratroopers accounted themselves magnificently. Despite losing another paratrooper KIA and one WIA, the issue was never really in doubt. The Cubans held, and several hours later they were relieved. They returned to base to rest, refit, and prepare an offensive to take the fight to the enemy, looking to root the enemy out of their base in the Mulan District.
Overview, somewhere in Diwala, north is up. Nothing fancy, just a 2' x 2' surface with plenty of buildings and walls.
I'm playing this out in 15mm using the old school "Ambush Alley" rules, as written. The is the first scenario out of the book, "Contracting Trouble," a classic of modern wargaming. My intent is to play out all five scenarios in the book in a row, to learn the rules, put them through their paces, and see if I dig'em.
The opposing forces, with Task Force Razor at left and the FLA insurgents at right.
Task Force Razor: the boss, Captain Soares (Razor 6), and three assault teams (Razor 01, 02, and 03, with 03 led by Lt Hinajosa).
The troops are all Eureka Minis.
The bad guys, AKA, the Free Leon Army (FLA), local insurgents looking to overthrow the democratically-elected government. There are seven Leaders (Flytrap Factory Taliban, and all the rest of the terrorists are from Rebel Minis), nine RPGs, eight RPKs (Light Support), and eighteen riflemen with AKs.
Map, this time with troops. Task Force Razor is at bottom center, with Insurgent groups at bottom left, left, top center right, and right, with reinforcement hotpots spread around as well. The mission for the Cuban paratroopers is actually to eliminate three of the hotpots and move off the table at the break between the wall and building at top right.
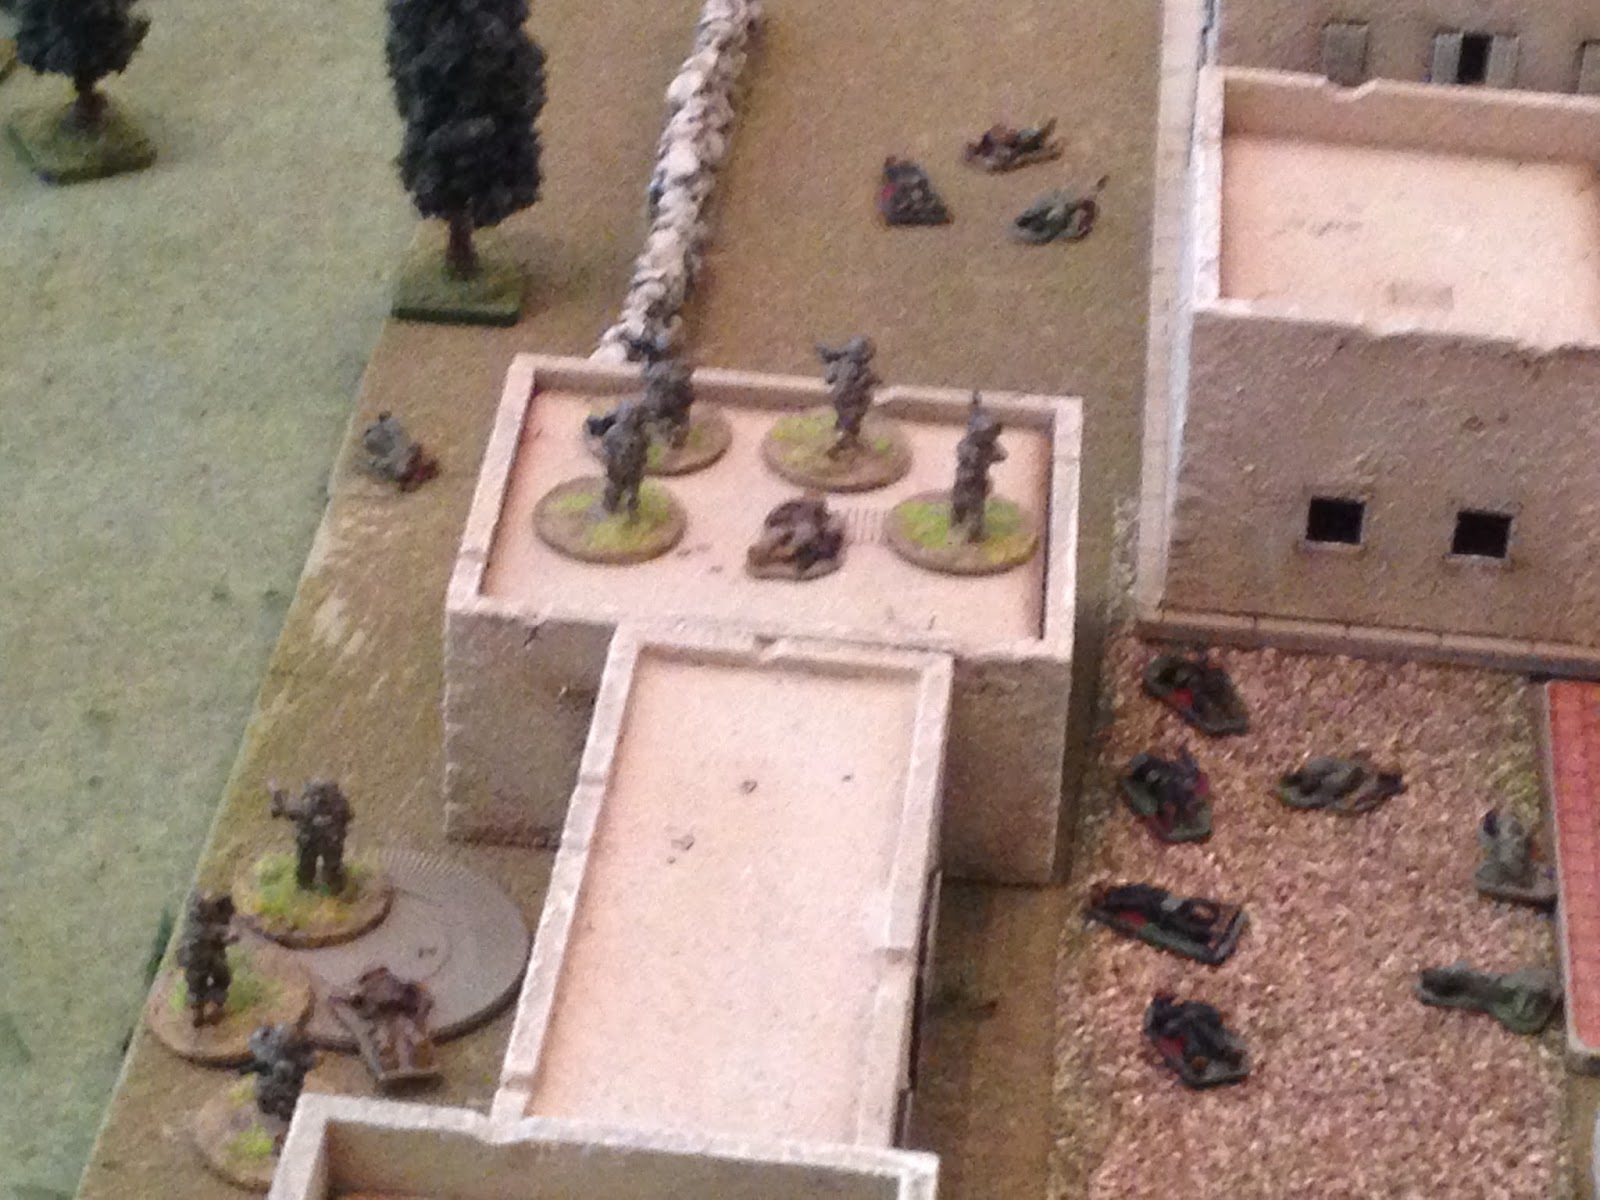
The Task Force Razor starting positions: as usual, Captain Soares is out front, leading the way. Then he has three assault teams, left to right: Razor 03, 02, and 01. I have a bad feeling about this...
The southwest corner, with Task Force Razor at bottom right, Insurgent groups at left and top left, and hotspots at far left and top left.
The northwest corner, with a hotspot you couldn't see in the previous photo (center bottom left). Also have a new Insurgent group at top right.
The northeast, with the Insurgent group from the last photo at top center and a new one at bottom left, hotspot at top right next to the Cuban exit point.

And the southwest corner, with an Insurgent group at right. Playing as the Insurgent, I tried to space the hotspots out to make it as difficult as possible for the Cubans, and I figure the Insurgents should do their best to hold off contact as long as possible, and then go nuts and pop like ten groups into the fight at the same time. But knowing that the big danger is the big overwhelm, the Cubans have to act quickly, stay concentrated, paring off large portions of the battlefield in order to limit exposure as well as be able to move quickly in small spaces to eliminate hotspots while keeping two of the three teams on Overwatch to deal with the any encroaching bad guys. My big fears are: getting my teams spread out too far where they can't support each other with Overwatch or if a team takes casualties, and having a large Insurgent group pop up right in the middle of my teams while I'm dealing with a different hotspot (I can't deal with multiple hotspots simultaneously as teams on Overwatch can't move, and vice versa). Also, I'm expecting things to be tougher as I'll finally be playing the Insurgents with D8 morale (rather than the D6 morale I've been using, which has seen plenty of bad guys skedaddling for the hills).
One quick note: I played morale the right way, and not a single team failed a morale check. D10's are pretty powerful I suppose. Having said that, I forgot all about Insurgent 'shrinkage'...
I pull the Fog of War card: "Dirty Fighting." As the paratroopers enter the Mulan District, a dust storm whips up, cutting effective engagement ranges significantly. And now we fight!
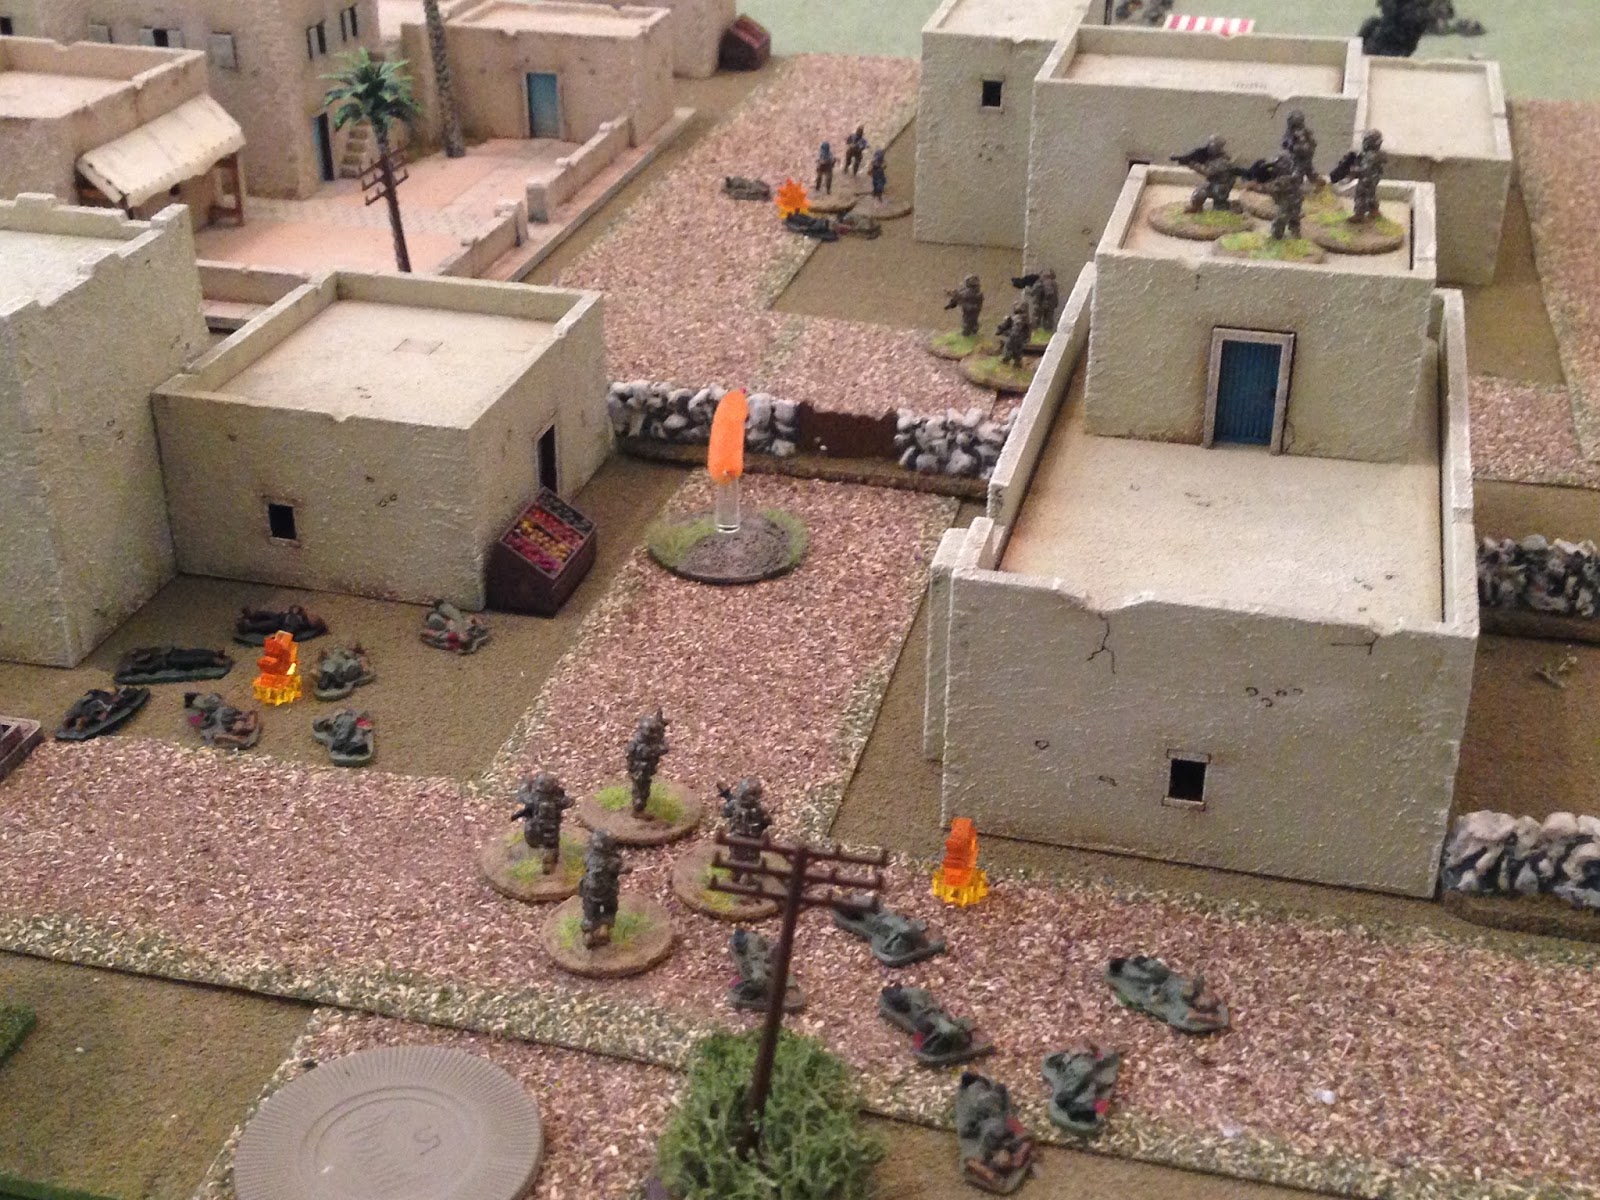
The offensive into the Mulan District begins with Razor 03 hopping the wall and moving left (bottom left)...
Where they come face to face with a group of FLA militants; the Cubans are first on the trigger...
Three terrorists fall, including their leader, but the survivors return fire, but the fire is inaccurate.
*Actually, it was very accurate: the bad guys scored five hits, but the boy rolled and saved them all!
While Razor 03's gunfight is going on (bottom left), Razor 02 moves up on a roof (top center right) and Lt Hinajosa and Razor 01 move left (bottom right).
Razor 02 spots a second insurgent group and opens fire.
Only one enemy soldier goes down, and the bad guys return fire but don't hit anyone.
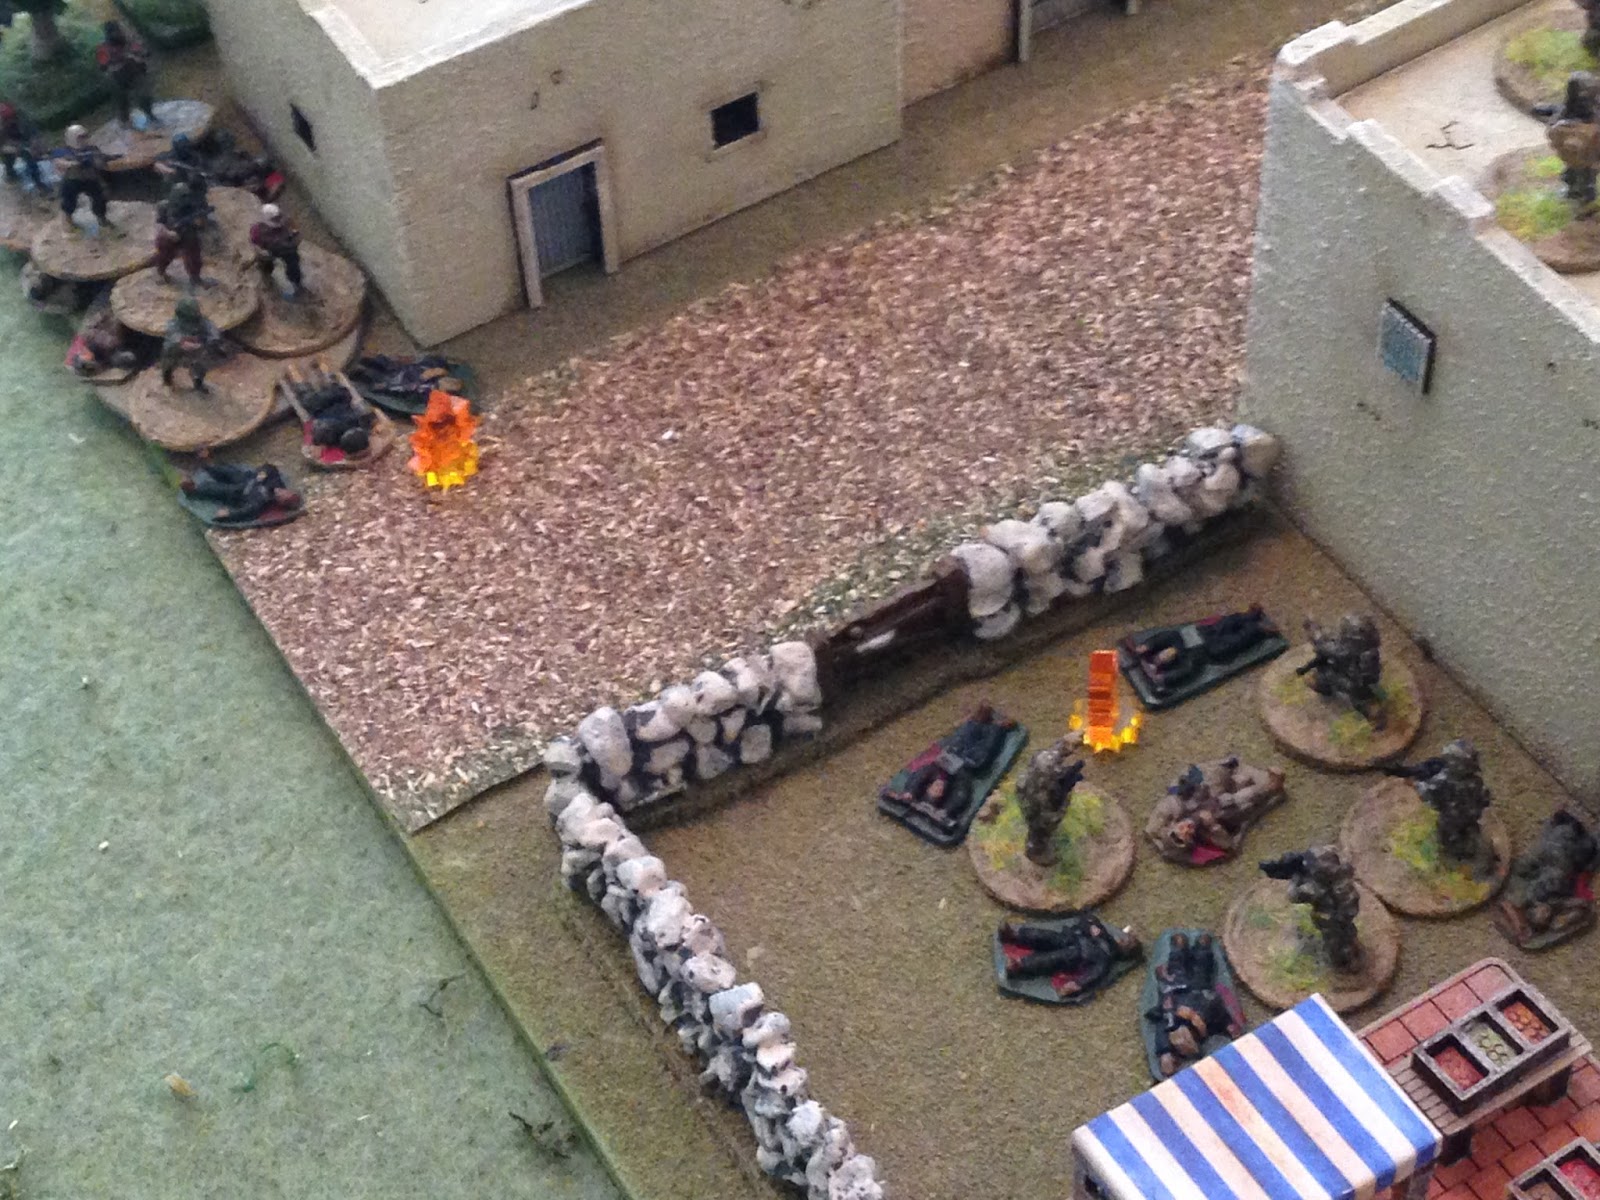
Looking northeast to southwest, two insurgent groups move forward (bottom right and center left, with Razor 03's gunfight at top right), looking to get at Razor 02 (top center right) while they can't be supported by the other Cuban teams.
At left is the group at bottom right from the previous photo, at right is the bad guy group fighting it out with Razor 02. The enemy receives reinforcements in the northwest (bottom center).
Razor 02 (top center right) goes on Overwatch, and Razor 03 is stuck in (bottom left) on the left; Lt Hinajosa is torn about what to do with Razor 01 (bottom right): he wants to keep pushing left, then move north up the road, shutting down enemy avenues of approach (hotspots), which would allow him to accomplish his mission while minimizing exposure. But Razor 02 is calling out new troop movements in the east (right), and the good Lieutenant is wondering if he shouldn't take Razor 01 that way to help relieve pressure on Razor 02...
In any case, the terrorists in the west open up with a furious fusillade on Razor 03, at point blank range!
But the tough Cuban paratroopers stand firm and return fire.
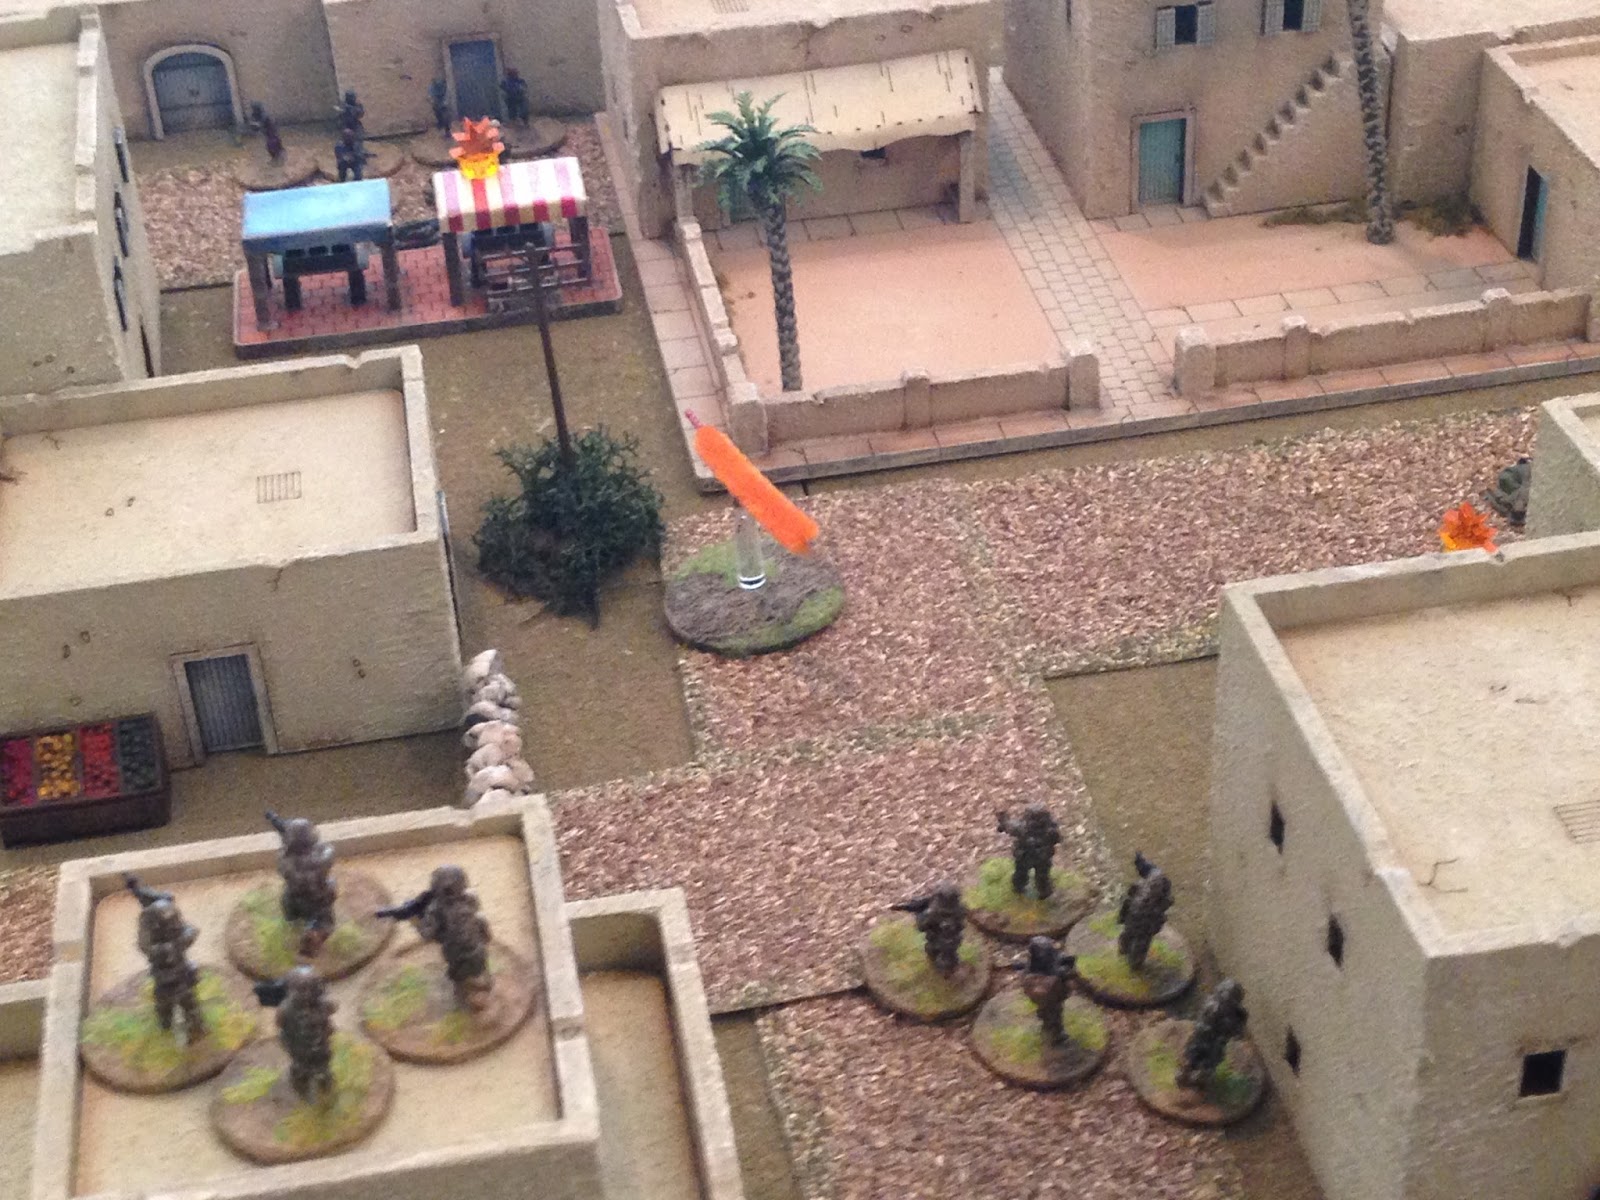
Decimating the enemy cell (left)! Razor 03 hops the wall and moves into the street (bottom left), where they sight the enemy reinforcement team (top left, behind the fruit stand, but out of sight o fthe bad guys at top center left, the guys fighting Razor 02, top right).
The Cubans again swing into action and cut loose.
But they're (top right) disjointed from the previous firefight and getting over the wall, and don't hit anything! The enemy (bottom left) return fire.
The enemy hasn't gotten a good look at them and the rounds zip overhead harmlessly. Razor 02 (bottom right) fires on the bad guys (top left) firing on Razor 03...
Dropping the enemy leader, though the group still hangs in there.
*But Razor 02 rolled a 1 on its Reaction Test and it's time for another Fog of War card: "Excellent Position." The bad guys just around the corner (off camera to bottom right) have managed to barricade themselves into some hard cover, making it more difficult to dig them out. This failure has also caused Razor 02 to fall off Overwatch...
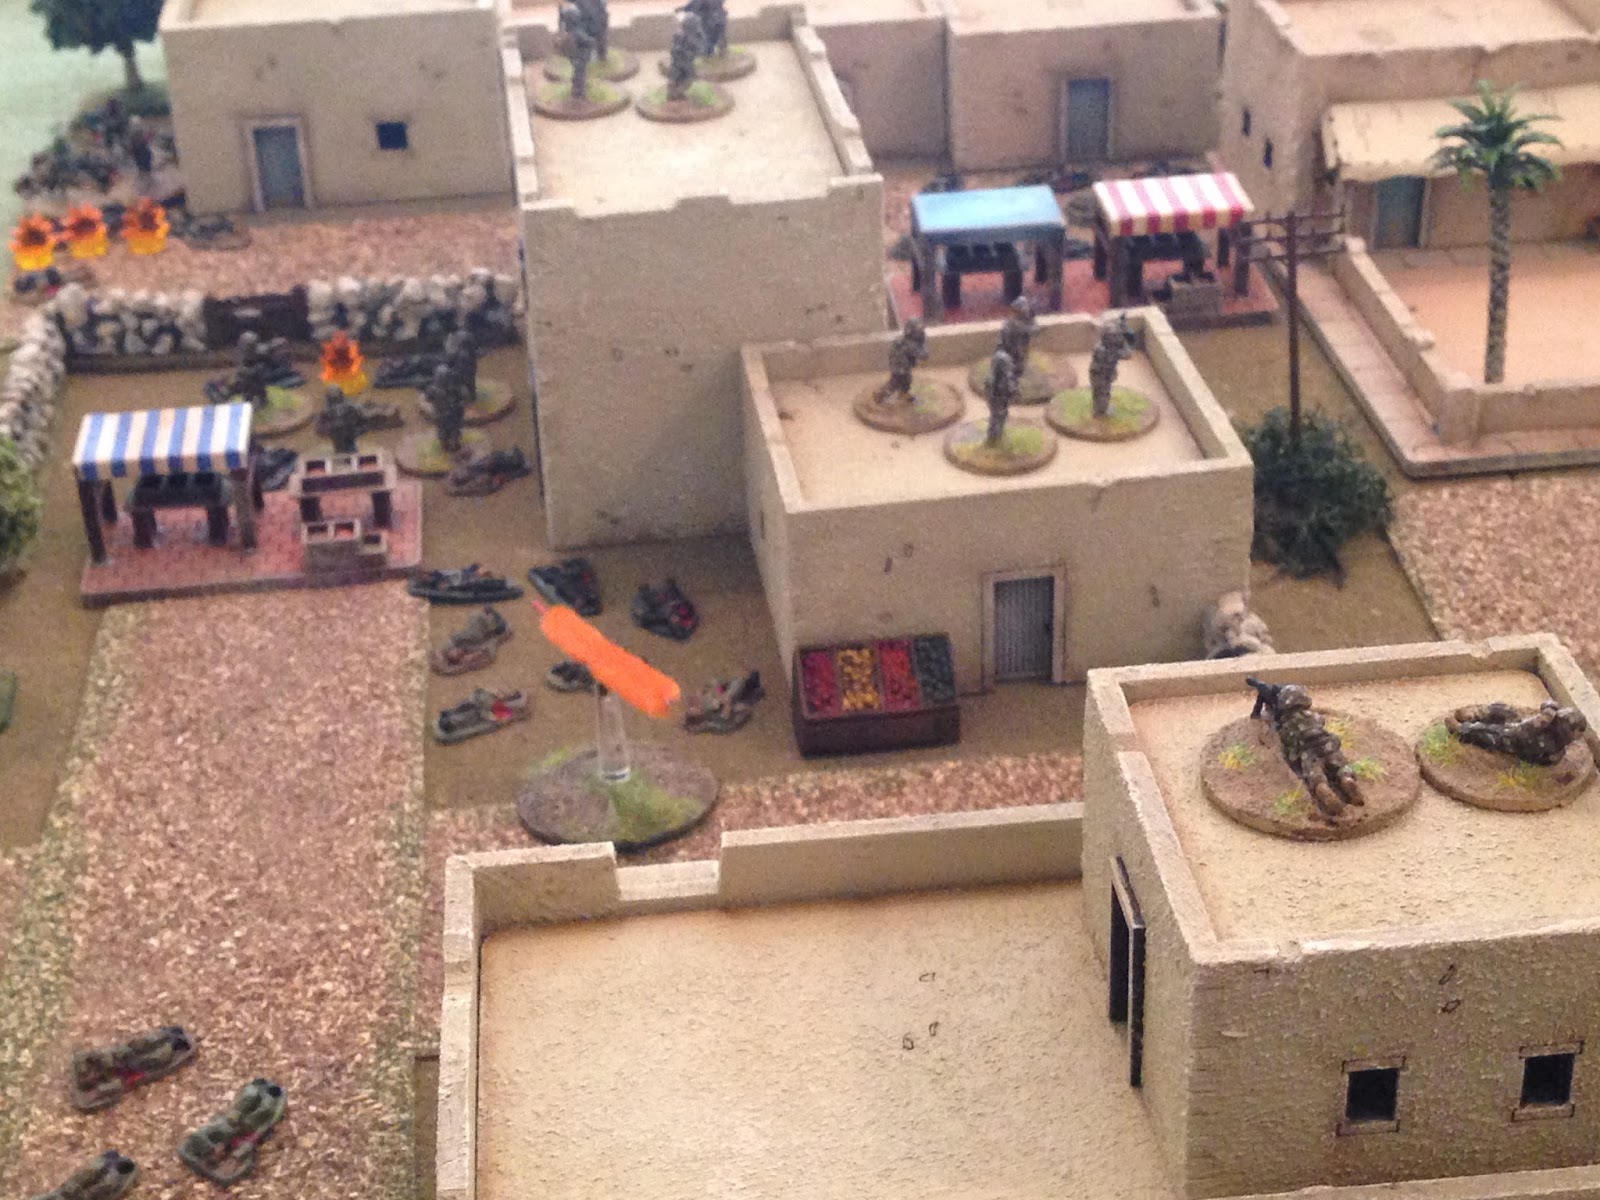
With Razor 02 (off camera to right) laying down cover fire, Razor 03 moves up (bottom center)...
Coming into contact with their third insurgent group of the morning. Once again they open fire...
Razor 03 (right) drops three more bad guys (bottom left), who return fire, but don't manage to hit anyone.
*Our firing dice haven't been so great, but our defense dice have been fantastic (*knock on wood*).
With Razor 02 (left) dealing with a stoppage in their SAW (fell of Overwatch), Lt Hinajosa has made his decision: Razor 02 needs support, so rather than keep pushing left, the acting CO pushes Razor 01 right (bottom center), and as soon as they step out they sight bad guys (top left, behind the fruit stand, with another two groups barely visible at far left and top center right).
The Lieutenant and Razor 01 open fire.
*I need to look this up: the bad guys rolled a 1 on their React Test, but if I recall correctly, Fog of War cards are only pulled on good guy 1s. Yep, only good guys.
Two insurgents fall (bottom right), and the survivors stand and return fire...
But Lt Hinajosa pushes the paratroopers forward (bottom right, with Razor 02 at bottom center; really would be great if they were still on Overwatch...), coming into contact with another set of bad guys (top right).
Razor 01 shifts fire, focusing on the immediate threat.
The bad guys are caught in the open, and half their number fall, but the remaining three return fire.
*The bad guys rolled another damn 1!!! I wish these counted, I like the Fog of War cards. There's not reason not to, I guess, it's not lie they're only incidents that are bad for the good guys, they work both ways.
But again the Cubans dodge a bullet, literally ;) (top right). More insurgents pour onto the table to join the fight (bottom left).
Razor 02 (right) goes on Overwatch as Razor 03 (bottom left) prepares to deal with the two remaining insurgent groups in the northwest (center left and top left).
Razor 03 begins moving forward, firing as they go.
Razor 03 (bottom left) knocks down one bad guy, then Razor 02 (bottom right) joins in, finishing them off. Razor 02 then shifts fire onto the three bad guys at center left, the ones in the 'Excellent Position.'
But they fall too; guess that position wasn't so excellent after all. Razor 03 keeps pushing forward, into the intersection. "Sarge!"
"Contact right!" Razor 03 (bottom center) turns and engages another terrorist group (top center, with Razor 02 at top right and the acting CO/Razor 01 just left of them, at ground level).
Razor 03 (off camera to left) only pops one bad guy (bottom left, the other casualty is from Razor 01's previous round of fire). The bad guys pass morale, but with Razor 01 just around the corner (off camera to bottom center left) they decide to fall back to the northeast (top right) in order to husband their forces.
Razor 03 moves up onto an enemy hotspot.
While on the right side, Lt Hinajosa and Razor 01 (bottom right, with Razor 02 on rooftop at bottom center; they've fallen off Overwatch, which occurred when they rolled a 1, so I need to draw another Fog of War card) moves up and fires on some nearby bad guys (top left).
Mowing down all but one Tango, who wisely decides to fall back and live to fight another... minute or two.
Razor 01 then moves up (center, from bottom center).
The bad guys are in bad shape: they've had two groups entirely eliminated, and three beat up so bad they only left six survivors (bottom left, center right, and top right, with the acting CO and Razor 01 visible at top left). The insurgents have already lost 27 men in this battle, and then they look for help, but no reinforcements make it to the area this turn.
Things are going swimmingly for Task Force Razor, right?
Razor 02 (bottom right) maintains Overwatch as Lt Hinajosa and Razor 01 get up on a building in the north (top center), and Razor 03 kills a hotspot (far left).
Then I finally remember to draw a Fog of War Card from Razor 02's earlier failure, and I get great news. It tells me to draw an Asset Card ("Unexpected Help"), and whaddaya know, our old friends, Jupiter 31, the sniper team from mission number two, are back to support Task Force Razor (bottom right)!
There is a lull in the fight as the bad guys use out of contact movement to consolidate in the north (bottom right, with Razor 01 at center, Razor 02 at top left, Razor 03 at top center, and Jupiter 31 off camera to far left). The bad guys are doing the right thing, building up strength, but they are failed by their comrades! Again they fail to receive reinforcements.
Razor 02 stays on Overwatch (center right) as Jupiter 31 moves up to their building (bottom right) and Lt Hinajosa and Razor 01 move north on the rooftops (top center).
And Razor 03 dashes up onto the next enemy hotspot (center, below Razor 01, from bottom center).
The insurgents are in a bad way; they've consolidated three decimated groups into one (bottom center), and are joined by some buddies (right), but the Cubans have penetrated deep into the north and are rapidly shutting down hotspots, making it progressively more difficult for the bad guys to get more help onto the table. Their commander was considering pushing further into the northwest corner (top right) to ambush and Cubans that come around that way, but the fear is that the Task Force Razor simply leaves Razor 01 (top center) on Overwatch while the rest of the teams simply by-pass the insurgents in the northwest and exit in the northeast (off camera to bottom left).
The acting CO and Razor 01 go on Overwatch (on building) as Razor 03 (bottom center) kills another hotspot (two down, only need three to be mission complete, then move off the table at the northeast exit).
*Which reminds me, if you're wondering why a several of the insurgent hotspots were lined up over here on the left (west), it's because you've got to put them somewhere, and 2' x 2' isn't a lot of space to hide them, even with all the buildings breaking up LOS. So the bad guys figured they've at least put them as far away from the Cuban exit point as possible.
As Razor 01 and 03 are doing their thing (top left), the sniper team, Jupiter 31, moves up and relieves Razor 02 (bottom right), so that they can move up (center).
The bad guys are looking to hold off and build their forces up as long as possible (top center and left), and they do receive reinforcements (bottom left), but they arrive right in view of Razor 01 (center right) and Razor 03 (bottom center), which kind of forces their hand.
With a storm brewing, Razor 02 goes up on a building in the center, and while they can catch glimpses of an enemy group in the north (top center right), they don't have a shot. Jupiter 31 (bottom right) and the acting CO and Razor 01 (center left) are on Overwatch as Razor 03 (left) prepares to deal with the enemy reinforcements (top left), doing what the paratroopers do best: take the enemy apart piecemeal.
But there's a hiccup as the FLA militants get off the first shot!
*I had Razor 03 rolling D8 and Razor 01 (Overwatch) rolling D8, but the bad guys had a D8 leader. The Regulars rolled two 7s and the bad guys rolled an 8!
And Task Force Razor has suffered its first casualty of the day! A para falls (center right) as his comrades return fire. The terrorists are roughly handled, with all but one falling in the northwest corner (top left), and he shelters behind the building.
As Lt Hinojasa comes down to check the casualty: he's hit and needs to be evacuated. The acting commanding officer of Task Force Razor quickly stabilizes the young paratroopers wounds.
As another group of insurgents comes rumbling around the corner (top left)!!!
Razor 01 (bottom right, with Razor 03 just off camera to bottom center) opens up on the terrorists, raining fire down on them...
Four bad guys fall (top left), as Jupiter 31 (bottom right) engages as well. But the snipers can't get a clear shot, and no one is hit.
*What!!!??? The sniper missed!!!??? He had four dice, and nothing? He would usually have five for Optimum Range, but I didn't give it to him because of the sandstorm.
The enemy now faces another conundrum: the Cubans had a rifle team and a sniper team on Overwatch. The bad guys had one group in the line of fire, and it was shot to pieces. Then they pushed another group into the line of fire, and it was shot to pieces. All this was expected, but they figured, with all those tests, that the good guys would hopefully fail and fall off Overwatch, which would allow the last team to move up unmolested. But the good guys didn't fall off Overwatch, they passed, and now two teams have been shot to pieces and the third is wavering, not sure what to do. Should the bad guys press the attack, knowing they'll likely be gunned down, or should they wait and try to build up reinforcements, knowing the Cubans are very near to satisfying their mission objectives and then leaving, and as each hotspot is eliminated it will become harder and harder to get reinforcements?

Eh, go for it. The third bad guy team (which policed up the couple survivors from the first two cells) pops up. And while they'll have to deal with Razor 01 (off camera to bottom right), but they cleverly moved up in a location where Jupiter 31 (the sniper team) is masked by buildings and unable to fire.
Razor 01 engages the enemy super group.
The enemy is valiant, but it's a bloodbath, with four Tangos going to meet their maker. Under heavy fire, they hold their ground, waiting for their chance to strike back. But morale flags a bit when they hear none of their brothers have chosen to join them (again, no reinforcements, which is impressive when the Insurgency Level is 5).
Jupiter 31 (bottom right) and Razor 01 (center top left) are on Overwatch as Razor 03 (center) stands by and Lt Hinajosa prepares Razor 03 (left) to go handle the remaining insurgents (top left).
Razor 01 continues pouring fire down onto the bad guys.
Dropping three, and then Razor 03 (bottom right) adds its fire to the equation.
The enemy is kaput, so Lt Hinajosa and Razor 03 hop the wall and move up to another enemy hotspot (bottom left), leaving their casualty behind (right, the khaki casualty figure).
But that was all part of the plan, and so as Razor 03 pushed the assault (top left), Razor 02 moved down and took over their casualty (center left, from far right).
There are ZERO insurgents on the table at this point; they roll for reinforcements and get a decent-sized group, but they are scheduled to arrive on a hotspot that Razor 03 has already killed, so no reinforcements. This is turning into a cakewalk!
Lt Hinajosa and Razor 03 (far left) kill their third insurgent hotspot (MISSION COMPLETE) as Razor 02 passes the casualty over the wall and reforms on the north side, turning east (right) to head for the exit.
Jupiter 31 (top left) and Razor 01 (to center) are on Overwatch as Razor 02 (just right of Razor 01) and Razor 03 (masked by building at top right) are moving to the exit in the northeast (bottom right, just above the building. But just as everything is looking peachy, the enemy receives reinforcements in the northeast, right next to the exit, right next to the building we will hereafter refer to as "The Hellhouse."
The bad guys are down to two hotspots: bottom right (which is #1), and top right (#2, just peeking out from behind a building, above the lone tree). So the bad guys can only receive reinforcements on hotspot rolls of 1, 2, and 6. And the Cubans are mighty close to #2, looking to shut it down.
Jupiter 31 (off camera to top right) and Razor 01 (top right) are on Overwatch as Razor 02, carrying the casualty, moves east up the street (center) and the acting CO and Razor 03 move east up an alley in the north, looking to kill that final insurgent hotspot (far left), which they have just landed on.
The insurgents dash west, into the alley, looking to hug the buildings to avoid Cuban Overwatch positions, and get nice and close for a pointblank ambush (center, with Razor 02 visible between the buildings at top center right, and Razor 03 at top right).
But as those bad guys move up (center), their hearts soar as word reaches them that, miraculously, two more groups of their brothers have come to the fight (bottom left and far right, with Razor 03 right next to them)!
*Now how the hell is that possible??? They roll and get reinforcements; okay, all they needed was 1-5 on D6, pretty sure thing (though it's failed three times already this game). Then they roll on the reinforcement table and get a '7,' which is roll and roll again for another group! Which, okay, that happens, but then they somehow roll and come on in the only spots they can. Both of them! The only controversial aspect to all this, and I need to look it up, is the group at top right is coming onto hotspot #2, which Razor 03 is physically sitting on. Now, insurgent groups don't have to come on table literally on the hotspot, it can be within 6 or 8" (I don't recall exactly, and it doesn't matter to me, close enough counts), but the question is, can they come on the table at a hotspot occupied by a Regular force?
Well, ain't that a kick in the ass? I'm reading my notes, and the bad guys actually had THREE insurgent groups as reinforcements, rolling '7' TWICE, but one of the three groups was supposed to come on at hotspot #3, which Razor 03 had already shut down.
In the north, Captain Soares and Razor 03 come nose to nose with a previously unspotted group of bad guys; caught off guard by the sudden appearance of terrorists at point blank range, the bad guys are able to open up first!
A Cuban (bottom center) goes down as the rest of the team returns fire, but only one enemy soldier goes down! Because of the nearby buildings, the troops on Overwatch (Razor 01, just off camera to right) are unable to pitch in to help with this gunfight...
Uh-oh... I've got a really bad feeling now. The insurgents just received a boatload of help in a very small space, and we're already struggling with casualties.
The only ones that can get there is Razor 02, despite having a casualty to tend to, so Razor 01 (bottom left) looks on as Razor 02 moves up (top center right, with Razor 03 at ground level to their left) and sticks its nose in.
The Cuban paratroopers (bottom center) surprise the enemy teams (bottom left is the insurgent group that just fired on Razor 03) with their sudden appearance on the rooftop and open fire on the bad guys in the street (top center).
Three bad guys go down (center), and the last man falls back to the Hell House (bottom right), joining the insurgents there.
Razor 02 then turns its guns on the bad guys below them (Razor 03 at top left).
Three more bad guys fall (right center), and its remaining two members dash to the rear, linking up with the others at the Hell House (bottom center left).
With the situation temporarily stabilized, Captain Soares (bottom left) bends over to check the Razor 03 casualty: he's hit pretty bad and won't be able to get back in the fight... Razor 02 (center, on roof) goes on Overwatch as the remainder of Razor 03 kills the enemy hotspot they're sitting on.
With Razor 02 (far left) covering them, Razor 01 dashes into the plaza (center) while Jupiter 31, the sniper team, moves up on the right (right).
And the bad guys at the Hell House (bottom center) receive more reinforcements! Clearly they are determined to make a stand in the Mulan District!
The insurgents actually rolled up TWO more reinforcement groups, but one of them landed on a dead hotspot. That's quite a mess they've created down there at the Hell House...
With Razor 02 (left) on Overwatch, Captain Soares leads the remains of Razor 03, dragging a casualty (center right) forward...
While Razor 01 gets into position (center) overlooking the Hell House (top right) and Jupiter 31 dashes across the street (bottom center). Razor 01 can't yet see the bad guys behind Hell House, but the sniper peers around the corner and gets a good look at the mob sheltering back there, which keeps Jupiter 31 from getting on the roof and getting their guns into the fight.
The Insurgent leader at the Hell House decides that now is the time to fight, and so he leads his men into position (bottom left) to engage the Cubans!
Razor 02 (bottom left, with Razor 03 just above them and Razor 01 at far right) spots the movement and opens fire...
Putting three insurgents out of the fight. But the there are still 10 bad guys at the Hell House, though they don't receive any reinforcements (again they rolled up two more groups, but they both landed on dead hotspots).
Razor 01 (center), 02 (top left), and 03 (top center left) all go on Overwatch, weapons leveled at the Hell House. The enemy leader screams to his men to open fire!
Sorry to show dice, but I've got three TQ8 teams on Overwatch, meaning they should rip the hell out of the bad guys, but the TQ6 Insurgent super-group manages to beat all three of them!
The mob of Insurgents at the Hell House unleash a torrent of fire on Razor 02 (top center, with Razor 01 at top left and Razor 03 behind trees at top right)!
All four members of Razor 02 go down in a hail of 7.62mm fire...
Razor 01 (bottom left) immediately returns fire.
But only one bad guy goes down (top right)!!! Razor 03 (far left) cuts loose...
Felling another two insurgents, but the group stands its ground, going toe-to toe with the Cuban paratroopers!
I need Marines!!! This would never happen if there were Marines! It has become extraordinarily difficult to beat this last insurgent group; two of my three teams had dependents (casualties), lessening their firepower, and the bad guy group is so big it's rolling ten defense dice (the maximum) each time it's shot at. For example, Razor 01, which is at full strength, rolled seven firepower dice and scored five hits, but the bad guys rolled ten defense dice and were able to save four of them. The bad guys actually rolled six successes, but couldn't beat an '8.'
Razor 03 (top left) and Razor 01 (center) are on Overwatch as Jupiter 31 moves into the fight (bottom right), in sight of the Hell House (top right).
The firefight rages as Razor 01 (bottom left) steps up its fire.
Two more bad guys go down (top left) as Razor 03 (bottom left) opens fire.
But the bad guys (top right) are unaffected as Razor 03 (top left) is depleted and doesn't have a clear line of sight... Jupiter 31 (bottom right) gets in on the action...
The sniper team (top left) manages to drop two more terrorists, whittling their number down to three men left!
But three more Tangos show up immediately to replenish their ranks!
Razor 01 keeps up the fusillade.
Two more bad guys are knocked out as Jupiter 31 (bottom right) reloads and gets back in the fight.
But the bad guys loose a burst of fire at Razor 03 (top left)...
Captain Soares and Lieutenant Hinajosa both go down!!! The last man standing in Razor 03 returns fire...
Another bad guy goes down, but immediately six more Tangos arrive to add their rifles to the fight!
Then, there was a lull in the fight, long enough for several soldiers from Razor 01 to raise up and get a look at the area around the Hell House: "IED!!! IED!!! They've got the place rigged to blow!!!"
The reason Razor 03 fired after the bad guys is because not only did they fail the reaction roll, they failed with a '1,' which meant a Fog of War card was drawn, and it was an IED. which was placed adjacent the Hell House, right in the path of TF Razor's exit from the board.
The senior ranking member of TF Razor at this point is Corporal Ortega, the team leader of Razor 01. He made contact with the rest of the members of the Task Force and requested a SITREP so that he could understand the overall tactical situation. Realizing he was, indeed, in charge of TF Razor at this point, he ordered Razor 01 and Jupiter 31 to step up their rate of fire to keep the enemy's heads down, at which point several members tossed smoke grenades. The teams then began pulling back to the southern edge of the battle area, where Cpl Ortega immediately radioed back to HQ to request support: "Broken Arrow, Broken Arrow, troops in contact and in danger of being overrun!" CLEF aircraft were vectored in on station to provide support, and the Quick Reaction Force (QRF) was dispatched to assist TF Razor's forward elements.

Having pulled back and delivered a NATO 9-line brief, Cpl Ortega watched safely from a nearby rooftop as a CLEF F-4 Phantom rolled in and planted a Mk 83 1000-pound bomb directly on the Hell House.
Shortly thereafter the QRF arrived to rescue the survivors of TF Razor's forward element.

Following the airstrike and the arrival of the QRF, TF Razor moved north to recover its casualties and secure the local area. The area was quiet, no further contact, but while TF Razor had secured the physical area of the Mulan district, it was only because the remaining insurgents had pulled back to regroup and continue the fight.
Wow, just when I thought this stuff was too easy, WHAM-O, I get body slammed! Mission NOT ACCOMPLISHED, my first failure with Ambush Alley. As per usual, the fight started pretty well, and though we took a casualty pretty early, we seemed to be okay, particularly with the addition of Jupiter 31 (via Fog of War card). We moved up rapidly, whacking lots of bad guys and making good progress satisfying the mission requirements (killing lots of hotspots and getting close to the exit point). But as we approached the exit we took another casualty, which slowed things up a bit, and then we ran into the issue of being faced with the last remaining hotspot being behind the Hell House, which also housed a sizeable force of Insurgents, which were (inexplicably!) able to continue to pour a steady stream of reinforcements to. Then we had a stunning lack of situational awareness (read: failed reaction test) which resulted in the wholesale slaughter of Razor 02, followed by another which saw Razor 03 and the Commanding Officer cut down. To be honest, this was enough to render TF Razor combat ineffective and make mission accomplishment untenable; the realization that the Hell House was rigged to blow was simply icing on the cake for the bad guys.
In any case, TF Razor quickly scurried back to its base to lick its wounds. Casualties were checked: the enemy lost 29 men, but Cuban casualties were atrocious: one paratrooper was killed in action, while another five were badly wounded, including their commander, Captain Soares. Lieutenant Hinajosa, luckily, was discovered to be only slightly wounded; he is back in action and now the acting commander of Task Force Razor until Captain Soares' return.
It was a helluva fight, and the Cuban paratroopers are looking for retribution!
V/R,
Jack


Once the two teams arrived at the house and you could not take them out straight away it was a losing proposition. Which is a shame as it was going well until then!
ReplyDeleteDid you find that the insurgents were harder to get rid of with d8 morale? It did not seem to make much of a difference in the report but I do notice they did not run away.
Shaun,
ReplyDeleteI see you're getting caught up! ;)
Yeah, everything was going pretty well until the Hell House became the Hell House, I was on the cusp of skipping through the that scenario. Regarding morale, I don't really like the higher (I think I was actually using D10 morale for the bad guys). It didn't seem to feel right that a group of eight bad guys hops out, six of them get gunned down, and the other two have the gumption to stand there and shoot it out.
What I'm thinking about doing is having them fall back to regroup (probably with the survivors of other groups, like I had them do in this fight, albeit voluntarily rather than compulsory from morale checks).
V/R,
Jack