All,
AKA, Ambush Alley in South Leon #1
So, a bit of review as I'm all over the place when it comes to projects: on 1 May 1990 Cuban Liberation Expeditionary Forces (CLEF) deployed to the west African Republic of South Leon. A county seen as pivotal during the Cold War as a stopper to the Domino Theory in Africa, since The Wall fell it has largely been ignored by the Western Powers that propped it up throughout the Cold War. And that would be fine, except:
1. South Leon has a Marxist neighbor to the north,
Fédération Socialiste Nationale de Leon, or FSNL. While it is suffering as well, having lost its primary backer when the Soviet Union collapsed, that is actually making things worse. Aside from the cultural hatred the two tribes have for each other, the FSNL regime is under pressure due to a stagnant economy, and what better way to relieve pressure then redirect the anger at outside forces, such as South Leon?
and
2. South Leon has an internal problem, the Free Leon Army (FLA), which is Marxist and thus has problems with the republican government of South Leon and is backed by FSNL.
Both these problems were coming to a head, and so the Cubans, being the freedom-loving folks they are, decided to pitch in to save South Leon from the damn Communists! Generalissimo Estevante authorized the deployment of a battalion-sized Task Group to South Leon. Headed by a Marine, Major Fulgencio, the task force is built around a company of Marines under 1st Lieutenant Ordonez (Task Force Redleg) and a company of paratroopers under the recently promoted Captain Soares (Task Force Razor). The overall Task Group is filled out by a contingent of tanks, armored personnel carriers, amphibious assault vehicles, Special Forces, Intelligence, an air combat element, and various other support personnel necessary to keep the Task Group operating at full capacity.Task Group Fulgencio landed in South Leon on 1 May 1990, with Task Force Redleg deploying north to the Demilitarized Zone (the border with FSNL), and Task Force Razor moving just east of the capital city, to the capital of the home-grown insurgency, Diwala.
Things were quiet until early June 1990, when Task Force Redleg's patrolling of the DMZ ran into a battalion-sized force of FSNL "volunteers" infiltrating south across the border. Three short, sharp clashes saw the victorious Cuban Marines sending the FSNL volunteers packing back across the DMZ. Again things have been quiet, but intel has been picking up on chatter to the east, and so Captain Soares' Task Force Razor has stepped up its presence patrol activity in the city of Diwala. There have been several incidents of sniping and Improvised Explosive Devices in the city, though none of the Cuban paratroopers has so far been seriously injured. But that is about to change...
It is now 1430 on 2 July 1990, and calls for assistance have come into Task Force Razor headquarters. The harried voice on the other end of the line stated a South Leon National Police patrol was ambushed, and while the first two vehicles made it out of the kill zone and returned to base, they left the third vehicle, which was disabled, at the ambush site. And it has several National Police officers in it...
Captain Soares immediately rounded up a Quick Reaction Force and headed out the door to rescue the South Leon National Police troops.
Overview, somewhere in Diwala, north is up. Nothing fancy, just a 2' x 2' surface with plenty of buildings and walls.
I'm playing this out in 15mm using the old school "Ambush Alley" rules, as written. The is the first scenario out of the book, "Contracting Trouble," a classic of modern wargaming. My intent is to play out all five scenarios in the book in a row, to learn the rules, put them through their paces, and see if I dig'em.
The opposing forces, with civilians at top, the South Leon National Police at center, the bad guys at right, and Task Force Razor at left. It appears I beefed the scenario up a bit, though. I've added three groups of civvies (I think that's actually in the optional rules), and then given the Regulars an Amtrac and an extra fireteam, though I've also beefed up the Insurgents' beginning force.
Task Force Razor: the AAV is a beautiful model from Irish Serb (I've got two, with two more to paint), and the troops are Modern Australians from Eureka Minis. They have Razor's CO, Captain Soares, and three teams of four.
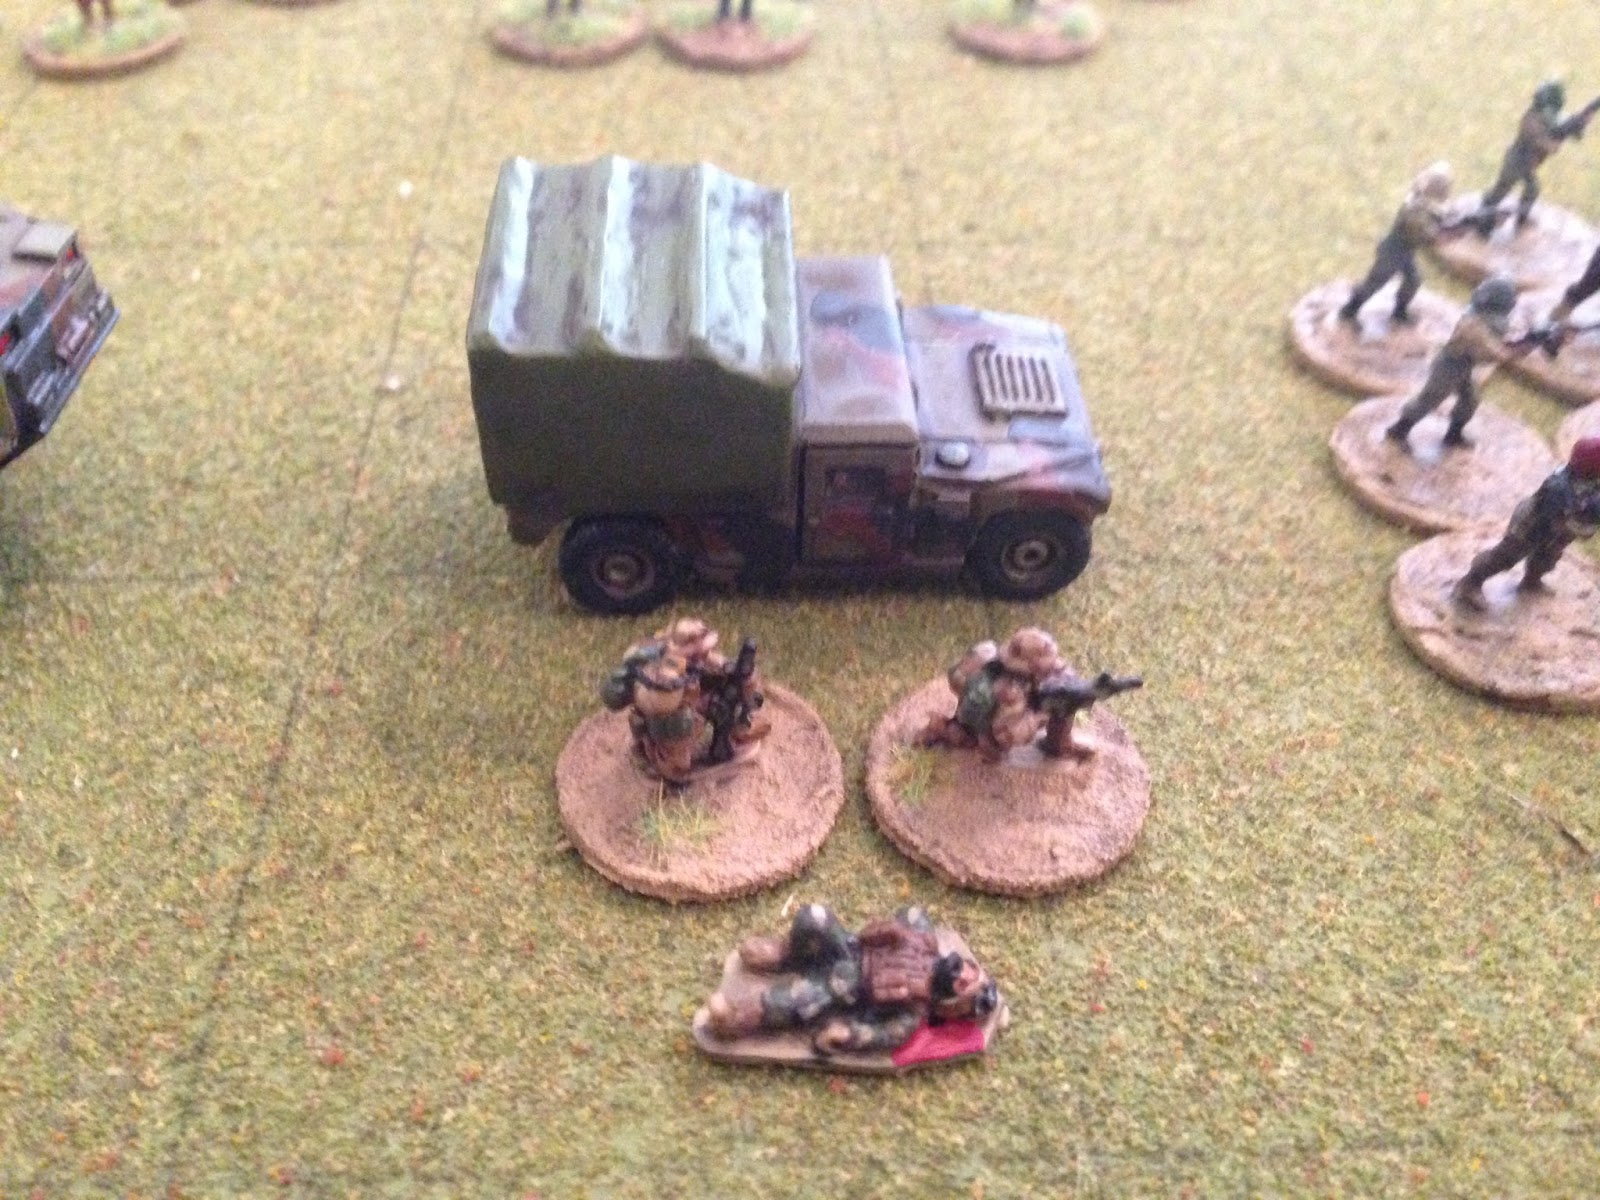
The South Leon National Police: the HMMWV is from Flytrap Factory, while the two troops are Peter Pig Vietnam-era LRRPs and the casualty figure is Peter Pig Modern USMC.
The bad guys, AKA, the Free Leon Army (FLA), local insurgents looking to overthrow the democratically-elected government. There are seven Leaders (Flytrap Factory Taliban, and all the rest of the terrorists are from Rebel Minis), nine RPGs, eight RPKs (Light Support), and eighteen riflemen with AKs.
And then there are three groups of civilians who just want to rubberneck a bit.
The map, this time with troops. The South Leon National Police (SLNP)'s disabled HMMWV is at center top, on the road. Task Force Razor is at center bottom, straight down the road. There are FLA Insurgents all over the place (atop building at bottom center right, just above that building, atop the building at top center right, at top left, and at far left. The three civilian groups are on the road at left, on the road at far right, and in the plaza at center left.
The khaki-colored poker chips (bottom right, right, behind building at top center right, at let, and at bottom left) are "Insurgent Hot Spots." In Ambush Alley, at the end of each turn you roll to see if the bad guys get reinforcements. If they do, you roll to see what size the group is and what weapons they have, and lastly you roll to see where they will show up. Each hotspot is numbered 1 through 5, and if a 6 is rolled the bad guys get to pick which hotspot they want to use. Hotspots can be destroyed if they are unoccupied and a Regular unit physically moves onto it and stays there for a turn, doing nothing else.
The mission is for Task Force Razor to move north, recover the SNLP officers, then escort them back south off the table.
*This photo shows the Insurgent groups as they are supposed to be from the book, but before I started the game I reinforced each of the groups with more guys.
**This was my first game, and I made a TON of mistakes!!!
The SNLP position; the HMMWV was disabled by an IED which wounded one officer. The other two are hunkered down and begging for help on the radio.
These guys won't do anything until Task Force Razor gets in physical contact with them, and the bad guys can't attack them until Task Force Razor gets in physical contact with them.
Task Force Razor: Captain Soares, the Commanding Officer (CO, or "Razor 6"), is on foot, leading this train. Razor 01 is at right, Razor 02 at left, and Razor 03 is riding in the track, which is Swampy 62.
The southwest, showing FLA insurgents at top left, civvies at top right, and Razor 02 at bottom right.
The northwest, showing civvies at left, FLA insurgents at top left, and SNLP at far right.
The northeast, with SNLP at left, FLA insurgents at top center, and civvies at bottom right.
And southeast, showing FLA insurgents at top left and far right, and Task Force Razor at bottom center/right.
Here you can see I beefed up the insurgents (top left, center, and bottom right). It's time to move out!
Razor 01 (bottom right, with the CO at bottom center right), begins moving up, but as they do, the Cuban paratroopers notice movement on the building to their east (just above them at far right).
Cuban fire drops one Tango, but the bad guys are not otherwise affected. Razor 01 keeps pushing forward.
*I have no idea why I didn't allow the Insurgents to shoot back, which is what should have happened when the weren't destroyed/forced to flee. Ahh, I just looked at my notes: I played it right! This team doesn't have a Leader, so they had to test to see if they can react, and they failed that, didn't even make it to testing against the good guys!
But as Razor 01 moves north up the street (left), they come into contact with a second Insurgent group (top left, with first group at top right).
The Cuban paras deliver another dose of small-arms fire.
Three bad guys go down, and the remaining two flee the area!
*I meant for the bad guys to be TQ6/M8, but wasn't paying attention and so the first three games I played the Insurgents as TQ6/M6, so you're going to see a lot of bad guys running away that shouldn't have been...
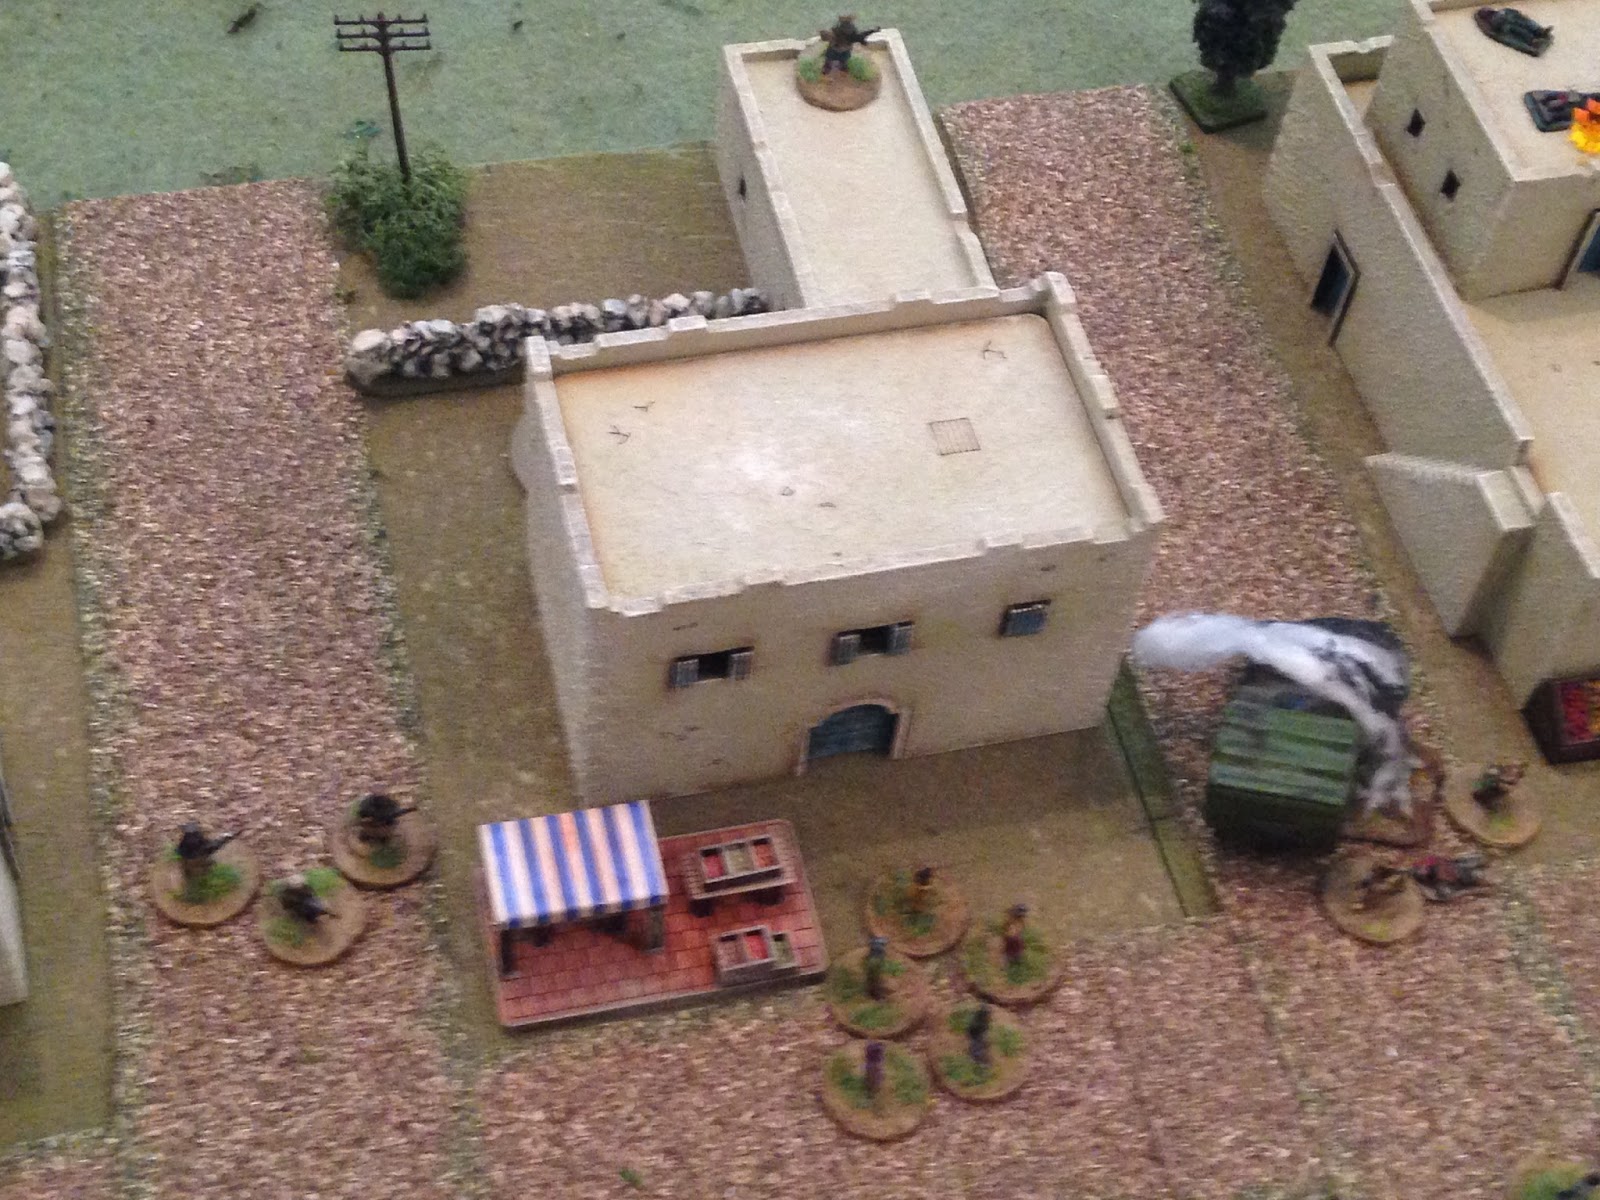
Capt Soares moves up the road (top center, just above tree) as Razor 01 is firing (right) and Razor 02 move into the plaza (left), near a mob of civilians.
Razor 02 (bottom right) spots movement up ahead: bad guys on a roof (top left), getting uncomfortably close to the South Leon National Police guys (left center). Cuban rifles and SAWs bark again...
Three terrorists fall and the sole survivor runs away.
In the rear, Swampy 62 slews its turret right to deal with the FLA militia previously engaged by Razor 01.
The .50 caliber HMG fire is devastating, felling two enemy troops and forcing the remaining two to head for the exits.
Swampy 62 then moves up the street, halting on Capt Soares' orders.
It seems like every civilian in three blocks' distance has come out to see what's going on (left, top right, and center), with SNLP at left center top and Capt Soares/Swampy 62 at bottom right.
In the northwest, four Insurgent leaders were collaborating. Having decided on a course of action, three move south down an alley (bottom left), while one moves east (right, atop building at top center, with a band of civvies at bottom center and the SNLP at bottom right).
The Cubans are exceedingly close by (top right), but the Insurgent commanders (top left) signal a cell (center) to hold fast, reinforcements are on the way.
And immediately another cell of six terrorists arrives (center bottom), prepared to fight the infidels (top right).
It's eerily quiet as Capt Soares moves into the intersection (just above the track), signaling the SNLP troops, with Swampy 62 moving up right behind him. But the track can't move any further due to the civilians in the intersection, so Swampy 62 drops the hatch and Razor 03 dismounts as Razor 01 (right) and Razor 02 (left) move up.
*It just occurred to me that I moved every single friendly unit, I didn't put any on Overwatch, so the enemy can move with impunity.
And they do: immediately, the two terrorist cells in the west climb atop buildings overlooking the plaza!
In the north (this is looking west to east at the north end of the building), the Insurgent leader on the building hops down and dashes across the street (top left, from far left). The other three (yes, three, one is masked by the building at bottom left) Insurgent leaders decide to split up...
One dashes south across the street (bottom left), looking to get to the two cells in the west (bottom right), while the other two leaders move up and join a civilian crowd (center top), looking to stir things up.
Razor 03 (bottom center, with Razor 02 at center) hones in on the Insurgents in the southwest (top left)...
They're fire is incredibly accurate, whacking five bad guys, but the sixth holds steady!
Razor 03 then faces about and moves up the street, tucking in behind the civilians (center left), looking to break up the mob so that the track can get through. Razor 01 (right) is looking west...
They (bottom center) cut loose on the other terrorist cell in the west (top center).
Two bad guys fall and the remaining four run off before the leader (top center) can get there!
Razor 01 then takes up position atop the nearby building (right).
In the plaza, Razor 02 engages the one bad guy left behind after Razor 03's bout of fire.
They eliminate the group, then move up (top right).
As they get topside, they spot the enemy leader moving towards the western insurgent groups (left). They quickly whack him; "Sergeant, look! We've got Tangos mixed in with the civilians in the west (top center)!" "Hold your fire!"
The bad guys are too close to the civvies to fire at.
Captain Soares sprints up to the SNLP officers: "hang on guys, we're going to get you out of here! Pack up your stuff, we're leaving soon!"
Swampy 62 still can't move because of the civilians: "Razor 03, Swampy 62! You gotta get those damn civvies out da way!" "Calm your ass down, Swampy 62, we're working on it."
Right now there are no insurgent groups on the table, they've all been eliminated. But there are still three leaders: in the north, the single leader creeps up the side of the building (top right), looking to get to the eastern civvie crowd (center) and make big trouble for Moose and Squirrel...
While on the western side of the SNLP position, the two Insurgent leaders are making big trouble...
All of a sudden the civilian crowd disperses, revealing a rather large group of bad guys!
*A very cool rules mechanic that allows Insurgent leaders to turn a civilian crowd into Insurgents. You can never relax in this game, though my son was just commenting on how easy things were going.
And then more bad guy reinforcements show up in the southeast (right).
Razor 03 pushes into the crowd, trying to disperse them so the track can get through (center, with Razor 01 at top right and the CO/SNLP at top left).
And it works! The civilians moves south (bottom right, Razor 03 at center left).
And with the civilians out of the way in the west, or having picked up weapons (top center, SNLP at top center right), Razor 02 takes them under fire.
The boy is hot! Oh yeah, I may not have said, but my 8-year old boy and I are playing co-op against the bad guys; he's rolling, and he practically can't miss.
*Though I will also add I was playing wrong again: I was playing that Defense dice had to beat the attack dice to save, when the rules clearly state all the Defense dice have to do is tie the attack...
In any case, four bad guys going down, including one of the leaders, but the other leader keeps the remaining troops in the fight...
And for the first time all day, the bad guys actually get to shoot at the Cubans! The Insurgent group is at bottom center, SNLP at bottom left, Razor 03 at far left, Razor 01 atop building just off camera to far left, and Razor 02 is at top right.
Razor 02 (just off camera to bottom left) takes cover as the rounds impact against the stone walls (the bad guys only scored two hits, and the boy was easily able to beat them). With the civvies out of the way, Swampy 62 rolls forward, hammering away with its .50 cal HMG.
Four more terrorists go down, and the last two run for the hills!
Razor 01 (on building at center, with bad guys at bottom left, civvies at center right and center left, and the SNLP at center top right) goes on Overwatch.
The northern Insurgent leader creeps forward (top center), trying to reach the civilians in the street (center). But Razor 01 spots him and opens fire.
*Not supposed to fire within 6" of civvies, but I figured it was okay because of the elevated position.
And another bad guy falls.
In the southeast, the insurgents move up on Razor 01, which is preoccupied with gunning down the enemy leader in the north...
The bad guys get close and open fire...
*I pretty consistently forgot to use "optimum range" firing dice all game, forgot to give Overwatch and Cautious movement a +1 on reaction tests, and I forgot all about Insurgent "out of contact" movement. Here I let the Insurgents move and fire, and I don't think I'm supposed to.
But the bad guys are terrible marksmen and miss everything (scored one hit, easily beaten by six D8 defense dice). Razor 01 returns fire.
Four more Tangos down, but once again we have a sole survivor standing and fighting. He is the only FLA fighter on the table...
Until reinforcements arrived (center top, Razor 01 at top left, sole survivor bad guy at bottom right).
*Reinforcements are automatic in this scenario, they come every single turn.
Swampy 62 turns around, facing south, and drops the ramp. The two SNLP officers carry their wounded comrade into the vehicle.
Razor 01 faces off against the enemy reinforcements.
Four enemy soldiers fall, but they stand and return fire...
But the luck has run out!!!
*Remember, I was playing that defense dice had to beat firepower dice, not just tie them. So the bad guy (D6) five beats my five, then the fours beat my threes...
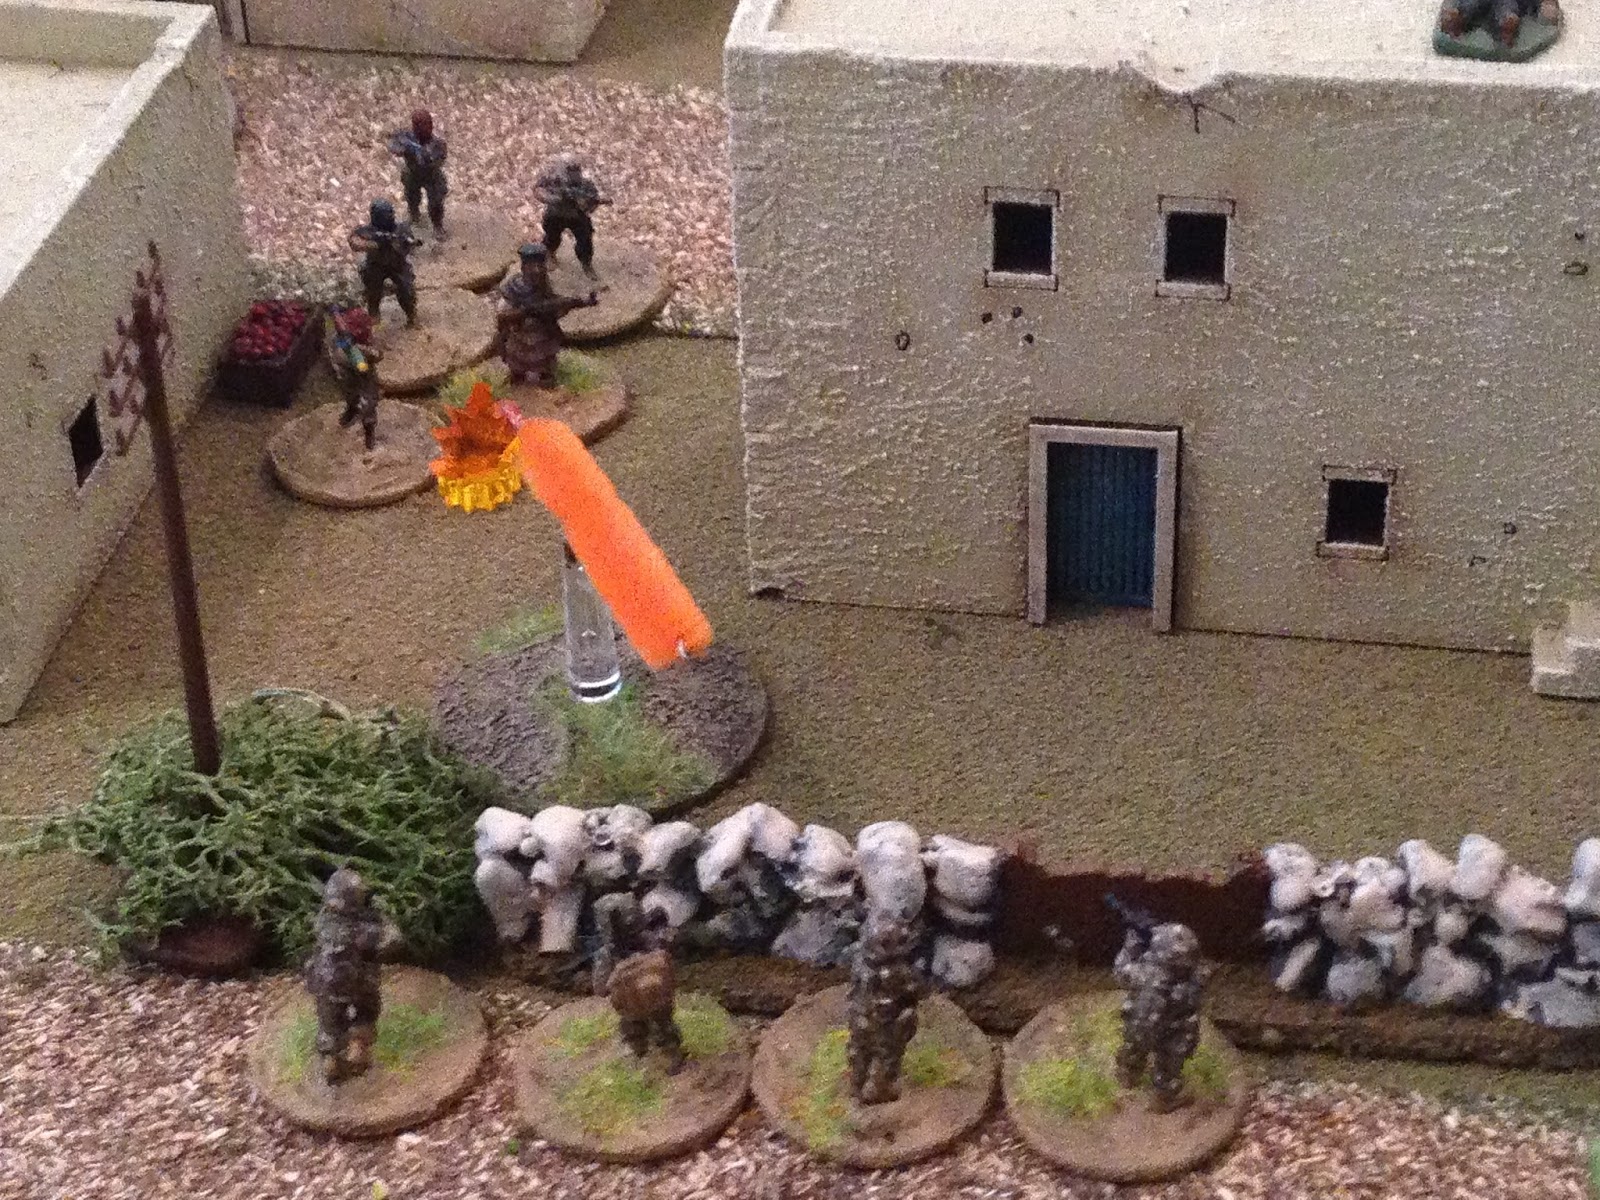
The bad guys launched an RPG!
The rocket slams into the building, and three Razor 03 men go down!!!
So far it's been kinda slow, but now the radios jump to life, too much chatter trying to figure out what the hell just happened and how bad it is.
With Razor 01 writhing about on the roof (left), Razor 03 moves over to engage their assailants.
Dropping both bad guys.
*Yeah, I'm running out of casualty figures.
Razor 02 (bottom left) is on Overwatch as Capt Soares dashes to the building (center right top).
And more bad guy reinforcements arrive in the west, near Razor 02's position.
The next few moments are a flurry of activity: "they're in, go! go! go!" Swampy 62, having embarked the SNLP officers, gets in gear and begins moving south down the road, as Razor 01's survivor drags a comrade down off the roof (just above the track) and Razor 03 goes up on the roof with the other two Razor 01 casualties.
Captain Soares checks the first casualty: he's hit pretty bad, Urgent Surgical.
*In Ambush Alley you have to get casualties to cover, then check them, where they're either KIA, WIA, or OK.
In the west, Razor 02 engages the enemy reinforcements.
The Cubans (to center) knock down another two insurgents (top left), who stand and return fire to no effect, and then they are joined by reinforcements (bottom center).
*I just realized I forgot to roll morale for Razor 01 when they got whacked by the RPG.
Capt Soares drags his WIA comrade to Swampy 62, as Razor 03 pulls the other two Razor 01 casualties off the roof.
As the last Razor 01 para dashes into the courtyard (center), looking to join Razor 02 (top center).
A fierce firefight breaks out in the west, where Razor 02 (center) engages both enemy teams.
Razor 02 (top right) puts three kills on the insurgent group in the southwest, which stands and returns fire, though no Cubans are hit.
And then Razor 02 zones in on the group in the northwest again.
One enemy soldier falls, but another RPG is launched...
*It's not really that an RPG has been launched, it's just that we've already rolled the firepower and defense dice, and it's not good for the Cubans, so I play it like an RPG was fired.
See, this was an absolute disaster for me, but only because I was playing it wrong! It should have only been two hits...
But I screwed up, and so it was four hits! All four paratroopers of Razor 02 went down in a flash.
And then Insurgent reinforcements see nine more bad guys come on in the east (bottom right).
2nd Lt Hinojosa and the men of Razor 03 check the other two Razor 01 casualties: both are wounded and need to be evacuated. They drag their comrades over and place them in Swampy 62, as Captain Soares (bottom left) works through his options.
With the ramp down and Razor 03 (top center) loading the Razor 01 casualties, Captain Soares orders the two SNLP effectives out of the track: "sorry fellas, but things aren't going to well and we need your help." Capt Soares forms a command group with the two SNLP officers and the survivor from Razor 01. The track goes on Overwatch.
The Insurgents storm Task Force Razor! All three groups move up (top left, top right, and bottom left).
Again the .50 cal HMG hammers away...
Two bad guys go down, and then the Command Group (bottom left) open fire.
They only kill one more Tango, but the other six run for the hills!
*Like I said, I screwed up. They shouldn't have run, they should have dropped to D6 morale, if they failed at all, which obviously is less likely when you're using D8s...
Then the Command Group engages the enemy troops in the northwest...
Three down, the fourth runs.
But as the Command Group (center left) is firing to the northwest (off camera to top left), the southwest insurgent group launches and RPG at Swampy 62!!!
But the rocket skips off, detonating harmlessly in the distance!!!! Swampy 62 slews its turret and returns fire.
*The rocket hit, but the boy rolled a save, so it didn't penetrate!
Dropping both bad guys in the southwest.
More Insurgents arrive in the east (top right).
Swampy 62 backs into the plaza to make it easy to get the Razor 02 casualties in, as Capt Soares moves the Command Group onto the roof to begin casualty collection. At top center, Razor 03 is ready to get back in the fight.
They climb onto Razor 01's former perch and engage the new Insurgent group.
Totally eliminating it! The table is now completely devoid of insurgents.
But then three more groups arrive, one in the northwest (top left), one in the northeast (top right), and one in the southeast (bottom right). Capt Soares' Command Group is on the building at left center and Razor 03 is on the building at right center).
*I rolled nine TWICE on the reinforcement table...
Capt Soares and the Command Group drag the four Razor 02 casualties down into the plaza.
While Swampy 62 and Razor 03 (on building at right center) go on Overwatch.
The southeast bad guys move up...
Razor 03 guns down every single one of them (I remembered to use Optimum Range), as the northeast terrorist cell moves up...
And they, too, are gunned down in the street (I treated them as Exposed, so +1 FP die and -1 Defense Die).
But in the northwest, a terrorist group climbs up on a rooftop (bottom left).
Razor 03 failed its roll and the track couldn't see them.
And more Tangos arrive just below them.
The Command Group sets about checking the Razor 02 casualties: two paratroopers are back in the fight, but another is wounded, and Task Force Razor has suffered its first fatality! The Command Group loads the WIA and KIA into the back of Swampy 62.
Razor 03 (bottom left) fires on the terrorists in the northwest (top center right, the guys on the building, not the ones in the street).
All four bad guys are down, so Lt Hinajosa leads the team down into the street (bottom center, from top right).
The other insurgent team immediately takes their comrades' place (bottom left) on the roof (Razor 03 at top center).
Further north, Insurgent reinforcements arrive (top left; a leader, RPG, and AK).
The Command Group fires on the western bad guys...
Dropping four and sending the other three scurrying.
Razor 03 (center) is on Overwatch as the Swampy 62 and the Command Group move south, looking to reach the safe zone (edge of table at bottom right).
As their comrades are running for their lives (far left), the last bad guy group moves up) top center).
Razor 03 (bottom right) engages...
And the bad guys won't be able to get one more RPG off!
But then, as fate would have it, what happens but a single RPG gunner comes on as the enemy's reinforcements, and where does he come but on Hotspot #5, in the southwest, right next to Task Force Razor's exit point. The enemy rocketman peers around the corner at Captain Soares' Command Group, with Swampy 62 beyond them and Razor 03 (masked by the building from the RPG gunner) at top left.
But Captain Soares spots the enemy soldier and the group fires...
And now I can say with confidence that there will be no more RPGs this game. The Command Group moves off table, followed by Swampy 62 carrying the casualties...
Followed by Lt Hinajosa and Razor 03.
Wow, we were really skating, then BAM! Three of four men down in Razor 01, almost immediately followed by all four men of Razor 02 going down. And things really slow down when you suffer casualties; first you have to get to them, then you have to get them to cover, then you have to check them, then you have to take care of them. To be honest, this is why I brought a vehicle to the scenario, I just couldn't see trying to drag your casualties all the way back down the table, and ain't no helo gonna land in that mess, in the middle of a point-blank range gunfight.
But what a game! We were able to successfully accomplish the mission, and we were joking about how easy it was (the boy had just said, "Daddy, I think we need more bad guys"), and then we took the casualties and I really started sweating, thoughts of a few more casualties making us immobile and then the damn thing turning into the Alamo... Which is probably just the kind of tension you want out of a game! ;)
I'm not sure how exciting the batrep is, please let me know your thoughts. As I'm typing it, it seems like it's not even fair, just 'new bad guys on the table, good guys mow bad guys down.' And, for the sake of time (it takes a lot of damn time to download all these pics and type up the batrep), I didn't get into every single tactical decision we made, but I assure you, there were plenty, and there were about half a dozen times where the boy and I had to sit and stare at the table for a good five minutes, trying to figure out how we were going to deal with way too many bad guys while not having very many good guys.
Another thing is, the game has you draw "Fog of War" cards when you fail an activation roll with a '1.' Then stuff happens; sometimes it's bad, like an IED or a fire starts in a building your guys are occupying, and sometimes it's good, like you get air support, or a tank. But with the boy's good rolling, we only failed (or lost) a total of three reaction tests, and never with a 1, so we never had any Fog of War events.
Well, I had me some questions, so did myself some homework (also posted them on the Ambush Alley board on The Wargames Website, and got some help from some kind souls):
Q1: Do Defense Dice that tie the Hit Dice stop the kill?
-Page 24, para 4, I screwed that all up. Defense dice must "...match or exceed." well, I played it the same for the good guys and the bad guys, but I'll fix that for the next one...
Q2: When Insurgents fail their morale roll, do they always run?
-Page 36, para 6, I played this correct. Failing morale leaves an Insurgent unit "Shaken," and Shaken means they are reduced a TQ die type, with falling below D6 meaning they run. My Insurgents started at TQ6, so becoming Shaken meant they dropped below TQ6 and thus ran.
Q3: Is there such a thing as return fire? I.e., insurgents can either move or shoot (page 11, para 4).
They move up, Regulars fire, they take casualties, test morale and stand, do they get to shoot back?
-Page 19, para 3 says "Surviving Insurgents who are not casualties or do not Shrink may then take their interruption fire."
It appears this is only the case if the Insurgents had not previously performed an Interrupt (looking at Page 18, para 9).
Q4: Can Insurgents fire more than once during a turn?
-Page 17, paragraph 9 says "... but each Insurgent unit may only interrupt one Regular unit per turn."
-Page 19, para 11 says "This announcement counts as the units’ one interruption per turn, even if the
interrupted unit is destroyed before they have a chance to fire at it."
Q5: Is it true Insurgents can only move OR fire each turn, not both?
-Page 11, para 2 says Insurgents may Interrupt only once per turn, and Page 11, para 4, says Insurgents may only act (after Regulars finish) if they didn't Interrupt.
Q6: If a Regular team moves up and is spotted/attempted Interrupted by two Insurgent teams, and the
Regular team tests against both Insurgent teams and wins both, does the Regular team fire first
against both Insurgent teams, i.e., fire on one Insurgent team and then fire on the other?
-"Resolving Chains of Interruptions" on pages 19-20 lays out that the Regulars declare intent, the Insurgents declare Interruptions, roll TQ tests, resolve failures (Insurgent wins), then allow surviving/
standing Regulars to retaliate, then resolve successes (Regular wins), then allow surviving/standing
Insurgents to retaliate. So, if the Regular won both reaction tests, he fires on one bad guy, the bad
guy responds (if able), then fires on the other bad guy, then that bad guy responds (if able). That's how I'm reading it and that's how I played it, so I guess I'm good?
I also looked up to make sure: Insurgents without Leaders have to test to see if they can Interrupt, and if they fail, they don't get to do anything to that Regular unit's movement/fire. Though I think I may have let some of them return fire if they survived and stood, even though they failed the Interrupt test.
Anyway, back to the story: Task Force Razor accomplished its mission of rescuing the South Leon National Police officers, but the Cubans were shocked at their first casualties of the war (1 KIA, 4 WIA), and though they severely punished the enemy (68 casualties were reported by South Leon police and military), the Cubans were shocked at the sheer numbers and the militia's tenacity. No one had seen anything like this, but it was about to become a regular occurrence in Diwala. So stay tuned, next fight coming right up!
V/R,
Jack


Nice one Jack, thought you were gonna walk it!
ReplyDeleteYeah buddy, started off great, didn't it?
DeleteV/R,
Jack
Good report and nice to see the Ambush alley rules out. I have the original version of them and Force on Force, but never played. While the resolution is fast, I reckon this game went on for a while longer than most of the other games you have played - 3 1/2 hours maybe?
ReplyDeleteLooking forward to the rest of the games with AA.
Shaun,
DeleteHey man, how are ya!? I'm having a good time with Ambush Alley, should finish up the fifth fight this weekend, then working on the batreps.
I don't think I'd ever actually played Ambush Alley; I remember downloading their Quickstart Guide and "Contracting Trouble" scenario, but then Force On Force came out and I bought that, which my father and I played to death (in 10mm) prior to his passing. We had a great time, playing both WWII and Modern desert stuff. We also played a lot of Bag The Hun, as well as some Blitzkrieg Commander and I Ain't Been Shot Mum. Tried Crossfire, couldn't get it to work, we were both too chicken...
And yeah, these games are taking a long time; I'm guessing you figured that out by the length of the batrep/number of photos? Again, I'm having a good time, but it's not something I can keep up forever as my normal, go-to rules. Back to 5Core very soon ;)
Thanks man, talk to you soon.
V/R,
Jack
Hello Jack,
ReplyDeleteI figured out the time as a guess - new rules, lot of figures so probably about 4 hours. And based on a couple of other games you've played with new rules.
I have played I Ain't Been Shot Mum a few times. That is what me really interested in card based activation. In fact, after playing IABSM, it has been very difficult to play any WW2 game without card based activation. I especially like the "Tea Break"/end of turn card concept, although I know you are not fond. I would jumnp at any opportunity to play IABSM as I do really like it. I actually have not played too many WW2 rules. A friend and I have both CrossFire (that he has played before) and Iron Crosses - we have been talking for a few years about playing a WW2 games with at least one of these rules but it never seems to happen.
I am trying to gear up to play a few more games of 6mm company before Christmas, and even maybe some 20mm company games if I can fit it in. The latter is unlikely. But with you and Kyote doing all this skirmish stuff, I am really hankering to play some more 20mm 2'x2' skirmish games. If I do, I would try and blame you except you would happily take to blame in getting me to play more skirmish - it was your fault I started playing skirmish games in the first place!
Anyway, now you have played the games I have to try and read in a timely manner the reports when you post them :-)
Shaun,
DeleteYeah, the games take awhile even without me being a noob to the rules. There are lots of little things to remember, that I'm not remembering yet ;)
IABSM is a tough one; I like the concepts, but the card activation did feel a bit limiting. Having said that, it's occurring to me that I could live with IABSM's style of card activation if it had a simpler/more streamlined approach to some other things. Mainly: not using individually-based troops (better with 1 stand=1 squad), and much simplified shooting/morale. I actually keep thinking about playing using IABSM card activation but 5Core everything else.
It's funny you mention Iron Cross; I've read a few batreps and reviews, and it looks to have a very interesting activation system that I really want to try.
I sure hope you're able to get a bunch of games in and written up, I always enjoy them. I was really digging your blocked company-level games and trying to figure out how I might do the same. And you can blame me for whatever you like, just play more games! ;)
I'll post the next batrep Monday, about to head upstairs to play fight #5. Take care man.
V/R,
Jack
It is funny you mention about not using single figures with IABSM and streamlining the game. I actually did that 10 years ago and played a few non-solo games with the changes. I basically replaced the 8 figure sections with a single base with 2, 3, or 4 figures. The number of figures depended on how many dice they could use. For infantry I did not use the fire table or wounds and kills (i.e. for each hit roll 1d5 1-2 miss, 3-4 wound (affects dice rolled etc), 5-6 kill (remove a figure)). I replaced this with a simple d6 roll to hit (per figure) like Rapid fire and if hit, remove a figure. Had some rules for pining and suppression too (seem to remember something like if you rolled more dice than the target had figures and caused a casualty, then the target was suppressed) It made the game faster. If I played IABSM again, I would likely use my rules I have at the moment (as it uses a die per figure) but use the IABSM more complex card activation.
ReplyDeletei am actually playing a boardgame at the moment for the 6x6 challenge I am in. it is a solo game about the Fall of Rome. But I will be back to WW2 figures for a least a few games before the end of the year :-)
Shaun,
DeleteYeah, it just doesn't seem right to me trying to play a reinforced company-sized fight with individually-based figures. But your concept of bases with 2, 3, or 4 guys based on number of actions is brilliant! The only problem I see with that is having a bunch of guys based up that don't work for much else (i.e., if all your other forces are based with four guys per stand, now you have a set with 2, 3, and 4).
With all the gaming I've been doing, and even using different rulesets, I should have hopped in the 6 x 6 challenge myself.
And you depress the hell out of me: you should get a few WWII games in before the end of the year??? It's only July! ;)
V/R,
Jack
LOL> I have a bunch of 20mm German, British and Russian figures on bases with 2, 3 or 4 figures to a base. I used them for the IABSM games 10 years ago and they have been sitting in a draw since. Every timne I get out 20mm to play i use rules that are single based! I am loathe to take them off the base, just in case I ever decide to play multi-figure bases at 20mm. Of course, after 10 years I am starting to think the chances of this are low - I can use my 6mm to get any multi-figure base fix.
DeleteI have a bunch more ancient games lined up for the 6x6 challenge and so WW2 does not get much of a look in for the rest of 2017. Next year will be bigger for WW2 and that is only 5 months away. I could also be lying as next year we move houses (first time in 29 years) and so I may not be gaming much at all!
Shaun,
DeleteYeah, that sort of basing would be pretty rules-specific. As I'm sure you do, I try and stay away from stuff like that, I hate re-basing! Of course, that's exactly what I'm in the middle of right now...
Why don't you like playing with multi-based 20mm troops (the 6mm multi-based notwithstanding)? The reason I'm re-basing a bunch of my 15mm is because I'm realizing I started 15mm for skirmish gaming, but my games seem to be getting larger and larger, and moving all those individually based troops is aggravating the heck out of me!
Only five months away!!! That's practically half the year! You're killing me!!! And now you're telling me you won't be gaming next year? Moving can wait, you need to get your priorities straight ;)
On a side note, are you staying in the Brisbane area?
V/R,
Jack
I have not rebased in 10 years and am loathe to ever have to do it. Except I have rebased a few ancient figures I have acquired from ebay that were not on a standard base size, but that has been it.
DeleteI have never played with the based 20mm other than my modded IABSM as I have not found a ruleset to play with yet that requires bases. I keep the based units case I ever play Crossfire or some other game that uses bases and not casualty removal e.g. Fireball Forward, Flames of War. All the rules I have played in the last 10 years (and all the games prior to IABSM) has single figure casualty removal. Even the 20mm company sized rules I played recently has 3 figures to a section, but with casualty removal! However, you have given me an idea for a very fast game at 20mm where I can use my 6mm rules with a base = a squad/section and just scale up the distances to 20mm. Kind of in reverse as 6mm tends to be the 20mm rules but with distances moved from inches to cm, and the smallest firing unit in 20mm is a section ( 3 figures with 3 dice for firing) becoming at 6mm a platoon (3 bases with 3 dice for firing). This would allow for bigger battles by using bases and would be faster. I may have to think on this further. Interesting. You may be going larger but I am still interested in going smaller to skirmish games.
I will try and get in more WW2 bat reps just for you by the end of the year. Note that you cannot see my lips moving but I am lying :-) I will still be in the Brisbane area. The new house we bought a few years ago and it currently rented out. It is only a kilometre away, slightly further out but in a different suburb (from Auchenflower to Toowong if you are way too interested). Moving mainly as we are on a main road that has gradually got busier the longer we are here, and the house does not really face the right way and does not get a lot of sun, even with a number of skylights we have put in. My wife loves daylight. A lot. The new house gets loads of light and is on a much quieter street.
Shaun,
DeleteYeah man, I despise rebasing, yet regularly find myself doing it... can't wait to see what you come up with for your bigger battle 20mm stuff. And I appreciate you working to get back to WWII just for lil ol' me ;)
Sorry, not that familiar with the Brisbane area, and certainly not trying to be nosey! But I know this: more sunlight is definitely in order! Happy wife = happy life ;)
V/R,
Jack
That was a very good batrep, I really got drawn in. And it looked really good too! I think your strong commitment to casualty figures works very well, I need to learn that lesson for my own games. A couple of Qs:
ReplyDelete1 - If you had played the defence die right, do you think it would have had a major effect on the game? I was thinking presumably more fighters alive on both sides would mean a slower game and that might have made it more difficult?
2 - Mechanically, what do you think makes the game take the time it does? The number of dice rolls?
JWH,
DeleteThanks, I appreciate it! Glad you liked it, and yeah, if you're going to play Ambush Alley, you need more casualty figures!
1. I don't think it would have been a lot different; if anything, I think it would have benefited the Regulars more as it's pretty hard to hit them in any case (with the higher TQ and extra dice for body armor). I was also playing the morale rules wrong, but in retrospect (after playing five games), I kinda like the way I was playing: insurgents either get mowed down, get half mowed down and the other half runs away, or they don't take significant casualties and they stand and return fire. It seems a little bit odd when five out of seven insurgents get killed and the remaining two have the guts to stand toe to toe with the Regulars and shoot it out.
2. Hmmm... I think objectively the games aren't long. I think most gamers accept and expect a game to take somewhere between three and four hours, and that's where these games were. Me, I like games that I can set up, play, and take down within an hour, but that's just because I like to play as many games as I can in support of my various campaigns.
In any case, with regards to what makes it last longer, it does have quite a few die rolls, and many are opposed, so you're rolling for one side, arranging them, rolling for the other side, arranging them, and then comparing. But I think the biggest thing that makes the games last longer is the never-ending supply of insurgent reinforcements. As the Regular player, you may have it made in the shade, about to accomplish your mission, and then a lucky roll by the bad guys sees two groups of bad guys show up right in your path.
It's a lot of fun, and certainly adds to the tension, but it necessarily adds more time.
V/R,
Jack